Miles to go …

May 31, 2010

On the eve of Jazoon 2010 – Running in Zurich

Filed under: General — arungupta @ 2:00 pm

What do runners do in a new city on the eve of a technology conference they are speaking at ?

Of course, they find a track and run. Especially with a new GPS-enabled running watch :-) Check out the activity uploaded from Garmin Forerunner 305 to connect.garmin.com. The backend of Garmin community website seems like a Java Server Faces application, at least the URL ending in ".faces" indicate so!


There is no treadmill and bike at the hotel’s fitness center so guess will have to run this route again or explore new ones, we’ll see.

The Jazoon conference starts tomorrow and read about the presence of Oracle crew. Some fellow conference attendees are planning for a run to Üetliberg, most likely on Tuesday. Drop a comment on this blog if you are interested to run along.

Realized the conference + running gig has been going on for quite some time now …

  • JavaOne Adrenaline – 6:40 min / mile (JavaOne 2008)
  • Running by Spree in Berlin (Rails Conf 2008)
  • Running by the Singapore River – (Tech Days 2009, Singapore)
  • Running at Rails Conf, Las Vegas 2009, Day 2 Run – (Rails Conf 2009)
  • Running inside Parque Moinhos de Vento, Porto Alegre – (FISL 2009)
  • Running in the streets of Rome – (JRuby/Rails Workshop – 2009)
  • Running in Bussum – The Netherlands – (JFall 2009)

Note, this does not include running at the hotels’ fitness center :-)

Technorati: conf running zurich jazoon

Share and Enjoy:
  • Print
  • Digg
  • Sphinn
  • del.icio.us
  • Facebook
  • Google Bookmarks
  • DZone
  • StumbleUpon
  • Technorati
  • Twitter
  • Slashdot

TOTD #139: Asynchronous Request Processing using Servlets 3.0 and Java EE 6

Filed under: General — arungupta @ 8:17 am

Server resources are always valuable and should be used conservatively. Consider a Servlet that has to wait for a JDBC connection to be available from the pool, receiving a JMS message or reading a resource from the file system. Waiting for a "long running" process to completely blocks the thread – waiting, sitting and doing nothing – not an optimal usage of your server resources. Servlets 3.0 introduces the ability to asynchronously process requests such that the control (or thread) is returned back to the container to perform other tasks while waiting for the long running process to complete. The request processing continues in the same thread after after the response from the long running process is returned or or may be dispatched to a new resource from within the long running process. A typical use case for long running process is a Chat Application.

The asynchronous behavior need to be explicitly enabled on a Servlet. This is achieved by adding "asyncSupported" attribute on @WebServlet as shown below:

@WebServlet(name="AsyncServlet", urlPatterns={"/AsyncServlet"}, asyncSupported=true)
public class AsyncServlet extends HttpServlet {

The asynchronous processing can then be started in a separate thread using "startAsync" method on the request. This method returns "AsyncContext" which represents the execution context of the asynchronous request. The asynchronous request can then be completed by calling AsyncContext.complete (explicit) or dispatching to another resource (implicit). The container completes the invocation of asynchronous request in the later case.

Lets say the long running process is implemented as:

class MyAsyncService implements Runnable {
AsyncContext ac;
public MyAsyncService(AsyncContext ac) {
this.ac = ac;
}
@Override
public void run() {
System.out.println("Some long running process in \"MyAsyncService\"");
}
}

Note this is running in a separate thread. This service can be invoked from the original servlet as:

AsycnContext ac = request.startAsync();

The service may also be started as:

ScheduledThreadPoolExecutor executor = new ScheduledThreadPoolExecutor(10);
executor.execute(new MyAsyncService(ac));

The ScheduledThreadPoolExecutor usage is recommended as it makes the thread management easier.

A listener can be associated with the AsyncContext to get notified of when the async request is complete, timed out, or resulted in an error. This can be achieved as:

ac.addListener(new AsyncListener() {
@Override
public void onComplete(AsyncEvent event) throws IOException {
System.out.println("onComplete.");
}
. . .
});

A more complete code for the above fragment is given below. The "onComplete" method is used to clean up resources created during async processing.

The asynchronous request processing can be either completed in "run" method of "MyAsyncService" by invoking "AsycnContext.complete" as shown below:

@Override
public void run() {
System.out.println("Some long running process in \"MyAsyncService\"");
ac.complete();
}

or dispatched to a different resource as:

@Override
public void run() {
System.out.println("Some long running process in \"MyAsyncService\"");
ac.dispatch("/response.jsp");
}

Lets take a look at our complete code:

@WebServlet(name="AsyncServlet", urlPatterns={"/AsyncServlet"}, asyncSupported=true)
public class AsyncServlet extends HttpServlet {
protected void doGet(HttpServletRequest request, HttpServletResponse response)
throws ServletException, IOException {
response.setContentType("text/html;charset=UTF-8");
try {
System.out.println("Starting doGet");
AsyncContext ac = request.startAsync();
ac.addListener(new AsyncListener() {
@Override
public void onComplete(AsyncEvent event) throws IOException {
System.out.println("onComplete");
}
@Override
public void onTimeout(AsyncEvent event) throws IOException {
System.out.println("onTimeout");
}
@Override
public void onError(AsyncEvent event) throws IOException {
System.out.println("onError");
}
@Override
public void onStartAsync(AsyncEvent event) throws IOException {
System.out.println("onStartAsync");
}
});
System.out.println("Do some stuff in doGet ...");
// Start another service
ScheduledThreadPoolExecutor executor = new ScheduledThreadPoolExecutor(10);
executor.execute(new MyAsyncService(ac));
System.out.println("Some more stuff in doGet ...");
} finally {
}
}
class MyAsyncService implements Runnable {
AsyncContext ac;
public MyAsyncService(AsyncContext ac) {
this.ac = ac;
System.out.println("Dispatched to " + "\"MyAsyncService\"");
}
@Override
public void run() {
System.out.println("Some long running process in \"MyAsyncService\"");
ac.complete();
}
}
}

Invoking the GET operation of this Servlet shows the following sequence of statements in GlassFish server log:

INFO: Starting doGet
INFO: Dispatched to "MyAsyncService"
INFO: Doing some stuff in doGet ...
INFO: Some more in doGet ...
INFO: Some long running process in "MyAsyncService"
INFO: onComplete

The first statement marks the beginning of "doGet", the second statement indicates that the request is dispatched to the long running
"MyAsyncService", the third and fourth statement indicates that the response returned back to "doGet" for normal request processing. Finally fifth and sixth statement shows that now the asynchronous request is getting processed and is completed.

Clean and simple!

A request may be dispatched from Asynchronous servlet to Synchronous but other way around is illegal. The section 2.3.3.3 in the Servlets 3.0 specification provides an introduction to the Asynchronous Processing in Servlets 3.0.

The asynchronous behavior is available in the Servlet Filter as well.

The complete code used in this blog can be downloaded here. A fully working sample of a Chat Application using Servlets 3.0 can be seen here.

Technorati: totd glassfish v3 servlets javaee asynchronous comet

Share and Enjoy:
  • Print
  • Digg
  • Sphinn
  • del.icio.us
  • Facebook
  • Google Bookmarks
  • DZone
  • StumbleUpon
  • Technorati
  • Twitter
  • Slashdot

May 27, 2010

TOTD #138: GlassFish 3.1 Milestone 1 – Clustering and Application Versioning Demos

Filed under: General — arungupta @ 10:25 pm

GlassFish Server Open Source Edition 3.1 Milestone 1 is now available. The key functional drivers of this release are:

  • Clustering and Centralized Administration
  • High Availability

The Feature List shows the complete set of features planned for the release. The Draft Engineering Schedule shows what/when the features will be delivered. Per the schedule, Milestone 1 is the promoted build b02.

This is a bleeding-edge build and the first time clustering capabilities and application versioning are shown in GlassFish 3.1. GlassFish Server Open Source Edition 2.1.1 is the current stable release for all clustering and high availability capabilities.

The key features that work in this milestone build are Basic Clustering Support and Application Versioning. These features are now explained below.

Basic Clustering – This feature allows to create a multi-node cluster with few local/remote server instances and start them. The concept essentially remains similar to GlassFish v2. Here are the key concepts:

  1. New commands such as "create-cluster", "create-local-instance", "start-instance", and "list-instances" are now available.
  2. There is a central Domain Administration Server (DAS), corresponds to a GlassFish domain, that manages the entire cluster. This is also the "central repository" of all the artifacts and is the single point of entry to the cluster administration.
  3. The cluster consists of multiple instances (local and/or remote) that are synchronized with the DAS using SSH Provisioning (as opposed to the "Node Agent" in the v2). The first boot of an instance synchronizes the file system with DAS for configuration files, domain.xml, and any deployed applications. The communication between instance and DAS happen uses CLI interface.
  4. All applications are deployed to the DAS with a "–target" switch indicating the target cluster.
  5. Using an interim switch (ENABLE_REPLICATION=true), any command executed on the DAS is re-executed on the local/remote instances. This allows application deployment, JDBC connection pool/resource CRUD, and other similar commands to be re-executed on the instances participating in the cluster.
  6. Each instance’s administration data is accessible at "http://{host}:{port}/management/domain".

The complete details about how to create a cluster, instances, deploy an application, enable replication etc are available at 3.1 Milestone Clustering Demo Wiki. Here is a quick summary of commands that worked for me. The WAR file used below from the demo wiki.

./bin/asadmin start-domain --verbose &
./bin/asadmin create-cluster c1
./bin/asadmin create-local-instance --cluster c1 --systemproperties HTTP_LISTENER_PORT=18080:HTTP_SSL_LISTENER_PORT=18181:IIOP_SSL_LISTENER_PORT=13800:IIOP_LISTENER_PORT=13700:JMX_SYSTEM_CONNECTOR_PORT=17676:IIOP_SSL_MUTUALAUTH_PORT=13801:JMS_PROVIDER_PORT=18686:ASADMIN_LISTENER_PORT=14848 in1
./bin/asadmin create-local-instance --cluster c1 --systemproperties HTTP_LISTENER_PORT=28080:HTTP_SSL_LISTENER_PORT=28181:IIOP_SSL_LISTENER_PORT=23800:IIOP_LISTENER_PORT=23700:JMX_SYSTEM_CONNECTOR_PORT=27676:IIOP_SSL_MUTUALAUTH_PORT=23801:JMS_PROVIDER_PORT=28686:ASADMIN_LISTENER_PORT=24848 in2
./bin/asadmin list-instances
*** list-instances ***name: in1, host: dhcp-usca14-133-151.SFBay.Sun.COM, port: 14848, state: Not Runningname: in2, host: dhcp-usca14-133-151.SFBay.Sun.COM, port: 24848, state: Not Running
./bin/asadmin deploy --target c1 helloworld.war
./bin/asadmin start-local-instance in1
./bin/asadmin start-local-instance in2
./bin/asadmin list-instances
. . .
name: in1, host: dhcp-usca14-133-151.SFBay.Sun.COM, port: 14848, state: Uptime: 1 minutes, 8 seconds, Total milliseconds: 68984
name: in2, host: dhcp-usca14-133-151.SFBay.Sun.COM, port: 24848, state: Uptime: 31,665 milliseconds, Total milliseconds: 31665
. . .
curl http://localhost:18080/helloworld/hi.jsp
<html><head><title>JSP Test</title>
</head>
<body>
<h2>Hello, World.</h2>
Thu May 27 17:53:47 PDT 2010
</body></html>
curl http://localhost:28080/helloworld/hi.jsp
<html><head><title>JSP Test</title>
</head>
<body>
<h2>Hello, World.</h2>
Thu May 27 17:53:56 PDT 2010
</body></html>
./bin/asadmin stop-instance in1
./bin/asadmin stop-instance in2
./bin/asadmin delete-local-instance in1
./bin/asadmin delete-local-instance in2
./bin/asadmin delete-cluster c1

AS_DEBUG=true and/or AS_LOGFILE=true variables can be set to see some interesting debugging information.

This is only the beginning of a journey and much more exciting features will be released in the subsequent milestones. Milestone 2 is planned for Jun 21st, stay tuned!

Application Versioning – Will Hartung provided an excellent description of why application versioning is important. Basically, multiple versions of an application can be easily deployed concurrently on a GlassFish domain, with one version enabled at a given time. The application may be rolled back to a previous version, quickly is the keyword, in case a bug is encountered in a newer version. The time taken to undeploy the current application, copying the new archive over to server, expanding the archive, deploying/starting the application is all cut down since the application is pre-deployed.

Here is a quick summary of commands that worked for me:

./bin/asadmin deploy helloworld.war
./bin/asadmin deploy --name=helloworld:test helloworld.war
./bin/asadmin deploy --name=helloworld:beta helloworld.war
./bin/asadmin deploy --name=helloworld:rc helloworld.war
./bin/asadmin list-applications
helloworld <web>
helloworld:1 <web>
helloworld:beta <web>
helloworld:rc <web>
./bin/asadmin show-component-status helloworld:beta
Status of helloworld:beta is disabled.
./bin/asadmin show-component-status helloworld:rc
Status of helloworld:rc is enabled.
./bin/asadmin enable helloworld:beta
./bin/asadmin show-component-status helloworld:rc
Status of helloworld:rc is disabled.
./bin/asadmin show-component-status helloworld:beta
Status of helloworld:beta is enabled.
./bin/asadmin undeploy helloworld:1
./bin/asadmin list-applications
helloworld <web>
helloworld:beta <web>
helloworld:rc <web>

An exception with the message "javax.management.MalformedObjectNameException: Invalid character ‘:’ in value part of property" is thrown if this WAR deployed though. This is tracked as issue #12077.

In this milestone build, the "show-component-status" command is used to check the enabled status of a particular version. The milestone 2 build will provide support for "–verbose" option with "list-applications" and "list-components" command that will show the enabled status as part of the console output.

Read more details in Clustering Infrastructure One Pager, Clustering Design Spec, and Application Versioning One Pager.

Please try out these features, help review the different One Pagers, and file issues in the Issue Tracker.

Technorati: totd glassfish 3.1 clustering version cluster application

Share and Enjoy:
  • Print
  • Digg
  • Sphinn
  • del.icio.us
  • Facebook
  • Google Bookmarks
  • DZone
  • StumbleUpon
  • Technorati
  • Twitter
  • Slashdot

May 25, 2010

Oracle at Jazoon 2010 – Java SE, Java FX, Java EE 6, GlassFish, JPA 2.0, JSF 2, Servlets 3.0, OSGi, Cloud, HTML 5, Open DS, …

Filed under: General — arungupta @ 10:02 am

Oracle Corporation is a platinum sponsor of Jazoon and here are the list of sessions given by Oracle speakers.

Java SE and JavaFX: The Road Ahead Danny Coward Tuesday, 1 June 2010, 9:30-10:30, Arena 5
Servlet 3.0 – Asynchronous, extensibility, ease-of-development Rajiv Mordani Tuesday, 1 June 2010, 16:30-17:20, Arena 3
Java EE 6 Development with Eclipse, NetBeans, IntelliJ, and GlassFish Ludovic Champenois Tuesday, 1 June 2010, 16:30-16:50, Arena 6
JPA 2.0: Filling the Feature Gap Mike Keith Wednesday, 2 June 2010, 10:30-11:20, Arena 5
The Java Persistence Criteria API Linda DeMichiel Wednesday, 2 June 2010, 13:30-14:20, Arena 3
Java EE 6 and OSGi: yes you can with GlassFish v3 Jerome Dochez Tuesday, 1 June 2010, 17:00-17:20, Arena 6
Running your Java EE 6 applications in the Cloud Arun Gupta (me!) Thursday, 3 June 2010, 10:30-11:20, Arena 5
Building a high performance directory server in Java: Lessons learned and tips from the OpenDS project Ludovic Poitou, Matthew Swift Thursday, 3 June 2010, 13:30-14:20, Arena 6
Exploring HTML5 With Java Server Faces2 Roger Kitain Thursday, 3 June 2010, 13:30-14:20, Arena 7
Easy to Use, Highly Available, High Performance Java Database Access: Seriously? Craig Russell Thursday, 3 June 2010, 14:30-15:20, Arena 6

If you are into running, then join some fellow conference attendees for a run to Üetliberg, most likely on Tuesday. Leave a comment on this blog if you are interested in running along. Here is a running report from the last year.

Jun 2 is National Running Day in the US. I plan to celebrate by running a 1/2 marathon, or a Full Pikermi, in the neighborhood. Let me know if you’d like to join the fun.

See ya there next week!

Technorati: conf javaee glassfish oracle zurich jazoon

Share and Enjoy:
  • Print
  • Digg
  • Sphinn
  • del.icio.us
  • Facebook
  • Google Bookmarks
  • DZone
  • StumbleUpon
  • Technorati
  • Twitter
  • Slashdot

May 21, 2010

GlassFish 3.1 – One Pagers Available For Review

Filed under: General — arungupta @ 9:49 am

GlassFish Server Open Source Edition continue to follow the open and transparent process for the upcoming 3.1 release. The key functional drivers are:

  • Clustering and Centralized Administration
  • High Availability

This will bring GlassFish Server Open Source Edition 3.x in feature parity with GlassFish v2. Several components have published one pagers on the / alias and are available for review. Here are the one-pagers that are currently available today (in no particular order):

  • App Client Container – JNLP Customization
  • Web-based Administration Console
  • Upgrade Tool
  • Persistence Services
  • Clustering Infrastructure
  • Deployment
  • Connectors (Java EE Connector Architecture, Connection Pooling, JDBC-RA)
  • Embedded GlassFish
  • Jersey
  • EJB Container
  • RESTful API
  • Logging & Diagnostics

Please review and provide feedback following the guidelines and templates described here. A complete list is available on the One Pagers list and check for the status column with values as "Ready for Review" or "Under Review".

The Milestone 1 is just a few days away. In the meanwhile you can grab the latest nightly or promoted build to see if there are any major regressions with your applications or get the first flavor of some features. As always, please help us file issues in the bug tracker.

Here are some other relevant links:

  • GlassFish 3.1 One Pagers
  • GlassFish 3.1 Feature List
  • Draft Engineering Schedule
  • Weekly Engineering Meeting (Wed, 9am PT, phone only)
  • GlassFish Roadmap

Technorati: glassfish open transparent onepager review functional

Share and Enjoy:
  • Print
  • Digg
  • Sphinn
  • del.icio.us
  • Facebook
  • Google Bookmarks
  • DZone
  • StumbleUpon
  • Technorati
  • Twitter
  • Slashdot

May 18, 2010

TOTD #137: Asynchronous EJB, a light-weight JMS solution – Feature-rich Java EE 6

Filed under: General — arungupta @ 11:00 pm

One of the new features introduced in Enterprise Java Beans 3.1 (JSR 318)  is asynchronous invocation of a business method. This allows the control to return to the client before the container dispatches the instance to a bean. The asynchronous operations can return a "Future<V>" that allow the client to retrieve a result value, check for exceptions, or attempt to cancel any in-progress invocations.

The "@Asynchronous" annotation is used to mark a specific (method-level) or all (class-level) methods of the bean as asynchronous. Here is an example of a stateless session bean that is tagged as asynchronous at the class-level:

@Stateless
@Asynchronous
public class SimpleAsyncEJB {
public Future<Integer> addNumbers(int n1, int n2) {
Integer result;
result = n1 + n2;
try {
// simulate JPA queries + reading file system
Thread.currentThread().sleep(2000);
} catch (InterruptedException ex) {
ex.printStackTrace();
}
return new AsyncResult(result);
}
}

The method signature returns "Future<Integer>" and the return type is "AsyncResult(Integer)". The "AsyncResult" is a new class introduced in EJB 3.1 that wraps the result of an asynchronous method as a Future object. Under the covers, the value is retrieved and sent to the client. Adding any new methods to this class will automatically make them asynchronous as well.

The 2 second sleep simulates server side processing of the response which may involve querying the database or reading some information from the filesystem.

This EJB can be easily injected in a Servlet using the normal way:

@EJB SimpleAsyncEJB ejb;

This business method can be invoked in the "doGet" method of a Servlet as:

PrintWriter out = response.getWriter();
try {
Future<Integer> future = ejb.addNumbers(10, 20);
print(out, "Client is working ...");
Thread.currentThread().sleep(1000);
if (!future.isDone()) {
print(out, "Response not ready yet ...");
}
print(out, "Client is working again ...");
Thread.currentThread().sleep(1000);
if (!future.isDone()) {
print(out, "Response not ready yet ...");
}
print(out, "Client is still working ...");
Thread.currentThread().sleep(1000);
if (!future.isDone()) {
print(out, "Response not ready yet ...");
} else {
print(out, "Response is now ready");
}
Integer result = future.get();
print(out, "The result is: " + result);
} catch (InterruptedException ex) {
ex.printStackTrace();
} catch (ExecutionException ex) {
ex.printStackTrace();
} finally {
out.close();
}

The control is returned to the client right after the the EJB business method is invoked and does not wait for the business method execution to finish. The methods on "Future" API are used to query if the result is available. The "Thread.sleep()" for 1 second simulate that client can continue working and possibly check for results at a regular interval. The "print" is a convenience method that prints the string to "response.getWriter" and flushes the output so that it can be instantly displayed instead of getting buffered. Invoking this "doGet" shows the following output:

1274142978365: Client is working ...
1274142979365: Response not ready yet ...
1274142979365: Client is working again ...
1274142980366: Response not ready yet ...
1274142980366: Client is still working ...
1274142981366: Response is now ready
1274142981366: The result is: 30

The client transaction context does not and security context do propagate from the client to the asynchronous business method.

Up until now, any kind of asynchrony in the EJB required to use the Message Driven Beans which in turn required some JMS setup. Introduction of this feature allows you to easily incorporate asynchrony in your EJB applications.

Try this and other Java EE 6 features in GlassFish Server Open Source Edition 3 or Oracle GlassFish Server today!

The complete source code used in this blog can be downloaded here.

Technorati: totd javaee ejb asynchronous glassfish v3

Share and Enjoy:
  • Print
  • Digg
  • Sphinn
  • del.icio.us
  • Facebook
  • Google Bookmarks
  • DZone
  • StumbleUpon
  • Technorati
  • Twitter
  • Slashdot

May 17, 2010

TOTD #136: Default Error Page using Servlets 3.0 – Improved productivity using Java EE 6

Filed under: General — arungupta @ 11:13 pm

Servlets 2.x allowed to create a mapping between an HTTP error code or an exception type to the path of a resource in the Web application. This is achieved by specifying an "error-page" element in the "web.xml". The element definition looks like:

So any HTTP error code or an exception thrown within the application can be mapped to a resource bundled with the application. Here is a sample:

<error-page>
    <error-code>404</error-code>
    <location>/error-404.jsp</location>
</error-page>

Adding the above fragment in "web.xml" of an application will display "error-404.jsp" page to the client if a non-existing resource is accessed. This mapping can be easily done for other HTTP status codes as well by adding other <error-page> elements.

Similarly, <exception-type> element can be used to map an exception to a resource in the web application. This allows fine-grained mapping of errors from your web application to custom pages.

Starting with Servlets 3.0, <error-code> and <exception-type> elements are optional. An <error-page> without any <exception-type> and <error-code> will be considered as the webapp’s default error page, and will act as a "catch-all" for any error codes or exception types. It will be an error if a web.xml contains more than one such default error page.

A default error page may be overridden for specific exception types and error codes. For example:

     <error-page>
       <location>/error-default.jsp</location>
     </error-page>
     <error-page>
       <error-code>404</error-code>
       <location>/error-404.jsp</location>
     </error-page>

Any response with a status code other than 404 will be error-dispatched to /default.jsp, while a 404 response will be error-dispatched to /error-404.jsp.

So if the Servlet code looks like:

@WebServlet(name="HelloServlet", urlPatterns={"/HelloServlet"})
public class HelloServlet extends HttpServlet {
protected void doGet(HttpServletRequest request,
HttpServletResponse response) throws IOException {
String type = (String)request.getParameter("type");
if (type == null) {
response.getWriter().print("hello world");
return;
}
if (type.equals("helloex")) {
throw new HelloException();
} else if (type.equals("ncdfe")) {
throw new NoClassDefFoundError();
} else {
throw new NullPointerException();
}
}
}

And the "web.xml" looks like:

<?xml version="1.0" encoding="UTF-8"?>
<web-app version="3.0"
xmlns="http://java.sun.com/xml/ns/javaee"
xmlns:xsi="http://www.w3.org/2001/XMLSchema-instance"
xsi:schemaLocation="http://java.sun.com/xml/ns/javaee
http://java.sun.com/xml/ns/javaee/web-app_3_0.xsd">
<error-page>
<exception-type>java.lang.NoClassDefFoundError</exception-type>
<location>/error-ncdfe.jsp</location>
</error-page>
<error-page>
<exception-type>server.HelloException</exception-type>
<location>/error-helloex.jsp</location>
</error-page>
<error-page>
<error-code>404</error-code>
<location>/error-404.jsp</location>
</error-page>
<error-page>
<location>/error-default.jsp</location>
</error-page>
</web-app>

Lets say the directory structure looks like:

WEB-INF/classes/
WEB-INF/classes/server/
WEB-INF/classes/server/HelloException.class
WEB-INF/classes/server/HelloServlet.class
WEB-INF/web.xml
error-404.jsp
error-default.jsp
error-helloex.jsp
error-ncdfe.jsp

and this application is deployed as "DefaultErrorPage.war". Then here is a table of the page that gets displayed when the URL mentioned in the first column is accessed:

URL Response Comment
http://localhost:8080/DefaultErrorPage/HelloServlet "hello world" Expected result
http://localhost:8080/DefaultErrorPage/HelloServlet2 error-404.jsp HTTP 404
http://localhost:8080/DefaultErrorPage/HelloServlet?type=ncdfe error-ncdfe.jsp System exception
http://localhost:8080/DefaultErrorPage/HelloServlet?type=helloex error-helloex.jsp User exception
http://localhost:8080/DefaultErrorPage/HelloServlet?type error-default.jsp Catch-all exception

Try this and other Java EE 6 features in GlassFish Server Open Source Edition 3 or Oracle GlassFish Server today!

The complete source code used in this blog can be downloaded here.

The default setting in Chrome is to show suggestions to navigate to other parts of the website or search with Google. This can be easily disabled by Chrome -> Preferences -> Under the Hood and deselecting "Show suggestions for navigation errors" in Privacy section. This is explained in detail here.

Technorati: totd javaee glassfish v3 servlet default error

Share and Enjoy:
  • Print
  • Digg
  • Sphinn
  • del.icio.us
  • Facebook
  • Google Bookmarks
  • DZone
  • StumbleUpon
  • Technorati
  • Twitter
  • Slashdot

May 13, 2010

Bay Area JUG Roundup 2010 – Trip Report

Filed under: General — arungupta @ 2:18 pm

Oracle hosted the first Bay Area JUG Roundup yesterday.

There were about 200 attendees from different JUGs and communities in the Bay Area. There were representatives from Silicon Valley Web JUG, San Francisco JUG, Silicon Valley JavaFX JUG, Oakland Java SIG, SDForum Java SIG, Bay Area Scala Enthusiasts, and SF Bay Groovy & Grails Group. Good quality free food, beer, wine, and tee-shirts left everybody thrilled. A live Java Posse session was certainly hilarious so stay tuned for their latest podcast.

Justin Kestelyn kick started the event and provided an update on Oracle Technology Network using the slides below:

Bay Area JUG Roundup 2010

Sonya Barry, community manager for java.net, presented the roadmap for 2010-2011.

I had good discussions with lots of folks and already working on scheduling a bunch of Java EE 6 hands-on sessions through out different JUGs in the San Francisco Bay Area. Let me know if you’d like to learn the latest and greatest in the Java EE 6 landscape or organize a similar workshop in your community.

Here are some pictures from the event:

And the complete album at:

Technorati: conf oracle bayarea jug community svwebjug sfjug oaklandsig sdforum sig

Share and Enjoy:
  • Print
  • Digg
  • Sphinn
  • del.icio.us
  • Facebook
  • Google Bookmarks
  • DZone
  • StumbleUpon
  • Technorati
  • Twitter
  • Slashdot

May 11, 2010

TOTD #135: JSF2 Composite Components using NetBeans IDE – lightweight Java EE 6

Filed under: General — arungupta @ 11:07 pm

NetBeans IDE provide comprehensive feature set to build applications using Java Server Faces 2 (JSR 314). This Tip Of The Day (TOTD) explains how to create JSF composite components using wizards provided by the NetBeans IDE.

The JSF2 specification, section 3.6 defines composite components as:

A tree of "UIComponent" instances, rooted at a top level component, that can be thought of and used as a single component in a view. The component hierarchy of this subtree is described in the composite component defining page.

This definition is good from the specification perspective but can help with some layman explanation. Essentially, a composite component is what it says – a composition of two or more components such that it behaves like a single component. For example, consider four components in a panel grid where 2 components are "h:outputText" to display prompts and other 2 are "h:inputText" to receive input from the user. The composite components allow all of these components (1 panel grid + 2 "h:inputText" + 2 "h:outputText") packaged as a single component.

Resource Handling and Facelets, both features newly introduced in the JSF2 specification, makes the creation of composite component much easier. The Resource Handling defines a standard location for bundling resources in a web application and Facelets defines a cleaner templating language that enables composition. In technical terms:

A composite component is any Facelet markup file that resides inside of a resource library.

Lets create a simple Web application using JSF 2 that accepts a username/password and displays it in a new page. The application is first created using the traditional "h:inputText" and "h:outputText" elements and is then converted to use a composite component.

Before we dig into composite component creation using JSF2, here are the steps listed to create one using JSF 1.2:

  1. Implement UIComponent subclass
  2. Markup rendering code in Renderer
  3. Register your component and renderer in faces-config.xml
  4. Implement your JSP tag
  5. And the TLD

There is Java code involved, sub-classing from JSF classes, deployment descriptor editing in "faces-config.xml", declaring TLDs and then implementing the JSP tag. Creating a composite component in JSF 1.2 was quite a chore and spread all over. There are lots of files

With that background, lets see what it takes us to create a composite component using JSF2.

The CDI backing bean for the application looks like:

package server;
import javax.enterprise.context.RequestScoped;
import javax.inject.Named;
@Named("simplebean")
@RequestScoped
public class SimpleBean {
String name;
String password;
public String getPassword() {
return password;
}
public void setPassword(String password) {
this.password = password;
}
public String getName() {
return name;
}
public void setName(String name) {
this.name = name;
}
}

The "index.xhtml" Facelet markup file looks like:

<?xml version='1.0' encoding='UTF-8' ?>
<!DOCTYPE html PUBLIC "-//W3C//DTD XHTML 1.0 Transitional//EN"
"http://www.w3.org/TR/xhtml1/DTD/xhtml1-transitional.dtd">
<html xmlns="http://www.w3.org/1999/xhtml"
xmlns:ui="http://java.sun.com/jsf/facelets"
xmlns:h="http://java.sun.com/jsf/html">
<h:head>
<title>Enter Name &amp; Password</title>
</h:head>
<h:body>
<h1>Enter Name &amp; Password</h1>
<h:form>
<h:panelGrid columns="2">
<h:outputText value="Name:"/>
<h:inputText value="#{simplebean.name}" title="name"
id="name" required="true"/>
<h:outputText value="Password:"/>
<h:inputText value="#{simplebean.password}" title="password"
id="password" required="true"/>
</h:panelGrid>
<h:commandButton action="show" value="submit"/>
</h:form>
</h:body>
</html>

And the "show.xhtml" Facelet markup looks like:

<?xml version='1.0' encoding='UTF-8' ?>
<!DOCTYPE html PUBLIC "-//W3C//DTD XHTML 1.0 Transitional//EN"
"http://www.w3.org/TR/xhtml1/DTD/xhtml1-transitional.dtd">
<html xmlns="http://www.w3.org/1999/xhtml"
xmlns:h="http://java.sun.com/jsf/html">
<h:head>
<title>Show Name &amp; Password</title>
</h:head>
<h:body>
<h1>Show Name &amp; Password</h1>
<h:panelGrid columns="2">
<h:outputText value="Name:"/>
<h:outputText value="#{simplebean.name}" />
<h:outputText value="Password:"/>
<h:outputText value="#{simplebean.password}" />
</h:panelGrid>
</h:body>
</html>

Now select the <panelGrid> fragment in "index.xhtml" as shown below:

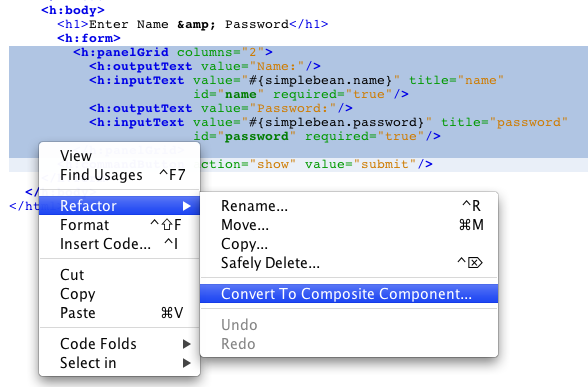
Right-click and select "Convert To Composite Component …" and specify the values as given in the wizard below:

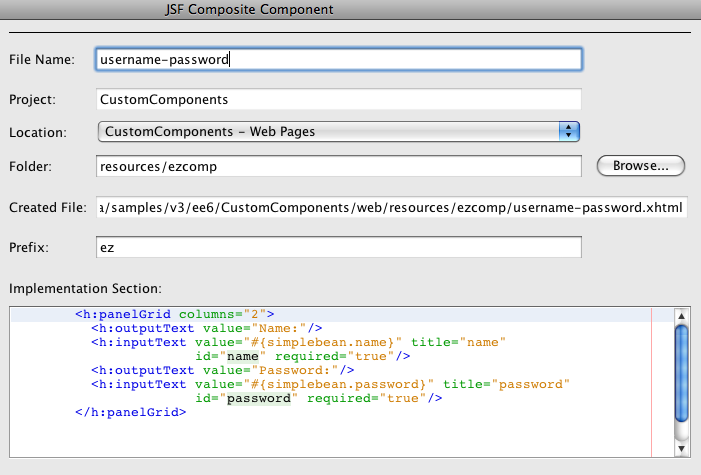
Note, most of the values are default and only the "File Name:" is changed. After clicking on "Finish" in the wizard, the updated page looks like:

<?xml version='1.0' encoding='UTF-8' ?>
<!DOCTYPE html PUBLIC "-//W3C//DTD XHTML 1.0 Transitional//EN"
"http://www.w3.org/TR/xhtml1/DTD/xhtml1-transitional.dtd">
<html xmlns="http://www.w3.org/1999/xhtml"
xmlns:ui="http://java.sun.com/jsf/facelets"
xmlns:h="http://java.sun.com/jsf/html"
xmlns:ez="http://java.sun.com/jsf/composite/ezcomp">
<h:head>
<title>Enter Name &amp; Password</title>
</h:head>
<h:body>
<h1>Enter Name &amp; Password</h1>
<h:form>
<ez:username-password/>
<h:commandButton action="show" value="submit"/>
</h:form>
</h:body>
</html>

The namspace/prefix "http://java.sun.com/jsf/composite/ezcomp" is added to the markup page. <ez:username-password> is the composite component used instead of those multiple components. The namespace prefix, "ez", and the tag name, "username-password", are chosen based upon the values entered in the wizard.

The JSF 2 specification, section 3.6.1.4 defines that:

The occurrence of the string “http://java.sun.com/jsf/composite/” in a Facelet XML namespace declaration means that whatever follows that last “/” is taken to be the name of a resource library.

The resource library location is relative to the Facelet markup file that is using it. So in our case, all the code is rightly encapsulated in the "resources/ezcomp/username-password.xhtml" file as:

<?xml version='1.0' encoding='UTF-8' ?>
<!DOCTYPE html PUBLIC "-//W3C//DTD XHTML 1.0 Transitional//EN"
"http://www.w3.org/TR/xhtml1/DTD/xhtml1-transitional.dtd">
<html xmlns="http://www.w3.org/1999/xhtml"
xmlns:cc="http://java.sun.com/jsf/composite"
xmlns:h="http://java.sun.com/jsf/html">
<!-- INTERFACE -->
<cc:interface>
</cc:interface>
<!-- IMPLEMENTATION -->
<cc:implementation>
<h:panelGrid columns="2">
<h:outputText value="Name:"/>
<h:inputText value="#{simplebean.name}" title="name"
id="name" required="true"/>
<h:outputText value="Password:"/>
<h:inputText value="#{simplebean.password}" title="password"
id="password" required="true"/>
</h:panelGrid>
</cc:implementation>
</html>

Notice, the composite component name matches the Facelet markup file name. The markup file lives in "resources/ezcomp" directory as indicated by the namespace value.

<cc:interface> defines metadata that describe the characteristics of component, such as supported attributes, facets, and attach points for event listeners. <cc:implementation> contains the markup substituted for the composite component.

The "index.xhtml" page is using the composite component and is conveniently called the using page. Similarly the "username-password.xhtml" page is defining the composite component and is conveniently called the defining page. In short, creating composite components in JSF2 requires the following steps:

  1. Move the required tags to a separate Facelet markup file, "defining page", in the "resources" directory
  2. Declare the namespace/prefix derived from "http://java.sun.com/jsf/composite" and the directory name
  3. Refer the composite component in the "using page".

Much simpler and cleaner than JSF 1.2. Are you using JSF 2 composite components ?

The entire source code used in this blog can be downloaded here.

JSF 2 implementation is bundled with GlassFish Server Open Source Edition, try it today!

Technorati: totd glassfish v3 netbeans jsf2 javaee composite components ajax

Share and Enjoy:
  • Print
  • Digg
  • Sphinn
  • del.icio.us
  • Facebook
  • Google Bookmarks
  • DZone
  • StumbleUpon
  • Technorati
  • Twitter
  • Slashdot

May 10, 2010

TOTD #134: Interceptors 1.1 in Java EE 6 – What and How ?

Filed under: General — arungupta @ 11:04 pm

TOTD #129 explained Managed Beans 1.0, this Tip Of The Day (TOTD) attempts to explain the basics of Interceptors 1.1 – a "new" specification introduced in the Java EE 6.

The specification is not entirely new as the concept is borrowed from the EJB 3.0 specification and abstracted at a higher level so that it can be more generically applied to a broader set of specifications in the platform. Interceptors do what they say – they intercept on invocations and lifecycle events on an associated target class. Basically, interceptor is a class whose methods are invoked when business methods on the target class are invoked and/or lifecycle events such as methods that create/destroy the bean occur. Interceptors are typically used to implement cross-cutting concerns like logging, auditing, and profiling.

Contexts and Dependency Injection (CDI, aka JSR 299) uses the concept defined by Interceptors 1.1 and adds the notion of interceptors binding.

Let see some code to make it all clear.

Each interceptor require at least one interceptor binding to associate with the target class. An interceptor binding is defined as:

import java.lang.annotation.ElementType;
import java.lang.annotation.Retention;
import java.lang.annotation.RetentionPolicy;
import java.lang.annotation.Target;
import javax.interceptor.InterceptorBinding;
@InterceptorBinding
@Retention(RetentionPolicy.RUNTIME)
@Target({ElementType.METHOD, ElementType.TYPE})
public @interface MyInterceptorBinding {
}

And then the interceptor is defined as:

import javax.interceptor.AroundInvoke;
import javax.interceptor.Interceptor;
import javax.interceptor.InvocationContext;
@Interceptor
@MyInterceptorBinding
public class MyInterceptor {
@AroundInvoke
public Object intercept(InvocationContext context) throws Exception {
System.out.println("before interception");
Object result = context.proceed();
System.out.println("after interception");
return result;
}
}

The "@AroundInvoke" annotation (can be only one per interceptor) on a method in the interceptor class ensures that this method is invoked around the business method interception. This will be more clear after the program flow is explained later. Multiple interceptors can be chained and the flow/outcome may be diverted in any of them using "InvocationContext".

The associated target bean looks like:

. . .
import javax.interceptor.Interceptors;
@ManagedBean(value="mybean")
@Interceptors(MyInterceptor.class)
public class MyManagedBean {
@PostConstruct
public void setupResources() {
// setup your resources
System.out.println("Setting up resources ...");
}
. . .
}

The only missing part on the server-side is enabling bean discovery by adding an empty "beans.xml" as:

<?xml version="1.0" encoding="UTF-8"?>
<beans xmlns="http://java.sun.com/xml/ns/javaee"
xmlns:xsi="http://www.w3.org/2001/XMLSchema-instance"
xsi:schemaLocation="http://java.sun.com/xml/ns/javaee http://java.sun.com/xml/ns/javaee/beans_1_0.xsd">
</beans>

Notice, there is no need to explicitly mention <interceptors> in "beans.xml". Multiple interceptors on a bean can be easily defined as:

@ManagedBean(value="mybean")
@Interceptors({MyInterceptor.class, MyInterceptor2.class})
public class MyManagedBean {

Lets see how this bean and interceptor can be used. Create a Servlet as:

@WebServlet(name="TestServlet", urlPatterns={"/TestServlet"})
public class TestServlet extends HttpServlet {

Inject a bean as …

@Inject
MyManagedBean bean;

and then invoke the bean’s method in "doGet" or "doPost" methods of the servlet as:

String result = bean.sayHello("Duke");

Notice that @Inject is used to inject the managed bean and bean discovery is enabled by adding an empty "beans.xml". This ensures that CDI inject works as expected and all the interceptors are invoked as well. Another alternative is to inject the bean using @Resource but "beans.xml" need to be removed in order for the interceptors to be invoked. So inject your bean using @Inject + "beans.xml" or @Resource. The recommended approach is to use @Inject + "beans.xml" as CDI might be used in other parts of your applications as well.

If 2 interceptors, each with a separate interceptor binding, managed bean class, and the servlet is included in a web application then the directory structure will look like:

./META-INF
./META-INF/MANIFEST.MF
./WEB-INF
./WEB-INF/beans.xml
./WEB-INF/classes
./WEB-INF/classes/server
./WEB-INF/classes/server/MyInterceptor.class
./WEB-INF/classes/server/MyInterceptor2.class
./WEB-INF/classes/server/MyInterceptorBinding.class
./WEB-INF/classes/server/MyInterceptorBinding2.class
./WEB-INF/classes/server/MyManagedBean.class
./WEB-INF/classes/server/TestServlet.class

If there are "System.out.println"s inserted at relevant positions in the interceptor and the Servlet code, then the code flow looks like:

Before Intercept
Before Intercept2
sayHello
After Intercept2
After Intercept
processRequest

"Before XXX" messages are printed by a method from the interceptors, in the order of chaining, before "context.proceed" is invoked in all the interceptors. "sayHello" method is invoked from the "doGet" or "doPost" method in the Servlet. "After XXX" messages are printed from the interceptors after "context.proceed" method is invoked, this time in the reverse order of chain. And finally "processRequest" method is invoked again from the "doGet" or "doPost" method in the Servlet.

The complete source code for the sample explained above can be downloaded here.

Technorati: javaee glassfish v3 managedbeans interceptors cdi ejb servlet

Share and Enjoy:
  • Print
  • Digg
  • Sphinn
  • del.icio.us
  • Facebook
  • Google Bookmarks
  • DZone
  • StumbleUpon
  • Technorati
  • Twitter
  • Slashdot
Older Posts »

The views expressed on this blog are my own and do not necessarily reflect the views of Oracle.
Powered by WordPress