Miles to go …

April 30, 2010

TOTD #132: Servlets 3.0 in Embedded GlassFish Reloaded – lightweight Java EE 6

Filed under: General — arungupta @ 11:25 am

This Tip Of The Day (TOTD) is a refresh of Embeddable GlassFish in Action – Servlet in a Maven Project.

GlassFish v3 runs easily in embedded mode – no download, installation, or configuration – every thing done programmatically within a JVM. This blog shows how to deploy a simple Servlet using these APIs and then write a simple test to invoke it – all within the same VM.

Lets get started!

  1. Lets create our Maven project:
    mvn archetype:create -DarchetypeGroupId=org.apache.maven.archetypes \
    -DgroupId=org.glassfish.embedded.samples -DartifactId=webtier2
    
  2. Add the following <repository>, <dependency>, and <plugin> to the generated "pom.xml:
    <repositories>
    <repository>
    <id>glassfish-repository</id>
    <name>Java.net Repository for Glassfish</name>
    <url>http://download.java.net/maven/glassfish</url>
    </repository>
    </repositories>
    . . .
    <dependencies>
    . . .
    <dependency>
    <groupId>org.glassfish.extras</groupId>
    <artifactId>glassfish-embedded-all</artifactId>
    <version>3.0</version>
    </dependency>
    </dependencies>
    <build>
    <plugins>
    <plugin>
    <groupId>org.apache.maven.plugins</groupId>
    <artifactId>maven-compiler-plugin</artifactId>
    <version>2.0.2</version>
    <configuration>
    <source>1.5</source>
    <target>1.5</target>
    </configuration>
    </plugin>
    </plugins>
    </build>
    

    Read Setting the Class Path for more discussions on the different JAR files that are available. The version may be changed form "3.0" to "3.1-SNAPSHOT" to pick the latest bug fixes and improvements.

  3. Change the generated "src/main/java/org/glassfish/embedded/samples/App.java" to:
    package org.glassfish.embedded.samples;
    import java.io.IOException;
    import javax.servlet.ServletException;
    import javax.servlet.annotation.WebServlet;
    import javax.servlet.http.HttpServlet;
    import javax.servlet.http.HttpServletRequest;
    import javax.servlet.http.HttpServletResponse;
    /**
    * Hello world!
    */
    @WebServlet(name="app", urlPatterns={"/app"})
    public class App extends HttpServlet {
    @Override
    protected void doGet(HttpServletRequest request,
    HttpServletResponse response)
    throws ServletException, IOException {
    response.getWriter().println("Hello Duke");
    }
    }
    

    This is using "@WebServlet" annotation, a new feature in Servlets 3.0, to mark a POJO as a Servlet. Notice the servlet is hosted at "/app" URL. No "web.xml" will be required in this case.

  4. Edit the generated "src/test/java/org/glassfish/embedded/samples/AppTest.java" and add the following method:
    public void testServlet() throws IOException, LifecycleException {
    // Build a server
    Server.Builder builder = new Server.Builder("server");
    Server server = builder.build();
    // Specify the port
    server.createPort(8080);
    // Add the Web container
    server.addContainer(ContainerBuilder.Type.web);
    // Create the WAR file
    ScatteredArchive.Builder saBuilder = new ScatteredArchive.Builder("test",
    Collections.singleton(new File("target/classes").toURI().toURL()));
    ScatteredArchive archive = saBuilder.buildWar();
    // Deploy the WAR file
    EmbeddedDeployer deployer = server.getDeployer();
    deployer.deploy(archive, null);
    // Read the response from the servlet hosted at "/app"
    URL url = new URL("http://localhost:8080/test/app");
    BufferedReader br = new BufferedReader(
    new InputStreamReader(
    url.openConnection().getInputStream()));
    // ... and assert
    assertEquals("Hello Duke", br.readLine());
    }
    

    This method is well commented and where all the magic is happening.

    The updated import statements look like:

    import java.io.BufferedReader;
    import java.io.File;
    import java.io.IOException;
    import java.io.InputStreamReader;
    import java.net.URL;
    import java.util.Collections;
    import junit.framework.Test;
    import junit.framework.TestCase;
    import junit.framework.TestSuite;
    import org.glassfish.api.deployment.DeployCommandParameters;
    import org.glassfish.api.embedded.ContainerBuilder;
    import org.glassfish.api.embedded.EmbeddedDeployer;
    import org.glassfish.api.embedded.LifecycleException;
    import org.glassfish.api.embedded.ScatteredArchive;
    import org.glassfish.api.embedded.Server;
    

  5. And now fire the following command:
    mvn test
    

    and see the output as:

    Running org.glassfish.embedded.samples.AppTest
    Apr 30, 2010 10:49:55 AM com.sun.enterprise.v3.server.AppServerStartup run
    INFO: GlassFish v3 (74.2) startup time : Embedded(498ms) startup services(433ms) total(931ms)
    Apr 30, 2010 10:49:55 AM com.sun.enterprise.transaction.JavaEETransactionManagerSimplified initDelegates
    INFO: Using com.sun.enterprise.transaction.jts.JavaEETransactionManagerJTSDelegate as the delegate
    Apr 30, 2010 10:49:55 AM org.glassfish.admin.mbeanserver.JMXStartupService$JMXConnectorsStarterThread run
    INFO: JMXStartupService: JMXConnector system is disabled, skipping.
    Apr 30, 2010 10:49:55 AM AppServerStartup run
    INFO: [Thread[GlassFish Kernel Main Thread,5,main]] started
    Apr 30, 2010 10:49:55 AM org.hibernate.validator.util.Version INFO: Hibernate Validator null
    Apr 30, 2010 10:49:55 AM org.hibernate.validator.engine.resolver.DefaultTraversableResolver detectJPA
    INFO: Instantiated an instance of org.hibernate.validator.engine.resolver.JPATraversableResolver.
    Apr 30, 2010 10:49:56 AM com.sun.enterprise.v3.services.impl.GrizzlyProxy$2$1 onReady
    INFO: Grizzly Framework 1.9.18-k started in: 154ms listening on port 8080
    Apr 30, 2010 10:50:00 AM com.sun.common.util.logging.LoggingConfigImpl openPropFile
    INFO: Cannot read logging.properties file.
    Apr 30, 2010 10:50:00 AM com.sun.enterprise.web.WebContainer createHttpListener
    INFO: Created HTTP listener embedded-listener on port 8080
    Apr 30, 2010 10:50:00 AM com.sun.enterprise.web.WebContainer configureHttpServiceProperties
    WARNING: pewebcontainer.invalid_http_service_property
    Apr 30, 2010 10:50:00 AM com.sun.enterprise.web.WebContainer createHosts
    INFO: Created virtual server server
    Apr 30, 2010 10:50:00 AM com.sun.enterprise.web.WebContainer loadSystemDefaultWebModules
    INFO: Virtual server server loaded system default web module
    Apr 30, 2010 10:50:02 AM com.sun.enterprise.security.SecurityLifecycle INFO: security.secmgroff
    Apr 30, 2010 10:50:03 AM com.sun.enterprise.security.ssl.SSLUtils checkCertificateDates
    SEVERE: java_security.expired_certificate
    Apr 30, 2010 10:50:03 AM com.sun.enterprise.security.SecurityLifecycle onInitialization
    INFO: Security startup service called
    Apr 30, 2010 10:50:03 AM com.sun.enterprise.security.PolicyLoader loadPolicy
    INFO: policy.loading
    Apr 30, 2010 10:50:03 AM com.sun.enterprise.security.auth.realm.Realm doInstantiate
    INFO: Realm admin-realm of classtype com.sun.enterprise.security.auth.realm.file.FileRealm successfully created.
    Apr 30, 2010 10:50:03 AM com.sun.enterprise.security.auth.realm.Realm doInstantiate
    INFO: Realm file of classtype com.sun.enterprise.security.auth.realm.file.FileRealm successfully created.
    Apr 30, 2010 10:50:03 AM com.sun.enterprise.security.auth.realm.Realm doInstantiate
    INFO: Realm certificate of classtype com.sun.enterprise.security.auth.realm.certificate.CertificateRealm successfully created.
    Apr 30, 2010 10:50:03 AM com.sun.enterprise.security.SecurityLifecycle onInitialization
    INFO: Security service(s) started successfully....
    classLoader = WebappClassLoader (delegate=true; repositories=WEB-INF/classes/)
    SharedSecrets.getJavaNetAccess()=java.net.URLClassLoader$7@71e13a2c
    Apr 30, 2010 10:50:03 AM com.sun.enterprise.web.WebApplication start
    INFO: Loading application test at /test
    Tests run: 2, Failures: 0, Errors: 0, Skipped: 0, Time elapsed: 9.845 sec
    Results :
    Tests run: 2, Failures: 0, Errors: 0, Skipped: 0
    

    The key messages in the log are highlighted in bold.

    As you can see embedded GlassFish started in less than a second … neat! It also shows a message that HTTP listener is starting on port 8080. And finally the 2 tests passed – one is the default one generated by Maven and other is the new one that we added!

A future blog will show how to create JDBC resource using these APIs and use the JPA 2 APIs to query an in-memory database.

Alternatively, you can also use the Maven plug-in or EJB 3.1 Embeddable API. Always refer to the GlassFish v3 Embedded Server Guide for the definitive documentation. The latest javadocs are available here.

How are you using embeddable GlassFish ?

Technorati: totd glassfish v3 javaee embedded servlet

Share and Enjoy:
  • Print
  • Digg
  • Sphinn
  • del.icio.us
  • Facebook
  • Google Bookmarks
  • DZone
  • StumbleUpon
  • Technorati
  • Twitter
  • Slashdot

April 28, 2010

TOTD #131: Dynamic OSGi services in GlassFish – Using ServiceTracker

Filed under: General — arungupta @ 11:15 pm

OSGi is the dynamic module system for Java. Each module, or bundle as called in OSGi terminology, is packaged as a JAR file and the inbound and outbound dependencies are explicitly defined using the META-INF/MANIFEST.MF in the JAR file. A complex software system may be broken into multiple modules where each module may be exposing a set of services. These services are then consumed by some other "client" OSGi bundles. The beauty of dynamic nature of OSGi is that each bundle can be easily updated without restarting the framework and any reference to the service in the "client" bundles is also updated accordingly. However the client needs to ensure that they are watching out for changes in the lifecycle of "service" bundle.

GlassFish‘s modular architecture is based upon OSGi. The different capabilities such as Web container, EJB container, and RESTful Web services are provided as OSGi modules. The OSGi framework is available to developers as well so that they can construct their application as OSGi modules and leverage all the goodness.

This Tip Of The Day (TOTD) explains an OSGi design pattern that allows the client to track the dynamic discovery of an OSGi service. This means that client keeps a reference to the service which is automatically refreshed if the bundle providing the service is refreshed. And of course, it uses GlassFish to deploy the bundles :-)

For those, who prefer to see the results directly, download and unzip this zip file:

  1. Give the following command in the root directory:
    mvn clean install
    
  2. Copy the generated bundles to "domains/domain1/autodeploy/bundles" directory as:
    cp helloworld-api/target/helloworld-api-1.0-SNAPSHOT.jar \
    helloworld-impl/target/helloworld-impl-1.0-SNAPSHOT.jar \
    helloworld-client/target/helloworld-client-1.0-SNAPSHOT.jar \
    ~/tools/glassfish/v3/final/glassfishv3/glassfish/domains/domain1/autodeploy/bundles
    

    The following log messages will be displayed in the console:

    [#|2010-04-28T17:03:55.090-0700|INFO|glassfishv3.0|javax.enterprise.system.std.com.sun.enterprise.v3.
    services.impl|_ThreadID=23;_ThreadName=Thread-23;|Getting a new service|#]
    [#|2010-04-28T17:03:55.091-0700|INFO|glassfishv3.0|javax.enterprise.system.std.com.sun.enterprise.v3.
    services.impl|_ThreadID=23;_ThreadName=Thread-23;|Hello Duke|#]
    [#|2010-04-28T17:03:57.091-0700|INFO|glassfishv3.0|javax.enterprise.system.std.com.sun.enterprise.v3.
    services.impl|_ThreadID=23;_ThreadName=Thread-23;|Getting a new service|#]
    [#|2010-04-28T17:03:57.092-0700|INFO|glassfishv3.0|javax.enterprise.system.std.com.sun.enterprise.v3.
    services.impl|_ThreadID=23;_ThreadName=Thread-23;|Hello Duke|#]


    The log messages from the client bundle invoking the service bundle are highlighted in bold.

  3. Update the service implementation
    1. Edit service implementation in "hello-impl/src/main/java/org/samples/osgi/helloworld/impl/HelloImpl.java" and change the "return" statement from:
      return "Hello " + name;
      

      to

      return "Howdy " + name;
      
    2. Create the service implementation bundle again by giving the command:
      mvn clean install
      

      in the "helloworld-impl" directory.

    3. Copy the updated bundle from "helloworld-impl/target/helloworld-impl-1.0-SNAPSHOT.jar" to "glassfishv3/glassfish/domains/domain1/autodeploy/bundles" directory. The following sequence of log messages will be seen:
      [#|2010-04-28T17:04:47.110-0700|INFO|glassfishv3.0|javax.enterprise.system.std.com.sun.enterprise.v3.
      services.impl|_ThreadID=23;_ThreadName=Thread-23;|Getting a new service|#]
      [#|2010-04-28T17:04:47.110-0700|INFO|glassfishv3.0|javax.enterprise.system.std.com.sun.enterprise.v3.
      services.impl|_ThreadID=23;_ThreadName=Thread-23;|Hello Duke|#]
      [#|2010-04-28T17:04:48.151-0700|INFO|glassfishv3.0|javax.enterprise.system.std.com.sun.enterprise.v3.
      services.impl|_ThreadID=22;_ThreadName={felix.fileinstall.poll=5000,
      felix.fileinstall.bundles.new.start=true, service.pid=org.apache.felix.fileinstall.b0b03c1b-5a58-457d-bfde-116be31299f0,
      felix.fileinstall.dir=/Users/arungupta/tools/glassfish/v3/final/glassfishv3/glassfish/domains/domain1
      /autodeploy/bundles/, felix.fileinstall.filename=org.apache.felix.fileinstall-autodeploy-bundles.cfg,
      service.factorypid=org.apache.felix.fileinstall, felix.fileinstall.debug=1};|Updated
      /Users/arungupta/tools/glassfish/v3/final/glassfishv3/glassfish/domains/domain1/autodeploy/bundles/
      helloworld-impl-1.0-SNAPSHOT.jar|#]
      [#|2010-04-28T17:04:49.110-0700|INFO|glassfishv3.0|javax.enterprise.system.std.com.sun.enterprise.v3.
      services.impl|_ThreadID=23;_ThreadName=Thread-23;|Getting a new service|#]
      [#|2010-04-28T17:04:49.111-0700|INFO|glassfishv3.0|javax.enterprise.system.std.com.sun.enterprise.v3.
      services.impl|_ThreadID=23;_ThreadName=Thread-23;|Howdy Duke|#]
      

      As evident from the log messages, "Hello Duke" message is printed first, the service implementation bundle gets refreshed, and then the message from the updated service implementation, i.e. "Howdy Duke" is printed. Notice, only the service implementation got refreshed.

Now some explanation!

The application is split into 3 bundles – API, Impl, and Client. Splitting into 3 bundles allows cleaner separation and other implementations of the service  to show up relying purely upon the API bundle.

The "API" bundle (helloworld-api) has one class with the following interface:

package org.samples.osgi.helloworld.api;
public interface Hello {
public String sayHello(String name);
}

This bundle has the following manifest entry:

<Export-Package>${pom.groupId}.api</Export-Package>

to ensure that the package with the service interface is exported and available for imports by service implementers. The "Impl" bundle (helloworld-impl) has the trivial implementation of this interface as:

package org.samples.osgi.helloworld.impl
import org.samples.osgi.helloworld.api.Hello;
public class HelloImpl implements Hello {
public String sayHello(String name) {
return "Hello " + name;
}
}

And the bundle’s activator registers the service as:

package org.samples.osgi.helloworld.impl;
import java.util.Properties;
import org.samples.osgi.helloworld.api.Hello;
import org.osgi.framework.BundleActivator;
import org.osgi.framework.BundleContext;
public class App implements BundleActivator {
public void start(BundleContext bc) throws Exception {
bc.registerService(Hello.class.getName(), new HelloImpl(), new Properties());
}
public void stop(BundleContext bc) throws Exception {
bc.ungetService(bc.getServiceReference(Hello.class.getName()));
}
}

This bundle defines the dependency on the package exported earlier as:

<dependency>
<groupId>${pom.groupId}</groupId>
<artifactId>helloworld-api</artifactId>
<version>1.0-SNAPSHOT</version>
</dependency>

and also imports the appropriate packages as:

<Import-Package>${pom.groupId}.api, org.osgi.framework</Import-Package>

The "client" bundle’s (helloworld-client) activator uses "org.osgi.util.tracker.ServiceTracker" for the dynamic discovery of service. The code looks like:

package org.samples.osgi.helloworld.client;
import org.osgi.framework.BundleActivator;
import org.osgi.framework.BundleContext;
import org.osgi.framework.ServiceReference;
import org.osgi.util.tracker.ServiceTracker;
import org.samples.osgi.helloworld.api.Hello;
public class App implements BundleActivator {
BundleContext ctx;
ServiceTracker tracker;
public void start(BundleContext context) {
System.out.println("Starting client bundle");
this.ctx = context;
// Create a service tracker to monitor Hello services.
tracker = new ServiceTracker(context, Hello.class.getName(), null);
        tracker.open();
new PingService(tracker).start();
}
public void stop(BundleContext context) {
System.out.println("Stopping client bundle");
tracker.close();
}
private class PingService extends Thread {
ServiceTracker tracker;
PingService(ServiceTracker tracker) {
this.tracker = tracker;
}
public void run() {
try {
while (true) {
Thread.sleep(2000);
System.out.println("Getting a new service");
Hello hello = (Hello) tracker.getService();
 if (hello == null)
System.out.println("No service found!");
else     
System.out.println(hello.sayHello("Duke"));
}
} catch (InterruptedException ex) {
ex.printStackTrace();
}
}
}
}

The ServiceTracker API allows customized service tracking and find services that meet search criteria defined by filters. Basically it listens to different service events and gets/ungets the service accordingly. In this case, a "ServiceTracker" is created to track the service by specifying the class name. The "tracker.open()" starts the service tracking. A new thread is started which pings the service every 2 seconds and prints the received response. Notice, a new service is retrieved from the service tracker as the service bundle might have been refreshed.

Please read through OSGi javadocs for more details on these APIs.

A future blog will show how a Java EE 6 MVC-based application can be split into multiple OSGi bundles using this design pattern.

How are you using dynamic discovery of services in OSGi ?

Technorati: totd osgi modules glassfish v3 felix dynamic discovery

Share and Enjoy:
  • Print
  • Digg
  • Sphinn
  • del.icio.us
  • Facebook
  • Google Bookmarks
  • DZone
  • StumbleUpon
  • Technorati
  • Twitter
  • Slashdot

April 26, 2010

TOTD #130: Invoking a OSGi service from a JAX-WS Endpoint – OSGi and Enterprise Java

Filed under: General — arungupta @ 11:22 pm

Sahoo blogged about JAX-WS Web service in an OSGi bundle. This Tip Of The Day (TOTD) provides complete steps to create such an application from scratch.

We will create an OSGi service, a JAX-WS compliant Web service as hybrid application, and a JAX-WS Web service client.

Lets create an OSGi service first.

  1. Create a simple OSGi service as explained in TOTD #36. Generate the maven project as:
    mvn archetype:create -DarchetypeGroupId=org.apache.maven.archetypes \
    -DgroupId=org.glassfish.samples.osgi.hello.service -DartifactId=osgi-pure
    

    The updated directory structure looks like:

    osgi-pure
    osgi-pure/pom.xml
    osgi-pure/src
    osgi-pure/src/main
    osgi-pure/src/main/java
    osgi-pure/src/main/java/org
    osgi-pure/src/main/java/org/glassfish
    osgi-pure/src/main/java/org/glassfish/samples
    osgi-pure/src/main/java/org/glassfish/samples/osgi
    osgi-pure/src/main/java/org/glassfish/samples/osgi/hello
    osgi-pure/src/main/java/org/glassfish/samples/osgi/hello/service
    osgi-pure/src/main/java/org/glassfish/samples/osgi/hello/service/Hello.java
    osgi-pure/src/main/java/org/glassfish/samples/osgi/hello/service/impl
    osgi-pure/src/main/java/org/glassfish/samples/osgi/hello/service/impl/App.java
    osgi-pure/src/main/java/org/glassfish/samples/osgi/hello/service/impl/HelloImpl.java
    

    "Hello.java" is the OSGi service interface and looks like:

    public interface Hello {
    public String sayHello(String name);
    }
    

    "HelloImpl.java" is a trivial implementation of the service and looks like:

    public class HelloImpl implements Hello {
    public String sayHello(String name) {
    return "Hello " + name;
    }
    }
    

    "App.java" is the Bundle Activator and looks like:

    import org.glassfish.samples.osgi.hello.service.impl.HelloImpl;
    import java.util.Properties;
    import org.glassfish.samples.osgi.hello.service.Hello;
    import org.osgi.framework.BundleActivator;
    import org.osgi.framework.BundleContext;
    /**
    * Hello world!
    */
    public class App implements BundleActivator {
    public void start(BundleContext bc) throws Exception {
    bc.registerService(Hello.class.getName(), new HelloImpl(), new Properties());
    }
    public void stop(BundleContext bc) throws Exception {
    bc.ungetService(bc.getServiceReference(Hello.class.getName()));
    }
    }
    

    The "start" method registers the OSGi service using the name "Hello" and "stop" method un-registers the service.

  2. The updated "maven-bundle-plugin" from TOTD #36 looks like:

    <plugin>
    <groupId>org.apache.felix</groupId>
    <artifactId>maven-bundle-plugin</artifactId>
    <extensions>true</extensions>
    <configuration>
    <instructions>
    <Export-Package>${pom.groupId}</Export-Package>
    <Bundle-Activator>${pom.groupId}.impl.App</Bundle-Activator>
    </instructions>
    </configuration>
    </plugin>
    

    Notice, only the package that contains the service interface, i.e. "org.glassfish.samples.osgi.hello.service", is exported and the activator and service implementation are in a different package.

  3. Create the OSGi service bundle as:

    mvn install
    

    This also installs the OSGi bundle in the local maven repository. Deploy this bundle in GlassFish v3 by copying to "glassfish/domains/domain1/autodeploy/bundles" directory. Make sure GlassFish is running or start it as:

    asadmin start-domain --verbose
    

Lets create a hybrid application that consists of a JAX-WS compliant Web service, queries the OSGi service registry, invokes the OSGi service and return a response to the client.

  1. Create the Maven project as:
    mvn archetype:create -DarchetypeGroupId=org.apache.maven.archetypes \
    -DgroupId=org.glassfish.samples.osgi.jaxws.webservice -DartifactId=helloservice
    
    
  2. Change the generated "src/main/java/org/glassfish/samples/osgi/jaxws/webservice/App.java" such that it looks like:

    import javax.jws.WebService;
    import org.glassfish.samples.osgi.hello.service.Hello;
    import org.osgi.framework.BundleContext;
    import org.osgi.framework.BundleReference;
    import org.osgi.framework.ServiceReference;
    /**
    * Hello world!
    */
    @WebService
    public class App {
    public String sayHello(String name) {
    Hello service = getService(Hello.class);
    return service.sayHello(name);
    }
    /**
    * This method looks up service of given type in OSGi service registry and returns if found.
    * Returns null if no such service is available,
    */
    private static <T> T getService(Class<T> type)
    BundleContext ctx = BundleReference.class.cast(
    App.class.getClassLoader()).getBundle().getBundleContext();
    ServiceReference ref = ctx.getServiceReference(type.getName());
    return ref != null ? type.cast(ctx.getService(ref)) : null;
    }
    }
    

    The "getService" method queries the OSGI service registry and returns the service reference. The "sayHello" method looks for the "Hello" service and invokes a method on it. The name "Hello" is the same as registered during the OSGi bundle creation earlier.

  3. In the generated "pom.xml":
    1. Change the packaging to "war".
    2. Add the following repository:

      <repositories>
      <repository>
      <id>java.net</id>
      <name>GlassFish Maven Repository</name>
      <url>http://maven.glassfish.org/content/groups/glassfish</url>
      </repository>
      </repositories>
      

      so that Java EE API dependency can be resolved.

    3. Add the following dependencies in "provided" scope:

      <dependency>
      <groupId>javax</groupId>
      <artifactId>javaee-api</artifactId>
      <version>6.0</version>
      <scope>provided</scope>
      </dependency>
      <dependency>
      <groupId>org.osgi</groupId>
      <artifactId>org.osgi.core</artifactId>
      <version>4.2.0</version>
      <scope>provided</scope>
      </dependency>
      <dependency>
      <groupId>org.glassfish.samples.osgi.hello.service</groupId>
      <artifactId>osgi-pure</artifactId>
      <version>1.0-SNAPSHOT</version>
      <scope>provided</scope>
      </dependency>
      

      Notice "osgi-pure" bundle is specified as dependency as that is used to invoke the service.

    4. Add the following plugins to "pom.xml" to create the hybrid application:

      <plugins>
      <plugin>
      <groupId>org.apache.maven.plugins</groupId>
      <artifactId>maven-compiler-plugin</artifactId>
      <version>2.0.2</version>
      <configuration>
      <source>1.5</source>
      <target>1.5</target>
      </configuration>
      </plugin>
      <plugin>
      <groupId>org.apache.felix</groupId>
      <artifactId>maven-bundle-plugin</artifactId>
      <configuration>
      <supportedProjectTypes>
      <supportedProjectType>war</supportedProjectType>
      <supportedProjectType>bundle</supportedProjectType>
      <supportedProjectType>jar</supportedProjectType>
      </supportedProjectTypes>
      <instructions>
      <Import-Package>javax.jws; version=2.0, *</Import-Package>
      <Web-ContextPath>${pom.artifactId}</Web-ContextPath>
      </instructions>
      </configuration>
      <executions>
      <execution>
      <id>bundle-manifest</id>
      <phase>process-classes</phase>
      <goals>
      <goal>manifest</goal>
      </goals>
      </execution>
      </executions>
      </plugin>
      <plugin> <!-- Need to use this plugin to build war files -->
      <artifactId>maven-war-plugin</artifactId>
      <version>2.1-beta-1</version>
      <configuration>
      <archive>
      <!-- add bundle plugin generated manifest to the war -->
      <manifestFile>
      ${project.build.outputDirectory}/META-INF/MANIFEST.MF
      </manifestFile>
      <!-- For some reason, adding Bundle-ClassPath in maven-bundle-plugin
      confuses that plugin and it generates wrong Import-Package, etc.
      So, we generate it here.
      -->
      <manifestEntries>
      <Bundle-ClassPath>WEB-INF/classes/</Bundle-ClassPath>
      </manifestEntries>
      </archive>
      <failOnMissingWebXml>false</failOnMissingWebXml>
      </configuration>
      </plugin>
      </plugins>
      

      The "maven-bundle-plugin" is used to generate the appropriate OSGi metadata and "maven-war-plugin" is used to bundle the WAR file.

  4. Generate the deployable archive as:

    mvn clean package
    

    This generates "target/helloservice-1.0-SNAPSHOT.war". The generated manifest in "target/helloservice-1.0-SNAPSHOT/WEB-INF/classes/META-INF/MANIFEST.MF" looks like:

    Manifest-Version: 1.0
    Export-Package: org.glassfish.samples.osgi.jaxws.webservice;uses:="org
    .glassfish.samples.osgi.hello.service,javax.jws,org.osgi.framework";v
    ersion="1.0.0.SNAPSHOT"
    Bundle-Version: 1.0.0.SNAPSHOT
    Tool: Bnd-0.0.357
    Bundle-Name: helloservice
    Bnd-LastModified: 1272315464139
    Created-By: 1.6.0_17 (Apple Inc.)
    Bundle-ManifestVersion: 2
    Bundle-SymbolicName: org.glassfish.samples.osgi.jaxws.webservice.hello
    service
    Web-ContextPath: helloservice
    Import-Package: javax.jws;version="2.0",org.glassfish.samples.osgi.hel
    lo.service,org.glassfish.samples.osgi.jaxws.webservice;version="1.0",
    org.osgi.framework;version="1.5"
    
  5. Now this archive is a hybrid application, i.e. its a WAR file and an OSGi bundle. So lets deploy this file by copying the file to "domains/domain1/autodeploy/bundles" and see a message like:
    WS00018: Webservice Endpoint deployed App listening at address at http://localhost:8080/helloservice/AppService
    
  6. Accessing "http://localhost:8080/helloservice/AppService" in a browser window shows the following page:

Lets create the client project now to invoke this Web service.

  1. Create a new directory "client" and invoke the following command to generate the client-side artifacts:
    wsimport -keep http://localhost:8080/helloservice/AppService?wsdl
    
  2. Create a new directory "client" and a new file "HelloClient" in that directory as:
    package client;
    import org.glassfish.samples.osgi.jaxws.webservice.*
    public class HelloClient {
    public static void main(String[] args) throws Exception {
    App port = new AppService().getAppPort();
    System.out.println(port.sayHello("Duke"));
    }
    }
    

    This "main" method gets a reference to the generated service class, gets the port from it, and then invokes the method by passing an argument.

  3. Compile the client code as:
    javac -d . -cp . client/HelloClient.java
    
  4. Invoke the client as:
    java -cp . client.HelloClient
    

    to see the result as:

    Hello Duke

    This result is coming from the OSGi service implementation.

All the three projects explained above are available in this download.

Using similar concept, a pure OSGi client can invoke a pure OSGi service which can then delegate the actual business method implementation to a JAX-WS endpoint and then use all the goodness of the underlying stack. This way, the benefits of JAX-WS are extended to a pure OSGi client and vice versa.

Also see other OSGi entries on this blog.

Technorati: totd jaxws osgi glassfish v3 webservice

Share and Enjoy:
  • Print
  • Digg
  • Sphinn
  • del.icio.us
  • Facebook
  • Google Bookmarks
  • DZone
  • StumbleUpon
  • Technorati
  • Twitter
  • Slashdot

April 19, 2010

TOTD #129: Managed Beans 1.0 in Java EE 6 – What and How ?

Filed under: General — arungupta @ 4:16 am

Two new specifications released as part of the Java EE 6 platform are Managed Beans 1.0 and Interceptors 1.1. This Tip Of The Day (TOTD) attempts to explain the basics of Managed Beans 1.0. A later blog will explain the what/how of Interceptors 1.1.

A short definition for a managed bean – its a POJO that is treated as managed component by the Java EE container.

There are several component specifications in the Java EE platform that annotates a POJO to achieve the desired functionality. For example, adding "@Stateful" annotation to a POJO makes it a stateful EJB. Similarly adding "@javax.faces.bean.ManagedBean" to a POJO makes it a JSF managed bean. Java EE 6 introduces a new specification – "Managed Beans 1.0" that provides a common foundation for the different kinds of component that exist in the Java EE platform. In addition, the specification also defines a small set of basic services:

  • Resource Injection
  • Lifecycle callbacks
  • Interceptors

The different component specifications can then add other characteristics to this managed bean. The specification even defines well known extension points to modify some aspects. For example CDI/JSR 299 relaxes the requirement to have a POJO with no-args constructor and allow constructor with more complex signatures. CDI also adds support for lifecycle scopes and events. Similarly EJB is a managed bean and adds support for transactions and other services.

A managed bean is created by adding "javax.annotation.ManagedBean" annotation as:

@javax.annotation.ManagedBean(value="mybean")
public class MyManagedBean {
...
}

The standard annotations "javax.annotation.PostConstruct" and "javax.annotation.PreDestroy" from the JSR 250 can be applied to any methods in the managed bean to perform any resource initialization or clean up by the managed bean. A bean with lifecycle callbacks can look like:

@ManagedBean(value="mybean")
public class MyManagedBean {
  @PostConstruct
  public void setupResources() {
    // setup your resources
    System.out.println("Setting up resources ...");
  }
  @PreDestroy
  public void cleanupResources() {
     // collect them back here
    System.out.println("Collecting them back ...");
  }
  public String sayHello(String name) {
    return "Hello " + name;
  }
}

This bean can be injected in a Servlet or any other managed component in three different ways:

  1. Using @Resource annotation as:

    @ResourceMyManagedBean bean;
  2. Using "@Inject" annotation as:
    @InjectMyManagedBean bean;
  3. Using the JNDI reference "java:app/ManagedBean/mybean" or "java:module/mybean" where "ManagedBean" is name of the deployed archive (WAR in this case), shown as:
    InitialContext ic = new InitialContext(); MyManagedBean bean = (MyManagedBean)ic.lookup("java:module/mybean");

    Its important to provide a name to the managed bean, as there is no default name, for the JNDI reference to work. EJB and CDI specifications extend this rule and provide default naming rules.

Once the bean is injected then its business methods can be invoked directly.

As part of Java EE 6, all EJB and CDI beans are defined as managed beans and so:

@Stateless
public class FooBean {
    . . .
}

and

@Named
public class BarBean {
    . . .
}

are implicitly managed beans as well.

No other beans in the Java EE platform are currently implicitly defined as managed beans. However JAX-RS resources can also be defined as EJB and CDI beans in which case the JAX-RS resources will be implicit managed beans as well. A future version of different component specifications may discuss if it makes sense to align other Java EE POJO elements to align with Managed Beans specification.

Technorati: javaee glassfish v3 managedbeans cdi ejb servlet jndi

Share and Enjoy:
  • Print
  • Digg
  • Sphinn
  • del.icio.us
  • Facebook
  • Google Bookmarks
  • DZone
  • StumbleUpon
  • Technorati
  • Twitter
  • Slashdot

April 13, 2010

TOTD #128: EJBContainer.createEJBContainer: Embedded EJB using GlassFish v3

Filed under: General — arungupta @ 11:00 pm

This blog has been in my Drafts folder for quite some time now, needed some final tweaks, and finally pushing it out.

Chapter 22 of Enterprise JavaBeans 3.1 specification (released as part of Java EE 6) describes "Embeddable Usage" as:

Unlike traditional Java EE server-based execution, embeddable usage allows client code and its corresponding enterprise beans to run within the same JVM and class loader. This provides better support for testing, offline processing (e.g. batch), and the use of the EJB programming model in desktop applications.

Earlier blogs already described the steps in detail but I had to try this stuff myself :-) And moreover this Tip Of The Day (TOTD) shows, as always, complete detailed steps to get you going from scratch.

Lets see how such an embeddable EJB application can be easily created.

  1. Create a Maven project as:
    mvn archetype:create -DarchetypeGroupId=org.apache.maven.archetypes -DgroupId=org.glassfish.embedded.samples -DartifactId=ejb31
    
  2. Add the following fragments to "pom.xml" to ensure right set of JARs are pulled in:
    <repositories>
    <repository>
    <id>download.java.net</id>
    <name>Java.net Maven Repository</name>
    <url>http://download.java.net/maven/2</url>
    </repository>
    </repositories>
    . . .
    <dependency>
    <groupId>org.glassfish.extras</groupId>
    <artifactId>glassfish-embedded-all</artifactId>
    <version>3.0</version>
    <scope>compile</scope>
    </dependency>
    . . .
    <build>
    <defaultGoal>install</defaultGoal>
    <plugins>
    <plugin>
    <groupId>org.apache.maven.plugins</groupId>
    <artifactId>maven-compiler-plugin</artifactId>
    <version>2.0.2</version>
    <configuration>
    <source>1.5</source>
    <target>1.5</target>
    </configuration>
    </plugin>
    </plugins>
    </build>
    

  3. Change the generated "src/main/java/org/glassfish/embedded/samples/App.java" to:
    package org.glassfish.embedded.samples;
    import javax.ejb.Stateless;
    /**
    * Hello world!
    */
    @Stateless
    public class App {
    public static String sayHello(String name) {
    return "Hello " + name;
    }
    }
    

    This creates our trivial Enterprise JavaBean.

  4. Change the generated "src/test/java/org/glassfish/embedded/samples/AppTest.java" to (taking the code snippet from Adam’s blog and slightly altering it):
    public void testEJB() throws NamingException {
    EJBContainer ejbC = EJBContainer.createEJBContainer();
    Context ctx = ejbC.getContext();
    App app = (App) ctx.lookup("java:global/classes/App");
    assertNotNull(app);
    String NAME = "Duke";
    String greeting = app.sayHello(NAME);
    assertNotNull(greeting);
    assertTrue(greeting.equals("Hello " + NAME));
    ejbC.close();
    }
    

    This is a simple test that looks up the bean using portable JNDI name, more explanation on JNDI name below.

  5. Run the tests by giving the following standard command in the Maven project:
    ~/samples/v3/embedded/ejb31 >mvn clean test
    [INFO] Scanning for projects...
    [INFO] ------------------------------------------------------------------------
    [INFO] Building ejb31
    [INFO]    task-segment: [clean, test]
    [INFO] ------------------------------------------------------------------------
    [INFO] [clean:clean {execution: default-clean}]
    [INFO] Deleting directory /Users/arungupta/samples/v3/embedded/ejb31/target
    . . .
    -------------------------------------------------------
    T E S T S
    -------------------------------------------------------
    Running org.glassfish.embedded.samples.AppTest
    Apr 9, 2010 3:48:16 PM org.glassfish.ejb.embedded.EJBContainerProviderImpl getValidFile
    SEVERE: ejb.embedded.location_not_exists
    Apr 9, 2010 3:48:19 PM com.sun.enterprise.v3.server.AppServerStartup run
    INFO: GlassFish v3 (74.2) startup time : Embedded(1180ms) startup services(1523ms) total(2703ms)
    Apr 9, 2010 3:48:20 PM com.sun.enterprise.transaction.JavaEETransactionManagerSimplified initDelegates
    INFO: Using com.sun.enterprise.transaction.jts.JavaEETransactionManagerJTSDelegate as the delegate
    Apr 9, 2010 3:48:21 PM org.glassfish.admin.mbeanserver.JMXStartupService$JMXConnectorsStarterThread run
    INFO: JMXStartupService: JMXConnector system is disabled, skipping.
    Apr 9, 2010 3:48:21 PM AppServerStartup run
    INFO: [Thread[GlassFish Kernel Main Thread,5,main]] started
    Apr 9, 2010 3:48:30 PM com.sun.enterprise.security.SecurityLifecycle INFO: security.secmgroff
    Apr 9, 2010 3:48:31 PM com.sun.enterprise.security.ssl.SSLUtils checkCertificateDates
    SEVERE: java_security.expired_certificate
    Apr 9, 2010 3:48:31 PM com.sun.enterprise.security.SecurityLifecycle onInitialization
    INFO: Security startup service called
    Apr 9, 2010 3:48:31 PM com.sun.enterprise.security.PolicyLoader loadPolicy
    INFO: policy.loading
    Apr 9, 2010 3:48:32 PM com.sun.enterprise.security.auth.realm.Realm doInstantiate
    INFO: Realm admin-realm of classtype com.sun.enterprise.security.auth.realm.file.FileRealm successfully created.
    Apr 9, 2010 3:48:32 PM com.sun.enterprise.security.auth.realm.Realm doInstantiate
    INFO: Realm file of classtype com.sun.enterprise.security.auth.realm.file.FileRealm successfully created.
    Apr 9, 2010 3:48:32 PM com.sun.enterprise.security.auth.realm.Realm doInstantiate
    INFO: Realm certificate of classtype com.sun.enterprise.security.auth.realm.certificate.CertificateRealm successfully created.
    Apr 9, 2010 3:48:32 PM com.sun.enterprise.security.SecurityLifecycle onInitialization
    INFO: Security service(s) started successfully....
    Apr 9, 2010 3:48:33 PM com.sun.ejb.containers.BaseContainer initializeHome
    INFO: Portable JNDI names for EJB App : [java:global/classes/App!org.glassfish.embedded.samples.App, java:global/classes/App]
    Apr 9, 2010 3:48:34 PM org.glassfish.admin.mbeanserver.JMXStartupService shutdown
    INFO: JMXStartupService and JMXConnectors have been shut down.
    Apr 9, 2010 3:48:34 PM com.sun.enterprise.v3.server.AppServerStartup stop
    INFO: Shutdown procedure finished
    Apr 9, 2010 3:48:34 PM AppServerStartup run
    INFO: [Thread[GlassFish Kernel Main Thread,5,main]] exiting
    Tests run: 2, Failures: 0, Errors: 0, Skipped: 0, Time elapsed: 18.61 sec
    Results :
    Tests run: 2, Failures: 0, Errors: 0, Skipped: 0


    The key log messages are highlighted in bold and are described:

    1.  "mvn clean test" builds the project and runs the test.
    2. The server started in under 3 seconds, 2703 ms to be precise.
    3. The portable JNDI name for the EJB is "java:global/classes/App" (convenience name for a bean with one view) and the fully-qualified notation is "java:global/classes/App!org.glassfish.embedded.samples.App". The convenience name is constructed in the "global" namespace + the unqualified name of the directory + bean name. The later is created by adding the fully-qualified name of the interface to the former.
    4. The server shuts down after the tests are run, shows that 2 tests (one default + one newly added) ran, and both passed.

So no explicit GlassFish downloading and/or configuring, just deployed a simple EJB, and ran the tests – everything within one VM.

A future blog will show how to add other Java EE functionality to this app.

Technorati: totd embedded ejb glassfish javaee v3

Share and Enjoy:
  • Print
  • Digg
  • Sphinn
  • del.icio.us
  • Facebook
  • Google Bookmarks
  • DZone
  • StumbleUpon
  • Technorati
  • Twitter
  • Slashdot

April 12, 2010

TOTD #127: Embedding GlassFish in an existing OSGi runtime – Eclipse Equinox

Filed under: General — arungupta @ 12:00 pm

GlassFish has a modular architecture based upon OSGi and bundles Apache Felix as the OSGi runtime. TOTD #103 explains how to run GlassFish with two other OSGi runtimes (Equinox and Knopflerfish). However you may already have an OSGi runtime in your environment and like to run GlassFish within it. Sahoo blogged about how to embed GlassFish in Equinox.

This Tip Of The Day (TOTD) provides complete set of steps with Equinox and the different download options.

  1. There are two download options for Equinox – SDK or Framework. The framework is an easier option to start with as its just a single JAR. So create a top-level directory as "equinox-3.5.2" and download the latest framework JAR from here. Complete details about the starting and configuring the framework are described here.
  2. Start the framework and check its status as:
    ~/tools/equinox-3.5.2 >java -jar org.eclipse.osgi_3.5.2.R35x_v20100126.jar -console
    osgi> ss
    Framework is launched.
    id State Bundle
    0 ACTIVE org.eclipse.osgi_3.5.2.R35x_v20100126
    

    Notice only one bundle, i.e. Equinox main bundle, is currently active.

  3. Download and unzip the latest GlassFish 3.1 nightly build.
  4. Shutdown the framework by typing "exit" on the console or Ctrl+C. Copy "glassfish/osgi/equinox/configuration/config.ini" to "equinox-3.5.2/configuration" directory. This is required because the version number of some packages exported by JRE is not uniform across frameworks. This will hopefully be fixed in future versions of the frameworks.
  5. Sahoo’s blog describes an OSGi bundle that controls the lifecycle of GlassFish. Download and unzip the OSGi bundle’s Maven project.
  6. Edit "src/main/java/sahoo/embeddedgf/GFActivator.java" file and change the value of "installRoot" and "instanceRoot" on line 73 and 74 to match the location of your GlassFish install. Build the bundle as:
    mvn package
    

    which generates "target/embeddedgf-1.0-SNAPSHOT.jar". The bundle performs three tasks:

    1. Install all the bundles from "glassfish/modules" directory.
    2. Creates a configuration with "com.sun.aas.installRoot" and "com.sun.aas.instanceRoot" properties.
    3. Starts the main GlassFish bundle.
  7. Start the framework again, install the bundle, and check its status as:
    osgi> install file:///Users/arungupta/samples/v3/osgi/embeddedgf/target/embeddedgf-1.0-SNAPSHOT.jar
    Bundle id is 1
    osgi> ss
    Framework is launched.
    id      State       Bundle
    0       ACTIVE      org.eclipse.osgi_3.5.2.R35x_v20100126
    1       INSTALLED   sahoo.embeddedgf_1.0.0.SNAPSHOT
    

    Now GlassFish bundle is installed but not started. Optionally, the framework may be started with "-clean" switch that clears out the cache and starts with a clean slate.

  8. Start the newly installed bundle and see the log messages as:
    osgi> start 1
    osgi> [#|2010-04-10T10:46:04.616-0700|INFO|glassfishv3.0|com.sun.grizzly.config.GrizzlyServiceListener|_ThreadID=10;_ThreadName=Configuration Updater;|Perform lazy SSL initialization for the listener 'http-listener-2'|#]
    [#|2010-04-10T10:46:04.700-0700|INFO|glassfishv3.0|null|_ThreadID=11;_ThreadName=Thread-13;|Grizzly Framework 1.9.19-beta1 started in: 26ms listening on port 4848|#]
    [#|2010-04-10T10:46:04.700-0700|INFO|glassfishv3.0|null|_ThreadID=12;_ThreadName=Thread-9;|Grizzly Framework 1.9.19-beta1 started in: 50ms listening on port 8181|#]
    [#|2010-04-10T10:46:04.709-0700|INFO|glassfishv3.0|null|_ThreadID=13;_ThreadName=Thread-8;|Grizzly Framework 1.9.19-beta1 started in: 135ms listening on port 8080|#]
    . . .
    [#|2010-04-10T10:46:11.625-0700|INFO|glassfishv3.0|null|_ThreadID=21;_ThreadName={felix.fileinstall.poll=5000, felix.fileinstall.bundles.new.start=true, service.pid=org.apache.felix.fileinstall.76a03b47-814c-4359-ad37-f5d12e752a6f, felix.fileinstall.dir=/Users/arungupta/tools/glassfish/3.1/apr9/glassfishv3/glassfish/domains/domain1/autodeploy/bundles/, felix.fileinstall.filename=org.apache.felix.fileinstall-autodeploy-bundles.cfg, service.factorypid=org.apache.felix.fileinstall, felix.fileinstall.debug=1};|{felix.fileinstall.poll (ms) = 5000, felix.fileinstall.dir = /Users/arungupta/tools/glassfish/3.1/apr9/glassfishv3/glassfish/domains/domain1/autodeploy/bundles, felix.fileinstall.debug = 1, felix.fileinstall.bundles.new.start = true, felix.fileinstall.tmpdir = /var/folders/+E/+E6YtSvGGEKNwOA77I-9Fk+++TI/-Tmp-/fileinstall--1798045578591636699, felix.fileinstall.filter = null}|#]
    
  9. Check the status of installed bundle as:
    osgi> ss
    Framework is launched.
    id      State       Bundle
    0       ACTIVE      org.eclipse.osgi_3.5.2.R35x_v20100126
    Fragments=89, 106, 109
    1       ACTIVE      sahoo.embeddedgf_1.0.0.SNAPSHOT
    2       RESOLVED    org.glassfish.appclient.acc-config_3.1.0.SNAPSHOT
    3       RESOLVED    org.glassfish.admin.cli_3.1.0.SNAPSHOT
    4       RESOLVED    org.glassfish.admin.core_3.1.0.SNAPSHOT
    5       RESOLVED    org.glassfish.admin.util_3.1.0.SNAPSHOT
    . . .
    220     ACTIVE      org.glassfish.web.weld-integration_3.1.0.SNAPSHOT
    221     RESOLVED    org.jboss.weld.osgi-bundle_1.0.1.SP1
    222     RESOLVED    com.ctc.wstx_0.0.0
    223     RESOLVED    org.glassfish.connectors.work-management_3.1.0.SNAPSHOT
    osgi>
    

    So now all the GlassFish modules are installed and the required ones are started. "http://localhost:8080" shows the default web page and "asadmin" can be used to issue the standard commands.

If you downloaded Eclipsed SDK, then the framework needs to be started as:

java -jar plugins/org.eclipse.osgi_3.5.2.R35x_v20100126.jar -console

and the configuration file needs to be copied to "plugins/configuration" directory.

A future blog will show how to run GlassFish inside Eclipse as an RCP, however this requires issue #11782 to be fixed.

There are several other OSGi entries on this blog or on Sahoo’s blog.

How are you using GlassFish’s OSGi capabilities ?

Technorati: glassfish osgi embedded eclipse equinox

Share and Enjoy:
  • Print
  • Digg
  • Sphinn
  • del.icio.us
  • Facebook
  • Google Bookmarks
  • DZone
  • StumbleUpon
  • Technorati
  • Twitter
  • Slashdot

April 8, 2010

TOTD #126: Creating an OSGi bundles using Eclipse and deploying in GlassFish

Filed under: General — arungupta @ 11:00 pm

TOTD #125 showed how to create an OSGi bundle using NetBeans and deploy in GlassFish. This Tip Of The Day (TOTD) shows how to do the same using Eclipse. OSGi replaced the plug-in technologies starting with Eclipse 3.0 and Equinox is used for all the modularity in Eclipse now.

Anyway, lets get started!

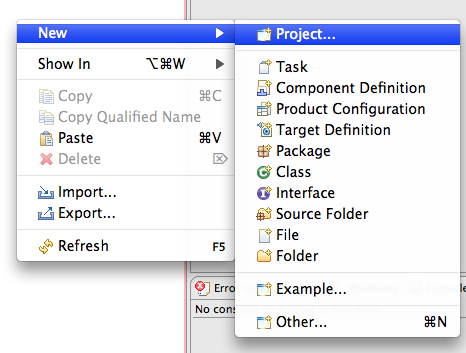
  1. In Eclipse 3.5.1, create a new Plug-in project by right-clicking in Package Explorer, selecting "New", Project …" as shown below:

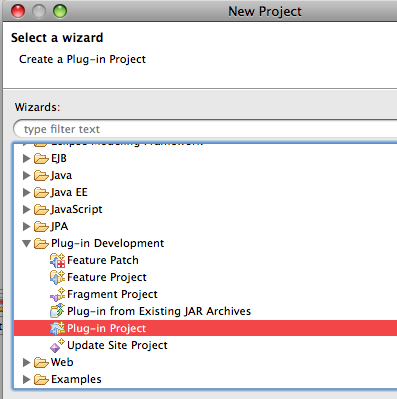
    and choose the "Plug-in Project":

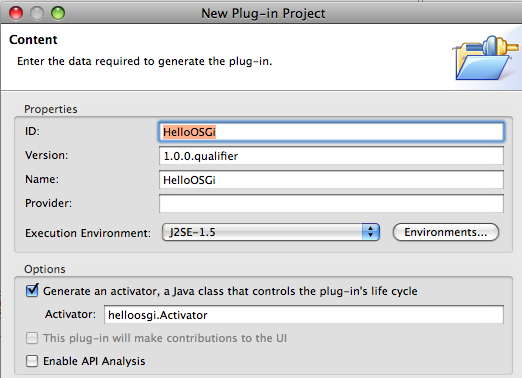
  2. Enter the project name as "HelloOSGi"

    and take all other defaults. Make sure "Generate an activator …" checkbox is selected and click on "Next >".

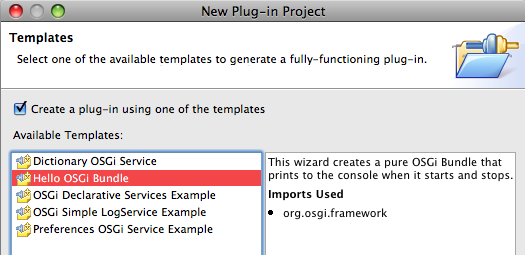
  3. Pick a project template as shown below:

    This creates a template "Activator" class that prints the messages when the bundle is started / stopped. Click on "Next >".

  4. Take the default start and stop message as:

    and click on "Finish".

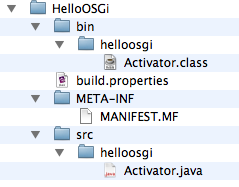
  5. The generated directory structure looks like:

    and the generated source code looks like:

    package helloosgi;
    import org.osgi.framework.BundleActivator;
    import org.osgi.framework.BundleContext;
    public class Activator implements BundleActivator {
    /*
    * (non-Javadoc)
    * @see org.osgi.framework.BundleActivator#start(org.osgi.framework.BundleContext)
    */
    public void start(BundleContext context) throws Exception {
    System.out.println("Hello World!!");
    }
    /*
    * (non-Javadoc)
    * @see org.osgi.framework.BundleActivator#stop(org.osgi.framework.BundleContext)
    */
    public void stop(BundleContext context) throws Exception {
    System.out.println("Goodbye World!!");
    }
    }


    Notice the imports are from standard org.osgi.framework.* package. The generated manifest looks like:

    Manifest-Version: 1.0
    Bundle-ManifestVersion: 2
    Bundle-Name: HelloOSGi
    Bundle-SymbolicName: HelloOSGi
    Bundle-Version: 1.0.0.qualifier
    Bundle-Activator: helloosgi.Activator
    Import-Package: org.osgi.framework;version="1.3.0"
    Bundle-RequiredExecutionEnvironment: J2SE-1.5
    

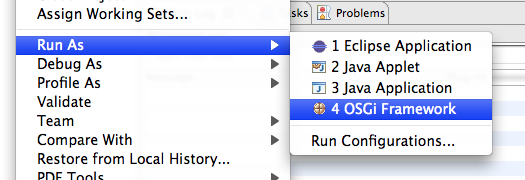
  6. Right-click on your project, select "Run As", "OSGi Framework" as shown below:

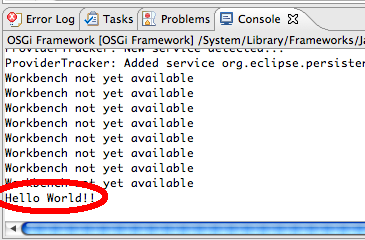
    This launches the OSGi concole within Eclipse, starts the bundle, and prints the "Hello World!!" message from our Activator class in the console:

    This runs our newly created OSGi bundle using the Equinox framework within Eclipse. Our goal however is to run this bundle in GlassFish and so lets do that.

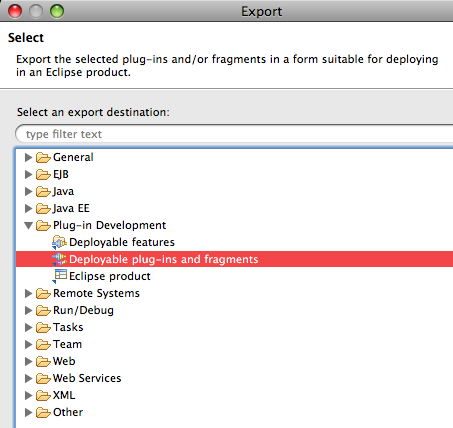
  7. Select "File", "Export …", "Plug-in Development", and select "Deployable Plug-ins and fragments":

    and click on "Next >".

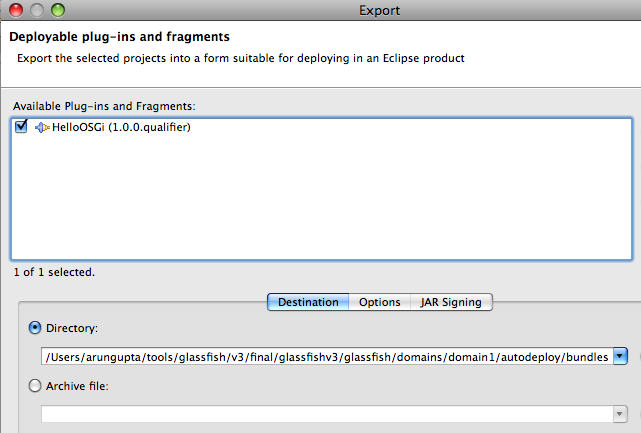
  8. Make sure "HelloOSGi" bundle is selected and specify the "domains/domain/autodeploy/bundles" directory of your GlassFish installation as specified below:

    GlassFish can be downloaded from here, unzipped, and started as "asadmin start-domain". And then you see the following message in your GlassFish logs:

    [#|2010-04-08T10:25:10.895-0700|INFO|glassfishv3.0|javax.enterprise.system.std.com.sun.enterprise.v3.services.impl|_ThreadID=24;_ThreadName={felix.fileinstall.poll=5000, felix.fileinstall.bundles.new.start=true, service.pid=org.apache.felix.fileinstall.b3dcd962-8b41-4669-858b-7c2e7d32d5c8, felix.fileinstall.dir=/Users/arungupta/tools/glassfish/v3/final/glassfishv3/glassfish/domains/domain1/autodeploy/bundles/, felix.fileinstall.filename=org.apache.felix.fileinstall-autodeploy-bundles.cfg, service.factorypid=org.apache.felix.fileinstall, felix.fileinstall.debug=1};|Hello World!!|#]

    Again, the same message from Activator class.

TOTD #118 shows other ways to manage OSGi bundles in GlassFish.

This blog showed how to create an OSGi bundle using Eclipse and deployed in GlassFish v3.

Also read other OSGi entries on this blog.

Technorati: totd eclipse glassfish osgi equinox

Share and Enjoy:
  • Print
  • Digg
  • Sphinn
  • del.icio.us
  • Facebook
  • Google Bookmarks
  • DZone
  • StumbleUpon
  • Technorati
  • Twitter
  • Slashdot

April 7, 2010

Java EE 6, GlassFish, NetBeans, Eclipse, OSGi at Über Conf: Jun 14-17, Denver

Filed under: General — arungupta @ 11:13 pm
Über Conf is a conference by No Fluff Just Stuff gang and plans to blow the minds of attendees with over 100 in-depth sessions (90 minutes each) from over 40 world class speakers on the Java platform and pragmatic Agile practices targeted at developers, architects, and technical managers.

Get your hands dirty and learn from the industry leaders in an intimate setting where the attendance is capped at 500 and in the beautiful city of Denver.

I’ll be speaking on:

  • Java EE 6 & GlassFish v3: Paving the path for the future
  • Getting the best of both worlds: OSGi & Java together

The talks will start with an introduction of key concepts and then provide a detailed overview of the technology. The talks will be interspersed with multiple demos to leave you feel empowered. There will be NetBeans and Eclipse (hopefully IDEA too) showing the simplicity, ease-of-use, and increased productivity with Java EE 6. There will be multiple demos showing OSGi application development and how OSGi + Java EE leverage the best of both worlds.

Keeping with the spirit of "No Fluff Just Stuff", the material presented will be purely technical :-)

Hear Jay Zimmerman (Über Conf Director) talk about the event. My first engagement with NFJS was Rich Web Experience 2007 and that was a great experience, truly "rich". This is my first speaking engagement with NFJS and looking forward to a long term relationship :-)

On a personal front, I never ran in Denver so looking forward to some nice runs in the mile high city! Any recommendations ?

Technorati: conf nofluffjuststuff uberconf denver glassfish javaee netbeans eclipse intellij osgi

Share and Enjoy:
  • Print
  • Digg
  • Sphinn
  • del.icio.us
  • Facebook
  • Google Bookmarks
  • DZone
  • StumbleUpon
  • Technorati
  • Twitter
  • Slashdot

April 5, 2010

TOTD #125: Creating an OSGi bundles using NetBeans and deploying in GlassFish

Filed under: General — arungupta @ 12:00 pm

NetBeans has a modular architecture where each module is created as an NBM. OSGi is another popular modular system for Java applications and used by GlassFish to provide a light-weight Java EE 6 compliant application server.

There are a lot of similarities between NBM and OSGi:

  • Runtime container manages lifecycle and dependencies of modules
  • Both are packaged as JAR, metadata stored in META-INF/MANIFEST.MF and some other information
  • Runtime starts up, read meta information and sets up dependencies
  • Every module has its own class loader loading explicitly declared dependencies only

The following presentation explain the similarities and differences between NBM and OSGi very clearly:

Frankenstein’s IDE: NetBeans and OSGi

Netigso provides a bridge between NBM and OSGi bundles. Using Netigso, NetBeans 6.9 allows you to choose between creating a NBM or an OSGi bundle.

This Tip Of The Day (TOTD) shows how to create an OSGi bundle using NetBeans and deploy in GlassFish.

  1. Download and Install NetBeans 6.9 latest nightly build from here.
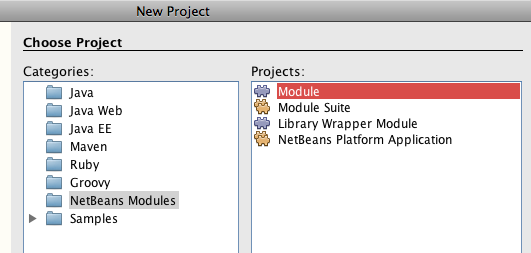
  2. Create a new NetBeans module by selecting "New Project…" and picking the values as shown in the image below:

    and click on "Next >".

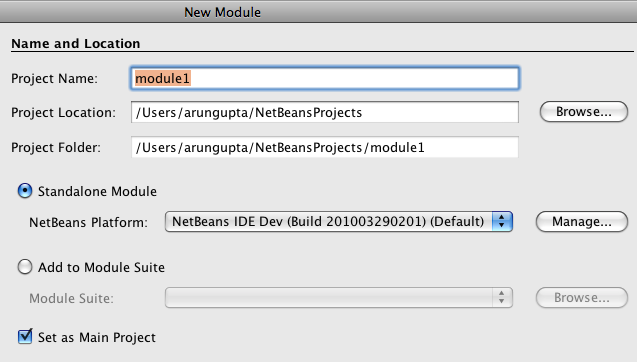
  3. The module can be created either stand-alone or added to a suite (more on this later). For now, lets create a stand-alone module as shown below:

    and click on "Next >".

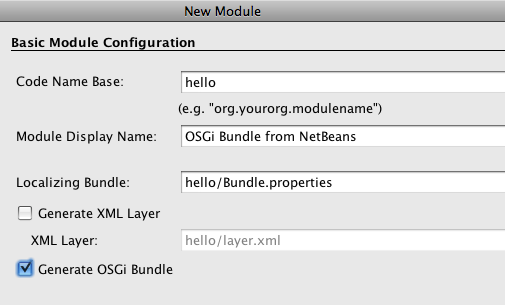
  4. On the bundle configuration page, specify the options as shown below:

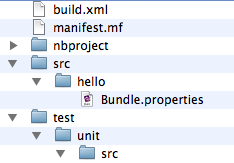
    and click on "Finish". "Code Name Base" is name of the base package. Notice "Generate OSGi Bundle" is selected which is what will generate the OSGi bundle instead of NBM. The generated directory structure looks like:

    The "manifest.mf" looks like:

    Manifest-Version: 1.0
    Bundle-Localization: hello/Bundle
    Bundle-Name: %OpenIDE-Module-Name
    Bundle-SymbolicName: hello
    Bundle-Version: 1.0

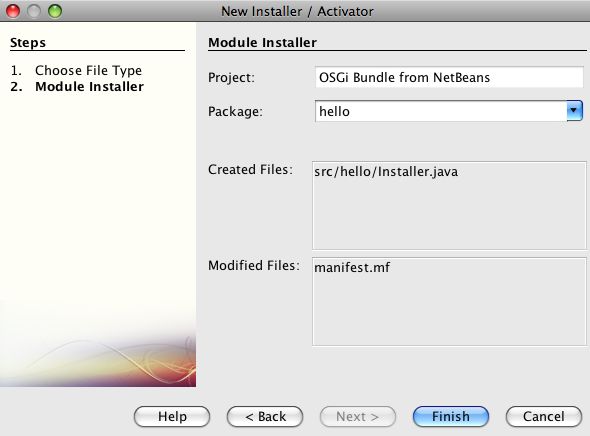
  5. Right-click on "Source Packages", select "New", "Installer / Activator …" as shown below:

    Take the default values as shown below:

    and click on "Finish". The generated source code looks like:

    /*
    * To change this template, choose Tools | Templates
    * and open the template in the editor.
    */
    package hello;
    import org.osgi.framework.BundleActivator;
    import org.osgi.framework.BundleContext;
    /**
    * Manages a bundle's lifecycle. Remember that an activator is optional and
    * often not needed at all.
    */
    public class Installer implements BundleActivator {
    public void start(BundleContext c) throws Exception {
    }
    public void stop(BundleContext c) throws Exception {
    }
    }
    

    The code that needs to be executed during starting and stopping this OSGi bundle can now be added to "start" and "stop" methods respectively. To keep it simple, add the following line to "start" method:

    System.out.println("OSGi Bundle from NetBeans: Started");
    

    and the following to "stop" method:

    System.out.println("OSGi Bundle from NetBeans: Stopped");
    
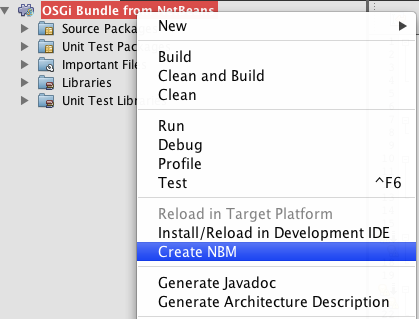
  6. Right-click on the project and select "Create NBM" as shown below:

    This creates "hello.jar" in the "build" directory of project.

  7. Fire up your GlassFish as "asadmin start-domain" and copy "hello.jar" to "glassfishv3/glassfish/domains/domain1/autodeploy/bundles" directory to deploy the bundle. It shows a log statement as:

    [#|2010-04-02T18:37:07.001-0700|INFO|glassfishv3.0|javax.enterprise.system.std.com.sun.enterprise.v3.services.impl|_ThreadID=24;_ThreadName={felix.fileinstall.poll=5000, felix.fileinstall.bundles.new.start=true, service.pid=org.apache.felix.fileinstall.b3dcd962-8b41-4669-858b-7c2e7d32d5c8, felix.fileinstall.dir=/Users/arungupta/tools/glassfish/v3/final/glassfishv3/glassfish/domains/domain1/autodeploy/bundles/, felix.fileinstall.filename=org.apache.felix.fileinstall-autodeploy-bundles.cfg, service.factorypid=org.apache.felix.fileinstall, felix.fileinstall.debug=1};|OSGi Bundle from NetBeans: Started|#]

    The message printed from our generated bundle is highlighted in the bold. TOTD #118 shows other ways to manage OSGi bundles in GlassFish.

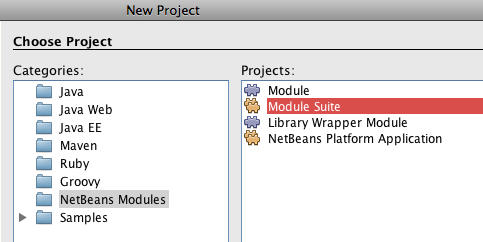
If you’d like to create multiple OSGi bundles that are related to each other then you create a "Module Suite" as shown below:

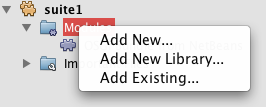
Multiple modules can be added by right-clicking on "Modules"

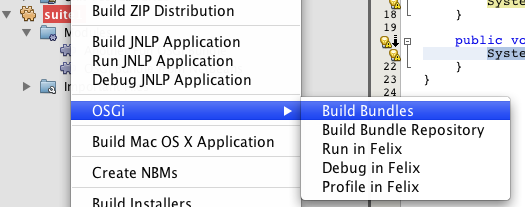
and either creating a new module or adding an existing one. Make sure to check "Generate OSGi Bundle" for the newly created bundle as well. Once the modules are added, then you can right-click on the suite, select "OSGi" and build all the modules in the suite together by selecting "Build Bundles" as shown below:

All the modules are now created in "/build/cluster/modules" directory of your suite.

Clicking on "Build Bundle Repository" creates an OSGi Bundle Repository (a federated repository of bundles).

UPDATED (Apr 8, 2010): Adding Maven-based OSGi functionality from NetBeans based upon a user comment, thanks Petr!

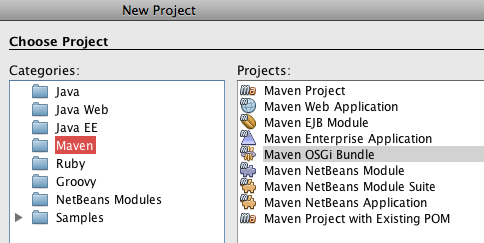
NetBeans also allows Maven-based OSGi projects to be easily created. This allows you to create pure-OSGi bundles without any NBM "fluff".

  1. Create a new Maven project and select "Maven OSGi Bundle":

    and click on "Next >".

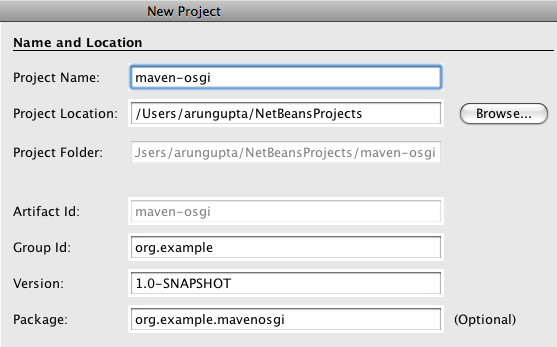
  2. Enter the project details as:

    and click on "Finish".

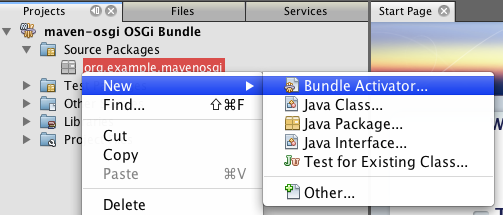
  3. Expand "Source Packages", right click on the generated package and select "New", "Bundle Activator …":

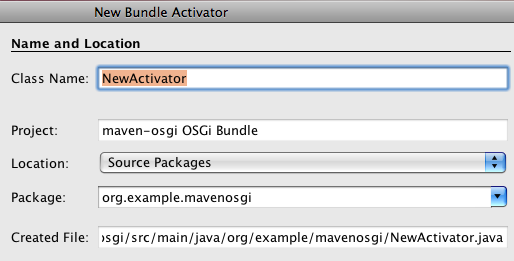
    Take the defaults as shown below:

    and click on "Finish".

  4. The generated code looks like:
    import org.osgi.framework.BundleActivator;
    import org.osgi.framework.BundleContext;
    /**
    *
    * @author arungupta
    */
    public class NewActivator implements BundleActivator {
    public void start(BundleContext context) throws Exception {
    //TODO add activation code here
    }
    public void stop(BundleContext context) throws Exception {
    //TODO add deactivation code here
    }
    }
    

    Add add the following line to "start" method:

    System.out.println("OSGi Bundle from NetBeans/Maven: Started");
    

    and the following to "stop" method:

    System.out.println("OSGi Bundle from NetBeans/Maven: Stopped");
    
  5. Right-click the project and select "Clean and Build" to build "target/maven-osgi-1.0-SNAPSHOT.jar" in your project directory. This bundle can now be dropped in "glassfish/domains/domain1/autodeploy/bundles" to see a message like:

    [#|2010-04-08T11:54:09.721-0700|INFO|glassfishv3.0|javax.enterprise.system.std.com.sun.enterprise.v3.services.impl|_ThreadID=24;_ThreadName={felix.fileinstall.poll=5000, felix.fileinstall.bundles.new.start=true, service.pid=org.apache.felix.fileinstall.b3dcd962-8b41-4669-858b-7c2e7d32d5c8, felix.fileinstall.dir=/Users/arungupta/tools/glassfish/v3/final/glassfishv3/glassfish/domains/domain1/autodeploy/bundles/, felix.fileinstall.filename=org.apache.felix.fileinstall-autodeploy-bundles.cfg, service.factorypid=org.apache.felix.fileinstall, felix.fileinstall.debug=1};|OSGi Bundle from NetBeans/Maven: Started|#]

    And the generated manifest looks like:

    Manifest-Version: 1.0
    Export-Package: org.example.mavenosgi;uses:="org.osgi.framework"
    Built-By: arungupta
    Tool: Bnd-0.0.357
    Bundle-Name: maven-osgi OSGi Bundle
    Created-By: Apache Maven Bundle Plugin
    Bundle-Version: 1.0.0.SNAPSHOT
    Build-Jdk: 1.6.0_17
    Bnd-LastModified: 1270752743664
    Bundle-ManifestVersion: 2
    Bundle-Activator: org.example.mavenosgi.NewActivator
    Import-Package: org.example.mavenosgi,org.osgi.framework;version="1.5"
    Bundle-SymbolicName: org.example.maven-osgi
    

Technorati: totd netbeans glassfish osgi nbm module

Share and Enjoy:
  • Print
  • Digg
  • Sphinn
  • del.icio.us
  • Facebook
  • Google Bookmarks
  • DZone
  • StumbleUpon
  • Technorati
  • Twitter
  • Slashdot

The views expressed on this blog are my own and do not necessarily reflect the views of Oracle.
Powered by WordPress