GlassFish 3.1 Milestone 2 enables SSH provisioning that allows you to create, start, stop, and delete a cluster spanning multiple instances on local and remote machines from the Domain Administration Server (DAS). This Tip Of The Day (TOTD) builds upon TOTD #141 and explains how you can create such a cluster on Amazon EC2 with Ubuntu 10.04. Carla also blogged about a similar scenario here.
The cluster topology created is shown below:
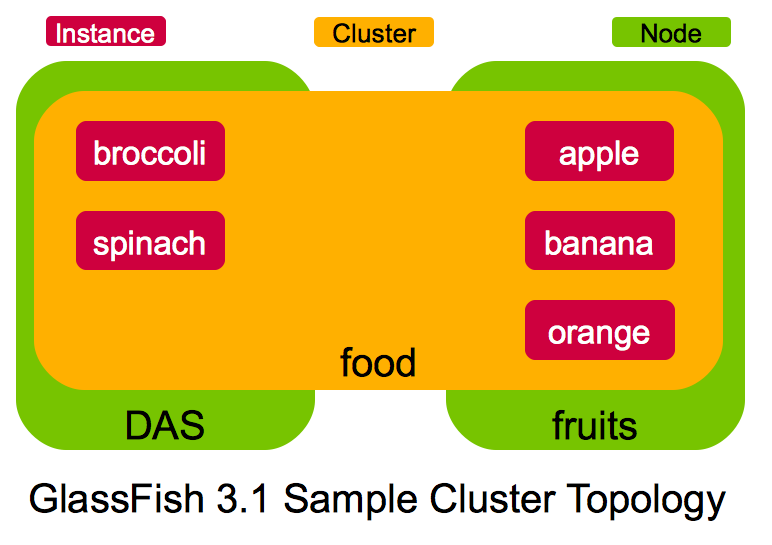
The key points shown in the topology are:
- It consists of DAS and a remote machine "fruits" (shown in green color)
- There is one cluster "food" spanning these two machines (shown in yellow color)
- DAS has "broccoli" and "spinach" instances (shown in red color)
- "fruits" has "apple", "banana", and "orange" instances (shown in red color)
Amazon EC2 assigned the public IP address of "ec2-184-72-12-163.us-west-1.compute.amazonaws.com" to DAS and "ec2-184-72-17-228.us-west-1.compute.amazonaws.com" to the remote machine. These IP addresses are used in the command invocations below.
Lets get started!
- Configure SSH between DAS and the remote machine – More details about SSH key setup here.
- Copy the keypair generated in TOTD #141 (ec2-keypair.pem) to DAS as:
~/.ec2 >scp -i /Users/arungupta/.ec2/ec2-keypair.pem /Users/arungupta/.ec2/ec2-keypair.pem \\
[email protected]
ec2-keypair.pem 100% 1751 1.7KB/s 00:00
Notice, the public IP address of DAS is specified here. This key will be used to copy the private keys generated in next step to the remote machine.
- Generate a private/public key pair on DAS as:
ubuntu@ip-10-160-47-196:~$ ssh-keygen -t dsa Generating public/private dsa key pair. Enter file in which to save the key (/home/ubuntu/.ssh/id_dsa): Enter passphrase (empty for no passphrase): Enter same passphrase again: Your identification has been saved in /home/ubuntu/.ssh/id_dsa. Your public key has been saved in /home/ubuntu/.ssh/id_dsa.pub. The key fingerprint is: 0a:b8:cd:8c:a0:7f:3d:00:9e:ec:ac:06:a1:f1:2f:cb ubuntu@ip-10-160-47-196 The key's randomart image is: +--[ DSA 1024]----+ | | | | | | |o .. | |o*.o. S | |+.=*.. . | |ooo.+o. | | ++ o o | |o.E+ . | +-----------------+ - Copy the generated public to ".ssh" directory of the remote machine as:
ubuntu@ip-10-160-142-175:~/.ssh$ scp -i ec2-keypair.pem id_dsa.pub \\ [email protected]:.ssh/authorized_keys2 - Make sure the ssh connection works between DAS and remote machine without specifying any key or passphrase as shown below:
ssh [email protected]
- Copy the keypair generated in TOTD #141 (ec2-keypair.pem) to DAS as:
- Install "sun-java6-jdk" and "unzip" package and GlassFish on DAS and remote machine as explained in TOTD #141. In short:
ssh -i /Users/arungupta/.ssh/ec2-keypair.pem [email protected] sudo add-apt-repository "deb http://archive.canonical.com/ lucid partner" sudo apt-get update sudo apt-get install sun-java6-bin sun-java6-jre sun-java6-jdk sudo update-java-alternatives -s java-6-sun sudo apt-get install unzipwget http://dlc.sun.com.edgesuite.net/glassfish/3.1/promoted/glassfish-3.1-b06.zipunzip glassfish-3.1-b06.zip - Start GlassFish on DAS and remote machine as:
export ENABLE_REPLICATION=true export PATH=~/glassfishv3/bin:$PATH asadmin start-domain --verbose & - Create the cluster and instances by issuing the following commands on the DAS
- Create the cluster as:
ubuntu@ip-10-160-142-175:~$ asadmin create-cluster food [#|2010-06-25T22:11:27.604+0000|INFO|glassfish3.1|org.hibernate.validator.util.Version| _ThreadID=23;_ThreadName=http-thread-pool-4848(2);|Hibernate Validator bean-validator-3.0-JBoss-4.0.2_03|#] [#|2010-06-25T22:11:27.638+0000|INFO|glassfish3.1|org.hibernate.validator.engine. resolver.DefaultTraversableResolver|_ThreadID=23;_ThreadName=http-thread-pool-4848(2);| Instantiated an instance of org.hibernate.validator.engine.resolver.JPATraversableResolver.|#] Command create-cluster executed successfully. - Create a node on the remote machine as:
ubuntu@ip-10-160-142-175:~3$ asadmin create-node-ssh --nodehost \\ ec2-184-72-17-228.us-west-1.compute.amazonaws.com --nodehome /home/ubuntu/glassfishv3 fruits Command create-node-ssh executed successfully. - List all the nodes as:
ubuntu@ip-10-160-142-175:~$ asadmin list-nodes localhost fruits Command list-nodes executed successfully. - Create two instances ("broccoli" and "spinach") on DAS as:
ubuntu@ip-10-160-142-175:~$ asadmin create-instance --cluster=food \\
--systemproperties AJP_INSTANCE_NAME=broccoli:AJP_INSTANCE_PORT=19090 broccoli
[#|2010-06-25T23:22:02.891+0000|INFO|glassfish3.1|javax.enterprise.system.tools.admin
.com.sun.enterprise.v3.admin.cluster|_ThreadID=103;_ThreadName=http-thread-pool-4848(2);|
Creating instance broccoli on localhost|#]
[#|2010-06-25T23:22:03.750+0000|INFO|glassfish3.1|null|_ThreadID=30;_ThreadName=stdout;|
Using DAS host localhost and port 4848 from existing das.properties for nodeagent
ip-10-160-142-175. To use a different DAS, create a new nodeagent by specifying a
new --nodeagent name with the correct values for --host and --port.|#]
[#|2010-06-25T23:22:03.785+0000|INFO|glassfish3.1|null|_ThreadID=30;_ThreadName=stdout;|
Command _create-instance-filesystem executed successfully.|#]
Command create-instance executed successfully.
ubuntu@ip-10-160-142-175:~$ asadmin create-instance --cluster=food \\
--systemproperties AJP_INSTANCE_NAME=spinach:AJP_INSTANCE_PORT=19091 spinach
[#|2010-06-25T23:22:24.813+0000|INFO|glassfish3.1|javax.enterprise.system.tools.admin.
com.sun.enterprise.v3.admin.cluster|_ThreadID=106;_ThreadName=http-thread-pool-4848(5);|
Creating instance spinach on localhost|#]
[#|2010-06-25T23:22:25.636+0000|INFO|glassfish3.1|null|_ThreadID=32;_ThreadName=stdout;|
Using DAS host localhost and port 4848 from existing das.properties for nodeagent
ip-10-160-142-175. To use a different DAS, create a new nodeagent by specifying a
new --nodeagent name with the correct values for --host and --port.|#]
[#|2010-06-25T23:22:25.672+0000|INFO|glassfish3.1|null|_ThreadID=32;_ThreadName=stdout;|
Command _create-instance-filesystem executed successfully.|#]
Command create-instance executed successfully.
The AJP_INSTANCE_NAME and AJP_INSTANCE_PORT properties will be used by mod_jk in a subsequent blog.
- Create three instances ("apple", "banana", and "orange") on the remote machine as:
ubuntu@ip-10-160-142-175:~$ asadmin create-instance --cluster=food --node=fruits \\
--systemproperties AJP_INSTANCE_NAME=apple:AJP_INSTANCE_PORT=19090 apple
[#|2010-06-25T23:23:33.208+0000|INFO|glassfish3.1|javax.enterprise.system.tools.admin.
com.sun.enterprise.v3.admin.cluster|_ThreadID=104;_ThreadName=http-thread-pool-4848(3);|
Creating instance apple on fruits|#]
[#|2010-06-25T23:23:35.682+0000|INFO|glassfish3.1|javax.enterprise.system.tools.admin.
com.sun.enterprise.v3.admin.cluster|_ThreadID=104;_ThreadName=http-thread-pool-4848(3);|
Command _create-instance-filesystem executed successfully.
|#]
Command create-instance executed successfully.
ubuntu@ip-10-160-142-175:~$ asadmin create-instance --cluster=food --node=fruits \\
--systemproperties AJP_INSTANCE_NAME=banana:AJP_INSTANCE_PORT=19091 banana
[#|2010-06-25T23:23:59.697+0000|INFO|glassfish3.1|javax.enterprise.system.tools.admin.
com.sun.enterprise.v3.admin.cluster|_ThreadID=102;_ThreadName=http-thread-pool-4848(1);|
Creating instance banana on fruits|#]
[#|2010-06-25T23:24:01.500+0000|INFO|glassfish3.1|javax.enterprise.system.tools.admin.
com.sun.enterprise.v3.admin.cluster|_ThreadID=102;_ThreadName=http-thread-pool-4848(1);|
Using DAS host ip-10-160-142-175.us-west-1.compute.internal and port 4848 from
existing das.properties for nodeagent ip-10-160-142-20. To use a different DAS,
create a new nodeagent by specifying a new --nodeagent name with the correct
values for --host and --port.
Command _create-instance-filesystem executed successfully.
|#]
Command create-instance executed successfully.
ubuntu@ip-10-160-142-175:~$ asadmin create-instance --cluster=food --node=fruits \\
--systemproperties AJP_INSTANCE_NAME=orange:AJP_INSTANCE_PORT=19092 orange
[#|2010-06-25T23:24:13.286+0000|INFO|glassfish3.1|javax.enterprise.system.tools.admin.
com.sun.enterprise.v3.admin.cluster|_ThreadID=105;_ThreadName=http-thread-pool-4848(4);|
Creating instance orange on fruits|#]
[#|2010-06-25T23:24:15.089+0000|INFO|glassfish3.1|javax.enterprise.system.tools.admin.
com.sun.enterprise.v3.admin.cluster|_ThreadID=105;_ThreadName=http-thread-pool-4848(4);|
Using DAS host ip-10-160-142-175.us-west-1.compute.internal and port 4848 from
existing das.properties for nodeagent ip-10-160-142-20. To use a different DAS,
create a new nodeagent by specifying a new --nodeagent name with the correct
values for --host and --port.
Command _create-instance-filesystem executed successfully.
|#]
Command create-instance executed successfully.
- Create the cluster as:
- Start the cluster
- List all instances as:
ubuntu@ip-10-160-142-175:~3$ asadmin list-instances broccoli not running spinach not running apple not running banana not running orange not running Command list-instances executed successfully. - Start the cluster as:
ubuntu@ip-10-160-142-175:~$ asadmin start-cluster food . . . Command start-cluster executed successfully. - List all the instances again as:
ubuntu@ip-10-160-142-175:~$ asadmin list-instances
. . .
broccoli running
spinach running
apple running
banana running
orange running
The HTTP ports of each instance can be grepped from DAS’s "domain.xml". Here are the ports for each created instance:
broccoli 28080 spinach 28081 apple 28080 banana 28081 orange 28082 On Amazon, you may have to poke holes in the firewall as:
ec2-authorize default -p 28080
ec2-authorize default -p 28081
ec2-authorize default -p 28082
And now "http://ec2-184-72-12-163.us-west-1.compute.amazonaws.com:28080/" ("broccoli" instance on DAS) will show the default index page. Similarly other host and port combinations will show this page as well.
- List all instances as:
This blog showed how to create a GlassFish 3.1 cluster spanning multiple instances on Amazon EC2 with Ubuntu 10.04.
Subsequent blogs will show:
- How to deploy an app to this cluster and some variations ?
- How to front-end this cluster with mod_jk for load-balancing ?
Technorati: totd glassfish clustering ssh instance amazon ec2 ubuntu
- TOTD #67: How to front-end a GlassFish Cluster with Apache + mod_jk on Mac OSX Leopard ?
- GlassFish asadmin CLI-driven Cluster Setup
- TOTD #152: GlassFish Installer – Typical and Custom installation
- TOTD #11: Setup Mongrel cluster for JRuby-on-Rails applications on Unix
- TOTD #141: Running GlassFish 3.1 on Ubuntu 10.04 AMI on Amazon EC2
Hi Arun,
Thanks for the write up. Can we achieve session replication between these two EC2 instances here? How to resolve the "multicast" issue in EC2?
Comment by rubycube — October 20, 2010 @ 5:14 am
rubycube,
Session replication blog/screencast coming in next few days.
Comment by Arun Gupta — October 21, 2010 @ 9:08 am
That’s great. Have you already done this? We are trying to setup a VPN between two ec2 instances to resolve the multicast issue. What is your opinion? We are in the process of finalizing the application server. Eagerly waiting for your reply.
Comment by rubycube — October 21, 2010 @ 10:53 pm
Hi Rubycube
We have not tried using VPN on two EC2 instances to resolve multicast issue as we are focusing on getting the HA functionality ready for physical environments with multicast enabled.
We would certainly welcome your inputs and experience on this. Please do share your notes on any setup steps for the same and any gotchas folks need to watch out for.
–Shreedhar
GlassFish HA Team
Comment by Shreedhar — October 28, 2010 @ 2:19 pm