Miles to go …

February 1, 2010

Screencast #29: Web service using NetBeans 6.8 and GlassFish v3 (Accessing database in business method)

Filed under: webservices — arungupta @ 11:14 pm

GlassFish v3 comes bundled with Metro – a secure, reliable, transactional, and .NET interoperable Web services stack. Metro is compliant with JAX-WS and provides additional quality of service attributes that can be easily enabled using NetBeans IDE.

This blog contains a screencast that shows how to create a simple Web service using NetBeans 6.8, implement the business logic by accessing a database table using Java Persistence API, and deploy on GlassFish v3.

Please post your questions to .

Several other screencasts on GlassFish v3and related topics are available here.

Technorati: netbeans jax-ws metro webservice glassfish jpa database

Share and Enjoy:
  • Print
  • Digg
  • Sphinn
  • del.icio.us
  • Facebook
  • Google Bookmarks
  • DZone
  • StumbleUpon
  • Technorati
  • Twitter
  • Slashdot

January 12, 2010

TOTD #117: Invoke a JAX-WS Web service from a Rails app deployed in GlassFish

Filed under: webservices — arungupta @ 11:24 pm

A user on GlassFish Forum tried invoking a JAX-WS Web service from a Rails application and faced some issues. This Tip Of The Day (TTOD) will discuss the different approaches and shows their current status.

A Rails app can be deployed on GlassFish in 3 different ways:

  1. Directory Deployment in GlassFish v3 Server – TOTD #72 explains how to deploy a trivial Rails application (with just a scaffold) on GlassFish v3 server. Even though the blog uses a Rails application, any Rack-based application can be deployed on the server. This server is also the Reference Implementation for Java EE 6 and can also run Grails and Django applications.
  2. Directory Deployment using light-weight GlassFish Gem – GlassFish Gem is a light-weight version of the full-blown server and is stripped to run, just like the server, any Rack-based application such as Merb, Rails, and Sinatra. TOTD #70 shows how to deploy the same application using GlassFish Gem.
  3. WAR file in GlassFish v2.x or v3 – TOTD #73 explains how to deploy a Rails application as WAR file on GlassFish v2. The JNDI connection pooling part of the blog may be skipped to simplify the steps but the concepts are still valid. TOTD #44 shows how to do JNDI connection pooling for GlassFish v3. As GlassFish v2 has in-built support for session replication, TOTD #92 demonstrate how Rails application can leverage that functionality.

Now lets get to the issue reported by the user using these 3 deployment models.

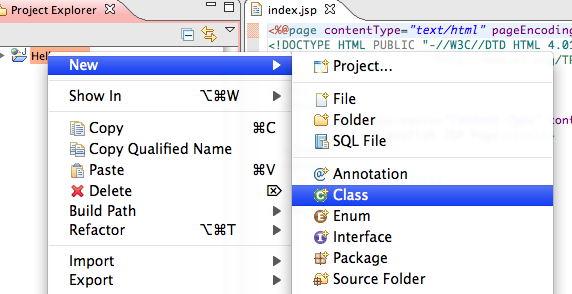
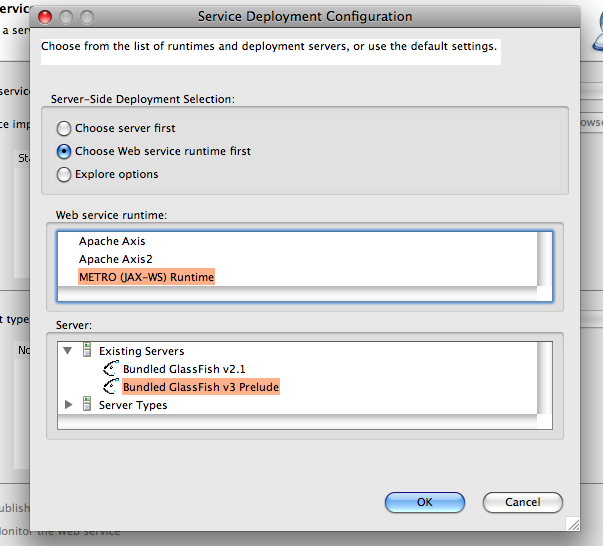
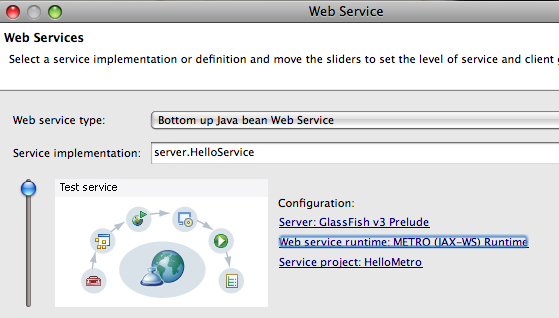
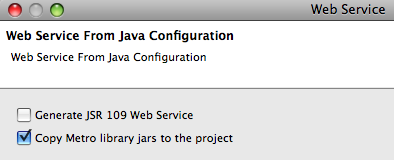
First, lets deploy a simple Web service endpoint and generate a JAR file of the client-side artifacts:

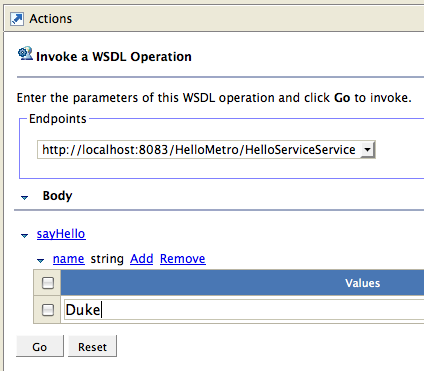
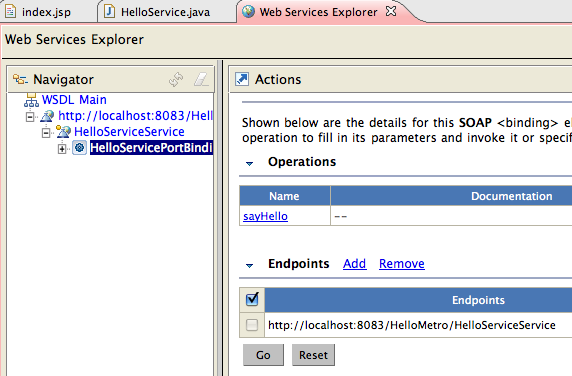
  1. This blog will use a simple Web service as defined in screencast #ws7. The Web service endpoint looks like:
    package server;
    import javax.jws.WebService;
    /**
    * @author arungupta
    */
    @WebService()
    public class HelloService {
    public String sayHello(String name) {
    return "Hello " + name;
    }
    }
    

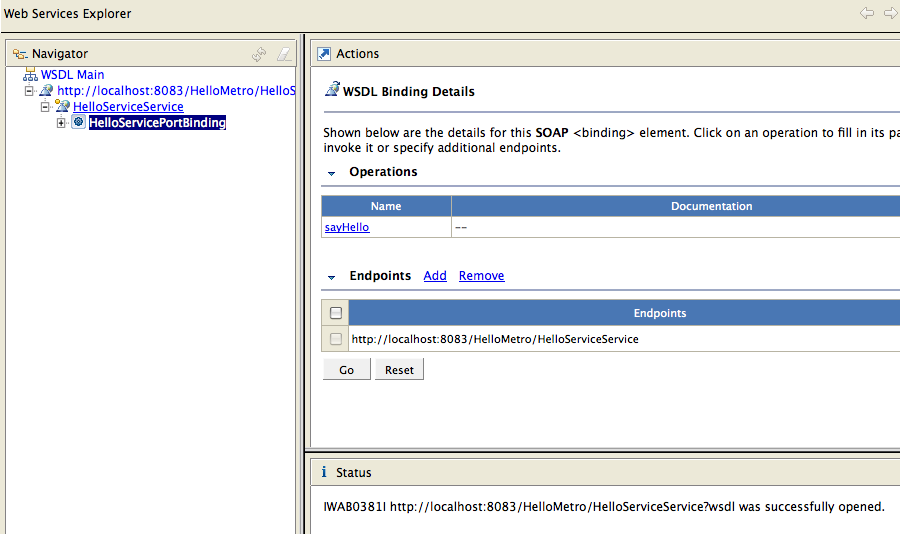
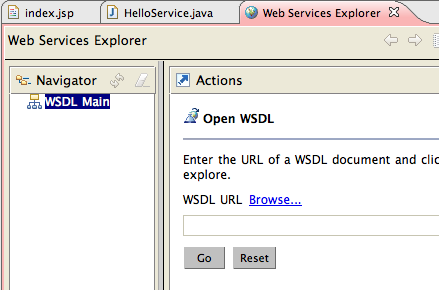
  2. Generate Web service client-side artifacts as:
    ~/samples/v3/rails/webservice/tmp >wsimport -keep http://localhost:8080/HelloWebService/HelloServiceService?wsdl
    parsing WSDL...
    generating code...
    compiling code...
    
  3. Create a Web service client jar file as:
    jar cvf wsclient.jar ./server
    

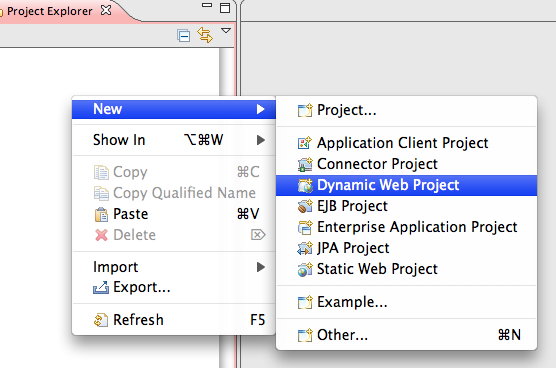
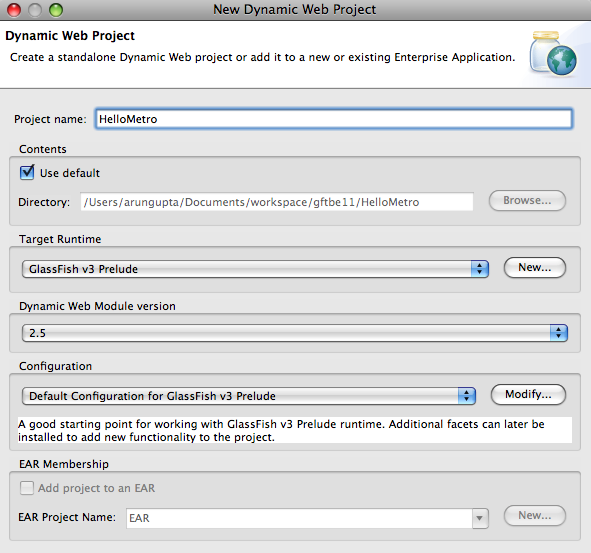
Now lets write a Rails application and invoke this Web service:

  1. Create a simple Rails application as:
    jruby -S rails webservice
    

    Optionally you may specify "-d mysql" to use MySQL database. Or better un-comment the following line:

    # config.frameworks -= [ :active_record, :active_resource, :action_mailer ]
    

    in "config/environment.rb" as no database interaction is required.

  2. Create a controller and view as:
    jruby script/generate controller home index
    
  3. Update the Controller in "app/controllers/home_controller.rb" as:
    include Java
    class HomeController < ApplicationController
    def index
    service = Java::server.HelloServiceService.new
    port = service.getHelloServicePort
    @result = port.sayHello("Duke")
    end
    end
    
  4. Change the View in "app/views/home/index.html.erb" as:
    <h1>Home#index</h1%gt;
    <p>Find me in app/views/home/index.html.erb</p>
    <%= @result %>
    

Now lets deploy this Web service using the 3 different deployment models mentioned above.

GlassFish v3 allows a directory-based deployment of Rails applications. This application needs to locate the Web service client classes. The "wsclient.jar" can be copied to the "lib" directory of Rails application ("webservice/lib" in our case), "domains/domain1/lib/ext" or "JRUBY_HOME/lib". The library can also be passed during deployment using "–libraries" switch. None of this approach seem to work correctly as explained in issue# 11408. So for now, invoking a JAX-WS Web service from a Rails application deployed directly on GlassFish v3 is not possible, at least until the bug is fixed.

In order to deploy the same application using GlassFish Gem, you can copy "wsclient.jar" to the "lib" directory of your Rails application. And also add the following line to "app/controllers/home_controller.rb":

require 'lib/wsclient.jar'

Alternatively you can copy it to "JRUBY_HOME/lib" directory if this Web service client is accessed my multiple applications. In this case there is no need to add any "require" statement to your Controller. Anyway, running the application as:
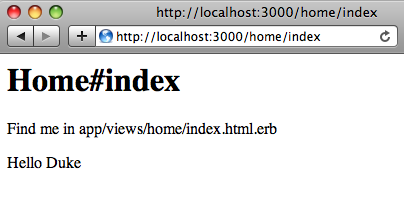
jruby -S glassfish

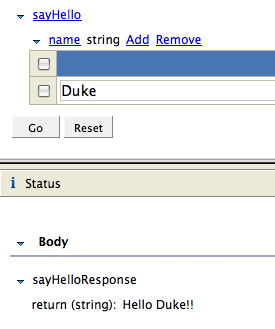
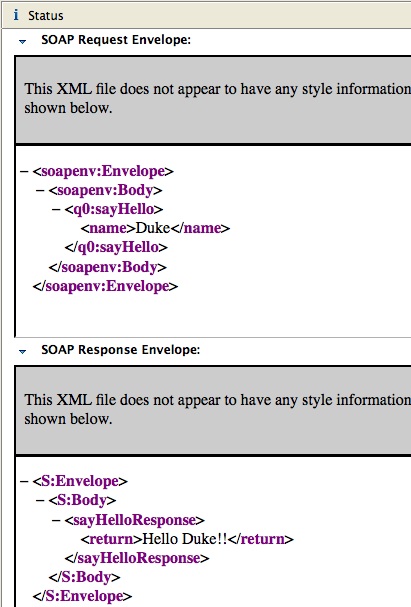
and accessing "http://localhost:3000/home/index" shows the following output:

And finally as explained in TOTD #73, bundle up your original Rails application as WAR and then deploy on GlassFish v3 as:

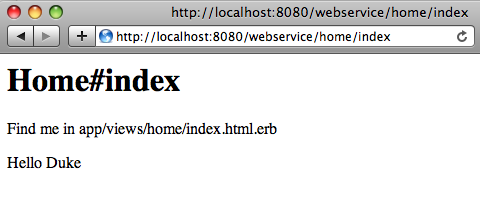
asadmin deploy webservice.war

Make sure to copy "wsclient.jar" to the "lib" directory of your Rails application and then Warbler will copy it to "WEB-INF/lib" of the generated WAR file. The output is shown as below:

So if you want to invoke a Metro/JAX-WS Web service from a Rails application, then run your Rails application using GlassFish Gem or deploying as a WAR file. It’ll work on GlassFish v3 server when issue# 11408 is fixed.

Here are some additional links:

  • TOTD #104 also shows how popular Rails applications such as Redmine, Typo, and Substruct can be easily deployed on GlassFish.
  • Rails applications can be easily clustered using Apache + mod_proxy or  nginx.

A complete archive of all the TOTDs is available here.

Technorati: totd glassfish v3 jruby rails webservice jax-ws metro

Share and Enjoy:
  • Print
  • Digg
  • Sphinn
  • del.icio.us
  • Facebook
  • Google Bookmarks
  • DZone
  • StumbleUpon
  • Technorati
  • Twitter
  • Slashdot

August 25, 2009

TOTD #98: Create a Metro JAX-WS Web service using GlassFish Tools Bundle for Eclipse

Filed under: webservices — arungupta @ 4:00 am

Now that you’ve installed GlassFish Tools Bundle for Eclipse 1.1, lets use this bundle to create a simple Metro/JAX-WS compliant Web service and deploy on GlassFish. These steps will work with either Eclipse 3.4.2 or 3.5 with WTP Java EE support.

  1. Lets create a simple “Dynamic Web Project” as shown below:

  2. Name the project “HelloMetro” and take all other defaults:

    Click on “Finish” to complete the project creation.

  3. Metro allows to create a Web service from a POJO class. So let’s add a POJO to the project by right-clicking on the project and selecting “New”, “Class” as shown below:


    Specify the package name as “server”, class name as “HelloService” and click on “Finish”.

  4. Add a simple method to the newly generated class as:

    
    public String sayHello(String name) {
    return "Hello " + name + "!!";
    }

  5. Expand the project, go to “HelloService.java” in “server” package, right-click, select “Web Services”, “Create Web service”.
  6. Click on “Web service runtime: Apache Axis” and select “Metro (JAX-WS) Runtime” as the Web service runtime as shown below:

  7. Move the slider on the left to top. This will enable testing of the deployed Web service. The completed configuration looks like:

    and click on “Next >”.

  8. Select the checkbox “Copy Metro library jars to the project” to resolve the references correctly as shown below:

    and click on “Next >”. This bundles the application and deploys to GlassFish and provides an option to test the deployed Web service as shown below:

    Clicking on the “Launch” button shows the following output in the browser:

    The WSDL is hosted at “http://localhost:8083/HelloMetro/HelloServiceService?wsdl”.

  9. Click on “sayHello” method, click on “Add” and enter the value as “Duke” as shown below:

    Click on “Go” and the response is shown as:

    Clicking on “Source” in the response window shows the SOAP request/response messages as shown below:

  10. Alternatively, you can click on “Finish” to complete the dialog. Then click on “Run” menu item, “Launch the Web Services Explorer” to see a screen as:

    Enter the URL of the WSDL in “WSDL URL” box as “http://localhost:8083/HelloMetro/HelloServiceService?wsdl” and click on “Go”. Now you are seeing the similar screen to test the Web service within the integrated browser as shown below:

A future blog will cover how to write a database-enabled application using the bundled Dali JPA Tools and MySQL pre-registered JDBC driver.

Please send your questions and comments to .
Please leave suggestions on other TOTD that you’d like to see. A complete archive of all the tips is available here.

Technorati: totd glassfish eclipse galileo webservices metro jax-ws

Share and Enjoy:
  • Print
  • Digg
  • Sphinn
  • del.icio.us
  • Facebook
  • Google Bookmarks
  • DZone
  • StumbleUpon
  • Technorati
  • Twitter
  • Slashdot

December 4, 2008

JavaFX 1.0 launched – access services hosted on embedded GlassFish

Filed under: webservices — arungupta @ 6:30 am

Today Sun announces the availability of Java FX 1.0.

JavaFX 1.0 is a rich client platform for creating and delivering Rich Internet Applications across all screens (desktop, browser, and mobile) of your life. It consists of the following key components:


    • JavaFX SDK includes JavaFX script compiler and runtime tools, and a host of libraries to create RIAs for desktop, browser and mobile platforms, command-line tools & Ant tasks and other goodies.
    • NetBeans 6.5 support (as plugin or bundled with IDE) that allows to build, preview and debug JavaFX applications using NetBeans IDE. If you prefer CLI support then SDK can be downloaded.
    • Production Suite is a suite of tools and plugins for creative tools (such as Illustrator CS3+) that allows graphical assets to be exported to JavaFX applications.

      The beauty of JavaFX is that its fully integrated with the Java Runtime and takes advantage of the performance and ubiquity of Sun’s Java Runtime Environment that is installed on literally billions of devices worldwide. Hence, JavaFX applications will run on any desktop, browser, mobile device or any other connected device that runs the Java Runtime Environment.

      This blog shows how to create a simple JavaFX application using NetBeans IDE. The application plays a movie, allows the viewer to cast a vote if they liked it, and see aggregate response from other viewers. The application is developed using NetBeans 6.5, JavaFX 1.0 plugin, and coded using JavaFX Script. The voting engine is deployed as a RESTful Web service using Jersey on GlassFish.

      In terms of user experience, running the NetBeans project shows a window playing the movie. The first mouse hover over the window allows the viewer to click on “I love it” or “Not so great” and cast their vote as shown below:

      Any subsequent mouse hover shows aggregated results from other viewers as shown below:

      The results are not interesting if there is a single viewer of the movie. But for a production environment, this movie will be played by multiple users concurrently and the percentage numbers will be more meaningful. You can close the window and run the project again to vote again, as many times as you like :)

      For those who like to see quick results, here is a 4-step guide to get started:

      1. In NetBeans 6.5 IDE, install JavaFX plugin as explained here and RESTful Web services plugin as explained here. Both the plugins may be installed in one step by selecting the required plugins together.
      2. Download NetBeans project for JavaFX client from here and add Jersey dependencies as explained in bullet #5 below. 
      3. Download Web service endpoint Maven project from here and deploy the endpoint as explained in bullet #4 below.
      4. Run the JavaFX application as explained here.

      The remainder of this blog explains the details and shows how to construct the demo from scratch.

      Lets first create the JavaFX application that plays the video movie.

      1. In NetBeans 6.5, install “JavaFX SDK” plugin.  In the “Tools” menu, “Plugins”, search on “JavaFX”, select “JavaFX SDK” and click on “Install”.
      2. Create a new project of type “JavaFX”, “JavaFX Script Application”. Take the default values as shown below:

        and click on “Finish”.

      3. The source code for this class can be downloaded from here or alternatively constructed as explained in the sub-bullets.
        1. In the newly created class, change the Stage (root area for all scene content) to:

          Stage {
             title: “GlassFish Media Player”
             width: 625
             height: 360
             resizable: false
             scene: myScene
          }
        2. Create a scene that contains the view of the media to be played and controls the display of the Vote or Result nodes:
          var myScene: Scene = Scene {
             content: MediaView {
                     fitWidth: 625
                     fitHeight: 360
                     mediaPlayer: bind myPlayer

                     onMouseEntered: function( e: MouseEvent ):Void {
                         println(“mouse entered”);
                         if (voted == false) {
                             insert Vote{} into myScene.content;
                         } else {
                             insert Result{} into myScene.content;
                         }
                     }

                     on
          MouseExited: function( e: MouseEvent ):Void {
                         delete myScene.content[1]
                     }

                 }
          }

        3. Create a Media Player to use with the scene:
          var myPlayer: MediaPlayer = MediaPlayer{
              autoPlay: true
              media: bind myMedia
          };
        4. Create the media object to be used with the Media Player:
          var myMedia: Media = Media {
              source: “http://sun.edgeboss.net/download/sun/media/1460825906/1460825906_2957290001_DayEarth-Bluray.flv”
             };

          You can change the location of the movie here in the media player. For example, changing it to “http://mediacast.sun.com/users/ArunGupta/media/v3prelude-nb65-webapp.flv” will start playing the screencast #27.

        5. Create a Vote class that is a CustomNode and appears when a user’s mouse enters the scene where the video is playing. The user can select whether he likes the clip or not and the vote is recorded making a Web service call using Jersey Client APIs:
          class Vote extends CustomNode {
             override function create():Node {
                 return Group {
                     content: [
                         Rectangle {
                             fill: Color.GREEN
                             x: 185
                             y: 145
                             width: 243
                             height: 38
                             arcWidth: 20
                             arcHeight: 20
                         },

                         Text {
                             x: 195
                             y: 170
                             fill: Color.WHITE
                             font: Font {
                                 size: 18
                             }
                             content: "I love it"
                         },

                         Rectangle{
                             x: 191
                             y: 148
                             smooth: false
                             width: 73
                             height: 32
                             fill: Color.TRANSPARENT

                             onMouseClicked: function( e: MouseEvent ):Void {
                                 println("clicked I love it");
                                 voted = true;
                                 wsClient.voteLoveIt();
                                 delete myScene.content[1]
                             }
                         },

                         Text{
                             x: 305
                             y: 170
                             fill: Color.WHITE
                             font: Font {
                                 size: 18
                             }
                             content: “Not so great”
                             },

                         Rectangle {
                             x: 301
                             y: 148
                             smooth: false
                   &nbs
          p;         width: 118
                             height: 32
                             fill: Color.TRANSPARENT
                            
                             onMouseClicked: function( e: MouseEvent ):Void {
                                 voted = true;
                                 println(“clicked Not so great”);
                                 wsClient.voteNotSoGreat();
                                 delete myScene.content[1]
                             }
                         }
                     ]
                 }
             }
          };

        6. Create a Result class that is a CustomNode and simply reports on how many voters like this clip:
          class Result extends CustomNode {
             override function create():Node {
                 var resultPercent = wsClient.showResults();
                 var resultString = “{resultPercent} voters liked this clip”;

                 return Group {
                     content: [
                         Rectangle {
                             fill: Color.BLUE
                             x: 187
                             y: 145
                             width: 244
                             height: 38
                             arcWidth: 20
                             arcHeight: 20

                             onMouseClicked: function( e: MouseEvent ):Void {
                                 delete myScene.content[1]
                             }
                         },

                         Text {
                             x: 199
                             y: 170
                             fill: Color.WHITE
                             font: Font {
                                 size: 18
                             }
                             content: resultString
                         }
                     ]
                 }
             }
          };

        7. Add two instance variables:
          var voted = false;
          var wsClient = new WebserviceClient;

          The first variable captures if the viewer has already voted and the second variable is an instance to the RESTful Web service client.

        8. Add the following import statements:
          import javafx.scene.*;
          import javafx.scene.input.MouseEvent;
          import javafx.scene.media.Media;
          import javafx.scene.media.MediaPlayer;
          import javafx.scene.media.MediaView;
          import javafx.scene.paint.Color;
          import javafx.scene.shape.Rectangle;
          import javafx.scene.text.Font;
          import javafx.scene.text.Text;
          import javafx.stage.Stage;

          “Fix Imports” should be able to fix them and bug #154307 is already filed for that.

      4. Create a new class that is used to capture the Vote as:
        @javax.xml.bind.annotation.XmlRootElement
        public class VoteBean {
            public static enum VOTE { LOVE_IT, NOT_SO_GREAT };
           
            public VOTE vote;

            public VoteBean() { vote = VOTE.LOVE_IT; }
            public VoteBean(VOTE vote) {
                this.vote = vote;
            }
        }

        This is a simple Javabean with a standard JAXB annotation. This ensures that XML is used as the data format for transfering results between client and endpoint. The source code for this class is available here.

      5. Add Jersey libraries to the project by right-clicking on Project, select Libraries, click on “Add Library…”, select “JAX-RS 1.0″ and “Jersey 1.0 (JAX-RS RI)”, and click on “Add Library”.

        If these libraries are not available then install the “RESTful Web Services” plugin from the Plugin Center.

      6. And finally add the class that invokes the RESTful Webservice endpoint:
        public class WebserviceClient {

            private static com.sun.jersey.api.client.WebResource createWebResource() {
                return com.sun.jersey.api.client.Client.create().
                        resource(“http://localhost:8080/movie-feedback-webapp/webresources/myresource”);
            }

            public static void voteLoveIt() {
                createWebResource().type(“application/json”).
                        post(new VoteBean(VoteBean.VOTE.LOVE_IT));
            }

            public static void voteNotSoGreat() {
                createWebResource().type(“application/json”).
                        post(new VoteBean(VoteBean.VOTE.NOT_SO_GREAT));
            }

            public static String showResults() {
                return createWebResource().get(String.class);
            }
        }

        The Webservice endpoint will be hosted at “http://localhost:8080/movie-feedback-webapp/webresources/myresource”. A WebResource is created from the Client. The POST methods are used to cast the user vote and GET method is used to retrieve the aggregated results. The source code for this class is available here.

      Now lets create the RESTful endpoint using Jersey and deploy on GlassFish.

      1. Create and deploy a RESTful Web service endpoint
        1. Create a template RESTful Web service endpoint as described in TOTD #56. Lets use the artifactId as “movie-feedback-webapp”.
        2. Create the bean “VoteBean” in “org.glassfish.samples” package. This is the exactly same bean used earlier by the client:
          @javax.xml.bind.annotation.XmlRootElement
          public class VoteBean {
              public static enum VOTE { LOVE_IT, NOT_SO_GREAT };
              public VOTE vote;

              public VoteBean() { vote = VOTE.LOVE_IT; }
              public VoteBean(VOTE vote) {
                  this.vote = vote;
              }
          }

        3. Update the generated resource
          1. Add @com.sun.jersey.spi.resource.Singleton as class annotation so that only one instance of the resource is created for the entire web application. This allows to save state (preferences from other users) in the RESTful resource.
          2. Add two instance variables:
                int loveIt;
                int noSoGreat;
          3. Add a method that will process HTTP POST requests as:
                @POST
                public void postOneVote(VoteBean bean) {
                    if (bean.vote == VoteBean.VOTE.LOVE_IT) {
                        loveIt++;
                    } else {
                        noSoGreat++;
                    }
                    System.out.println(“In POST: ” + bean.vote);
                }

            This method stores the vote in the resource. The handling of POST request messages by Jersey is explained in TOTD #58.

          4. Add a method that will process HTTP GET requests as:
                @GET
                @Produces(“text/plain”)
                public String getOpinion() {
                    if (loveIt == 0 && noSoGreat == 0)
                        return “No votes cast yet!”;
                    return (loveIt * 100) / (loveIt + noSoGreat) + “%”;
                }

            This method calculates the percentage of viewers who liked the movie.

        4. Deploy the endpoint using “mvn glassfish:run” in “movie-feedback-webapp” directory.

      Now run the JavaFX application by right-clicking on the project and selecting “Run Project” and start voting! The percentage results will vary if the movie is voted upon more than once.

      This blog showed:

      • How to install JavaFX capabilities to an existing NetBeans 6.5 installation
      • How to create a simple JavaFX application that plays media files
      • Integrate it with existing Java libraries (Jersey client libraries in this case)
      • Invoke services hosted on GlassFish

      The steps followed in this blog allows for rapid development/debugging of JavaFX application accessing resources using embeddable GlassFish but are not ideal for production deployments. A future blog will show how this JavaFX application can be deployed as a Java Web Start application and scaled for mulitple users.

      The javafx.com/samples has loads of samples and javafx.com/tutorials shows how to build your own applications. The JavaFX Community Wiki is a great place to collaborate.

      Send your Jersey questions to , GlassFish questions to GlassFish Forum, and JavaFX questions to JavaFX Forums.

      <
      small>Technorati: glassfish v3 jersey webservices javafx netbeans

      Share and Enjoy:
      • Print
      • Digg
      • Sphinn
      • del.icio.us
      • Facebook
      • Google Bookmarks
      • DZone
      • StumbleUpon
      • Technorati
      • Twitter
      • Slashdot

      December 1, 2008

      TOTD #58: Jersey and GlassFish – how to process POST requests ?

      Filed under: webservices — arungupta @ 5:00 am

      Lets extend the Jersey endpoint (TOTD# 56) and client (TOTD# 57) such that it can accept a POST request and then invoke it.

      1. Add a new method to “MyResource.java” from TOTD# 56 as:

            @POST
            @Consumes(“application/json”)
            @Produces(“application/json”)
            public Greeting postIt(Greeting greeting) {
                System.out.println(“In POST: ” + greeting.greeting);
                return greeting;
            }

        The first line indicates that the Java method will process HTTP POST requests. The second and third line shows that the method consumes and produces JSON data format.

      2. Add a new method to “AppTest.java” from TOTD# 57 as:
            public void testPost() {
                Greeting result = createResource().
                        type(“application/json”).
                        post(Greeting.class, new Greeting(“yo!”));
                assertTrue(result.greeting.equals(“yo!”));
            }

        The main difference from the “testApp()” method is specifying the MIME type of the generated outbound request as “application/json”.

      3. Running the test as “mvn test” shows the following output:
        Running org.glassfish.samples.AppTest
        1 * Out-bound request
        1 > GET http://localhost:8080/helloworld-webapp/webresources/myresource
        1 >
        1 < 200
        1 < X-Powered-By: Servlet/2.5
        1 < Transfer-Encoding: chunked
        1 < Content-Type: text/plain
        1 < Server: GlassFish/v3
        1 < Date: Tue, 25 Nov 2008 20:19:34 GMT
        1 <
        <?xml version=”1.0″ encoding=”UTF-8″ standalone=”yes”?><greeting><greeting>Hi there!</greeting></greeting>
        1 * In-bound response
        1 * Out-bound request
        1 > POST http://localhost:8080/helloworld-webapp/webresources/myresource
        1 > Content-Type: application/json
        1 >
        {“greeting”:”yo!”}
        1 < 200
        1 < X-Powered-By: Servlet/2.5
        1 < Transfer-Encoding: chunked
        1 < Content-Type: application/json
        1 < Server: GlassFish/v3
        1 < Date: Tue, 25 Nov 2008 20:19:34 GMT
        1 <
        {“greeting”:”yo!”}
        1 * In-bound response
        Tests run: 2, Failures: 0, Errors: 0, Skipped: 0, Time elapsed: 1.191 sec

        The output shows request/response messages when both the tests are run together. Here are some highlights:

        1. “GET” and “POST” methods are clearly highlighted.
        2. The two “Content-Type” headers with value “text/plain” and ”application/json” are output from two tests. The output from POST method has two Content-Type headers, one for outbound request and another one for inbound response.
        3. The body content of POST method is using JSON format.

      Jersey and GlassFish provides a complete server-side and client-side API and framework for deploying and invoking RESTful Web service endpoints.

      How are you using Jersey ?

      Send all your questions to .

      Please leave suggestions on other TOTD (Tip Of The Day) that you’d like to see. An archive of all the tips is available here.

      Technorati: totd glassfish v3 embeddable jersey jsr311 rest json webservices

      Share and Enjoy:
      • Print
      • Digg
      • Sphinn
      • del.icio.us
      • Facebook
      • Google Bookmarks
      • DZone
      • StumbleUpon
      • Technorati
      • Twitter
      • Slashdot

      November 25, 2008

      TOTD #56: Simple RESTful Web service using Jersey and Embeddable GlassFish – Text and JSON output

      Filed under: webservices — arungupta @ 5:00 am


      Jersey is the open source, production quality, JAX-RS (JSR 311) Reference Implementation for building RESTful Web services in the GlassFish community. It also provides an API that allows developers to extend Jersey to suite their requirements.

      This Tip Of The Day (TOTD) shows how to create a simple RESTful Web service using Jersey and run it using embeddable GlassFish (glassfish:run). Maven is used to create and run the application. It also shows how the output format can be easily coverted from Text to JSON.

      Lets get started!

      1. Create a simple web app using Maven as:

        ~/samples/jersey >mvn archetype:generate -DarchetypeCatalog=http://download.java.net/maven/2
        [INFO] Scanning for projects…
        [INFO] Searching repository for plugin with prefix: ‘archetype’.
        [INFO] ————————————————————————
        [INFO] Building Maven Default Project
        [INFO]    task-segment: [archetype:generate] (aggregator-style)
        [INFO] ————————————————————————
        [INFO] Preparing archetype:generate
        [INFO] No goals needed for project – skipping
        [INFO] Setting property: classpath.resource.loader.class => ‘org.codehaus.plexus.velocity.ContextClassLoaderResourceLoader’.
        [INFO] Setting property: velocimacro.messages.on => ‘false’.
        [INFO] Setting property: resource.loader => ‘classpath’.
        [INFO] Setting property: resource.manager.logwhenfound => ‘false’.
        [INFO] [archetype:generate]
        [INFO] Generating project in Interactive mode
        [INFO] No archetype defined. Using maven-archetype-quickstart (org.apache.maven.archetypes:maven-archetype-quickstart:1.0)
        Choose archetype:
        1: remote -> jersey-quickstart-grizzly (Archetype for creating a RESTful web application with Jersey and Grizzly)
        2: remote -> jersey-quickstart-webapp (Archetype for creating a Jersey based RESTful web application WAR packaging)
        Choose a number:  (1/2): 2
        [INFO] snapshot com.sun.jersey.archetypes:jersey-quickstart-webapp:1.0.1-SNAPSHOT: checking for updates from jersey-quickstart-webapp-repo
        Define value for groupId: : org.glassfish.samples
        Define value for artifactId: : helloworld-webapp
        Define value for version:  1.0-SNAPSHOT: :
        Define value for package: : org.glassfish.samples
        Confirm properties configuration:
        groupId: org.glassfish.samples
        artifactId: helloworld-webapp
        version: 1.0-SNAPSHOT
        package: org.glassfish.samples
         Y: :
        [INFO] —————————————————————————-
        [INFO] Using following parameters for creating OldArchetype: jersey-quickstart-webapp:1.0.1-SNAPSHOT
        [INFO] —————————————————————————-
        [INFO] Parameter: groupId, Value: org.glassfish.samples
        [INFO] Parameter: packageName, Value: org.glassfish.samples
        [INFO] Parameter: package, Value: org.glassfish.samples
        [INFO] Parameter: artifactId, Value: helloworld-webapp
        [INFO] Parameter: basedir, Value: /Users/arungupta/samples/jersey
        [INFO] Parameter: version, Value: 1.0-SNAPSHOT
        [INFO] ********************* End of debug info from resources from generated POM ***********************
        [INFO] OldArchetype created in dir: /Users/arungupta/samples/jersey/helloworld-webapp
        [INFO] ————————————————————————
        [INFO] BUILD SUCCESSFUL
        [INFO] ————————————————————————
        [INFO] Total time: 21 seconds
        [INFO] Finished at: Mon Nov 24 14:09:27 PST 2008
        [INFO] Final Memory: 12M/30M
        [INFO] ————————————————————————
      2. Edit the generated “pom.xml” to add dependencies on GlassFish plugin
        1. Add the following plugin in the “pom.xml” under <build>/<plugins>:

                      <plugin>
                          <groupId>org.glassfish</groupId>
                          <artifactId>maven-glassfish-plugin</artifactId>
                      </plugin>
        2. Add the following plugin repositories:
              <pluginRepositories>
                  <pluginRepository>
                      <id>maven2-repository.dev.java.net</id>
                      <name>Java.net Repository for Maven</name>
                      <url>http://download.java.net/maven/2/</url>
                      <layout>default</layout>
                  </pluginRepository>
                  <pluginRepository>
                      <id>maven-repository.dev.java.net</id>
                      <name>Java.net Maven 1 Repository (legacy)</name>
                      <url>http://download.java.net/maven/1</url>
                      <layout>legacy</layout>
                  </pluginRepository>
              </pluginRepositories>
        3. Optionally, if the generated dependencies in “pom.xml” as shown below:
                  <dependency>
                      <groupId>org.glassfish.distributions</groupId>
                      <artifactId>web-all</artifactId>
           
                     <version>10.0-build-20080430</version>
                      <scope>test</scope>
                  </dependency>
                  <dependency>
                      <groupId>org.glassfish.embedded</groupId>
                      <artifactId>gf-embedded-api</artifactId>
                      <version>1.0-alpha-4</version>
                      <scope>test</scope>
                  </dependency>

          are changed to:

                  <dependency>
                      <groupId>org.glassfish.distributions</groupId>
                      <artifactId>web-all</artifactId>
                      <version>10.0-SNAPSHOT</version>
                      <scope>test</scope>
                  </dependency>
                  <dependency>
                     <groupId>org.glassfish.embedded</groupId>
                     <artifactId>glassfish-embedded-all</artifactId>
                     <version>3.0-Prelude-SNAPSHOT</version>
                  </dependency>

          then the latest version of Embedded GlassFish APIs are used.

        4. Also optionally, if you want to run against Jersey 1.0 bits then change the following property from “1.0.1-SNAPSHOT” to “1.0″.
              <properties>
                  <jersey-version>1.0</jersey-version>
              </properties>
      3. Run the application
        1. The generated source code is:

          package org.glassfish.samples;

          import javax.ws.rs.GET;
          import javax.ws.rs.Path;
          import javax.ws.rs.Produces;

          // The Java class will be hosted at the URI path “/helloworld”
          @Path(“/myresource”)
          public class MyResource {
             
              // The Java method will process HTTP GET requests
              @GET
              // The Java method will produce content identified by the MIME Media
              // type “text/plain”
              @Produces(“text/plain”)
              public String getIt() {
                  return “Hi there!”;
              }
          }

          Invoking “mvn glassfish:run” starts the embedded GlassFish and shows the following output:

          ~/samples/jersey/helloworld-webapp >mvn glassfish:run
          [INFO] Scanning for projects…
          [INFO] Searching repository for plugin with prefix: ‘glassfish’.
          [INFO] ————————————————————————
          [INFO] Building helloworld-webapp Jersey Webapp
          [INFO]    task-segment: [glassfish:run]
          [INFO] ————————————————————————
          [INFO] Preparing glassfish:run
          [INFO] [resources:resources]
          [INFO] Using default encoding to copy filtered resources.
          [INFO] [compiler:compile]
          [INFO] Compiling 1 source file to /Users/arungupta/samples/jersey/helloworld-webapp/target/classes
          [INFO] [glassfish:run]
          Nov 24, 2008 2:36:05 PM com.sun.enterprise.v3.server.AppServerStartup run
          INFO: HK2 initialized in 229 ms
          Nov 24, 2008 2:36:05 PM com.sun.enterprise.v3.server.AppServerStartup run
          INFO: com.sun.enterprise.naming.impl.ServicesHookup@2470b02c Init done in 237 ms
          Nov 24, 2008 2:36:05 PM com.sun.enterprise.v3.server.AppServerStartup run
          INFO: com.sun.enterprise.v3.server.Globals@13b3d787 Init done in 239 ms
          Nov 24, 2008 2:36:05 PM com.sun.enterprise.v3.server.AppServerStartup run
          INFO: com.sun.enterprise.v3.server.SystemTasks@61bedd7d Init done in 244 ms
          Nov 24, 2008 2:36:05 PM com.sun.enterprise.v3.server.AppServerStartup run
          INFO: com.sun.enterprise.v3.services.impl.HouseKeeper@2b9f7952 Init done in 245 ms
          Nov 24, 2008 2:36:05 PM com.sun.enterprise.v3.server.AppServerStartup run
          INFO: com.sun.enterprise.v3.services.impl.CmdLineParamProcessor@5249d560 Init done in 248 ms
          JMXMP connector server URL = service:jmx:jmxmp://localhost:8888
          Nov 24, 2008 2:36:05 PM com.sun.enterprise.v3.services.impl.GrizzlyProxy start
          INFO: Listening on port 8080
          Nov 24, 2008 2:36:06 PM com.sun.enterprise.v3.server.AppServerStartup run
          INFO: com.sun.enterprise.v3.services.impl.GrizzlyService@1baa56a2 startup done in 551 ms
          Nov 24, 2008 2:36:06 PM com.sun.enterprise.v3.services.impl.ApplicationLoaderService postConstruct
          INFO: loader service postConstruct started at 1227566166208
          Nov 24, 2008 2:36:06 PM com.sun.enterprise.v3.server.AppServerStartup run
          INFO: Application Loader startup done in 740 ms
          Nov 24, 2008 2:36:06 PM com.sun.enterprise.v3.server.AppServerStartup run
          INFO: Glassfish v3 started in 740 ms
          Nov 24, 2008 2:36:07 PM com.sun.enterprise.web.WebModuleContextConfig authenticatorConfig
          SEVERE: webModuleContextConfig.missingRealm
          Nov 24, 2008 2:36:07 PM com.sun.jersey.api.core.PackagesResourceConfig init
          INFO: Scanning for root resource and provider classes in the packages:
            org.glassfish.samples
          Nov 24, 2008 2:36:07 PM com.sun.jersey.api.core.PackagesResourceConfig init
          INFO: Root resource classes found:
            class org.glassfish.samples.MyResource
          Nov 24, 2008 2:36:07 PM com.sun.jersey.api.core.PackagesResourceConfig init
          INFO: Provider classes found:
          Hit ENTER for redeploy

          Notice how GlassFish v3 starts up in sub-second (740 ms in this case).

        2. “http://localhost:8080/helloworld-webapp” shows the following output:

        3. Clicking on “Jersey resource” redirects to “http://localhost:8080/helloworld-webapp/webresources/myresource” and shows the following output:

      4. Change the output representation to produce JSON representation
        1. Add a new JAXB bean:

          package org.glassfish.samples;

          import javax.xml.bind.annotation.XmlRootElement;

          /**
           * @author arungupta
           */
          @XmlRootElement
          public class Greeting {
              public String greeting;

              public Greeting() { }
              public Greeting(String greeting) {
                  this.greeting = greeting;
              }
          }

        2. Change the method implementation in MyResource as:
          //    @Produces(“text/plain”)
              @Produces(“application/json”)
              public Greeting getIt() {
                  return new Greeting(“Hi there!”);
              }
        3. And now “http://localhost:8080/helloworld-webapp/webresources/myresource” shows the following output:

          Notice the output is now in JSON format.

      5. Optionally a WAR file can be created using the command:
        mvn clean package

        and the WAR file is generated in “target/helloworld-webapp.war”. If Jersey is installed using GlassFish v3 Update Center then you can use “maven-assembly-plugin” to customize packaging of WAR and drastically reduce the size.

      The JSON representation can be configured in multiple ways as explained in Configuring JSON for RESTful Web Services in Jersey 1.0. This has certainly come a long way from TOTD #8 and is much more effecient now.

      The Jersey Wiki documents an extensive set of resources to get started.

      Send all your questions to .

      Please leave suggestions on other TOTD (Tip Of The Day) that you’d like to see. An archive of all the tips is available here.

      Technorati: totd glassfish v3 embeddable jersey jsr311 rest json webservices

      Share and Enjoy:
      • Print
      • Digg
      • Sphinn
      • del.icio.us
      • Facebook
      • Google Bookmarks
      • DZone
      • StumbleUpon
      • Technorati
      • Twitter
      • Slashdot

      October 17, 2008

      SOAP and REST – both equally important to Sun

      Filed under: webservices — arungupta @ 3:29 pm

      “Sun moving away from SOAP to embrace REST” is the misleading title of an article recently published in SD Times. The article provides a good introduction to JAX-RS and Jersey. But I really wonder what motivated the author of this article to use this title. This blog, hopefully, provides a better context.

      Jersey is the Reference Implementation of Java API for RESTful Web Services (JAX-RS, JSR 311) and was released earlier this week. The headline indicates that Sun is leaving SOAP and will support REST. The debate between REST and SOAP is not new and there are religious camps on both sides (even within Sun). And that’s completely understandable because each technology has its own merits and demerits. But just because a new JSR aimed to make RESTful Web services easy in the Java platform is released, it does not mean Sun Microsystems is leaving existing technology in trenches.

      The addition of Jersey to Sun’s software portfolio makes the Web services stack from GlassFish community a more compelling and comprehensive offering. This is in contrast  to “moving away” from SOAP as indicated by the title. As a matter of fact, Jersey will be included as part of Metro soon, the Web Services stack of GlassFish. And then you can use JAX-WS (or Metro) if you like to use SOAP or JAX-RS (or Jersey) if you prefer RESTful Web services. It’s all about a offering choice to the community instead of showing a direction.

      Here are some data points for JAX-WS:

      • The JAX-WS 2.0 specification was released on May 11, 2006. There have been couple of maintenance releases since then and another one brewing.
      • Parts of Metro, the implementation of JAX-WS, are currently baked into GlassFish, embeddable in JBoss WS Stack, and also part of Oracle Weblogic and IBM Websphere.
      • The implementation stack is mature and used in several key customer deployments. 
      • JAX-WS is already included in Java SE 6 and hence available to a much wider audience.
      • As opposed to “moving away”, JAX-WS 2.2 (currently being worked upon) will be included in Java EE 6 platform, as will Jersey be.

      So I believe both SOAP and REST are here to stay, at least in the near future. And Sun Microsystems is committed to support them!

      You still think Sun is moving away from SOAP ?

      It seems a personal preference is interpreted as Sun’s disinvestment in SOAP. It’s good to have increased readership but not at the cost of misleading headlines :)

      Technorati: jax-ws rest webservices metro sdtimes glassfish

      Share and Enjoy:
      • Print
      • Digg
      • Sphinn
      • del.icio.us
      • Facebook
      • Google Bookmarks
      • DZone
      • StumbleUpon
      • Technorati
      • Twitter
      • Slashdot

      August 12, 2008

      LOTD #1: Using Silverlight to access GlassFish Metro and JAX-WS Web service endpoints

      Filed under: webservices — arungupta @ 5:00 am

      Following TOTD (Tip Of The Day) pattern, I’m starting LOTD (Link Of The Day) series today. These are light-weight entries with generally a single line description and links to other blogs/articles/tips/whitepapers/screencasts/etc.

      Let’s start with three recent entries on MSDN that describe how to invoke Metro and JAX-WS Web service endpoints from Microsoft Silverlight and .NET:

      • Call a Java EE Web service from .NET Client
      • Call a Java EE Web service from Silverlight Client (deployed on GlassFish)
      • Call a Metro Web service from Silverlight (deployed on Tomcat)

      All entries will be archived at LOTD.

      Technorati: lotd webservices metro jax-ws glassfish msdn

      Share and Enjoy:
      • Print
      • Digg
      • Sphinn
      • del.icio.us
      • Facebook
      • Google Bookmarks
      • DZone
      • StumbleUpon
      • Technorati
      • Twitter
      • Slashdot

      July 31, 2008

      Why GlassFish Metro over Axis ?

      Filed under: webservices — arungupta @ 5:00 am

      Metro (Web services stack from GlassFish) is kicking strong these days – here are two instances!

      1. ArcGIS SOAP stack gains 90% performance improvement using Metro

        An intern in the Web services team for performance enhancement of ArcGIS SOAP SDK reported:

        With Axis 1.x based tool kits XML parsing was identified as a bottleneck and therefore we wanted to make a switch to a tool kit that uses the Streaming API for XML Parsing (StAX). We identified that Metro (Glassfish’s SOAP Stack) was the way to go and i generated the new Metro based SDK for accessing Web-Services.

        And the conclusion is …

        The result of this project is an increased performance of the ArcGIS Server’s SOAP stack (by about 90%).

        Pretty cool – Metro (Web services stack baked in GlassFish) gave about 90% improvement over Axis! Read more details about the study here.

      2. Change of the guard: AXIS out, JAX-WS in

        Here are some relevant points:

        I have come to a conclusion: I no longer want to deal with the hassle that has become Apache AXIS.

        AXIS2 is current, but has become very large, the doc is poor, the support is invisible, the generated code smells, and the seams are everywhere.  Fifty nine jar files?  Really?   Do I need this hassle?  With JAX-WS, do I need AXIS any longer? I think not.

        But I honestly cannot believe customers will continue to put up with the furball that AXIS2 has become. And if I am in a position to make a recommendation, I will recommend JAX-WS. It works.

      And you can also connect to Microsoft Exchange Server using JAX-WS.

      And here are some other endorsements for Metro.

      Technorati: webservices adoption glassfish metro axis

      Share and Enjoy:
      • Print
      • Digg
      • Sphinn
      • del.icio.us
      • Facebook
      • Google Bookmarks
      • DZone
      • StumbleUpon
      • Technorati
      • Twitter
      • Slashdot

      July 10, 2008

      Getting Started with GlassFish in IntelliJ IDEA

      Filed under: webservices — arungupta @ 5:30 am

      IntelliJ IDEA 7.0.x include plugins that provide support for configuring GlassFish. This blog provides clear instructions on how to get started by developing and deploying a JSP, Servlet and Web services using GlassFish in IntelliJ. The instructions are using IntelliJ 7.0.3 Build #7757 (with no additional plugins).

      1. Create a new project
        1. Clicking on “Create New Project” or “File”, “New Project”. Take the default as shown below:

          and click on “Next >”.

        2. Enter the project name as “GlassFishRocks” and take all defaults as shown:

          and click on “Next >”.

        3. Take another default for the source directory as shown:

          and click on “Next >”.

        4. For the first time use, JDK needs to be specified. Click on “+” in top-left corner as shown here:

          Take the default option of “JSDK” and specify the Home Directory as shown:

          Click on “OK” and then click on “Next >”.

        5. Let’s create a Web application. Select the list of technologies as shown:

          and finally (phew!) click on “Finish”. The expanded project looks like:

      2. Create a GlassFish configuration
        1. Select “Run”, “Edit Configurations” as shown:

        2. Click on “+” on top-left corner and select GlassFish as shown below:

        3. Specify the location of GlassFish Application server at:

          by clicking on “Configure” button and enter the values as shown:

          and click on “OK”. You can download and install GlassFish v2 UR2 from here.

        4. Enter the “Name” and select the “Server Domain” as shown:

          and click on “OK”.

      3. Deploy the Web application
        1. Click on the green button in the toolbar:

        2. Click on the “Fix” button on the bottom and then click “Run”. The recently created Web module is selected to be deployed as shown:

        3. This starts the GlassFish v2 UR2 Application Server and deploys the Web application showing the console as:

          and also shows the default page at “http://localhost:8080/GlassFishRocksWeb/”. You can edit “index.jsp”, re-deploy the Web facet and refresh the page to see the updated message.

          Notice, even though project’s name is “GlassFishRocks”, the application context root is “GlassFishRocksWeb”.

      4. Now lets create/deploy a new Servlet.
        1. Create a new project as described above and name it “KillerServlet”.
        2. Right-click on the project and select “New”, “Servlet” as shown:

        3. Enter the values as shown:

          and click on “OK”.

        4. The “Java EE: Structure” shows the project as:

        5. Double-click on “HelloServlet” (nested one) and add the following fragment to “doGet” method:
                  java.io.PrintWriter out = response.getWriter();
                  try {
                      out.println(“<html>”);
                      out.println(“<head>”);
                      out.println(“<title>Servlet NewServlet</title>”);
                      out.println(“</head>”);
                      out.println(“<body>”);
                      out.println(“<h1>Servlet NewServlet at ” + request.getContextPath () + “</h1>”);
                      out.println(“</body>”);
                      out.println(“</html>”);
                  } finally {
                      out.close();
                  }

          NetBeans IDE auto-generates this code for a Servlet ;-) And add the following to “doPost” method:

                 doGet(request, response);
        6. Double-click on “web.xml” and then select “Assembly Descriptor” tab.
        7. Click on “+” in Servlet Mappings and specify the values as:

        8. Deploy the project (as described above) and output from Servlet is displayed at “http://localhost:8080/KillerServletWeb/hello”. Read more details in Creating Java EE Apps and Servlets with IntelliJ IDEA.

          Remember the weird context root, it’s “KillerServletWeb” instead of “KillerServlet”. Now there may be a good reason to do so but nothing obvious.

      5. Now lets create a simple Web service using the Metro Web services stack (the stack baked into GlassFish)
        1. Create a new project with name “GlassFishWS” following the instructions given above.
        2. Select the list of technologies as shown:

        3. The default generated Web service looks like:

        4. The default generated Web service uses light-weight Endpoint API to host the endpoint. Run the Web service by right-clicking in the editor pane and selecting “Run” as shown or default shortcut of Ctrl+Shift+F10:

        5. The WSDL is now available at “http://localhost:9000/HelloWorld?wsdl”.
        6. Right-click on the project and select “New”, “Web Service Client” as shown:

          enter the value as “WSClient” and click on “OK”.

        7. In the next dialog, enter the values as shown:

        8. The generated client code has some errors as shown:

          Change the code to:

                client.HelloWorld service = new client.HelloWorldService().getHelloWorldPort();
                //invoke business method
                System.out.println(service.sayHelloWorldFrom(“Duke”));

          and run WSClient.main to see the result as:

          Now you deployed a Metro Web service using light-weight Endpoint API.  The bundled plugin version is 0.9 build 2 and the steps are so much cleaner from 0.7 version of the plugin.

          Read more about Web Services support in IntelliJ IDEA.

        9. Deploying this Web service on GlassFish is really simple.
          1. Create a new GlassFish configuration as explained above.
          2. Run the project using this configuration and the Web service is now hosted at “http://localhost:8080/GlassFishWSWeb/services/HelloWorld?wsdl”.
          3. Generate a client using the steps described above.

      Here are few issues filed:

      • JEEAS-180 does not allow an application to be re-deployed to GlassFish and that’s why the examples above use different projects.
      • JEEAS-181  asks for better integration of GlassFish logs in the IDE.
      • JEEAS-182 require support for GlassFish v3 in the GlassFish plugin. Please help by voting for this issue.
      • WSVC-61 reports the errors generated in Web services client code

      So whether you are using Eclipse, IntelliJ or NetBeans – you can easily configure GlassFish and deploy your applications directly from within the IDE. Here are some related links:

      • Debugging Apps on GlassFish using IntelliJ
      • GlassFish on Eclipse Ganymede
      • NetBeans 6.5 M1: GlassFish v3 + Rails
      • Screencast #24: Getting Started with GlassFish v3 TP2
      • NetBeans IDE and GlassFish
      • GlassFish Plugins

      However of all the IDEs, NetBeans IDE still provides the most comprehensive coverage in terms of development and deployment of Java EE applications (JSP, Servles, Java Server Faces, SOAP-based .NET 3.0-interoperable Web service, RESTful Web services, JPA, EJBs) and server plug-ins (GlassFish, Tomcat, JBoss, WebLogic, WebSphere, OC4J, SAP BusinessOne and JOnAS).

      Technorati: glassfish intellij idea jsp servlets metro webservices

      Share and Enjoy:
      • Print
      • Digg
      • Sphinn
      • del.icio.us
      • Facebook
      • Google Bookmarks
      • DZone
      • StumbleUpon
      • Technorati
      • Twitter
      • Slashdot
      Older Posts »

      The views expressed on this blog are my own and do not necessarily reflect the views of Oracle.
      Powered by WordPress