Miles to go …

August 24, 2009

TOTD #98: Create a Metro JAX-WS Web service using GlassFish Tools Bundle for Eclipse

Filed under: eclipse, totd, webservices — Tags: , , , , , , — arungupta @ 11:05 pm

Now that you’ve installed GlassFish Tools Bundle for Eclipse 1.1, lets use this bundle to create a simple Metro/JAX-WS compliant Web service and deploy on GlassFish. These steps will work with either Eclipse 3.4.2 or 3.5 with WTP Java EE support.

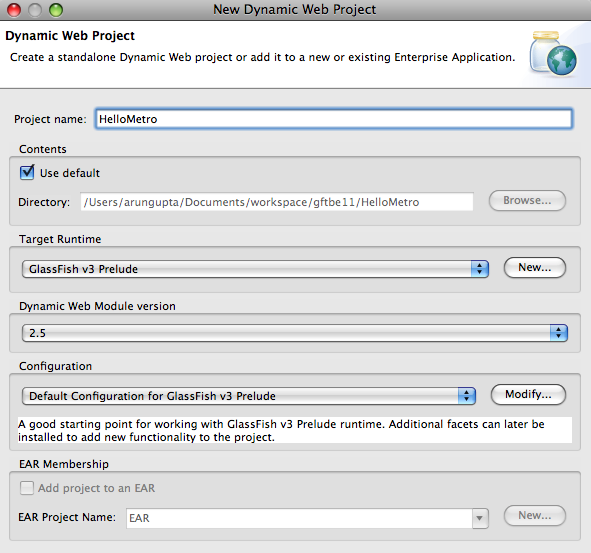
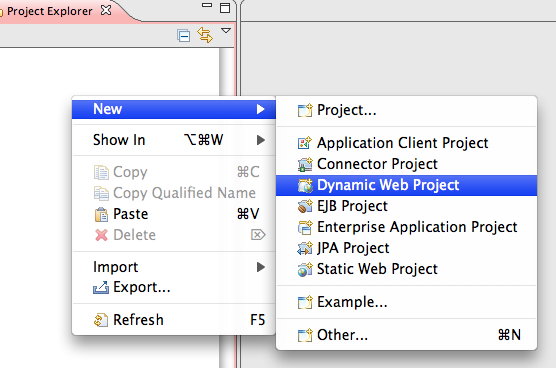
  1. Lets create a simple “Dynamic Web Project” as shown below:

  2. Name the project “HelloMetro” and take all other defaults:

    Click on “Finish” to complete the project creation.

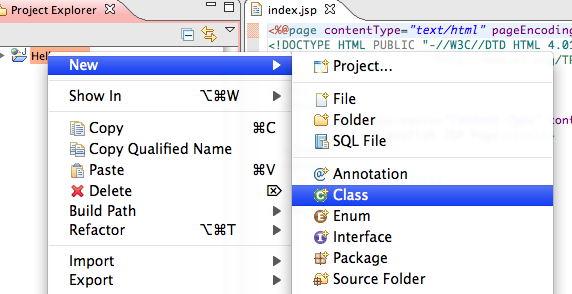
  3. Metro allows to create a Web service from a POJO class. So let’s add a POJO to the project by right-clicking on the project and selecting “New”, “Class” as shown below:


    Specify the package name as “server”, class name as “HelloService” and click on “Finish”.

  4. Add a simple method to the newly generated class as:

    
    public String sayHello(String name) {
          return "Hello " + name + "!!";
    }
    

  5. Expand the project, go to “HelloService.java” in “server” package, right-click, select “Web Services”, “Create Web service”.
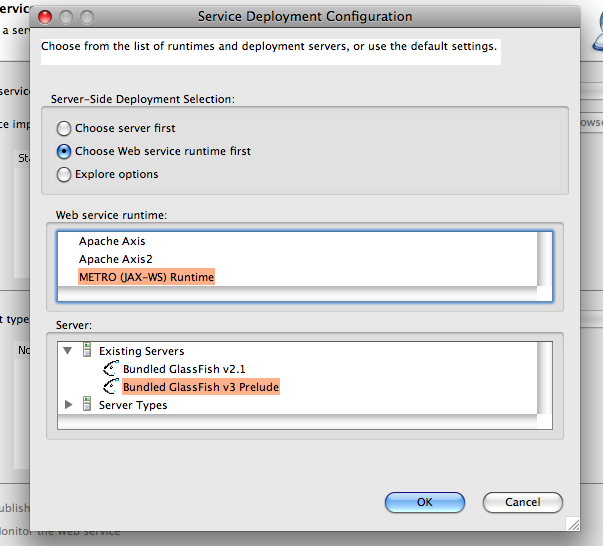
  6. Click on “Web service runtime: Apache Axis” and select “Metro (JAX-WS) Runtime” as the Web service runtime as shown below:

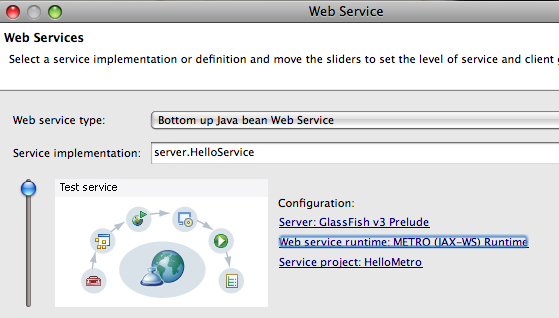
  7. Move the slider on the left to top. This will enable testing of the deployed Web service. The completed configuration looks like:

    and click on “Next >”.

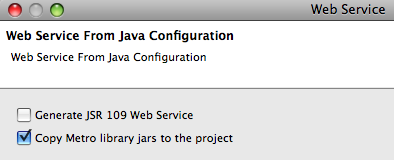
  8. Select the checkbox “Copy Metro library jars to the project” to resolve the references correctly as shown below:

    and click on “Next >”. This bundles the application and deploys to GlassFish and provides an option to test the deployed Web service as shown below:

    Clicking on the “Launch” button shows the following output in the browser:

    The WSDL is hosted at “http://localhost:8083/HelloMetro/HelloServiceService?wsdl”.

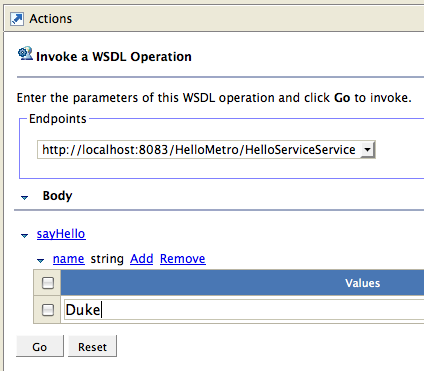
  9. Click on “sayHello” method, click on “Add” and enter the value as “Duke” as shown below:

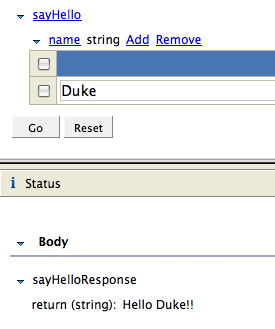
    Click on “Go” and the response is shown as:

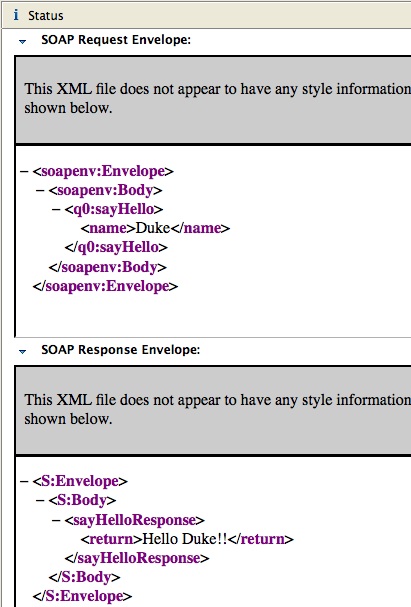
    Clicking on “Source” in the response window shows the SOAP request/response messages as shown below:

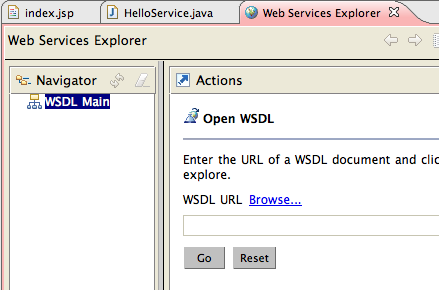
  10. Alternatively, you can click on “Finish” to complete the dialog. Then click on “Run” menu item, “Launch the Web Services Explorer” to see a screen as:

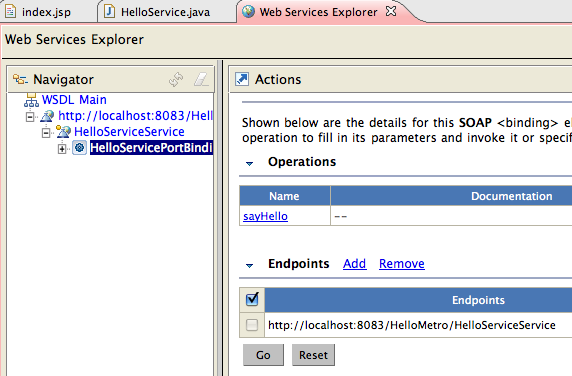
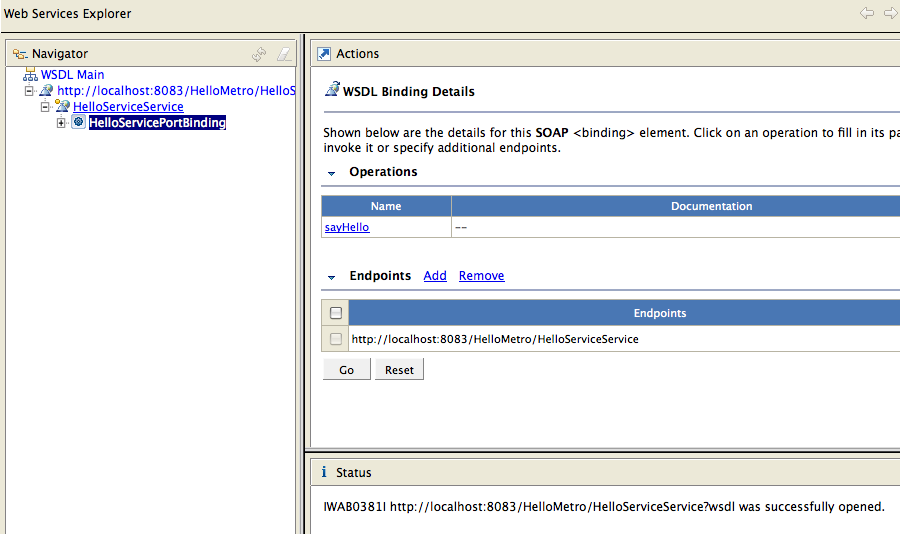
    Enter the URL of the WSDL in “WSDL URL” box as “http://localhost:8083/HelloMetro/HelloServiceService?wsdl” and click on “Go”. Now you are seeing the similar screen to test the Web service within the integrated browser as shown below:

A future blog will cover how to write a database-enabled application using the bundled Dali JPA Tools and MySQL pre-registered JDBC driver.

Please send your questions and comments to .
Please leave suggestions on other TOTD that you’d like to see. A complete archive of all the tips is available here.

Technorati: totd glassfish eclipse galileo webservices metro jax-ws

Share and Enjoy:
  • Print
  • Digg
  • Sphinn
  • del.icio.us
  • Facebook
  • Google Bookmarks
  • DZone
  • StumbleUpon
  • Technorati
  • Twitter
  • Slashdot

August 21, 2009

TOTD #97: GlassFish Plugin with Eclipse 3.5

Filed under: eclipse, totd — Tags: , , , — arungupta @ 1:20 pm

A new version of GlassFish Tools Bundle for Eclipse (ver 1.1) was recently released. The build contains

  • Eclipse 3.4.2 IDE with WTP Java EE support
  • GlassFish v2.1 pre-registered and configured
  • GlassFish v3 Prelude pre-registered and configured
  • JavaDB sample database pre-registered and configured
  • GlassFish Plugin (1.0.29)
  • MySQL JDBC driver registered to the IDE
  • Maven m2 plugins
  • JAX-WS Metro plugin
  • GlassFish documentation
  • And optionally, a JDK 1.6.

The functionality is also available in GlassFish Plugin that can be installed on Eclipse 3.5. However because of the Eclipse bug #280365, the plugin cannot be installed directly using Server Adapters. The alternative is to install explicitly using the Update Site. The instructions to do the same are given below:

  1. In “Help”, “Install New Software”, click on “Available Software Sites”:

  2. Search for “ajax” to see the output as:

  3. Click on “Enabled” button to enable the site and see the change as below:

    click on “OK”.

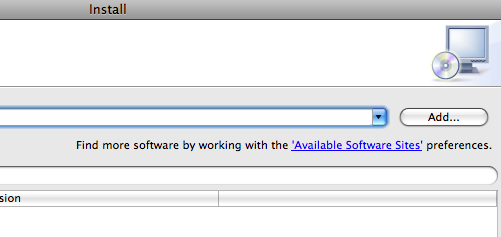
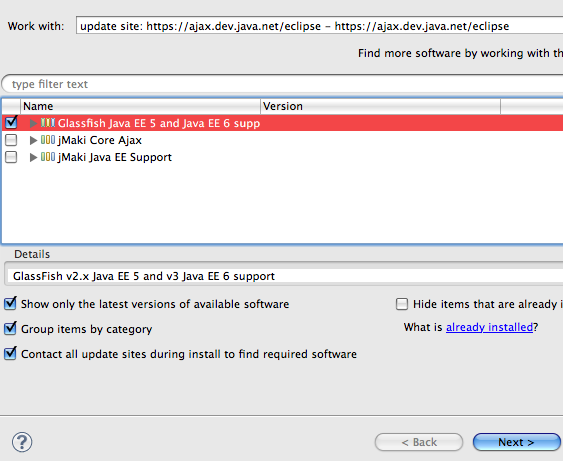
  4. Expand the drop-down list box and chose the recently added “update site” as shown below:

    and it shows all the software available from that site as:

  5. Take the defaults, click on “Next” and it shows the GlassFish plugin version number as shown below:
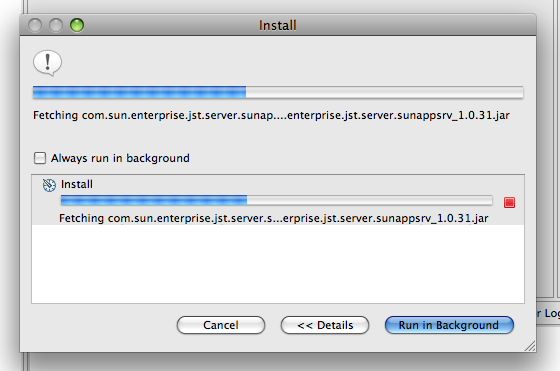
  6. Click on “Next”, accept the license by clicking on  “I accept …” and click on “Finish” to start the installation.

    The IDE restarts after the installation is complete.

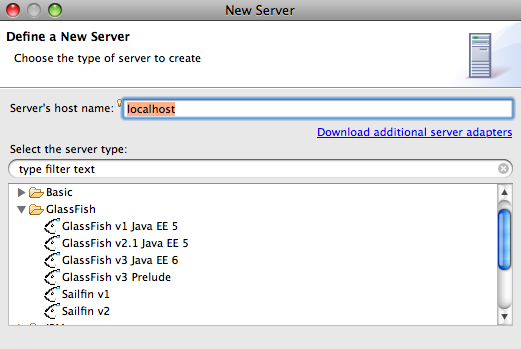
  7. Now a new server can be added using “Servers” tab and it shows GlassFish as an option as shown below:

The screencast #28 shows how to create a simple web application using GlassFish v3. Future blogs will show how to leverage the new functionality of JAX-WS Web services plugin and JPA Dali Tooling with GlassFish.

Please leave suggestions on other TOTD that you’d like to see. A complete archive of all the tips is available here.

Technorati: totd glassfish eclipse galileo

Share and Enjoy:
  • Print
  • Digg
  • Sphinn
  • del.icio.us
  • Facebook
  • Google Bookmarks
  • DZone
  • StumbleUpon
  • Technorati
  • Twitter
  • Slashdot

August 19, 2009

TOTD #96: GlassFish v3 REST Interface to Monitoring and Management – JSON, XML, and HTML representations

Filed under: admin, totd — Tags: , , , , , , — arungupta @ 11:00 pm

GlassFish Monitoring allows you to monitor the state of various runtime components of the application server. This information is used to identify performance bottlenecks and tuning the system for optimal performance, to aid capacity planning, to predict failures, to do root cause analysis in case of failures and sometimes to just ensure that everything is functioning as expected.

GlassFish Management allows you to manage the running Application Server instance such as query/create/delete resources (JDBC, JMS, etc), stop/restart the instance, rotate the log and other similar functions.

GlassFish v3 exposes Monitoring and Management data using a REST Interface. This Tip Of The Day (TOTD) shows how to play with this new functionality. Rajeshwar’s blog has lot of useful information on this topic.

Most of the functionality available in web-based Admin Console and CLI (asadmin) is now available using the REST interface. Both of these are pre-built tools that ships with the GlassFish bundle. The REST interface is a lower level API that enables toolkit developers and IT administrators to write their custom scripts/clients using language of their choice such as Java, JavaScript, Ruby or Groovy.

The default URL for the REST interface of monitoring is “http://localhost:4848/monitoring/domain” and for the management is “http://localhost:4848/management/domain”. Each URL provides an XML, JSON and HTML representation of the resources. If a web browser is used then a HTML representation is returned and displayed nicely in the browser. Rajeshwar’s blog described a Java client written using Jersey Client APIs that can be used to make all the GET/PUT/POST/DELETE requests. This blog will use something more basic, and extremely popular, to make all the RESTful invocations – cURL.

At this time the monitoring resources are read-only (GET) and management can be done using GET/POST/DELETE methods. POST is used for creating and updating resources/objects and the updates can be partial.

Lets get started.

  1. Download the latest continuous build from the trunk and unzip. This functionality is also available in the Web profile bundle. This blog is using build #2023.
  2. Start the application server as:
    ~/tools/glassfish/v3/2023/glassfishv3 >./bin/asadmin start-domain –verbose

    Aug 19, 2009 9:52:45 AM com.sun.enterprise.admin.launcher.GFLauncherLogger info
    INFO: JVM invocation command line:
    /System/Library/Frameworks/JavaVM.framework/Versions/1.6/Home/bin/java
    -cp

    . . .

    INFO: felix.fileinstall.dir            /Users/arungupta/tools/glassfish/v3/2023/glassfishv3/glassfish/domains/domain1/autodeploy-bundles
    Aug 19, 2009 9:53:05 AM
    INFO: felix.fileinstall.debug          1
    Aug 19, 2009 9:53:05 AM
    INFO: felix.fileinstall.bundles.new.start          true

  3. Monitoring information – Lets monitor this GlassFish instance using the REST interface.
    1. Retrieve JSON information – As mentioned above, the monitoring resources are read-only and so the information can be accessed as:
      ~/tools/glassfish/v3/2023/glassfishv3 >curl -H “Accept: application/json” http://localhost:4848/monitoring/domain -v
      * About to connect() to localhost port 4848 (#0)
      *   Trying ::1… connected
      * Connected to localhost (::1) port 4848 (#0)
      > GET /monitoring/domain HTTP/1.1
      > User-Agent: curl/7.16.3 (powerpc-apple-darwin9.0) libcurl/7.16.3 OpenSSL/0.9.7l zlib/1.2.3
      > Host: localhost:4848
      > Accept: application/json
      >
      < HTTP/1.1 200 OK
      < Content-Type: application/json
      < Transfer-Encoding: chunked
      < Date: Wed, 19 Aug 2009 17:40:29 GMT
      <
      {Domain:{},”child-resources”:["http://localhost:4848/monitoring/domain/server"]}
      * Connection #0 to host localhost left intact
      * Closing connection #0

      The command explicitly asks for JSON representation of the resources. The outbound headers are prepended with “>” and inbound headers with “<”. And the JSON representation is shown in the last line as:

      {Domain:{},”child-resources”:["http://localhost:4848/monitoring/domain/server"]}

      The key element to remember here is “http://localhost:4848/monitoring/domain/server” which can be used to retrieve more monitoring information.

    2. XML represetation: Lets change the command to ask for XML representation as:
      ~/tools/glassfish/v3/2023/glassfishv3 >curl -H “Accept: application/xml” http://localhost:4848/monitoring/domain -v
      * About to connect() to localhost port 4848 (#0)
      *   Trying ::1… connected
      * Connected to localhost (::1) port 4848 (#0)
      > GET /monitoring/domain HTTP/1.1
      > User-Agent: curl/7.16.3 (powerpc-apple-darwin9.0) libcurl/7.16.3 OpenSSL/0.9.7l zlib/1.2.3
      > Host: localhost:4848
      > Accept: application/xml
      >
      < HTTP/1.1 200 OK
      < Content-Type: application/xml
      < Transfer-Encoding: chunked
      < Date: Wed, 19 Aug 2009 17:43:51 GMT
      <
      <Domain>
      <child-resource>http://localhost:4848/monitoring/domain/server</child-resource>
      </Domain>
      * Connection #0 to host localhost left intact
      * Closing connection #0

      The command changes the “Accept” header to “application/xml” and now the XML representation of the monitoring resources is returned as:

      <Domain>
      <child-resource>http://localhost:4848/monitoring/domain/server</child-resource>
      </Domain>
    3. HTML representation: The command can be altered to get the HTML representation as “curl -H “Accept: text/html” http://localhost
      :4848/monitoring/domain -v
      “. But HTML is more pleasant when rendered by a browser and so viewing the page “http://localhost:4848/monitoring/domain” in the browser is shown as:
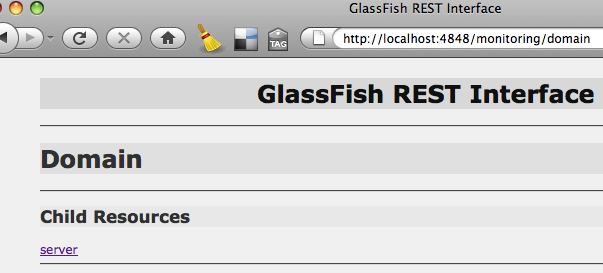
    4. Get more information: As mentioned above, more information about this GlassFish instance can be accessed by GETing from “http://localhost:4848/monitoring/domain/server” and here is the result:
      </tools/glassfish/v3/2023/glassfishv3 >curl -H “Accept: application/json” http://localhost:4848/monitoring/domain/server -v
      * About to connect() to localhost port 4848 (#0)
      *   Trying ::1… connected
      * Connected to localhost (::1) port 4848 (#0)
      > GET /monitoring/domain/server HTTP/1.1
      > User-Agent: curl/7.16.3 (powerpc-apple-darwin9.0) libcurl/7.16.3 OpenSSL/0.9.7l zlib/1.2.3
      > Host: localhost:4848
      > Accept: application/json
      >
      < HTTP/1.1 200 OK
      < Content-Type: application/json
      < Transfer-Encoding: chunked
      < Date: Wed, 19 Aug 2009 17:56:41 GMT
      <
      {Server:{},”child-resources”:["http://localhost:4848/monitoring/domain/server/webintegration",
      "http://localhost:4848/monitoring/domain/server/transaction-service",
      "http://localhost:4848/monitoring/domain/server/network",
      "http://localhost:4848/monitoring/domain/server/jvm",
      "http://localhost:4848/monitoring/domain/server/web",
      "http://localhost:4848/monitoring/domain/server/realm",
      "http://localhost:4848/monitoring/domain/server/http-service"]}
      * Connection #0 to host localhost left intact
      * Closing connection #0

      An HTML rendering of this representation looks like:
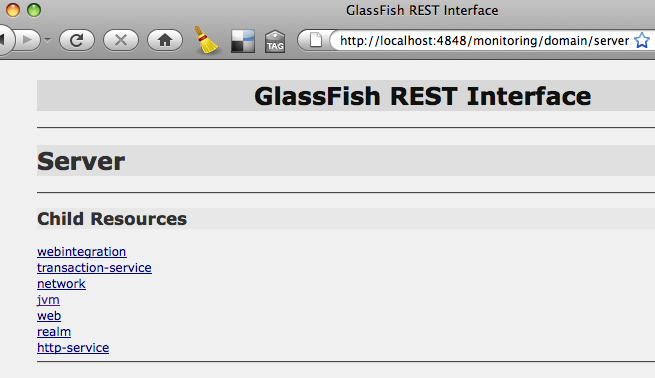
      You can keep clicking on the links and more detailed information about that resource is displayed. This is just one HTML representation and is purposely kept light-weight. You can certainly grab the XML representation and apply an XSLT to generate your own HTML rendering.

      The monitoring levels for different modules can be easily changed using the management REST interface as explained below.

  4. Management of the GlassFish instance
    1. Lets see all the options supported by management REST interface as:
      ~/tools/glassfish/v3/2023/glassfishv3 >curl -X OPTIONS http://localhost:4848/management/domain -v
      * About to connect() to localhost port 4848 (#0)
      *   Trying ::1… connected
      * Connected to localhost (::1) port 4848 (#0)
      > OPTIONS /management/domain HTTP/1.1
      > User-Agent: curl/7.16.3 (powerpc-apple-darwin9.0) libcurl/7.16.3 OpenSSL/0.9.7l zlib/1.2.3
      > Host: localhost:4848
      > Accept: */*
      >
      < HTTP/1.1 200 OK
      < Content-Type: application/json
      < Transfer-Encoding: chunked
      < Date: Wed, 19 Aug 2009 18:07:14 GMT
      <
      {
      “Method”:”GET”

      “Method”:”PUT”
      }
      * Connection #0 to host localhost left intact
      * Closing connection #0

      Specifying “-X OPTIONS” switch displays the various HTTP methods supported by the REST interface. Even though the results show GET and PUT, but it really means GET and POST (issue #9177). Lets try “GET” first.

    2. GET JSON information as:
      ~/tools/glassfish/v3/2023/glassfishv3 >curl -H “Accept: application/json” http://localhost:4848/management/domain -v
      * About to connect() to localhost port 4848 (#0)
      *   Trying ::1… connected
      * Connected to localhost (::1) port 4848 (#0)
      > GET /management/domain HTTP/1.1
      > User-Agent: curl/7.16.3 (powerpc-apple-darwin9.0) libcurl/7.16.3 OpenSSL/0.9.7l zlib/1.2.3
      > Host: localhost:4848
      > Accept: application/json
      >
      < HTTP/1.1 200 OK
      < Content-Type: application/json
      < Transfer-Encoding: chunked
      < Date: Wed, 19 Aug 2009 18:14:46 GMT
      <
      {Domain:{“log-root” : “${com.sun.aas.instanceRoot}/logs”,”application-root” : “${com.sun.aas.instanceRoot}/applications”,”locale” : “”,”version” : “re-continuous”},”child-resources”:["http://localhost:4848/management/domain/configs",
      "http://localhost:4848/management/domain/resources","http://localhost:4848/management/domain/servers",
      "http://localhost:4848/management/domain/property","http://localhost:4848/management/domain/applications",
      "http://localhost:4848/management/domain/system-applications","http://localhost:4848/management/domain/stop",
      "http://localhost:4848/management/domain/restart","http://localhost:4848/management/domain/uptime",
      "http://localhost:4848/management/domain/version","http://localhost:4848/management/domain/rotate-log",
      "http://localhost:4848/management/domain/host-port"]}
      * Connection #0 to host localhost left intact
      * Closing connection #0

      As the result shows, there are several RESTful URLs available (in “child-resources” element) to manage this GlassFish instance. For example:

      1. Show the host/port of GlassFish instance as:
        curl -H “Accept: application/json” http://localhost:4848/management/domain/host-port -v

        will show the result as:

        {“GetHostAndPort”:{“value” : “dhcp-usca14-132-79.SFBay.Sun.COM:8080″}}
      2. Show that web-based Admin Console is pre-installed as system application using:
        curl -H “Accept: application/json” http://localhost:4848/management/domain/system-applications/application/__admingui -v

        will show the result as:

        {__admingui:{“libraries” : “”,”availability-enabled” : “false”,”enabled” : “true”,”context-root” : “”,”location” : “${com.sun.aas.installRootURI}/lib/install/applications/__admingui”,”description” : “”,”name” : “__admingui”,”directory-deployed” : “true”,”object-type” : “system-admin”},”child-resources”:["http://localhost:4848/management/domain/system-applications/application/__admingui/module"]} td>
      3. Query the monitoring levels of different modules as:
        curl -H “Accept: application/json” http://localhost:4848/management/domain/configs/config/server-config/monitoring-service/module-monitoring-levels -v

        to see the result as:

        {ModuleMonitoringLevels:{“transaction-service” : “OFF”,”ejb-container” : “OFF”,”jdbc-connection-pool” : “OFF”,”orb” : “OFF”,”http-service” : “OFF”,”connector-connection-pool” : “OFF”,”jms-service” : “OFF”,”connector-service” : “OFF”,”jvm” : “OFF”,”thread-pool” : “OFF”,”web-container” : “OFF”},”child-resources”:[]}

        And then change the monitoring level of Web container as:

        ~/tools/glassfish/v3/2023/glassfishv3 >curl -X POST -d “web-container=ON” -H “Accept: application/json” http://localhost:4848/management/domain/configs/config/server-config/monitoring-service/module-monitoring-levels -v
        * About to connect() to localhost port 4848 (#0)
        *   Trying ::1… connected
        * Connected to localhost (::1) port 4848 (#0)
        > POST /management/domain/configs/config/server-config/monitoring-service/module-monitoring-levels HTTP/1.1
        > User-Agent: curl/7.16.3 (powerpc-apple-darwin9.0) libcurl/7.16.3 OpenSSL/0.9.7l zlib/1.2.3
        > Host: localhost:4848
        > Accept: application/json
        > Content-Length: 16
        > Content-Type: application/x-www-form-urlencoded
        >
        < HTTP/1.1 200 OK
        < Content-Type: application/json
        < Transfer-Encoding: chunked
        < Date: Wed, 19 Aug 2009 22:01:31 GMT
        <
        * Connection #0 to host localhost left intact
        * Closing connection #0
        “http://localhost:4848/management/domain/configs/config/server-config/monitoring-service/module-monitoring-levels” updated successfully

        The last line shows that the monitoring level is successfull updated and can be verified again as:

        ~/tools/glassfish/v3/2023/glassfishv3 >curl -H “Accept: application/json” http://localhost:4848/management/domain/configs/config/server-config/monitoring-service/module-monitoring-levels -v
        * About to connect() to localhost port 4848 (#0)
        *   Trying ::1… connected
        * Connected to localhost (::1) port 4848 (#0)
        > GET /management/domain/configs/config/server-config/monitoring-service/module-monitoring-levels HTTP/1.1
        > User-Agent: curl/7.16.3 (powerpc-apple-darwin9.0) libcurl/7.16.3 OpenSSL/0.9.7l zlib/1.2.3
        > Host: localhost:4848
        > Accept: application/json
        >
        < HTTP/1.1 200 OK
        < Content-Type: application/json
        < Transfer-Encoding: chunked
        < Date: Wed, 19 Aug 2009 22:36:47 GMT
        <
        * Connection #0 to host localhost left intact
        * Closing connection #0
        {ModuleMonitoringLevels:{“transaction-service” : “OFF”,”ejb-container” : “OFF”,”jdbc-connection-pool” : “OFF”,”orb” : “OFF”,”http-service” : “OFF”,”connector-connection-pool” : “OFF”,”jms-service” : “OFF”,”connector-service” : “OFF”,”jvm” : “OFF”,”thread-pool” : “OFF”,”web-container” : “ON”},”child-resources”:[]}
      4. Stop this GlassFish instance using:
        curl -H “Accept: application/json” http://localhost:4848/management/domain/stop -v

        Or restart the instance using:

        curl -H “Accept: application/json” http://localhost:4848/management/domain/restart -v
      5. Create a JDBC resource using an existing connection pool
        1. Lets see all the resources that are available:
          curl -H “Accept: application/json” http://localhost:4848/management/domain/resources -v

          and the results are shown as:

          {Resources:{},”child-resources”:["http://localhost:4848/management/domain/resources/jdbc-connection-pool",
          "http://localhost:4848/management/domain/resources/jdbc-resource"]}
        2. View all the JDBC connection pools as:
          curl -H “Accept: application/json” http://localhost:4848/management/domain/resources/jdbc/connection-pool -v

          and the results are shown as:

          {JdbcConnectionPool:{},”child-resources”:["http://localhost:4848/management/domain/resources/jdbc-connection-pool/__TimerPool",
          "http://localhost:4848/management/domain/resources/jdbc-connection-pool/DerbyPool"]}
        3. See all the JDBC resources available as:
          curl “Accept: application/json” http://localhost:4848/management/domain/resources/jdbc-resource -v

          and the results are shown as:

          {JdbcResource:{},”child-resources”:["http://localhost:4848/management/domain/resources/jdbc-resource/jdbc/__TimerPool",
          "http://localhost:4848/management/domain/resources/jdbc-resource/jdbc/__default"]}
        4. See all the OPTIONS accepted for JDBC resource creation as:
          curl -X OPTIONS -H “Accept: application/json” http://localhost:4848/management/domain/resources/jdbc-resource -v

          with the result as:

          {
          “Method”:”POST”,
          “Message Parameters”:{
          “id”:{“Acceptable Values”:”",”Default Value”:”",”Type”:”class java.lang.String”,”Optional”:”false”},
          “enabled”:{“Acceptable Values”:”",”Default Value”:”true”,”Type”:”class java.lang.Boolean”,”Optional”:”true”},
          “description”:{“Acceptable Values”:”",”Default Value”:”",”Type”:”class java.lang.String”,”Optional”:”true”},
          “target”:{“Acceptable Values”:”",”Default Value”:”",”Type”:”class java.lang.String”,”Optional”:”true”},
          “property”:{“Acceptable Values”:”",”Default Value”:”",”Type”:”class java.util.Properties”,”Optional”:”true”},
          “connectionpoolid”:{“Acceptable Values”:”",”Default Value”:”",”Type”:”class java.lang.String”,”Optional”:”false”}
          }

          “Method”:”GET”

        5. Finally, create the JDBC resource as:
          ~/tools/glassfish/v3/2023/glassfishv3 >curl -d “id=jdbc/sample&connectionpoolid=DerbyPool” http://localhost:4848/management/domain/resources/jdbc-resource -v
          * About to connect() to localhost port 4848 (#0)
          *   Trying ::1… connected
          * Connected to localhost (::1) port 4848 (#0)
          > POST /management/domain/resources/jdbc-resource HTTP/1.1
          > User-Agent: curl/7.16.3 (powerpc-apple-darwin9.0) libcurl/7.16.3 OpenSSL/0.9.7l zlib/1.2.3
          > Host: localhost:4848
          > Accept: */*
          > Content-Length: 42
          > Content-Type: application/x-www-form-urlencoded
          >
          < HTTP/1.1 201 Created
          < Content-Type: text/html
          < Transfer-Encoding: chunked
          < Date: Wed, 19 Aug 2009 20:45:51 GMT
          <
          * Connection #0 to host localhost left intact
          * Closing connection #0
          “http://localhost:4848/management/domain/resources/jdbc-resource/jdbc/sample” created successfully.

          Note, this is a POST request. The JDBC resource name and JDBC connection pool id are passed as CLI parameters using “-d” switch. The last line shows that the JDBC resource was created successfully.

        6. And finally query the JDBC Resources again as:
          curl -H “Accept: application/json” http://localhost:4848/management/domain/resources/jdbc-resource -v

          to see the updated result as:

          {JdbcResource:{},”child-resources”:["http://localhost:4848/management/domain/resources/jdbc-resource/jdbc/__TimerPool",
          "http://localhost:4848/management/domain/resources/jdbc-resource/jdbc/__default",
          "http://localhost:4848/management/domain/resources/jdbc-resource/jdbc/sample"]}

        Similarly JDBC connection pools can be created.

    3. POST can be used to update the top-level attributes such as “log-root” and “application-root”. The name of these attributes are shown in the result of GET.
    4. As earlier, XML representation of management resources can be obtained as:
      ~/tools/glassfish/v3/2023/glassfishv3 >curl -H “Accept: application/xml” http://localhost:4848/management/domain -v
      * About to connect() to localhost port 4848 (#0)
      *   Trying ::1… connected
      * Connected to localhost (::1) port 4848 (#0)
      > GET /management/domain HTTP/1.1
      > User-Agent: curl/7.16.3 (powerpc-apple-darwin9.0) libcurl/7.16.3 OpenSSL/0.9.7l zlib/1.2.3
      > Host: localhost:4848
      > Accept: application/xml
      >
      < HTTP/1.1 200 OK
      < Content-Type: application/xml
      < Transfer-Encoding: chunked
      < Date: Wed, 19 Aug 2009 18:17:07 GMT
      <
      <Domain log-root=”${com.sun.aas.instanceRoot}/logs” application-root=”${com.sun.aas.instanceRoot}/applications” locale=”" version=”re-continuous”>
      <child-resource>http://localhost:4848/management/domain/configs</child-resource>
      <child-resource>http://localhost:4848/management/domain/resources</child-resource>
      <child-resource>http://localhost:4848/management/domain/servers</child-resource>
      <child-resource>http://localhost:4848/management/domain/property</child-resource>
      <child-resource>http://localhost:4848/management/domain/applications</child-resource>
      <child-resource>http://localhost:4848/management/domain/system-applications</child-resource>
      <child-resource>http://localhost:4848/management/domain/stop</child-resource>
      <child-resource>http://localhost:4848/management/domain/restart</child-resource>
      <child-resource>http://localhost:4848/management/domain/uptime</child-resource>
      <child-resource>http://localhost:4848/management/domain/version</child-resource>
      <child-resource>http://localhost:4848/management/domain/rotate-log</child-resource>
      <child-resource>http://localhost:4848/management/domain/host-port</child-resource>
      * Connection #0 to host localhost left intact
      * Closing connection #0

      Just changing the “Accept” header to “application/xml” did the trick.

    5. And an HTML representation can be obtained by viewing the URL “http://localhost:4848/management/domain” in the browser with result as:
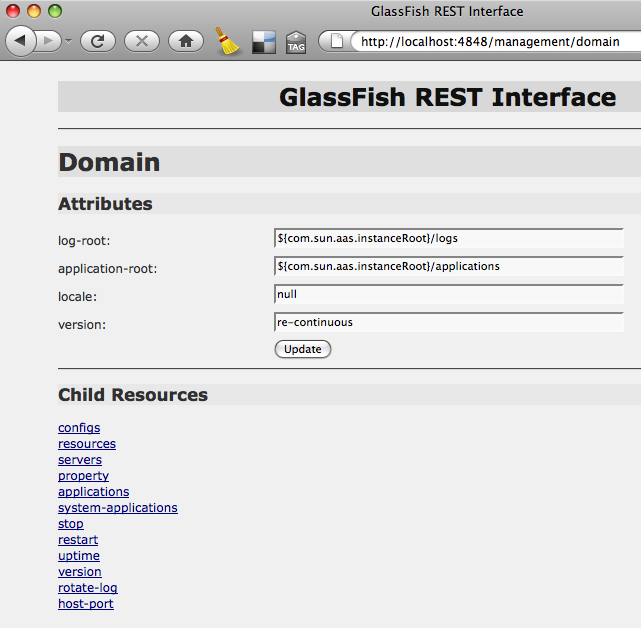
Just like GlassFish v3, the REST interface is extensible as well. So if a new container is plugged in that generates data (possibly through probes) captured in the runtime tree, that is automatically exposed in the RESTful interface.

Now for the Mac users, Safari prefers XML over HTML. Basically a resource, that can be served using both XML and HTML representation (as our Management and Monitoring interface), is served as XML by Safari and HTML by Firefox. So use Firefox on Mac if you want HTML rendering.

How will you use GlassFish RE
ST interface ?

Do your application server provide that level of administration capability ?

Please leave suggestions on other TOTD that you’d like to see. A complete archive of all the tips is available here.

Technorati: totd glassfish v3 rest management monitoring jersey
Share and Enjoy:
  • Print
  • Digg
  • Sphinn
  • del.icio.us
  • Facebook
  • Google Bookmarks
  • DZone
  • StumbleUpon
  • Technorati
  • Twitter
  • Slashdot

April 3, 2009

TOTD # 77: Running Seam examples with GlassFish

Filed under: general, totd — Tags: , , , , , , — arungupta @ 5:00 am
Seam is a full-stack solution to assemble complex web applications using simple annotated classes, a rich set of UI components, and very little XML. It integrates Ajax and Business Process Modeling with several Java EE technologies such as Java Server Faces (JSF), Java Persistence API (JPA), and Enterprise Java Beans (EJB 3.0).

GlassFish is a Java EE compliant application server so it’s natural to pick GlassFish as your deployment platform for Seam applications :)

This blog is going to show how Seam samples can be easily run on GlassFish.

  1. Download Seam 2.1.1 GA from here and unzip.
  2. Build “examples/jpa” sample as:
    ~/tools/jboss-seam-2.1.1.GA/examples/jpa >ant glassfish
    Buildfile: build.xml

    glassfish:

    initcopy:

    initpoms:
         [echo] Setting up dependencies
        [mkdir] Created dir: /Users/arungupta/tools/jboss-seam-2.1.1.GA/classes/poms
         [copy] Copying 1 file to /Users/arungupta/tools/jboss-seam-2.1.1.GA/classes/poms
    [artifact:install] [INFO] Installing /Users/arungupta/tools/jboss-seam-2.1.1.GA/classes/poms/root.pom to . . .

    . . .

    init.war:

    war:
         [copy] Copying 27 files to /Users/arungupta/tools/jboss-seam-2.1.1.GA/examples/jpa/exploded-archives-glassfish/jboss-seam-jpa.war
         [copy] Copying 7 files to /Users/arungupta/tools/jboss-seam-2.1.1.GA/examples/jpa/exploded-archives-glassfish/jboss-seam-jpa.war/WEB-INF/lib

    noejb.war:
         [copy] Copying 18 files to /Users/arungupta/tools/jboss-seam-2.1.1.GA/examples/jpa/exploded-archives-glassfish/jboss-seam-jpa.war/WEB-INF/lib
         [copy] Copying 2 files to /Users/arungupta/tools/jboss-seam-2.1.1.GA/examples/jpa/exploded-archives-glassfish/jboss-seam-jpa.war
         [copy] Copying 4 files to /Users/arungupta/tools/jboss-seam-2.1.1.GA/examples/jpa/exploded-archives-glassfish/jboss-seam-jpa.war

    distributable.war:

    noejb.archive:
          [jar] Building jar: /Users/arungupta/tools/jboss-seam-2.1.1.GA/examples/jpa/dist-glassfish/jboss-seam-jpa.war

    BUILD SUCCESSFUL
    Total time: 5 seconds

  3. Deploy the sample as:
    ~/tools/jboss-seam-2.1.1.GA/examples/jpa >~/tools/glassfish/v2.1/glassfish/bin/asadmin deploy dist-glassfish/jboss-seam-jpa.war
    Command deploy executed successfully.

    The app is now accessible at “http://localhost:8080/jboss-seam-jpa” and here are some of the captured screenshots:

    Simple and easy!

  4. Build “examples/hibernate” as:
    ~/tools/jboss-seam-2.1.1.GA/examples/hibernate >ant glassfish
    Buildfile: build.xml

    glassfish:

    initcopy:

    initpoms:
         [echo] Setting up dependencies
         [copy] Copying 1 file to /Users/arungupta/tools/jboss-seam-2.1.1.GA/classes/poms
    [artifact:install] [INFO] Installing /Users/arungupta/tools/jboss-seam-2.1.1.GA/classes/poms/root.pom to /Users/arungupta/.m2/repository/org/jboss/seam/root/2.1.1.GA/root-2.1.1.GA.pom

     . . .

    distributable.war:

    noejb.archive:
          [jar] Building jar: /Users/arungupta/tools/jboss-seam-2.1.1.GA/examples/hibernate/dist-glassfish/jboss-seam-hibernate.war

    BUILD SUCCESSFUL
    Total time: 6 seconds

  5. Deploy the sample as:
    ~/tools/jboss-seam-2.1.1.GA/examples/hibernate >~/tools/glassfish/v2.1/glassfish/bin/asadmin deploy dist-glassfish/jboss-seam-hibernate.war
    Command deploy executed successfully.

    The app is now accessible at “http://localhost:8080/jboss-seam-hibernate” and has exactly similar snapshots as shown in “jboss-seam-jpa” sample. Simple and easy, yet again!

  6. Build “examples/jee5/booking” and deploy as:
    ~/tools/jboss-seam-2.1.1.GA/examples/jee5/booking >ant
    Buildfile: build.xml

    initcopy:

    initpoms:
         [echo] Setting up dependencies
         [copy] Copying 1 file to /Users/arungupta/tools/jboss-seam-2.1.1.GA/classes/poms
    [artifact:install] [INFO] Installing /Users/arungupta/tools/jboss-seam-2.1.1.GA/classes/poms/root.pom to /Users/arungupta/.m2/repository/org/jboss/seam/root/2.1.1.GA/root-2.1.1.GA.pom
         [copy] Copying 1 file to /Users/arungupta/tools/jboss-seam-2.1.1.GA/classes/poms

    . . .

    archive:
          [jar] Building jar: /Users/arungupta/tools/jboss-seam-2.1.1.GA/examples/jee5/booking/dist/jboss-seam-jee5-booking.jar
          [jar] Building jar: /Users/arungupta/tools/jboss-seam-2.1.1.GA/examples/jee5/booking/dist/jboss-seam-jee5-booking.war
          [jar] Building jar: /Users/arungupta/tools/jboss-seam-2.1.1.GA/examples/jee5/booking/dist/jboss-seam-jee5-booking.ear

    BUILD SUCCESSFUL
    Total time: 5 seconds
    ~/tools/jboss-seam-2.1.1.GA/examples/jee5/booking >~/tools/glassfi
    sh/v2.1/glassfish/bin/asadmin deploy dist/jboss-seam-jee5-booking.ear

    Command deploy executed successfully.

    The application is now accessible at “http://localhost:8080/seam-jee5-booking”. Wow, that’s simple and easy as well!

So we have deployed multiple Seam samples on GlassFish v2.1 – simple and easy!

Here are some more useful pointers realted to Seam and GlassFish:

  • Chapter 39 of the Seam Community Documentation even describes how to deploy an application created using seam-gen on GlassFish.
  • Dan Allen, the author of Manning’s Seam in Action, presented a webinar at TheAquarium Online.
  • Several other Seam entries @ TA.
  • Deploying a seam-gen project to GlassFish (blog entry) – Here is a quote from the blog:

    GlassFish has a very sexy administrative console, but it also has a very sexy commandline tool known as asadmin. The asadmin tool gives you virtually unbounded control over the application server, including core tasks such as starting and stopping the application server, deploying and undeploying applications, and setting up database connection pools, amidst a plethora of other controls. You’ll see that my modified seam-gen tool takes advantage of a handful of these commands.

    And another one …

    GlassFish gives you efficiency through automation, which is undoubtedly the most effective way to become efficient. … GlassFish volunteers itself to participate in a script and is the reason why I choose it as my preferred application server.

  • GlassFish support added to seam-gen: It is certainly exciting to know that there are targets like “gf-deploy-datasource”, “gf-deploy-hibernate”, and “gf-prepare” available to Seam developers out-of-the-box.
  • Sample Application using JSF, Seam, and Java Persistence APIs on GlassFish – detailed step-by-step blog explaining how to run Seam applications on GlassFish

The other samples in the bundle (that I tried) rely upon non-Java EE jars in the App Server’s classpath. A slight build file tweaking can bundle those jars in the application itself and will allow to run them as well.

Are you deploying your Seam applications on GlassFish ?

Happy Seaming on GlassFish!

Please leave suggestions on other TOTD (Tip Of The Day) that you’d like to see. A complete archive of all the tips is available here.

Technorati: totd seam glassfish javaee javaserverfaces ejb jpa

Share and Enjoy:
  • Print
  • Digg
  • Sphinn
  • del.icio.us
  • Facebook
  • Google Bookmarks
  • DZone
  • StumbleUpon
  • Technorati
  • Twitter
  • Slashdot

February 12, 2009

TOTD #69: GlassFish High Availability/Clustering using Sun Web Server + Load Balancer Plugin on Windows Vista

Filed under: general, totd — Tags: , , , , , , , , — arungupta @ 12:15 am

TOTD #67 shows how to configure GlassFish High Availability using Apache httpd + mod_jk on Mac OS X. Even though that’s a standard and supported configuration, there are several advantages for replacing Apache httpd with Sun Web Server and mod_jk with Load Balancer plugin that comes with GlassFish.

This Tip Of The Day (TOTD) shows how to configure Clustering and Load Balancing using GlassFish v2.1, Sun Web Server, Load Balancer plugin on Windows Vista. This blog is using JDK 6 U7, GlassFish v2.1 (cluster profile), Sun Web Server 7 U4, and Load Balancer plug-in with Sun GlassFish Enterprise Server 2.1 Enterprise Profile (with HADB link).

Lets get started!

  1. Install the required software
    1. Download JDK (if not already installed).
    2. Download and Install GlassFish v2.1. Make sure to configure using “ant -f setup-cluster.xml”. This will ensure that the created domain is capable of creating clusters and can perform in-memory session replication for applications deployed on the cluster.
    3. Download and Install Sun Web Server. The process is very simple by unzipping the downloaded bundle, clicking on “setup.exe” and taking all the defaults.
    4. Download GlassFish Enterprise Profile for Load Balancer plugin bits. Start the install by clicking on the downloaded file and select the options as shown below:
    5. Copy the following “loadbalancer.xml” in “https-<host>” (replace <host> with the host name of your machine) directory of Sun Web Server installation directory:
      <?xml version=”1.0″ encoding=”UTF-8″?>
      <!DOCTYPE loadbalancer PUBLIC “-//Sun Microsystems Inc.//DTD Sun Java
      System Application Server 9.1//EN”
      “file:///C:/Sun/WebServer7/https-LH-KRKZDW6CJE1V/config/sun-loadbalancer_1_2.dtd
      “>

      <loadbalancer>
      <cluster name=”cluster1″ policy=”round-robin” policy-module=”">
      <instance name=”instance1″ enabled=”true”
      disable-timeout-in-minutes=”60″ listeners=”http://localhost:38080” weight=”100″/>
      <instance name=”instance2″ enabled=”true”
      disable-timeout-in-minutes=”60″ listeners=”http://localhost:38081” weight=”100″/>
      <web-module context-root=”/clusterjsp
      disable-timeout-in-minutes=”30″ enabled=”true” error-url=”"/>
      <health-checker interval-in-seconds=”7″ timeout-in-seconds=”5″ url=”/”/>
      </cluster>
      <property name=”response-timeout-in-seconds” value=”120″/>
      <property name=”reload-poll-interval-in-seconds” value=”7″/>
      <property name=”https-routing” value=”false”/>
      <property name=”require-monitor-data” value=”false”/>
      <property name=”active-healthcheck-enabled” value=”false”/>
      <property name=”number-healthcheck-retries” value=”3″/>
      <property name=”rewrite-location” value=”true”/>
      </loadbalancer>

      The parameters to be changed are highlighted in bold and explained below:

      1. Sun Web Server installation directory
      2. HTTP port of instances created in the cluster. The ports specified are the default ones and can be found by clicking on the instance as shown below:
      3. Context root of the application that will be deployed in the cluster. The Domain Administration Server (DAS) can be configured to populate this file whenever any application is deployed to the cluster.
  2. Create the cluster as explained in TOTD #67. The admin console shows the following screenshot after the cluster is created and all instances are created/started:

    and the following for 2 instances:

  3. Deploy “clusterjsp” as explained in TOTD #67. The admin console shows the following screenshot after “clusterjsp” is deployed:
  4. Start Sun Web Server using “startserv.bat” in “https-<host>” directory.

This concludes the installation and configuration steps, now show time!

Accessing “http://localhost/clusterjsp” shows:

The Sun Web Server is running on port 80 and uses “loadbalancer.xml” to serve the request from the configured instances in <loadbalancer> fragment. This particular page is served by “instance1″ as indicated in the image. Lets add session data with property name “aaa” and value “111″. The value is shown as:

The instance serving the data, “instance1″ in this case, and the session data are highlighted.

Now lets stop “instance1″ using the admin console and it looks like:

Click on “RELOAD PAGE” and it looks like:

Exactly same session data is served, this time by “instance2″.

The sequence above proves that the session data created by the user is preserved even if the instance serving the data goes down. This is possible because of GlassFish High Availability. The session data is served by the ”replica partner” where its already copied using in-memory session replication.

The following articles are also useful:

  • Load balancing for Glassfish V2 deployments using BIG-IP System
  • Configure the Cluster/Load Balancer with GlassFish v2

Please leave suggestions on other TOTD (Tip Of The Day) that you’d like to see. A complete archive of all tips is available here.

Technorati: totd glassfish highavailability clustering loadbalancing lbplugin sunwebserver windows vista

Share and Enjoy:
  • Print
  • Digg
  • Sphinn
  • del.icio.us
  • Facebook
  • Google Bookmarks
  • DZone
  • StumbleUpon
  • Technorati
  • Twitter
  • Slashdot

November 26, 2008

TOTD #57: Jersey Client API – simple and easy to use

Filed under: totd, webservices — Tags: , , , , , , , , — arungupta @ 5:00 am

TOTD #56 explains how to create a RESTful Web service endpoint using Jersey and publish the resource using JSON representation. The blog entry showed how the endpoint can be accessed from a Web browser. This Tip Of The Day explains how to use Jersey Client APIs to invoke the published endpoint.

Lets get started!

  1. Create a new directory “./src/test/java/org/glassfish/samples”
  2. Add a test
    1. Add a template test file “AppTest.java” as shown below:

      package org.glassfish.samples;

      import junit.framework.Test;
      import junit.framework.TestCase;
      import junit.framework.TestSuite;

      /**
       * Unit test for simple App.
       */
      public class AppTest
          extends TestCase
      {
          /**
           * Create the test case
           *
           * @param testName name of the test case
           */
          public AppTest( String testName )
          {
              super( testName );
          }

          /**
           * @return the suite of tests being tested
           */
          public static Test suite()
          {
              return new TestSuite( AppTest.class );
          }

          /**
           * Rigourous Test :-)
           */
          public void testApp()
          {
              assertTrue(true);
          }
      }

    2. Add a new method “createResource()” as:
          private WebResource createResource() {
              Client client = Client.create();
              WebResource resource = client.resource(“http://localhost:8080/helloworld-webapp/webresources/myresource”);
              return resource;
          }

      This code creates a default instance of Jersey Client and creates a Web resource from that client for the URI passed as an argument.

    3. Change the implementation of “testApp()” method as:
              Greeting result = createResource().get(Greeting.class);
              assertTrue(result.greeting.equals(“Hi there!”));

      This invokes the GET method on the resource by passing specific type and compares the returned and expected value.

    4. Add the following “imports”:
      import com.sun.jersey.api.client.Client;
      import com.sun.jersey.api.client.WebResource;
    5. Copy “Greeting.java” from TOTD #56 to ”./src/test/java/org/glassfish/samples” directory.
  3. Run the test
    1. Deploy the endpoint as “mvn glassfish:run”.
    2. Run the test as “mvn test”. The following output is shown:
      ~/samples/jersey/helloworld-webapp >mvn test
      [INFO] Scanning for projects…
      [INFO] ————————————————————————
      [INFO] Building helloworld-webapp Jersey Webapp
      [INFO]    task-segment: [test]
      [INFO] ————————————————————————
      [INFO] [resources:resources]
      [INFO] Using default encoding to copy filtered resources.
      [INFO] [compiler:compile]
      [INFO] Nothing to compile – all classes are up to date
      [INFO] [resources:testResources]
      [INFO] Using default encoding to copy filtered resources.
      [INFO] [compiler:testCompile]
      [INFO] Compiling 1 source file to /Users/arungupta/samples/jersey/helloworld-webapp/target/test-classes
      [INFO] [surefire:test]
      [INFO] Surefire report directory: /Users/arungupta/samples/jersey/helloworld-webapp/target/surefire-reports

      ——————————————————-
       T E S T S
      ——————————————————-
      Running org.glassfish.samples.AppTest
      Tests run: 1, Failures: 0, Errors: 0, Skipped: 0, Time elapsed: 0.587 sec

      Results :

      Tests run: 1, Failures: 0, Errors: 0, Skipped: 0

      [INFO] ————————————————————————
      [INFO] BUILD SUCCESSFUL
      [INFO] ————————————————————————
      [INFO] Total time: 4 seconds
      [INFO] Finished at: Mon Nov 24 16:50:17 PST 2008
      [INFO] Final Memory: 18M/43M
      [INFO] ————————————————————————

  4. View request and response messages
    1. Change the implementation of “createResource()” method as (changes highlighted in bold):

              Client client = Client.create();
              WebResource resource = client.resource(“http://localhost:8080/helloworld-webapp/webresources/myresource”);
              resource.addFilter(new LoggingFilter());
              return resource;
    2. Running the tests as “mvn test” now shows the output, with request and response messages, as shown below:
      Running org.glassfish.samples.AppTest
      1 * Out-bound request
      1 > GET http://localhost:8080/helloworld-webapp/webresources/myresource
      1 >
      1 < 200
      1 < X-Powered-By: Servlet/2.5
      1 < Transfer-Encoding: chunked
      1 < Content-Type: application/json
      1 < Server: GlassFish/v3
      1 < Date: Tue, 25 Nov 2008 07:07:51 GMT
      1 <
      {“greeting”:”Hi there!”}
      1 * In-bound response
      Tests run: 1, Failures: 0, Errors: 0, Skipped: 0, Time elapsed: 1.074 sec

Really easy!

Even though the APIs are used to invoke a RESTful endpoint deployed using Jersey but are very generic and can be used to invoke any RESTful endpoint. Paul’s blog explain in detail on the usage. You can also see how these APIs can be used to consume a service hosted using Apache Abdera.

com.sun.jersey.api.client, com.sun.jersey.api.client.config, and com.sun.jersey.api.client.filter packages documents all the classes that provide support for client-side communication with HTTP-based RESTful Web services.

Technorati: totd glassfish v3 embeddable jersey jsr311 rest json webservices

Share and Enjoy:
  • Print
  • Digg
  • Sphinn
  • del.icio.us
  • Facebook
  • Google Bookmarks
  • DZone
  • StumbleUpon
  • Technorati
  • Twitter
  • Slashdot

November 19, 2007

TOTD #18: How to Build The GlassFish v3 Gem for JRuby ?

Filed under: general, totd — Tags: , , , , , , — arungupta @ 12:02 am

Jerome posted the instructions to build GlassFish v3 Gem for JRuby – very simple and easy. A binary version of Gem is available here.

  1. Software pre-requisite
    1. Subversion client (for example Tigris)
    2. Maven 2.0.x
    3. JRuby 1.0.x (I used JRuby 1.0.2 and lets say installed in JRUBY_HOME).  Make sure JRUBY_HOME/bin is in your path.
  2. Build the Gem
    1. As explained in Jerome’s entry, you can check out complete GlassFish v3 workspace or just the Gem code. Here is how you’ll check out only the Gem code on a Windows machine using Tigris Subversion client:

      And after the check out is complete, you’ll see:

    2. Build the gem by giving the command:

      mvn install

      And success is achieved by seeing the following in the console:

      [INFO] (in C:/workspaces/glassfish/gem/target/dependency/glassfish)
      [WARNING] mkdir -p pkg
      [INFO] Successfully built RubyGem
      [INFO] Name: GlassFish
      [WARNING] mv GlassFish-10.0.0-java.gem pkg/GlassFish-10.0.0-java.gem
      [INFO] Version: 10.0.0
      [INFO] File: GlassFish-10.0.0-java.gem
      [INFO] [install:install]
      [INFO] Installing C:\workspaces\glassfish\gem\target\gem-10.0-SNAPSHOT.jar to C:\Users\Arun Gupta\.m2\repository\org\glassfish\distributions\gem\10.0-SNAPSHOT\gem-10.0-SNAPSHOT.jar
      [INFO] [install:install-file {execution: install-gem}]
      [INFO] Installing C:\workspaces\glassfish\gem\target\dependency\glassfish\pkg\GlassFish-10.0.0-java.gem to C:\Users\Arun Gupta\.m2\repository\org\glassfish\distributions\GlassFish-Gem\10.0-SNAPSHOT\GlassFish-Gem-10.0-SNAPSHOT.gem
      [INFO] ------------------------------------------------------------------------
      [INFO] BUILD SUCCESSFUL
      [INFO] ------------------------------------------------------------------------
      [INFO] Total time: 2 minutes 2 seconds
      [INFO] Finished at: Fri Nov 16 17:56:12 PST 2007
      [INFO] Final Memory: 11M/20M
      [INFO] ------------------------------------------------------------------------

      The Gem is available in target\dependency\glassfish\pkg directory.

  3. Install the Gem
    1. Change to the directory where the Gem is available

      cd target\dependency\glassfish\pkg

    2. Install the Gem as:

      C:\testbed\ruby\jruby-1.0.2\bin\jruby -S gem install GlassFish-10.0.0-java.gem
      Successfully installed GlassFish, version 10.0.0

And use it!

Please leave suggestions on other TOTD that you’d like to see. A complete archive is available here.

Technorati: totd v3 jruby ruby rubyonrails glassfish gem jrubyonglassfish

Share and Enjoy:
  • Print
  • Digg
  • Sphinn
  • del.icio.us
  • Facebook
  • Google Bookmarks
  • DZone
  • StumbleUpon
  • Technorati
  • Twitter
  • Slashdot

The views expressed on this blog are my own and do not necessarily reflect the views of Oracle.
Powered by WordPress