GlassFish 3.1 Milestone 2 enables SSH provisioning that allows you to create, start, stop, and delete a cluster spanning multiple instances on local and remote machines from the Domain Administration Server (DAS). This Tip Of The Day (TOTD) builds upon TOTD #141 and explains how you can create such a cluster on Amazon EC2 with Ubuntu 10.04. Carla also blogged about a similar scenario here.
The cluster topology created is shown below:
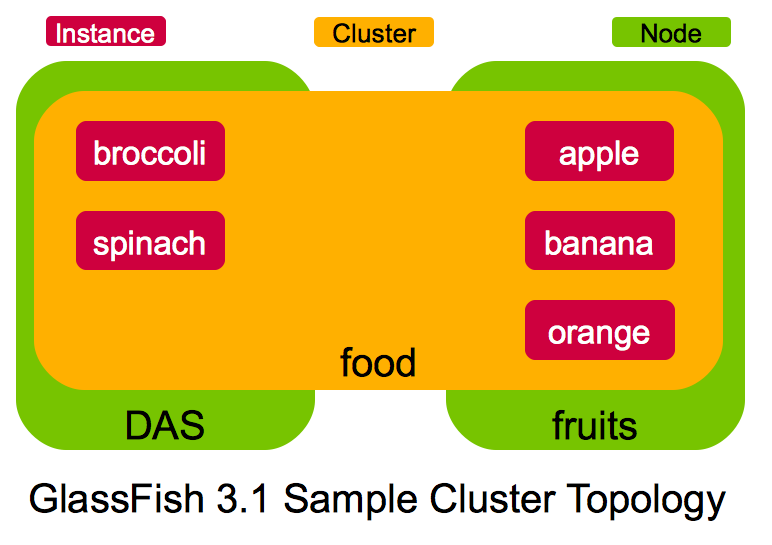
The key points shown in the topology are:
- It consists of DAS and a remote machine "fruits" (shown in green color)
- There is one cluster "food" spanning these two machines (shown in yellow color)
- DAS has "broccoli" and "spinach" instances (shown in red color)
- "fruits" has "apple", "banana", and "orange" instances (shown in red color)
Amazon EC2 assigned the public IP address of "ec2-184-72-12-163.us-west-1.compute.amazonaws.com" to DAS and "ec2-184-72-17-228.us-west-1.compute.amazonaws.com" to the remote machine. These IP addresses are used in the command invocations below.
Lets get started!
- Configure SSH between DAS and the remote machine – More details about SSH key setup here.
- Copy the keypair generated in TOTD #141 (ec2-keypair.pem) to DAS as:
~/.ec2 >scp -i /Users/arungupta/.ec2/ec2-keypair.pem /Users/arungupta/.ec2/ec2-keypair.pem \\
[email protected]
ec2-keypair.pem 100% 1751 1.7KB/s 00:00
Notice, the public IP address of DAS is specified here. This key will be used to copy the private keys generated in next step to the remote machine.
- Generate a private/public key pair on DAS as:
ubuntu@ip-10-160-47-196:~$ ssh-keygen -t dsa Generating public/private dsa key pair. Enter file in which to save the key (/home/ubuntu/.ssh/id_dsa): Enter passphrase (empty for no passphrase): Enter same passphrase again: Your identification has been saved in /home/ubuntu/.ssh/id_dsa. Your public key has been saved in /home/ubuntu/.ssh/id_dsa.pub. The key fingerprint is: 0a:b8:cd:8c:a0:7f:3d:00:9e:ec:ac:06:a1:f1:2f:cb ubuntu@ip-10-160-47-196 The key's randomart image is: +--[ DSA 1024]----+ | | | | | | |o .. | |o*.o. S | |+.=*.. . | |ooo.+o. | | ++ o o | |o.E+ . | +-----------------+ - Copy the generated public to ".ssh" directory of the remote machine as:
ubuntu@ip-10-160-142-175:~/.ssh$ scp -i ec2-keypair.pem id_dsa.pub \\ [email protected]:.ssh/authorized_keys2 - Make sure the ssh connection works between DAS and remote machine without specifying any key or passphrase as shown below:
ssh [email protected]
- Copy the keypair generated in TOTD #141 (ec2-keypair.pem) to DAS as:
- Install "sun-java6-jdk" and "unzip" package and GlassFish on DAS and remote machine as explained in TOTD #141. In short:
ssh -i /Users/arungupta/.ssh/ec2-keypair.pem [email protected] sudo add-apt-repository "deb http://archive.canonical.com/ lucid partner" sudo apt-get update sudo apt-get install sun-java6-bin sun-java6-jre sun-java6-jdk sudo update-java-alternatives -s java-6-sun sudo apt-get install unzipwget http://dlc.sun.com.edgesuite.net/glassfish/3.1/promoted/glassfish-3.1-b06.zipunzip glassfish-3.1-b06.zip - Start GlassFish on DAS and remote machine as:
export ENABLE_REPLICATION=true export PATH=~/glassfishv3/bin:$PATH asadmin start-domain --verbose & - Create the cluster and instances by issuing the following commands on the DAS
- Create the cluster as:
ubuntu@ip-10-160-142-175:~$ asadmin create-cluster food [#|2010-06-25T22:11:27.604+0000|INFO|glassfish3.1|org.hibernate.validator.util.Version| _ThreadID=23;_ThreadName=http-thread-pool-4848(2);|Hibernate Validator bean-validator-3.0-JBoss-4.0.2_03|#] [#|2010-06-25T22:11:27.638+0000|INFO|glassfish3.1|org.hibernate.validator.engine. resolver.DefaultTraversableResolver|_ThreadID=23;_ThreadName=http-thread-pool-4848(2);| Instantiated an instance of org.hibernate.validator.engine.resolver.JPATraversableResolver.|#] Command create-cluster executed successfully. - Create a node on the remote machine as:
ubuntu@ip-10-160-142-175:~3$ asadmin create-node-ssh --nodehost \\ ec2-184-72-17-228.us-west-1.compute.amazonaws.com --nodehome /home/ubuntu/glassfishv3 fruits Command create-node-ssh executed successfully. - List all the nodes as:
ubuntu@ip-10-160-142-175:~$ asadmin list-nodes localhost fruits Command list-nodes executed successfully. - Create two instances ("broccoli" and "spinach") on DAS as:
ubuntu@ip-10-160-142-175:~$ asadmin create-instance --cluster=food \\
--systemproperties AJP_INSTANCE_NAME=broccoli:AJP_INSTANCE_PORT=19090 broccoli
[#|2010-06-25T23:22:02.891+0000|INFO|glassfish3.1|javax.enterprise.system.tools.admin
.com.sun.enterprise.v3.admin.cluster|_ThreadID=103;_ThreadName=http-thread-pool-4848(2);|
Creating instance broccoli on localhost|#]
[#|2010-06-25T23:22:03.750+0000|INFO|glassfish3.1|null|_ThreadID=30;_ThreadName=stdout;|
Using DAS host localhost and port 4848 from existing das.properties for nodeagent
ip-10-160-142-175. To use a different DAS, create a new nodeagent by specifying a
new --nodeagent name with the correct values for --host and --port.|#]
[#|2010-06-25T23:22:03.785+0000|INFO|glassfish3.1|null|_ThreadID=30;_ThreadName=stdout;|
Command _create-instance-filesystem executed successfully.|#]
Command create-instance executed successfully.
ubuntu@ip-10-160-142-175:~$ asadmin create-instance --cluster=food \\
--systemproperties AJP_INSTANCE_NAME=spinach:AJP_INSTANCE_PORT=19091 spinach
[#|2010-06-25T23:22:24.813+0000|INFO|glassfish3.1|javax.enterprise.system.tools.admin.
com.sun.enterprise.v3.admin.cluster|_ThreadID=106;_ThreadName=http-thread-pool-4848(5);|
Creating instance spinach on localhost|#]
[#|2010-06-25T23:22:25.636+0000|INFO|glassfish3.1|null|_ThreadID=32;_ThreadName=stdout;|
Using DAS host localhost and port 4848 from existing das.properties for nodeagent
ip-10-160-142-175. To use a different DAS, create a new nodeagent by specifying a
new --nodeagent name with the correct values for --host and --port.|#]
[#|2010-06-25T23:22:25.672+0000|INFO|glassfish3.1|null|_ThreadID=32;_ThreadName=stdout;|
Command _create-instance-filesystem executed successfully.|#]
Command create-instance executed successfully.
The AJP_INSTANCE_NAME and AJP_INSTANCE_PORT properties will be used by mod_jk in a subsequent blog.
- Create three instances ("apple", "banana", and "orange") on the remote machine as:
ubuntu@ip-10-160-142-175:~$ asadmin create-instance --cluster=food --node=fruits \\
--systemproperties AJP_INSTANCE_NAME=apple:AJP_INSTANCE_PORT=19090 apple
[#|2010-06-25T23:23:33.208+0000|INFO|glassfish3.1|javax.enterprise.system.tools.admin.
com.sun.enterprise.v3.admin.cluster|_ThreadID=104;_ThreadName=http-thread-pool-4848(3);|
Creating instance apple on fruits|#]
[#|2010-06-25T23:23:35.682+0000|INFO|glassfish3.1|javax.enterprise.system.tools.admin.
com.sun.enterprise.v3.admin.cluster|_ThreadID=104;_ThreadName=http-thread-pool-4848(3);|
Command _create-instance-filesystem executed successfully.
|#]
Command create-instance executed successfully.
ubuntu@ip-10-160-142-175:~$ asadmin create-instance --cluster=food --node=fruits \\
--systemproperties AJP_INSTANCE_NAME=banana:AJP_INSTANCE_PORT=19091 banana
[#|2010-06-25T23:23:59.697+0000|INFO|glassfish3.1|javax.enterprise.system.tools.admin.
com.sun.enterprise.v3.admin.cluster|_ThreadID=102;_ThreadName=http-thread-pool-4848(1);|
Creating instance banana on fruits|#]
[#|2010-06-25T23:24:01.500+0000|INFO|glassfish3.1|javax.enterprise.system.tools.admin.
com.sun.enterprise.v3.admin.cluster|_ThreadID=102;_ThreadName=http-thread-pool-4848(1);|
Using DAS host ip-10-160-142-175.us-west-1.compute.internal and port 4848 from
existing das.properties for nodeagent ip-10-160-142-20. To use a different DAS,
create a new nodeagent by specifying a new --nodeagent name with the correct
values for --host and --port.
Command _create-instance-filesystem executed successfully.
|#]
Command create-instance executed successfully.
ubuntu@ip-10-160-142-175:~$ asadmin create-instance --cluster=food --node=fruits \\
--systemproperties AJP_INSTANCE_NAME=orange:AJP_INSTANCE_PORT=19092 orange
[#|2010-06-25T23:24:13.286+0000|INFO|glassfish3.1|javax.enterprise.system.tools.admin.
com.sun.enterprise.v3.admin.cluster|_ThreadID=105;_ThreadName=http-thread-pool-4848(4);|
Creating instance orange on fruits|#]
[#|2010-06-25T23:24:15.089+0000|INFO|glassfish3.1|javax.enterprise.system.tools.admin.
com.sun.enterprise.v3.admin.cluster|_ThreadID=105;_ThreadName=http-thread-pool-4848(4);|
Using DAS host ip-10-160-142-175.us-west-1.compute.internal and port 4848 from
existing das.properties for nodeagent ip-10-160-142-20. To use a different DAS,
create a new nodeagent by specifying a new --nodeagent name with the correct
values for --host and --port.
Command _create-instance-filesystem executed successfully.
|#]
Command create-instance executed successfully.
- Create the cluster as:
- Start the cluster
- List all instances as:
ubuntu@ip-10-160-142-175:~3$ asadmin list-instances broccoli not running spinach not running apple not running banana not running orange not running Command list-instances executed successfully. - Start the cluster as:
ubuntu@ip-10-160-142-175:~$ asadmin start-cluster food . . . Command start-cluster executed successfully. - List all the instances again as:
ubuntu@ip-10-160-142-175:~$ asadmin list-instances
. . .
broccoli running
spinach running
apple running
banana running
orange running
The HTTP ports of each instance can be grepped from DAS’s "domain.xml". Here are the ports for each created instance:
broccoli 28080 spinach 28081 apple 28080 banana 28081 orange 28082 On Amazon, you may have to poke holes in the firewall as:
ec2-authorize default -p 28080
ec2-authorize default -p 28081
ec2-authorize default -p 28082
And now "http://ec2-184-72-12-163.us-west-1.compute.amazonaws.com:28080/" ("broccoli" instance on DAS) will show the default index page. Similarly other host and port combinations will show this page as well.
- List all instances as:
This blog showed how to create a GlassFish 3.1 cluster spanning multiple instances on Amazon EC2 with Ubuntu 10.04.
Subsequent blogs will show:
- How to deploy an app to this cluster and some variations ?
- How to front-end this cluster with mod_jk for load-balancing ?
Technorati: totd glassfish clustering ssh instance amazon ec2 ubuntu


