TOTD #106 explained how to install Oracle database 10g R2 on Mac OS X. TOTD #107 explained how to connect this Oracle database using NetBeans. This Tip Of The Day will explain how to use the sample HR database (that comes with Oracle database server) to write a simple Java EE 6 application.
This application will use Java Server Faces 2.0 for displaying the results, Enterprise Java Beans 3.1 + Java Persistence API 2.0 for middle tier, and Oracle database server + GlassFish v3 as the backend. The latest promoted build (65 of this writing) will not work because of the issue #9885 so this blog will use build 63 instead.
Several improvements have been made over NetBeans 6.8 M1 build and this blog is using the nightly build of 9/27. The environment used in this blog is:
- NetBeans 9/27 nightly
- GlassFish v3 build 63
- Oracle database server 10.2.0.4.0 R2 on Mac OS X
- Oracle JDBC Driver type 4 (ojdbc6.jar)
Lets get started!
- Configure GlassFish v3 with JDBC connection
- Download and unzip build 63.
- Download ojdbc6.jar and copy to "glassfishv3/glassfish/domains/domain1/lib/ext" directory.
- Start the Application Server as:
./bin/asadmin start-domain --verbose & - Create a JDBC connection pool as:
./bin/asadmin create-jdbc-connection-pool --datasourceclassname oracle.jdbc.pool.OracleDataSource --restype javax.sql.DataSource --property "User=hr:Password=hr:URL=jdbc\:oracle\:thin\:@localhost\:1521\:orcl" jdbc/hrand verify the connection pool as:
./bin/asadmin ping-connection-pool jdbc/hr - Create a JDBC resource as:
./bin/asadmin create-jdbc-resource --connectionpoolid jdbc/hr jdbc/hr
- Configure GlassFish v3 build 63 in NetBeans
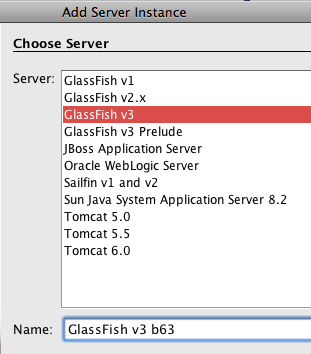
- In NetBeans IDE "Services" panel, right-click on "Servers" and click on "Add Server…". Choose "GlassFish v3" and provide a name as shown below:
- Click on "Next >" and specify the unzipped GlassFish location as:
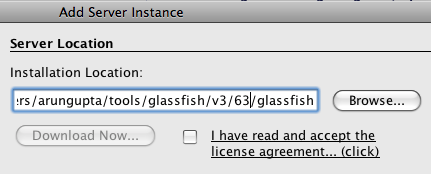
and click on "Finish".
- In NetBeans IDE "Services" panel, right-click on "Servers" and click on "Add Server…". Choose "GlassFish v3" and provide a name as shown below:
- Create the Java EE 6 application
- In "Projects" pane, right-click and select "New Project…".
- Choose "Java Web" and "Web Application" and click on "Next". Choose the project name as "HelloOracle":

and click on "Next >".
- Select the recently added GlassFish v3 server and choose "Java EE 6 Web" profile:
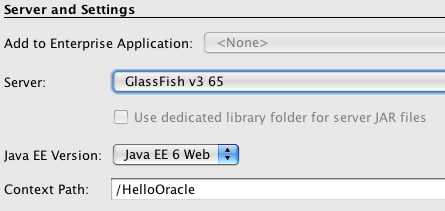
and click on "Next >". Notice "Java EE 6 Web" profile is chosen as the Java EE version.
- Select "JavaServer Faces" on the frameworks page:
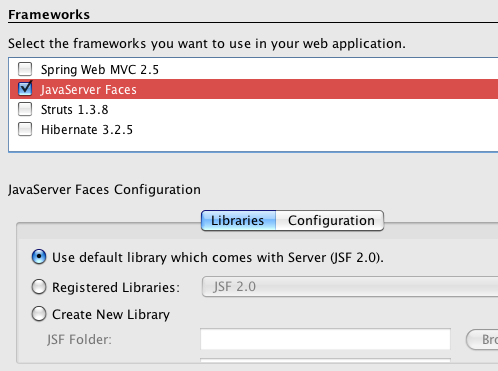
and click on "Finish". Notice the JSF libraries bundled with the App Server are used.
- Create the Java Persistence Unit
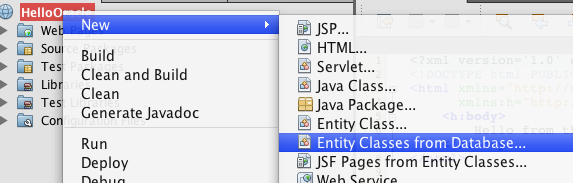
- Right-click on the project, select "New", "Entity Classes from Database…":
- From the Data Source, select "jdbc/hr" as shown:
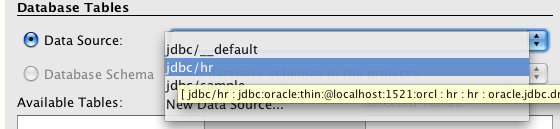
This is the same JDBC resource created earlier. Select "EMPLOYEES" from the Available Table, click on "Add >" to see the output as:

The related tables are automatically included. Click on "Next >".
- Click on "Create Persistence Unit …" and take all the defaults and click on "Create".
- Specify the package name as "model":
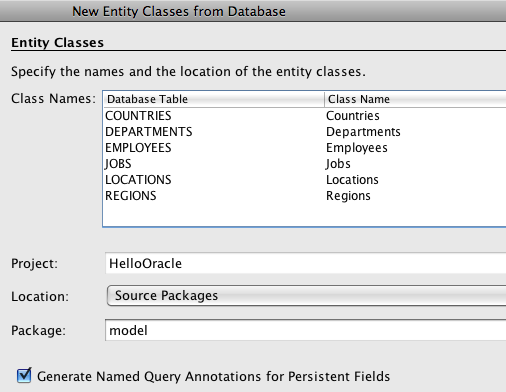
and click on "Finish". This generates a JPA-compliant POJO class that provide access to tables in the underlying Oracle database. The class name corresponding to each table is shown in the wizard.
- Right-click on the project, select "New", "Entity Classes from Database…":
- Create Enterprise Java Beans
- Right-click on the project and select "New Class…".
- Specify the class name as "EmployeesBean" and package as "controller", click on "Finish".
- Annotate the class to make it an Enterprise Java Bean and a JSF Managed Bean as:
@javax.ejb.Stateless
@javax.faces.bean.ManagedBean
Notice, the EJB is bundled in the WAR file and no special type of modules are required. Java EE 6 provides simplified packaging of EJB which makes it really ease to use.
Also this application is currently using JSF managed bean but will use JSR 299 (aka Web Beans) in a future blog.
- Inject the Persistence Unit by adding the following variable:
@PersistenceUnit EntityManagerFactory emf; - Add a new method to retrieve the list of all employees as:
public List getEmployees() {
return em.createNamedQuery("Employees.findAll").getResultList();
}
"Employees.findAll" is a default NamedQuery generated by NetBeans and makes it easy to query the database. Several other queries are generated for each mapped JPA class, such as "Employees.findByEmployeeId" and "Employees.findByFirstName". Custom queries can also be created and specified on the POJO class.
The completed class looks like:
@Stateless
@ManagedBean
public class EmployeesBean {
public List getEmployees() {
return emf.createEntityManager().createNamedQuery("Employees.findAll").getResultList();
}
}
- Use EJB in the generated JSF page
- JSF 2 uses Facelets as the templating mechanism and NetBeans generate a simple "index.xhtml" file to start with. Expand "Web Pages" and open "index.xhtml".
- Replace the body template with:
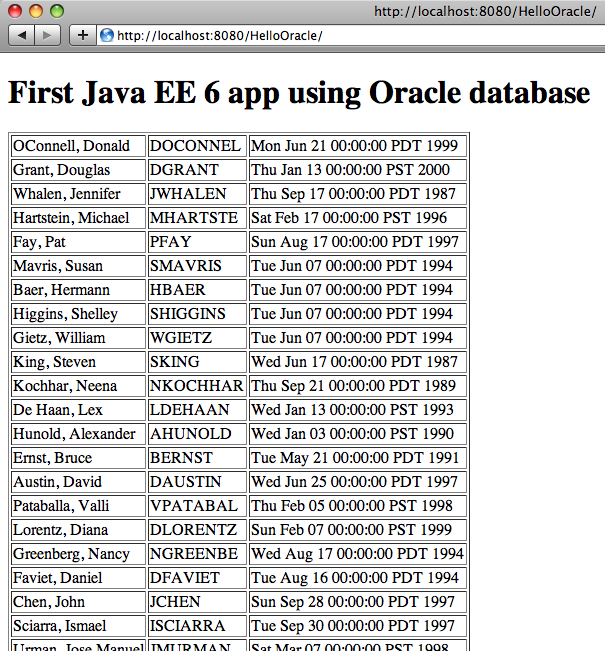
<h1>First Java EE 6 app using Oracle database</>
<h:dataTable var="emp" value="#{employeesBean.employees}" border="1">
<h:column><h:outputText value="#{emp.lastName}"/>, <h:outputText value="#{emp.firstName}"/></h:column>
<h:column><h:outputText value="#{emp.email}"/></h:column>
<h:column><h:outputText value="#{emp.hireDate}"/></h:column>
</h:dataTable>
It uses JSF value expressions to bind the Enterprise Java Bean and dumps the HTML formatted name, email, and hire date of each employee in the database.
- Run the project: Right-click on the project and select "Run" to see the output at "http://localhost:8080/HelloOracle/" as:
So we can easily create a Java EE 6 application using NetBeans, Oracle, and GlassFish.
A complete archive of all the TOTDs is available here.
This and other similar applications will be demonstrated at the upcoming Oracle Open World.
Technorati: totd oracle database glassfish v3 javaee javaserverfaces ejb jpa netbeans oow
- TOTD #112: Exposing Oracle database tables as RESTful entities using JAX-RS, GlassFish, and NetBeans
- TOTD #94: A simple Java Server Faces 2.0 + JPA 2.0 application – Getting Started with Java EE 6 using NetBeans 6.8 M1 & GlassFish v3
- TOTD #95: EJB 3.1 + Java Server Faces 2.0 + JPA 2.0 web application – Getting Started with Java EE 6 using NetBeans 6.8 M1 & GlassFish v3
- TOTD #107: Connect to Oracle database using NetBeans
- TOTD #99: Creating a Java EE 6 application using MySQL, JPA 2.0 and Servlet 3.0 with GlassFish Tools Bundle for Eclipse
Hi,
thanks for this sample.
I am not too sure about the use of the EmployeesBean class as a stateless session bean and a managed bean.
I mean you could have still injected the EntityManager instance in the class if it was just a managed bean.
What does the declaration of the class as a stateless session bean bring in this sample ?
Comment by Celinio — February 8, 2010 @ 10:20 pm
I have tried this several times, but can’t get the Bean properties available to jsf. The Bean is visible (employeesBean), but no properties other than values like toString and id. Even using those I get "id is not a property of employeesBean"
Comment by jmcecil — February 16, 2010 @ 1:50 pm
Celinio,
Stateless session bean only shows that you can have an EJB as a backing bean for JSF. Why would you do that ? For example, transactions and other goodness that EJB provides you.
jmcecil,
Can you check your @ManagedBean annotation package ? Otherwise please post your question to with source code.
Comment by Arun Gupta — February 16, 2010 @ 5:03 pm
Step 4 shows adding:
@PersistenceUnit
EntityManagerFactory emf;
but the completed class in section 5 shows:
@PersistenceContext
EntityManager em;
This appears to be inconsistent.
-NBW
Comment by NBW — February 22, 2010 @ 12:57 pm
Thanks NBW,
The code in the blog got out of sync from the working version in the IDE, now fixed.
-Arun
Comment by Arun Gupta — February 23, 2010 @ 4:47 pm
I wanted to print this tip of the day, but when I try it gets meshed with the twitter information. Is there anyway to print this totd without getter the twitter info. Thanks.
Comment by Mike — July 4, 2010 @ 11:44 am