If the numbers of articles, meetups, talk submissions at different conferences, tweets, and other indicators are taken into consideration, then seems like Docker is going to solve world hunger. It would be nice if it would, but apparently not. But it does solve one problem really well!
Lets hear it from @solomonstre – creator of Docker project!
In short, Docker simplifies software delivery by making it easy to build and share images that contain your application’s entire environment, or application operating system.
What does it mean by application operating system ?
Your application typically require a specific version of operating system, application server, JDK, database server, may require to tune the configuration files, and similarly multiple other dependencies. The application may need binding to specific ports and certain amount of memory. The components and configuration together required to run your application is what is referred to as application operating system.
You can certainly provide an installation script that will download and install these components. Docker simplifies this process by allowing to create an image that contains your application and infrastructure together, managed as one component. These images are then used to create Docker containers which run on the container virtualization platform, provided by Docker.
What are the main components of Docker ?
Docker has two main components:
- Docker: the open source container virtualization platform
- Docker Hub: SaaS platform for sharing and managing Docker images
Docker uses Linux Containers to provide isolation, sandboxing, reproducibility, constraining resources, snapshotting and several other advantages. Read this excellent piece at InfoQ on Docker Containers for more details on this.
Images are “build component” of Docker and a read-only template of application operating system. Containers are runtime representation, and created from, images. They are “run component” of Docker. Containers can be run, started, stopped, moved, and deleted. Images are stored in a registry, the “distribution component” of Docker.
Docker in turn contains two components:
- Daemon runs on a host machine and does the heavy lifting of building, running, and distributing Docker containers.
- Client is a Docker binary that accepts commands from the user and communicates back and forth with daemon
How do these work together ?
Client communicates with Daemon, either co-located on the same host, or on a different host. It requests the Daemon to pull an image from the repository using pull command. The Daemon then downloads the image from Docker Hub, or whatever registry is configured. Multiple images can be downloaded from the registry and installed on Daemon host.
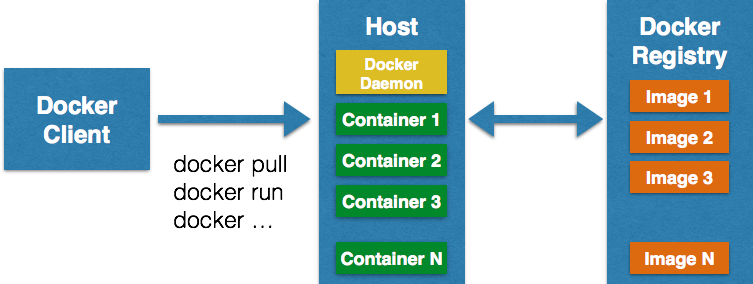
Client can then start the Container using run command. The complete list of client commands can be seen here.
Client communicates with Daemon using sockets or REST API.
Because Docker uses Linux Kernel features, does that mean I can use it only on Linux-based machines ?
Docker daemon and client for different operating systems can be installed from docs.docker.com/installation/. As you can see, it can be installed on a wide variety of platforms, including Mac and Windows.
For non-Linux machines, a lightweight Virtual Machine needs to be installed and Daemon is installed within that. A native client is then installed on the machine that communicates with the Daemon. Here is the log from booting Docker daemon on Mac:
1
2
3
4
5
6
7
8
9
10
11
12
13
14
15
16
17
18
19
20
21
22
23
24
25
26
27
28
29
30
|
bash
unset DYLD_LIBRARY_PATH ; unset LD_LIBRARY_PATH
mkdir -p ~/.boot2docker
if [ ! -f ~/.boot2docker/boot2docker.iso ]; then cp /usr/local/share/boot2docker/boot2docker.iso ~/.boot2docker/ ; fi
/usr/local/bin/boot2docker init
/usr/local/bin/boot2docker up && export DOCKER_HOST=tcp://$(/usr/local/bin/boot2docker ip 2>/dev/null):2375
docker version
~> bash
~> unset DYLD_LIBRARY_PATH ; unset LD_LIBRARY_PATH
~> mkdir -p ~/.boot2docker
~> if [ ! -f ~/.boot2docker/boot2docker.iso ]; then cp /usr/local/share/boot2docker/boot2docker.iso ~/.boot2docker/ ; fi
~> /usr/local/bin/boot2docker init
2014/07/16 09:57:13 Virtual machine boot2docker-vm already exists
~> /usr/local/bin/boot2docker up && export DOCKER_HOST=tcp://$(/usr/local/bin/boot2docker ip 2>/dev/null):2375
2014/07/16 09:57:13 Waiting for VM to be started...
.......
2014/07/16 09:57:35 Started.
2014/07/16 09:57:35 To connect the Docker client to the Docker daemon, please set:
2014/07/16 09:57:35 export DOCKER_HOST=tcp://192.168.59.103:2375
~> docker version
Client version: 1.1.1
Client API version: 1.13
Go version (client): go1.2.1
Git commit (client): bd609d2
Server version: 1.1.1
Server API version: 1.13
Go version (server): go1.2.1
Git commit (server): bd609d2
|
For example, Docker Daemon and Client can be installed on Mac following the instructions at docs.docker.com/installation/mac.
The VM can be stopped from the CLI as:
And then restarted again as:
And logged in as:
The complete list of boot2docker commands are available in help:
1
2
3
4
5
6
7
8
9
10
11
12
13
14
15
16
17
18
19
20
21
22
23
|
~> boot2docker help
Usage: boot2docker [] <command></command> []
boot2docker management utility.
Commands:
init Create a new boot2docker VM.
up|start|boot Start VM from any states.
ssh [ssh-command] Login to VM via SSH.
save|suspend Suspend VM and save state to disk.
down|stop|halt Gracefully shutdown the VM.
restart Gracefully reboot the VM.
poweroff Forcefully power off the VM (might corrupt disk image).
reset Forcefully power cycle the VM (might corrupt disk image).
delete|destroy Delete boot2docker VM and its disk image.
config|cfg Show selected profile file settings.
info Display detailed information of VM.
ip Display the IP address of the VM's Host-only network.
status Display current state of VM.
download Download boot2docker ISO image.
version Display version information.
|
Enough talk, show me an example ?
Some of the JBoss projects are available as Docker images at www.jboss.org/docker and can be installed following the commands explained on that page. For example, WildFly Docker image can be installed as:
1
2
3
4
5
6
7
8
9
10
11
12
13
14
15
16
17
18
|
~> docker pull jboss/wildfly
Pulling repository jboss/wildfly
2f170f17c904: Download complete
511136ea3c5a: Download complete
c69cab00d6ef: Download complete
88b42ffd1f7c: Download complete
fdbe853b54e1: Download complete
bc93200c3ba0: Download complete
0daf76299550: Download complete
3a7e1274035d: Download complete
e6e970a0db40: Download complete
1e34f7a18753: Download complete
b18f179f7be7: Download complete
e8833789f581: Download complete
159f5580610a: Download complete
3111b437076c: Download complete
|
The image can be verified using the command:
|
|
~> docker images
REPOSITORY TAG IMAGE ID CREATED VIRTUAL SIZE
jboss/wildfly latest 2f170f17c904 8 hours ago 1.048 GB
|
Once the image is downloaded, the container can be started as:
By default, Docker containers do not provide an interactive shell and input from STDIN. So if WildFly Docker container is started using the command above, it cannot be terminated using Ctrl + C. Specifying -i option will make it interactive and -t option allocated a pseudo-TTY.
In addition, we’d also like to make the port 8080 accessible outside the container, i.e. on our localhost. This can be achieved by specifying -p 80:8080 where 80 is the host port and 8080 is the container port.
So we’ll run the container as:
1
2
3
4
5
6
7
8
9
10
11
12
13
14
15
16
17
18
19
20
21
22
23
24
25
26
27
28
29
30
31
32
33
34
35
36
37
38
39
40
41
42
43
44
45
46
47
|
docker run -i -t -p 80:8080 jboss/wildfly
=========================================================================
JBoss Bootstrap Environment
JBOSS_HOME: /opt/wildfly
JAVA: java
JAVA_OPTS: -server -Xms64m -Xmx512m -XX:MaxPermSize=256m -Djava.net.preferIPv4Stack=true -Djboss.modules.system.pkgs=org.jboss.byteman -Djava.awt.headless=true
=========================================================================
22:08:29,943 INFO [org.jboss.modules] (main) JBoss Modules version 1.3.3.Final
22:08:30,200 INFO [org.jboss.msc] (main) JBoss MSC version 1.2.2.Final
22:08:30,297 INFO [org.jboss.as] (MSC service thread 1-6) JBAS015899: WildFly 8.1.0.Final "Kenny" starting
22:08:31,935 INFO [org.jboss.as.server] (Controller Boot Thread) JBAS015888: Creating http management service using socket-binding (management-http)
22:08:31,961 INFO [org.xnio] (MSC service thread 1-7) XNIO version 3.2.2.Final
22:08:31,974 INFO [org.xnio.nio] (MSC service thread 1-7) XNIO NIO Implementation Version 3.2.2.Final
22:08:32,057 INFO [org.wildfly.extension.io] (ServerService Thread Pool -- 31) WFLYIO001: Worker 'default' has auto-configured to 16 core threads with 128 task threads based on your 8 available processors
22:08:32,108 INFO [org.jboss.as.clustering.infinispan] (ServerService Thread Pool -- 32) JBAS010280: Activating Infinispan subsystem.
22:08:32,110 INFO [org.jboss.as.naming] (ServerService Thread Pool -- 40) JBAS011800: Activating Naming Subsystem
22:08:32,133 INFO [org.jboss.as.security] (ServerService Thread Pool -- 45) JBAS013171: Activating Security Subsystem
22:08:32,178 INFO [org.jboss.as.jsf] (ServerService Thread Pool -- 38) JBAS012615: Activated the following JSF Implementations: [main]
22:08:32,206 WARN [org.jboss.as.txn] (ServerService Thread Pool -- 46) JBAS010153: Node identifier property is set to the default value. Please make sure it is unique.
22:08:32,348 INFO [org.jboss.as.security] (MSC service thread 1-3) JBAS013170: Current PicketBox version=4.0.21.Beta1
22:08:32,397 INFO [org.jboss.as.webservices] (ServerService Thread Pool -- 48) JBAS015537: Activating WebServices Extension
22:08:32,442 INFO [org.jboss.as.connector.logging] (MSC service thread 1-13) JBAS010408: Starting JCA Subsystem (IronJacamar 1.1.5.Final)
22:08:32,512 INFO [org.wildfly.extension.undertow] (MSC service thread 1-9) JBAS017502: Undertow 1.0.15.Final starting
22:08:32,512 INFO [org.wildfly.extension.undertow] (ServerService Thread Pool -- 47) JBAS017502: Undertow 1.0.15.Final starting
22:08:32,570 INFO [org.jboss.as.connector.subsystems.datasources] (ServerService Thread Pool -- 27) JBAS010403: Deploying JDBC-compliant driver class org.h2.Driver (version 1.3)
22:08:32,660 INFO [org.jboss.as.connector.deployers.jdbc] (MSC service thread 1-10) JBAS010417: Started Driver service with driver-name = h2
22:08:32,736 INFO [org.jboss.remoting] (MSC service thread 1-7) JBoss Remoting version 4.0.3.Final
22:08:32,836 INFO [org.jboss.as.naming] (MSC service thread 1-15) JBAS011802: Starting Naming Service
22:08:32,839 INFO [org.jboss.as.mail.extension] (MSC service thread 1-15) JBAS015400: Bound mail session [java:jboss/mail/Default]
22:08:33,406 INFO [org.wildfly.extension.undertow] (ServerService Thread Pool -- 47) JBAS017527: Creating file handler for path /opt/wildfly/welcome-content
22:08:33,540 INFO [org.wildfly.extension.undertow] (MSC service thread 1-13) JBAS017525: Started server default-server.
22:08:33,603 INFO [org.wildfly.extension.undertow] (MSC service thread 1-8) JBAS017531: Host default-host starting
22:08:34,072 INFO [org.wildfly.extension.undertow] (MSC service thread 1-13) JBAS017519: Undertow HTTP listener default listening on /0.0.0.0:8080
22:08:34,599 INFO [org.jboss.as.server.deployment.scanner] (MSC service thread 1-11) JBAS015012: Started FileSystemDeploymentService for directory /opt/wildfly/standalone/deployments
22:08:34,619 INFO [org.jboss.as.connector.subsystems.datasources] (MSC service thread 1-9) JBAS010400: Bound data source [java:jboss/datasources/ExampleDS]
22:08:34,781 INFO [org.jboss.ws.common.management] (MSC service thread 1-13) JBWS022052: Starting JBoss Web Services - Stack CXF Server 4.2.4.Final
22:08:34,843 INFO [org.jboss.as] (Controller Boot Thread) JBAS015961: Http management interface listening on http://0.0.0.0:9990/management
22:08:34,844 INFO [org.jboss.as] (Controller Boot Thread) JBAS015951: Admin console listening on http://0.0.0.0:9990
22:08:34,845 INFO [org.jboss.as] (Controller Boot Thread) JBAS015874: WildFly 8.1.0.Final "Kenny" started in 5259ms - Started 184 of 233 services (81 services are lazy, passive or on-demand)
|
Container’s IP address can be found as:
|
|
~> boot2docker ip
The VM's Host only interface IP address is: 192.168.59.103
|
The started container can be verified using the command:
|
|
~> docker ps
CONTAINER ID IMAGE COMMAND CREATED STATUS PORTS NAMES
b2f8001164b0 jboss/wildfly:latest /opt/wildfly/bin/sta 46 minutes ago Up 12 minutes 8080/tcp, 9990/tcp sharp_pare
|
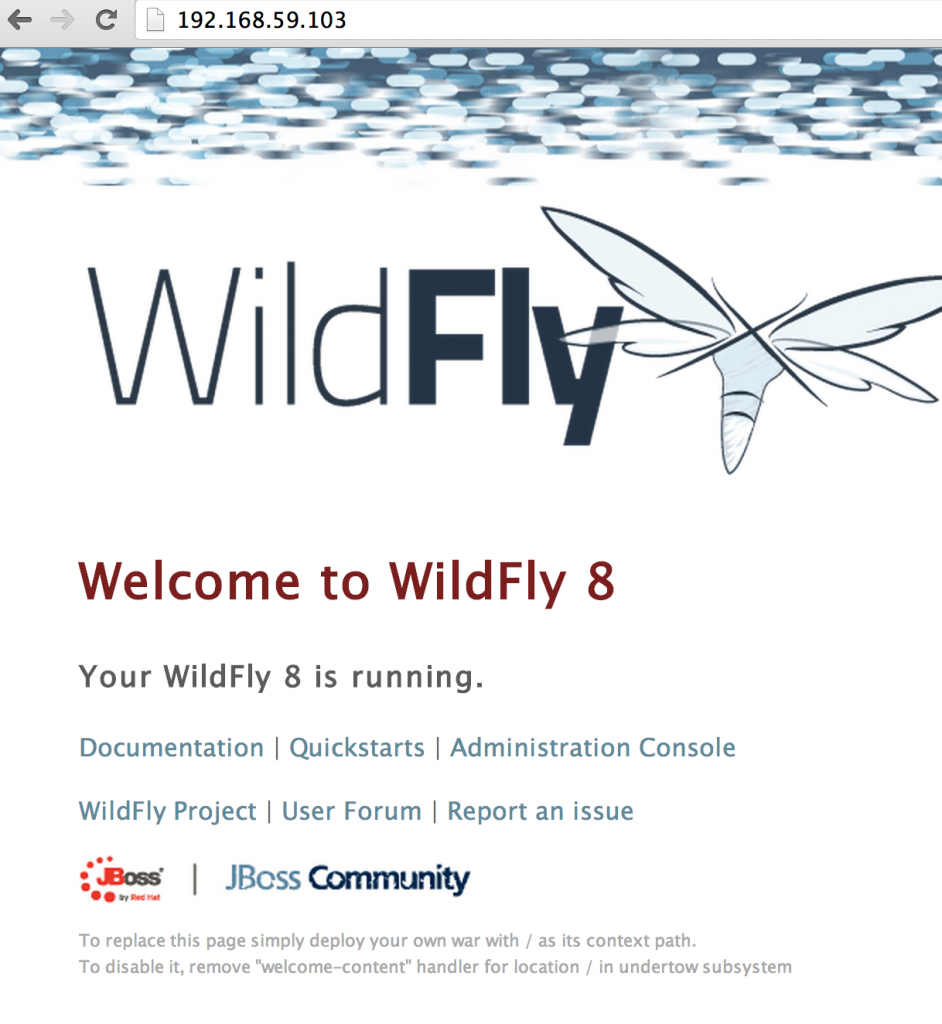
And now the WildFly server can now be accessed on your local machine as http://192.168.59.103 and looks like as shown:
Finally the container can be stopped by hitting Ctrl + C, or giving the command as:
|
|
~> docker stop b2f8001164b0
b2f8001164b0
|
The container id obtained from “docker ps” is passed to the command here.
More detailed instructions to use this image, such as booting in domain mode, deploying applications, etc. can be found at github.com/jboss/dockerfiles/blob/master/wildfly/README.md.
What else would you like to see in the WildFly Docker image ? File an issue at github.com/jboss/dockerfiles/issues.
Other images that are available at jboss.org/docker are:
- KeyCloak
- TorqueBox
- Immutant
- LiveOak
- AeroGear


Did you know that Red Hat is amongst one of the top contributors to Docker, with 5 Red Hatters from Project Atomic working on it ?