Tag Archives: javaee7

Java EE, Docker and Maven (Tech Tip #89)

Java EE applications are typically built and packaged using Maven. For example, github.com/javaee-samples/javaee7-docker-maven is a trivial Java EE 7 application and shows the Java EE 7 dependency:

And the two Maven plugins that compiles the source and builds the WAR file:

This application can then be deployed to a Java EE 7 container, such as WildFly, using the wildfly-maven-plugin:

Tests can be invoked using Arquillian, again using Maven. So if you were to package this application as a Docker image and run it inside a Docker container, there should be a mechanism to seamlessly integrate in the Maven workflow.

Docker Maven Plugin

Meet docker-maven-plugin!

This plugin allows you to manage Docker images and containers from your pom.xml. It comes with predefined goals:

Goal Description
docker:start Create and start containers
docker:stop Stop and destroy containers
docker:build Build images
docker:push Push images to a registry
docker:remove Remove images from local docker host
docker:logs Show container logs

Introduction provides a high level introduction to the plugin including building images, running containers and configuration.

Run Java EE 7 Application as Docker Container using Maven

TLDR;

  1. Create and Configure a Docker Machine as explained in Docker Machine to Setup Docker Host
  2. Clone the workspace as: git clone https://github.com/javaee-samples/javaee7-docker-maven.git
  3. Build the Docker image as: mvn package -Pdocker
  4. Run the Docker container as: mvn install -Pdocker
  5. Find out IP address of the Docker Machine as: docker-machine ip mydocker
  6. Access your application

Docker Maven Plugin Configuration

Lets look little deeper in our sample application.

pom.xml is updated to include docker-maven-plugin as:

Each image configuration has three parts:

  • Image name and alias
  • <build> that defines how the image is created. Base image, build artifacts and their dependencies, ports to be exposed, etc to be included in the image are specified here.Assembly descriptor format is used to specify the artifacts to be included and is defined in src/main/docker directory. assembly.xml in our case looks like:
  • <run> that defines how the container is run. Ports that need to be exposed are specified here.

In addition, package phase is tied to docker:build goal and install phase is tied to docker:start goal.

There are four docker-maven-plugin and you can read more details in the shootout on what serves your purpose the best.

How are you creating your Docker images from existing applications?

Enjoy!


WildFly Swarm: Building Microservices with Java EE

Perfection is achieved, not when there is nothing more to add, but when there is nothing left to take away

Antoine de Saint-Exupery

This quote by the French writer Antoine de Saint-Exupery was made to substantiate that often less is more. This is true for architect, artist, designer, writer, running, software developer, or in any other profession. Simplicity, minimalism, cutting down the cruft always goes a long way and has several advantages as opposed to something bloated.

What is WildFly Swarm?

WildFly is a light weight, flexible, feature rich, Java EE 7 compliant application server. WildFly 9 even introduced a 27MB Servlet-only distribution. These are very well suited for your enterprise and web applications.

WildFly Swarm takes the notch a bit higher. From the announcement:

WildFly Swarm is a new sidecar project supporting WildFly 9.x to enable deconstructing the WildFly AS and pasting just enough of it back together with your application to create a self-contained executable jar.

WildFly Swarm

The typical application development model for a Java EE application is to create an EAR or WAR archive and deploy it in an application server. All the dependencies, such as Java EE implementations are packaged in the application server and provide the functionality required by the application classes. Multiple archives can be deployed and they all share the same libraries. This is a well understood model and have been used over the past several years.

WildFly Swarm turns the table where it creates a “fat jar” that has all the dependencies packaged in a JAR file. This includes a minimalist version of WildFly, any required dependencies, and of course, the application code itself. The application can simply be run using java -jar.

Each fat jar could possibly be a microservice which can then independently upgrade, replace, or scale. Each fat jar would typically follow single responsibility principle and thus will have only the required dependencies packaged. Each JAR can use polyglot persistence, and use only the persistence mechanism that is required.

Show me the code!

A Java EE application can be packaged as WildFly Swarm fat jar by adding a Maven dependency and a plugin. Complete source code for a simple JAX-RS sample is available at github.com/arun-gupta/wildfly-samples/tree/master/swarm.

WildFly Swarm Maven Dependency

Add the following Maven dependency in pom.xml:

WildFly Swarm Maven Plugin

Add the following Maven plugin in pom.xml:

Create WildFly Swarm Fat Jar

The fat jar can be easily created by invoking the standard Maven target:

This generates a JAR file using the usual Maven conventions, and appends -swarm at the end. The generated WAR file name in our sample is swarm-1.0-SNAPSHOT-swarm.jar.

The generated WAR file is ~30MB, has 134 JARs (all in m2repo directory), and 211 classes. The application code is bundled in app/swarm-1.0-SNAPSHOT.war.

Run WildFly Swarm Fat Jar

This far jar can be run as:

The response can be verified as:

WildFly Swarm Release blog refers to lots of blogs about Servlet, JAX-RS with ShrinkWrap, DataSource via Deployment, Messaging and JAX-RS, and much more.

WildFly Swarm Next Steps

This is only 1.0.0.Alpha1 release so feel free to try out samples and give us feedback by filing an issue.

You have the power of all WildFly subsystems, and can even create embeddable Java EE container as shown in the release blog:

Subsequent blogs will show how a microservice can be easily created using WildFly Swarm.

WildFly Swarm Stay Connected

You can keep up with the project through the WildFly HipChat room, @wildflyswarm on Twitter, or through GitHub Issues.

WildFly 9.0 CR1 is Released – HTTP/2, Intelligent Load Balancing, Graceful shutdown, Offline CLI, more

WildFly 9 Banner

WildFly 9.0 CR1 is now released, download from wildfly.org/downloads (zip)!

It builds upon the Java EE 7 compliance already achieved in earlier versions and adds the following features:

  • Intelligent load balancing
  • HTTP/2 and SPDY support
  • A new offline CLI mode
  • Server suspend, resume, and graceful shutdown
  • A new Servlet-only distribution

Release Notes provide complete details. 86 issues were fixed since 9.0.0 Beta 2.

How do you get started?

  • Download zip and unzip
  • Start as:
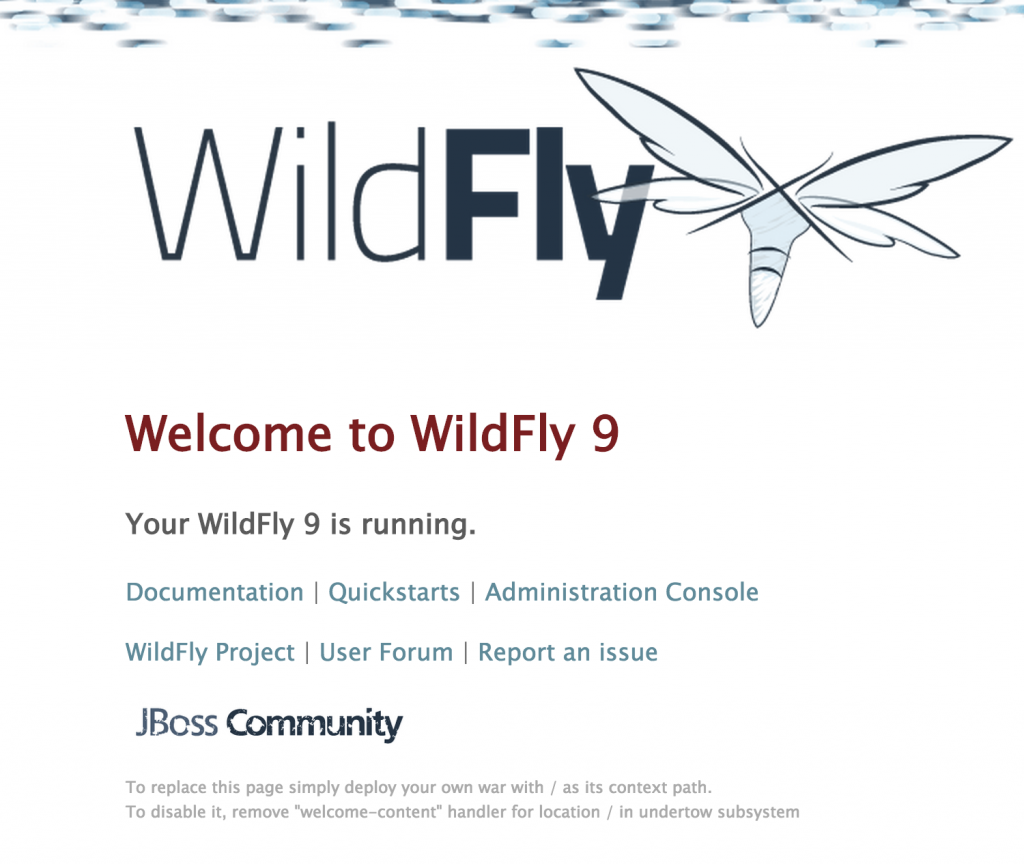
  • Access the main page as localhost:8080 as shown:WildFly 9 Welcome
  • Shutting down the server now shows the following log:

You can already configure this in JBoss Tools Alpha 2. Its currently not supported in NetBeans and has been filed as #252197.

Configure JRebel with Docker containers – Tech Tip #81

JRebel allows you to skip build and redeploy process by instantly deploying your application to the application server of your choice. It is supported in all the major IDEs such as NetBeans, Eclipse, and IntelliJ. It is also supported in a wide variety of application servers such as JBoss EAP, WildFly, WebLogic, WebsFear (err, WebSphere), Tomcat, and many others.

You can easily get started with JRebel in JBoss Developer Studio  or Integrate JRebel with JBoss on your local desktop. It can also be easily used with JBoss Developer Studio and Ticket Monster on OpenShift.

This Tech Tip will explain how do you set up JRebel with Docker containers. Specifically, we’ll use the sample application provided by Java EE 7 Hands-on Lab (jrebel branch), JBoss Tools with Eclipse Mars M5, and running the sample application in WildFly Docker container.

Many thanks to Adam Koblentz (@akoblentz) for helping me through the steps!

Lets get started!

Install JRebel in Eclipse

JRebel runs in three modes:

  • Local: App server is running from inside the IDE
  • External: App server is running from outside the IDE, such as using CLI, but on the same machine
  • Remote: App server is running on a different machine, VM, container, or cloud

Docker containers need to be configured using the “remote” mode.

  1. Install JBoss Tools  as explained at tools.jboss.org/downloads/. JRebel’s remote mode can only be enabled using the IDE. Install JRebel plugin from Eclipse Marketplace.

Package rebel.xml and rebel-remote.xml with the WAR

These files define the location of classes and resources in your archive.

  1. Clone the Java EE 7 HOL repo:
  2. Import the Maven project (from the solution directory) in the IDE, right-click on the project, select JRebel menu, and click on “Enable JRebel Nature”. This will generate rebel.xml in src/main/resources directory and would look something like:
  3. Right-click on the project again, and select “Enable Remoting”. This generates rebel-remote.xml, in src/main/resources directory again, and will look like:

    This needs to be done on the machine where JRebel will be used in the IDE. This will ensure that the public key is generated appropriately.
  4. Package your application as

    This will package rebel.xml and rebel-remote.xml in the WAR file.

Configure and Run the Application Server

Application server needs to know about JRebel agent and platform-specific library. Both of these files are available from Eclipse if JRebel was installed earlier. On Mac these files are available in eclipse/mars/m5/eclipse/plugins/org.zeroturnaround.eclipse.embedder_6.1.1.RELEASE-201503121801/jr6/jrebel/ directory. The exact name would very likely differ in your case.

  1. Build the image using the Dockerfile:

    The key parts in this image are:

    1. Using the official jboss/wildfly Docker image
    2. Copying the JRebel agent and platform-specific library to the image
    3. Configuring application server such that it knows about the “remote” mode and platform-specific library
    4. Start WildFly
    5. Downloads the pre-built WAR file from GitHub. This will not work for you, and you’ll need to replace it with something like:

      This WAR file is the same that was generated earlier.
  2. Actually build the image as:
  3. Run the container as:

    and this should show something like:

    JRebel license information is a good sign that everything is configured properly.

    If you used Docker Machine to Setup Docker Host then the application should now be accessible at 192.168.99.100:8080/movieplex7/.

Configure Eclipse

Last step is to configure Eclipse so that it knows where the application is deployed.

  1. In Eclipse, right-click on the project, select JRebel, Advanced Properties
  2. Click on “Edit” on next to “Deployment URLs”
  3. Click on Add and specify the URL of the application, 192.168.99.100:8080/movieplex7/ in our case.
  4. Click on Continue, Apply, OK.

Voila, the configuration is now complete.

Now changing any class, adding any method, updating any entity or HTML or JSF page will push the changes to the Docker container instantly. No need to redeploy the application.

Enjoy!

Deploy to WildFly and Docker from Eclipse – Tech Tip #79

Docker and WildFly Part 1 – Deployment via Volumes and Docker and WildFly Part 2 – Deployment over Management API shows two approaches of how JBoss Tools can be configured to run any application on WildFly server running as a Docker container.

The blogs provide detailed setup and the underlying background. This Tech Tip will provide a quick summary of how to deploy a Java EE 7 application to WildFly and Docker from Eclipse.

Lets get started!

Configure Docker

  1. Configure Docker on your machine using Docker Machine.
  2. Find the IP address as:

    and add an entry in /etc/hosts as:

Deployment to WildFly Container using Docker Volumes

  1. Create a folder that will be mounted as volume in the WildFly Docker container. In this case, the folder is /Users/arungupta/tmp/deployments.WildFly Docker container can be started as:

    rw ensures that the Docker container can write to it.
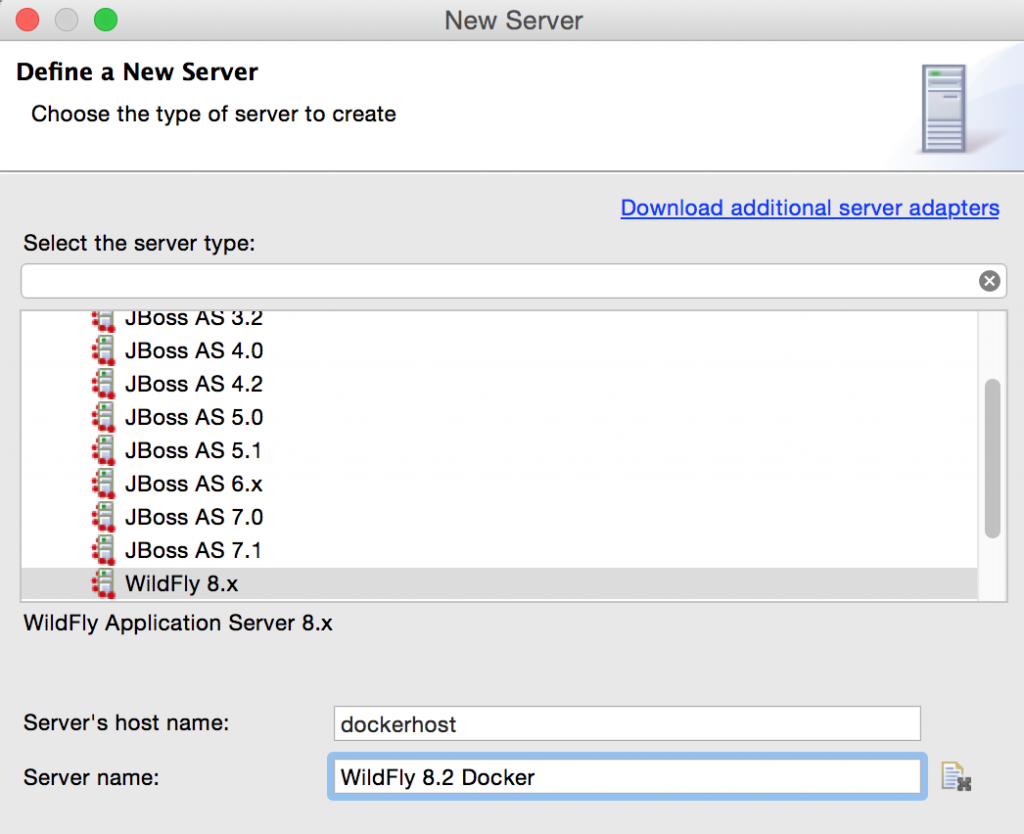
  2. Create a new server adapter:
    WildFly Docker Server Adapter
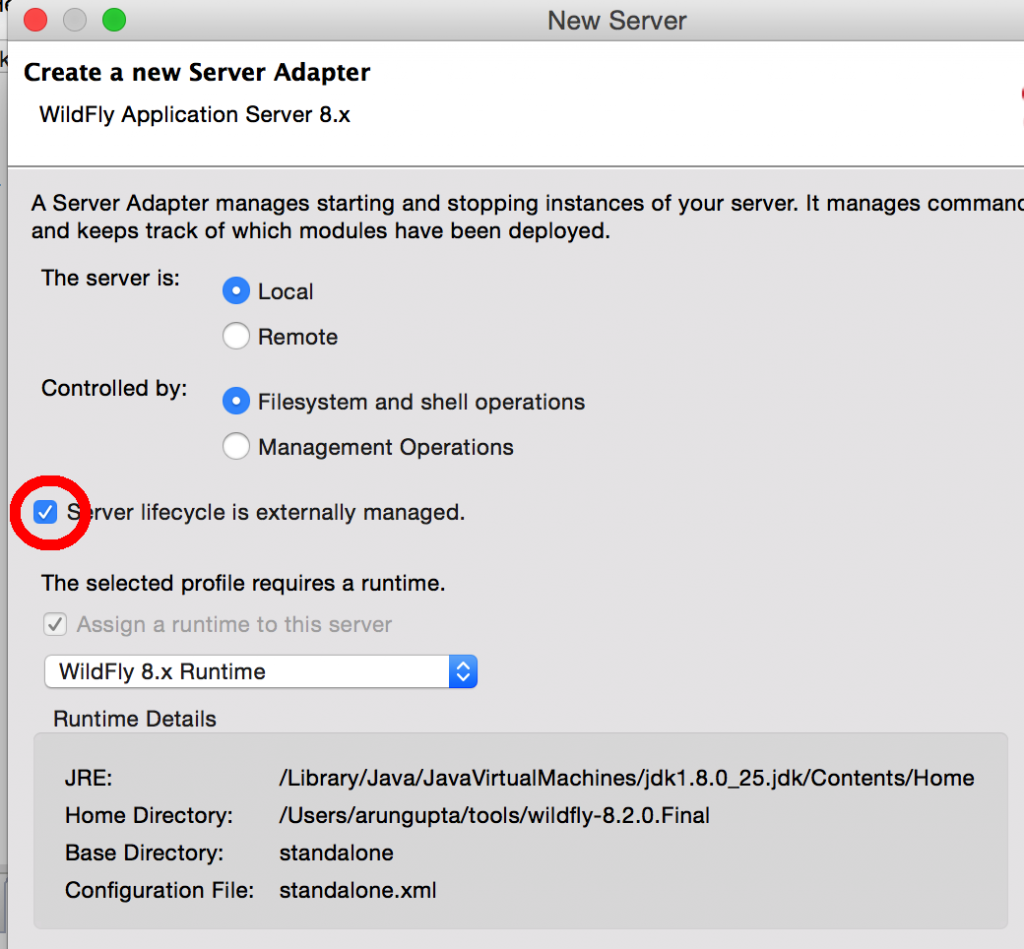
  3. Assign or create a WildFly 8.x runtime:

    Docker WildFly Server Adapter

    Changed properties are highlighted.

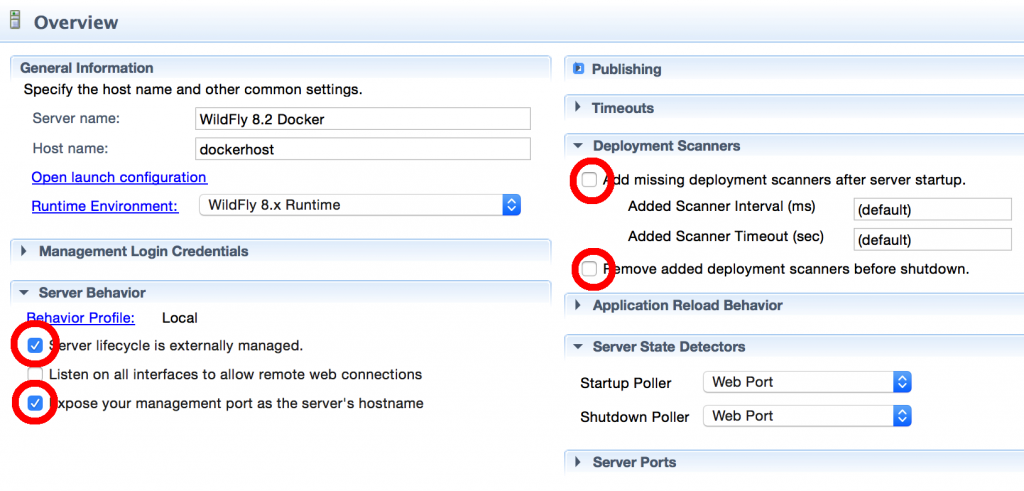
  4. Setup the server properties as:

    Docker WildFly Adapter Properties


    Changed properties are highlighted. The two properties on the left are automatically propagated from the previous dialog. Additional two properties on the right side are required to disable to keep deployment scanners in sync with the server.

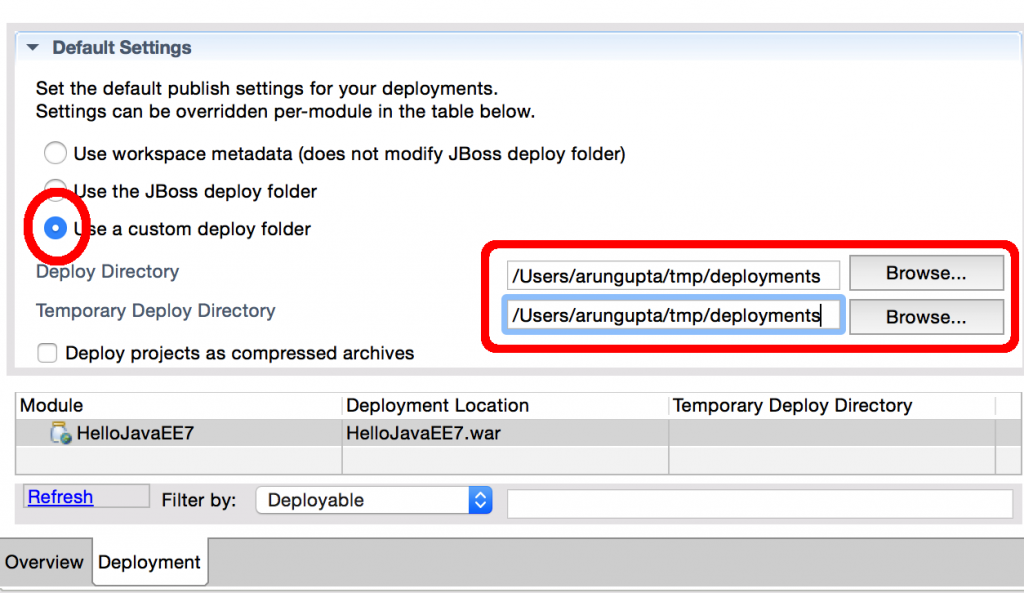
  5. Specify a custom deployment folder on Deployment tab of Server Editor:

    Docker WildFly Server Adapter

  6. Right-click on the newly created server adapter and click “Start”.

    Docker WildFly Server Synchronized

    Status quickly changes to “Started, Synchronized” as shown.

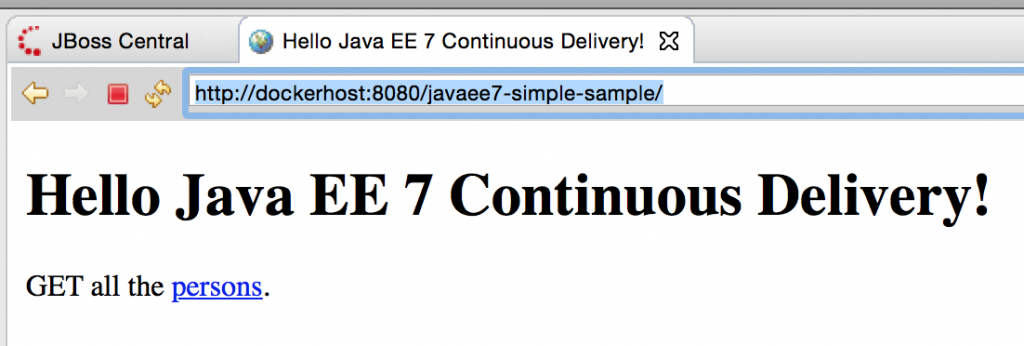
  7. Open up any Java EE 7 project (for example javaee7-simple-sample), right-click, Run on Server, and chose this server. The project runs and displays the page:

    Docker Java EE 7 Output


Deployment to WildFly Container using Management API

  1. Run WildFly management image as:

    This is only a convenience image to reduce the number of steps required to get started. Dockerfile for this image has more details, including admin credentials.

    Volume mapping is not required in this case, instead additional management port is exposed.

  2. Configure a remote server controlled by management operations:Docker WildFly Remote Server Configuration

    Changed properties are highlighted.

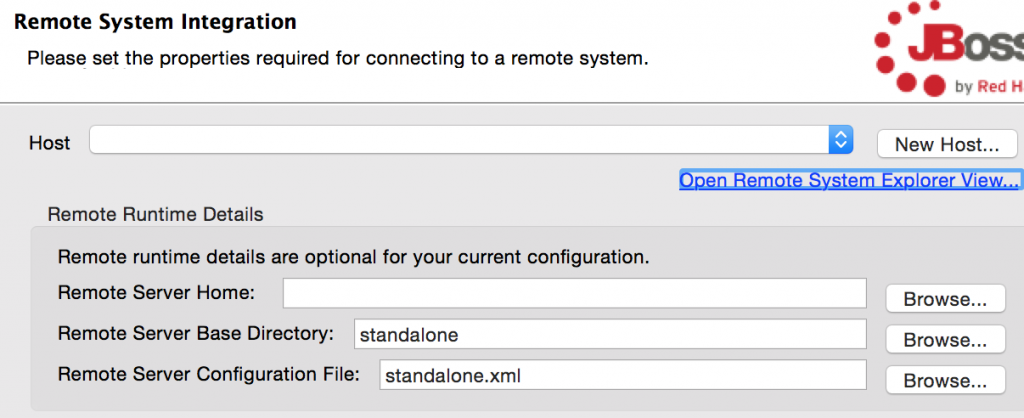
  3. Take the defaults:

    Docker WildFly Remote System Integration

  4. Set up server properties by specifying the admin credentials (Admin#70365). Note, you need to delete the existing password and use this instead:

    Docker WildFly Admin Credentials

  5. Right-click on the newly created server adapter and click “Start”.Status quickly changes to “Started, Synchronized” as shown.

    Docker WildFly Server Synchronized

  6. Open up any Java EE 7 project (for example javaee7-simple-sample), right-click, Run on Server, and chose this server. The project runs and displays the page:

    Docker Java EE 7 Output

Enjoy!

This blog showed how how to deploy a Java EE 7 application to WildFly and Docker from Eclipse.

Is there any other way that you deploy to WildFly Docker container from Eclipse?

Docker Machine to Setup Docker Host – Tech Tip #78

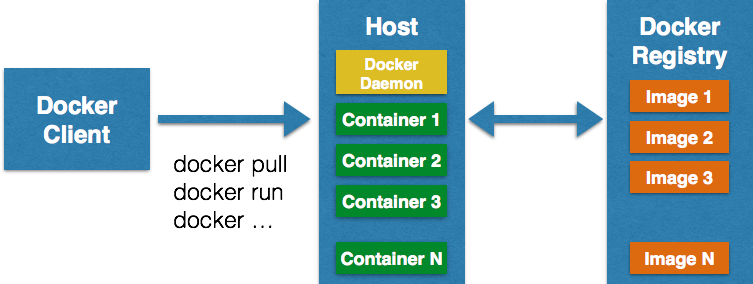
Running Docker containers typically involve three components:

  • Docker Client is a binary that accepts commands from the user and communicates back and forth with host
  • Docker Daemon runs on a host machine and does the heavy lifting of building, running, and distributing Docker containers
  • Docker Registry is SaaS platform for sharing and managing Docker images.Docker Hub is a public hub. Private registries can be easily setup as well, such as one by Artifactory. More on this in a subsequent blog.

Docker Client communicates with Daemon, either co-located on the same host, or on a different host. It requests the Daemon to pull an image from the repository using pull command. The Daemon then downloads the image from Docker Hub, or whatever registry is configured. Multiple images can be downloaded from the registry and installed on Daemon host.

Docker Architecture


In a typical development environment setup, Docker Client and Host/Daemon will be co-located on the same host machine. Even if they are on separate machines, it still require to login to the Host and setup Docker Daemon for that OS.

docker-logoDocker Machine takes you from zero-to-Docker on a host with a single command. This host could be your laptop, in the cloud, or in your data center. It creates servers, installs Docker on them, then configures the Docker client to talk to them.

This downloads the boot2docker VM, setup ssh keys, generate certificates, start the VM. It basically takes care of all the boring work so that you can focus on all the fun things.

This Tech Tip will show you to get started with Docker Machine and use it to setup Docker Host on Mac. It does not work on Windows yet because of github.com/docker/machine/issues/742.

Lets get started!

Install Docker Machine

  1. Download the appropriate binary from docs.docker.com/machine/#installation. Binary for Mac can be downloaded as:
  2. Verify the installation as:

Setup Mac Host using Docker Machine

  1. Docker Machine can be configured to use with multiple drivers, such as Amazon Web Services, Google Compute Engine, Microsoft Azure, and Oracle VirtualBox. On a developer laptop, Virtual Box is a convenient option.Virtual Box 4.3.20 is the minimum requirement. So make sure you’ve the correct version installed.
  2. Create a Docker Host using VirtualBox provider and call the machine as “mydocker”.Make sure ssh-keygen is in the PATH before invoking this command. On Mac, this is already in /usr/bin/ssh-keygen. On Windows, this can be installed as part of Git Bash.This can be done as:

    This downloads boot2docker with the Docker daemon installed, and will create and start a VirtualBox VM with Docker running.
  3. Find IP address of the machine as:

    Note down this IP address, this will be used for accessing the application.
  4. Check the status of running machine as:

    The * in the ACTIVE column indicates this is an active host.
  5. Check the environment of newly created machine as:

Setup Docker client to Communicate

  1. Setup your client to talk to this host as:

Run Java Application on Host

  1. Run Java EE 7 Application discussed in Java EE 7 Hands-on Lab on WildFly and Docker on this host as:
  2. Access the application at 192.168.99.101:8080/movieplex7/ and looks like:Docker Machine Output

Docker Machine Commands

Complete list of Docker Machine commands can be seen as:

Learn more about Docker Machine, Swarm, and Compose in this video:

Why would you use anything else other than Docker Machine to setup Docker host? How do you setup Docker Host otherwise?

Some useful references …

  • Full documentation
  • GitHub Repo
  • Issues
  • #docker-machine on freenode

Enjoy!

Docker Compose to Orchestrate Containers – Tech Tip #77

Docker Orchestration using Fig showed how to defining and control a multi-container service using Fig. Since then, Fig has been renamed to Docker Compose, or Compose for short.

First release of Compose was announced recently

From github.com/docker/compose

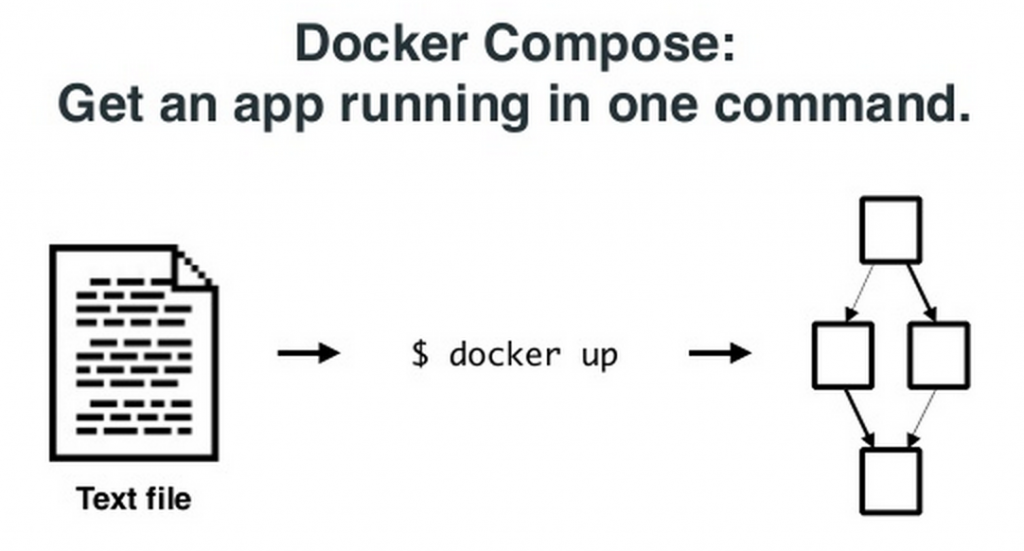
Compose is a tool for defining and running complex applications with Docker. With Compose, you define a multi-container application in a single file, then spin your application up in a single command which does everything that needs to be done to get it running.

Docker Compose uses the same API used by other Docker commands and tools.

Docker Compose

This Tech Tip will rewrite Docker Orchestration using Fig blog to use Docker Compose. In other words, it will show how to run a Java EE 7 application that is deployed using MySQL and WildFly.

Lets get started!

Install Docker Compose

Install Compose as:

Docker Compose Configuration File

Entry point to Compose is docker-compose.yml. To begin with, docker-compose tool also recognizes fig.yml file name but shows the following message:

And if both fig.yml and docker-compose.yml are available in the directory then the following message is shown:

Use the same configuration file from the previous blog and rename to docker-compose.yml:

This YML-based configuration file has:

  1. Two containers defined by the name “mysqldb” and “mywildfly”
  2. Image names are defined using “image”
  3. Environment variables for the MySQL container are defined in “environment”
  4. MySQL container is linked with WildFly container using “links”
  5. Port forwarding is achieved using “ports”

Start, Verify, Stop Docker Containers

  1. All the containers can be started, in detached mode, by giving the command:

    And that shows the output as:
  2. Verify the containers as:
  3. Logs for the containers can be seen as:

    And shows the output as:
  4. Find the IP address of the host as:

    And access the application as:

    To see the output as:

    Or in the browser as:

    Docker Compose Output

  5. Stop the containers as:

    to see the output as:

Docker Compose Commands

Complete list of Docker Compose commands can be seen by typing docker-compose and shows the output as:

A subsequent blog will likely play with scale command.

Help for each command is shown by typing -h after the command name. For example, help for run command is shown as:

Enjoy!

Build Binaries Only Once for Continuous Deployment

What is Build Binaries Only Once?

One of the fundamental principle of Continuous Delivery is Build Binaries Only Once, or in short BBOO. This means that the binary artifacts should be build once, and only once. These artifacts should then be stored in a repository manager, such as a Nexus Repository. Subsequent deploy, test, and release cycles should never attempt to build this binary again and instead reuse this binary. This ensures that the exact same binary has gone through all different test cycles and delivered to the customer.

Several times binaries are rebuilt during each testing phase using a specific tag of the workspace, and considered the same. But that is still different! This might turn out to be the same but that’s more incidental. Its more likely not same because of different environment configurations. For example, development team might be using JDK 8 on their machine and the test/staging might be using JDK 7. There are a multitude reasons because of which the binary artifacts could differ. So it’s very essential to build binaries only once, store them in a repository, and make them go through different test, staging, and production cycle. This increases the overall confidence level of delivery to the customer.

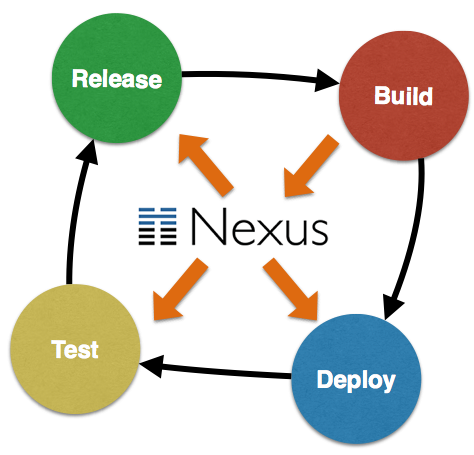
Build Binaries Only Once

This image shows how the binaries are built once during Build stage and stored on Nexus repository. There after, Deploy, Test, and Release stages are only reading the binary from Nexus.

The fact that dev, test, and staging environments differ is a different issue. And we’ll deal with that in a subsequent blog.

How do you setup Build Binaries Only Once?

For now, lets look at the setup:

  1. A Java EE 7 application WAR file is built once
  2. Store in a Nexus repository, or .m2 local repository
  3. Same binary is used for smoke testing
  4. Same binary is used for running full test suite

The smoke test in our case will be just a single test and full suite has four tests. Hopefully this is not your typical setup in terms of the number of tests, but at least you get to see how to setup everything.

Also only two stages of testing, smoke and full but the concept can be easily extended to add other stages. A subsequent blog will show a full blown deployment pipeline.

Lets get started!

  1. Check out a trivial Java EE 7 sample application from github.com/javaee-samples/javaee7-simple-sample. This is a typical Java EE application with REST endpoints, CDI beans, JPA entities.
  2. Setup a local Nexus Repository and deploy a SNAPSHOT of the application to it as:

    By default, Nexus repository is configured on localhost:8081/nexus. Note down the host/port if you are using a different combination. Also note down the exact version number that is deployed to Nexus. By default, it will be 1.0-SNAPSHOT.

    You can also deploy a RELEASE to this Nexus repository as:

    Note down whether you deployed SNAPSHOT or RELEASE.

    In either case, you can also specify -P release Maven profile and sources and javadocs will be attached with the deployment. So if RELEASE is deployed as:

    Then sources and javadocs are also attached.

  3. Check out the test workspace from github.com/javaee-samples/javaee7-simple-sample-test. Make the following changes in this project:
    1. Change nexus-repo property to match the host/port of the Nexus repository. If you used the default installation of Nexus and deployed a RELEASE, then nothing needs to be changed.By default, Nexus has one repository for SNAPSHOTs and another for RELEASEs. The workspace is configured to use RELEASE repository. If you deployed a SNAPSHOT, then “releases” in nexus-repo needs to be changed to “snapshots”to point to the appopriate repository.
    2. Change javaee7-sample-app-version property to match the version of the application deployed to Nexus.
  4. Start WildFly and run smoke tests as:

    This will run all files ending in “SmokeTest”. ShrinkWrap and Arquillian perform the heavy lifting of resolving the WAR file from Nexus and using it for running the tests:

    Running the smoke tests will show the results as:

  5. Run the full tests as:

    This will run all files included in your test suite and will show the results as:

    In both cases, smoke tests and full tests are using the binary that is deployed to Nexus.

Learn more about your toolset for creating this simple yet powerful setup:

arquillian-logo nexus-logowildfly-logo


Here are some other blogs coming in this series:

  • Use a CI server to deploy to Nexus
  • Run tests on WildFly running in a PaaS
  • Add static code coverage and code metrics in testing
  • Build a deployment pipeline

Enjoy!

OpenShift v3: Getting Started with Java EE 7 using WildFly and MySQL (Tech Tip #73)

OpenShift OriginOpenShift is Red Hat’s open source PaaS platform. OpenShift v3 (due to be released this year) will provide a holistic experience on running your microservices using Docker and Kubernetes. In a classic Red Hat way, all the work is done in the open source at OpenShift Origin. This will also drive the next major release of OpenShift Online and OpenShift Enterprise.

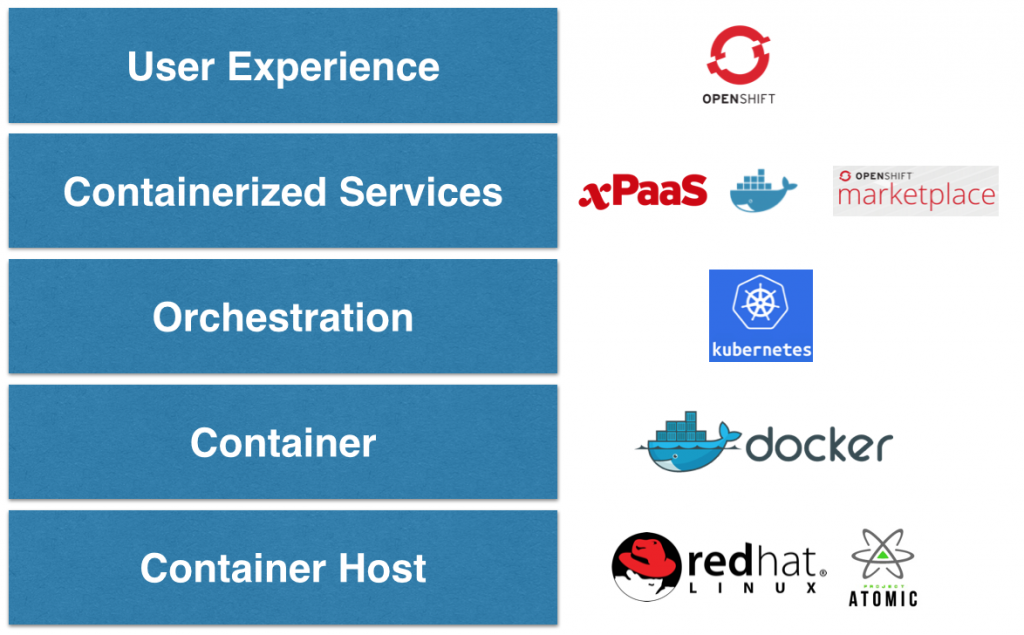
OpenShift v3 uses a new platform stack that is using plenty of community projects where Red Hat contributes such as Fedora, Centos, Docker, Project Atomic, Kubernetes, and OpenStack. OpenShift v3 Platform Combines Docker, Kubernetes, Atomic and More explain this platform stack in detail.

OpenShift v3 Stack

This tech tip will explain how to get started with OpenShift v3, lets get started!

Getting Started with OpenShift v3

Pre-built binaries for OpenShift v3 can be downloaded from Origin at GitHub. However the simplest way to get started is to run OpenShift Origin as a Docker container.

OpenShift Application Lifecycle provide complete details on what it takes to run a sample application from scratch. This blog will use those steps and adapt them to run using boot2docker VM on Mac. And in the process we’ll also deploy a Java EE 7 application on WildFly which will be accessing database on a separate MySQL container.

Here is our deployment diagram:

OpenShift v3 WildFly MySQL Deployment Strategy

  • WildFly and MySQL are running on separate pods.
  • Each of them is wrapped in a Replication Controller to enable simplified scaling.
  • Each Replication Controller is published as a Service.
  • WildFly talks to the MySQL service, as opposed to directly to the pod. This is important as Pods, and IP addresses assigned to them, are ephemeral.

Lets get started!

Configure Docker Daemon

  1. Configure the docker daemon on your host to trust the docker registry service you’ll be starting. This registry will be used to push images for build/test/deploy cycle.
    • Log into boot2docker VM as:
    • Edit the file

      This will be an empty file.
    • Add the following name/value pair:

      Save the file, and quit the editor.

    This will instruct the docker daemon to trust any docker registry on the 172.30.17.0/24 subnet.

Check out OpenShift v3 and Java EE 7 Sample

  1. Download and Install Go and setup GOPATH and PATH environment variable. Check out OpenShift origin directory:

    Note the directory where its checked out. In this case, its ~/workspaces/openshift.

    Build the workspace:

  2. Check out javaee7-hol workspace that has been converted to a Kubernetes application:

    This is also done in ~/workspaces/openshift directory.

Start OpenShift v3 Container

  1. Start OpenShift Origin as Docker container:

    Note ~/workspaces/openshift directory is mounted as /workspaces/openshift volume in the container. Some additional volumes are mounted as well.

    Check that the container is running:

  2. Log into the container as:

  3. Install Docker registry in the container by giving the following command:

  4. Confirm that the registry is running by getting the list of pods:

    osc is OpenShift Client CLI and allows to create and manage OpenShift projects. Some of the kubectl commands can also be using this script.

  5. Confirm the registry service is running. Note the actual IP address may vary:

  6. Confirm that the registry service is accessible:

    And look for the output:

Access OpenShift v3 Web Console

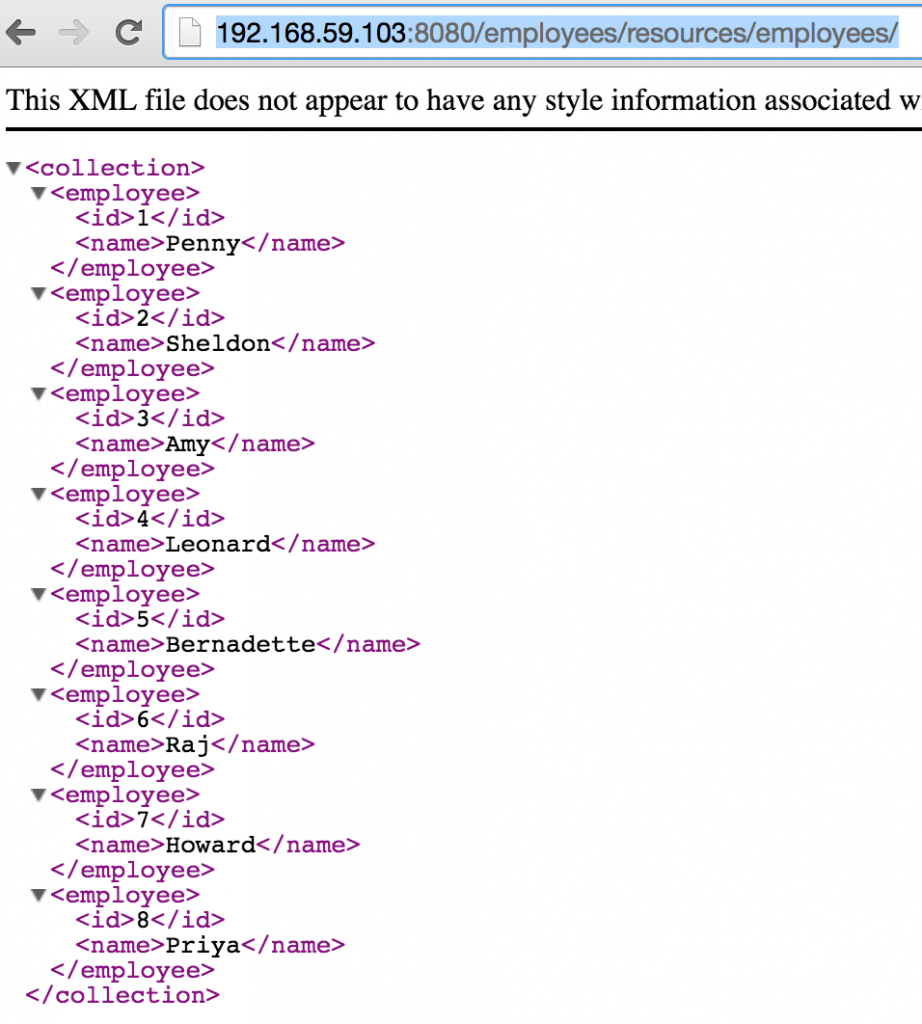
  1. OpenShift Origin server is now up and running. Find out the host’s IP address using boot2docker ip and open http://<IP addresss of boot2docker host>:8444 to view OpenShift Web  Console in your browser.For example, the console is accessible at https://192.168.59.103:8444/ on this machine.
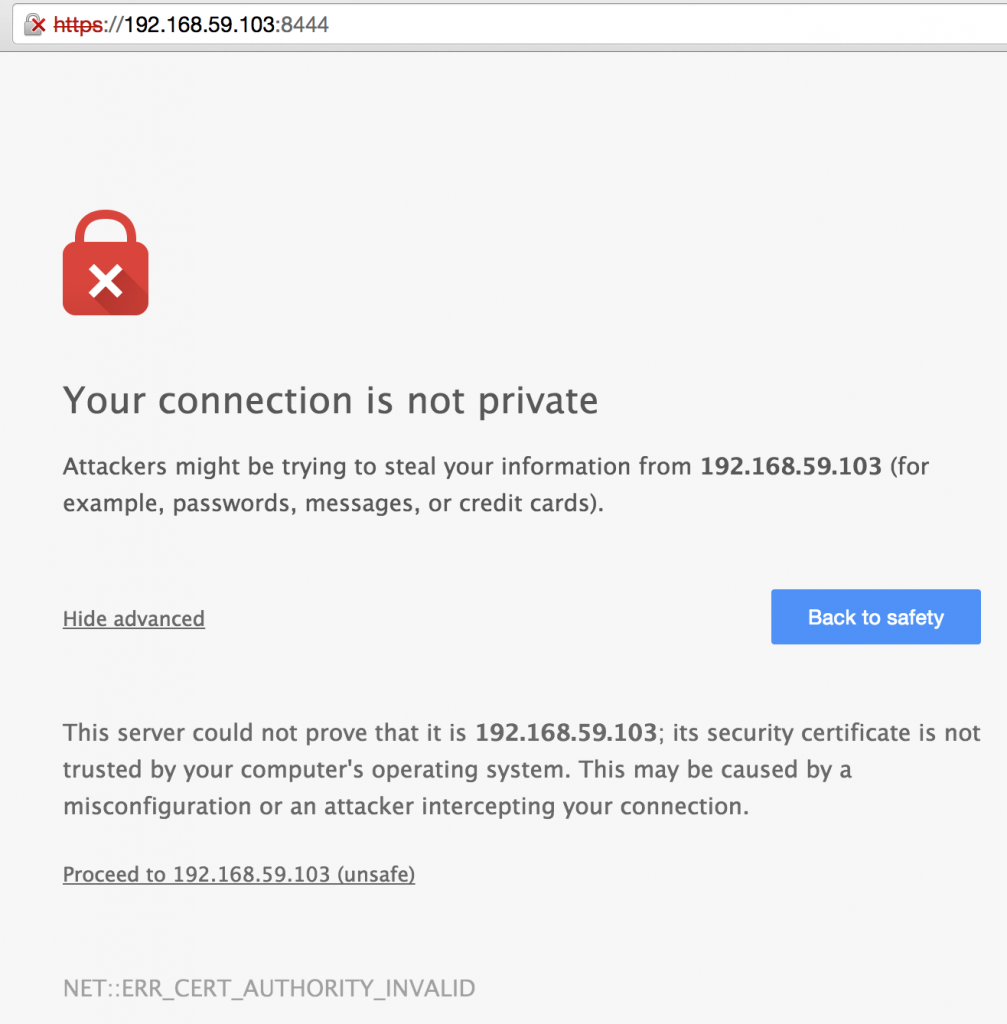
    OpenShift Origin Browser Certificate

    You will need to have the browser accept the certificate at https://<host>:8444 before the console can consult the OpenShift API. Of course this would not be necessary with a legitimate certificate.

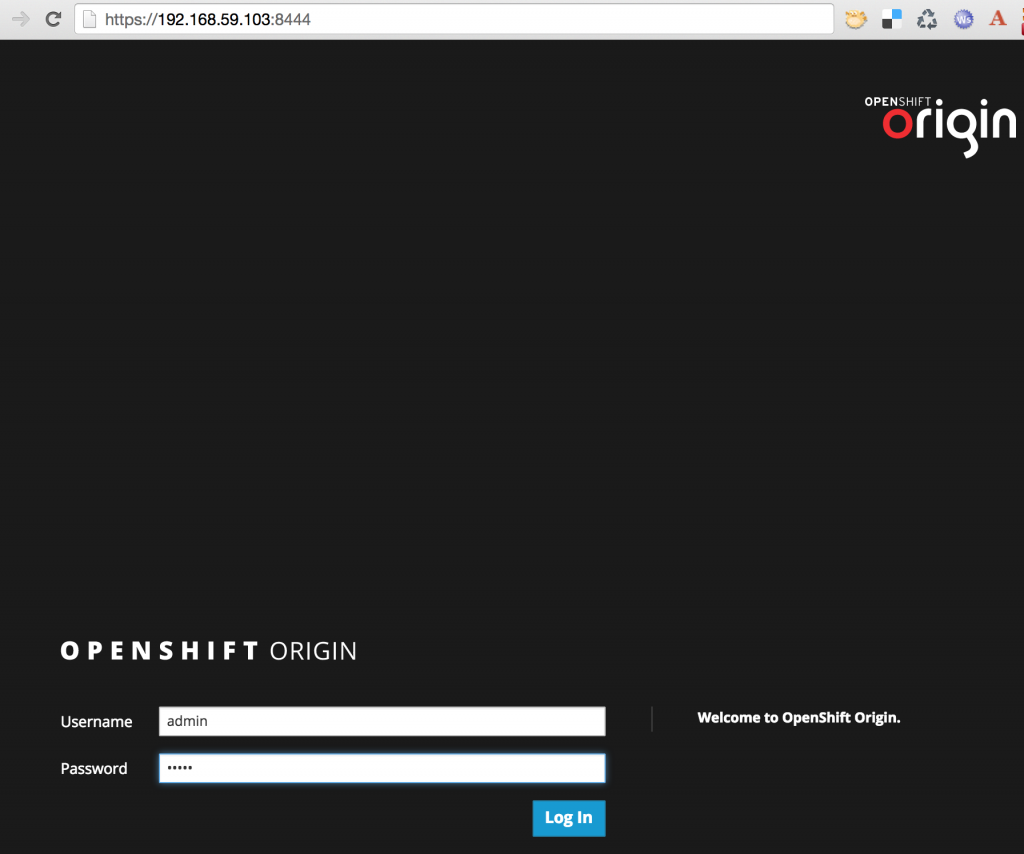
  2. OpenShift Origin login screen shows up. Enter the username/password as admin/admin:
    OpenShift Origin Login Screen

    and click on the “Log In” button. The default web console looks like:

    OpenShift v3 Web Console Default

Create OpenShift v3 Project

  1. Use project.json from github.com/openshift/origin/blob/master/examples/sample-app/project.json in the OpenShift v3 container and create a test project as:

    Refreshing the web console now shows:

    OpenShift Origin Test Project

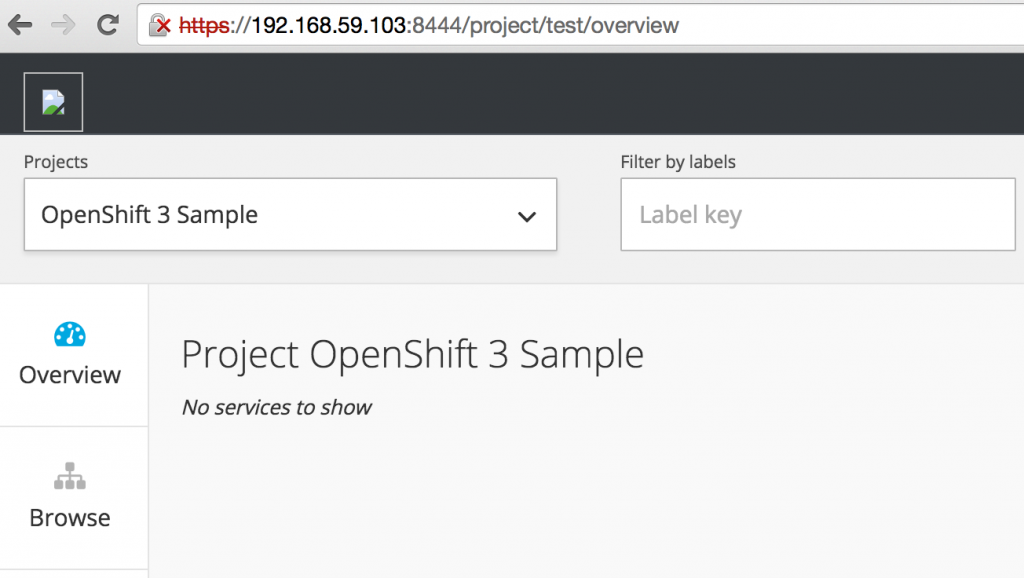
    Clicking on “OpenShift 3 Sample” shows an empty project description:

    OpenShift v3 Empty Project

  2. Request creation of the application template:

  3. Web Console automatically refreshes and shows:

    OpenShift v3 Java EE 7 Default Project

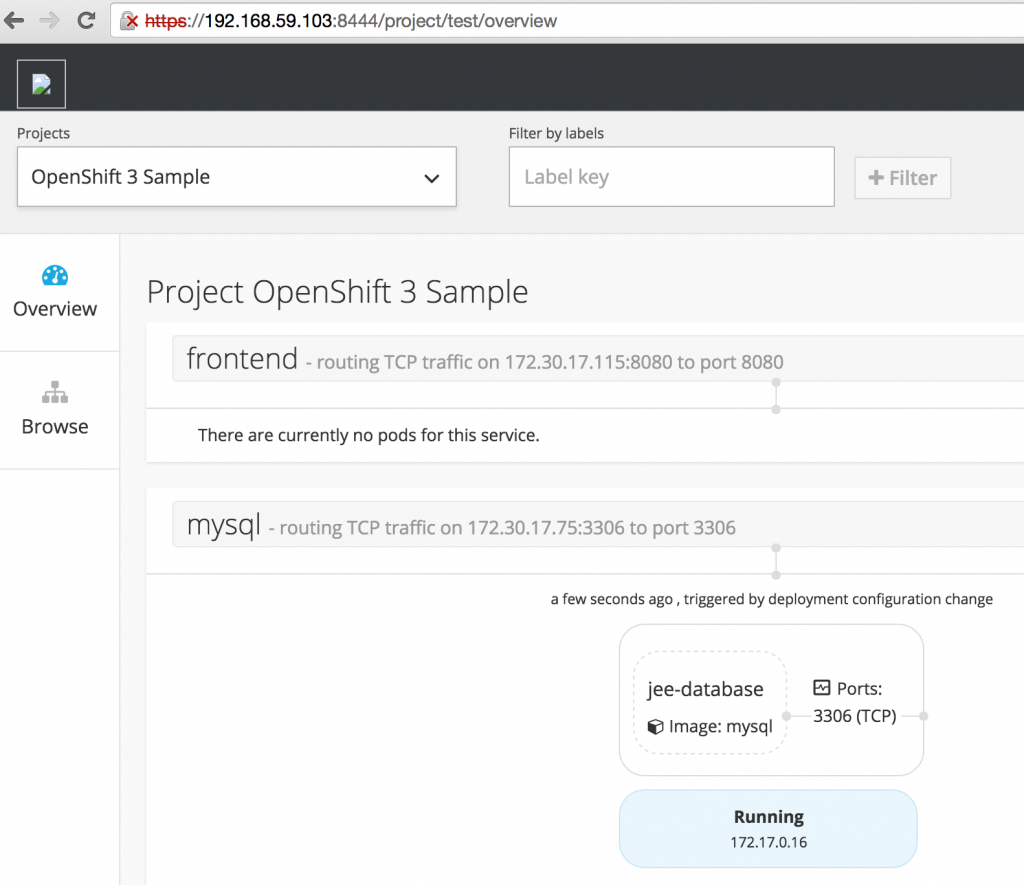
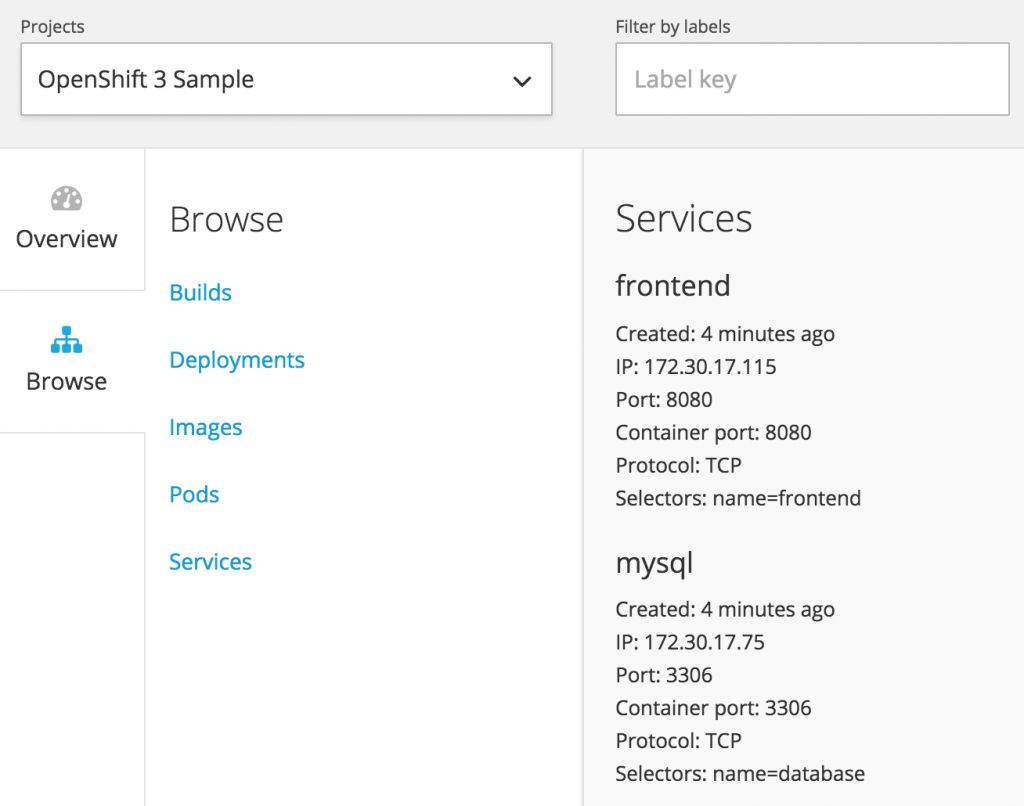
    The list of services running can be seen as:

    OpenShift v3 Java EE 7 Project Services

Build the Project

  1. Trigger an initial build of your project:

  2. Monitor the builds and wait for the status to go to “complete” (this can take a few minutes):

    You can add the –watch flag to wait for updates until the build completes:

    Wait for the STATUS column to show Complete. It will take a few minutes as all the components (WIldFly, MySQL, Java EE 7 application) are provisioned.  Effectively, their new Docker images are created and pushed to the local registry that was started earlier.

    Hit Ctrl+C to stop watching builds after the status changes to Complete.

  3. Complete log of the build can be seen as:

  4. Check for the application pods to start:

    Note, that the “frontend” and “database” pods are now running.

  5. Determine IP of the “frontend” service:

  6. Access the application at http://<IP address of “frontend”>:8080/movieplex7-1.0-SNAPSHOT should work. Note the IP address may (most likely will) vary. In this case, it would be http://172.30.17.115:8080/moviexplex7-1.0-SNAPSHOT.The app would not be accessible yet, as some further debugging is required to configure firewall on Mac when OpenShift v3 is used as Docker container. Until we figure that out, you can do docker ps in your boot2docker VM to see the list of all the containers:

    And then login to the container associated with frontend as:

    This will log in to the Docker container where you can check that the application is deployed successfully by giving the following command:

    This will print the index.html page from the application which has license at the top and rest of the page after that.

    Now once the firewall issue is resolved, this page will then be accessible on host Mac as well.

Lets summarize:

  • Cloned the OpenShift Origin and Java EE 7 sample repo
  • Started OpenShift v3 as Docker container
  • Loaded the OpenShift v3 Web Console
  • Create an OpenShift v3 project
  • Loaded Java EE 7 application template
  • Triggered a build, which deployed the application

Here are some troubleshooting tips if you get stuck.

Enjoy!

Java EE 7 and WildFly on Kubernetes using Vagrant (Tech Tip #71)

This tip will show how to run a Java EE 7 application deployed in WildFly and hosted using Kubernetes and Docker. If you want to learn more about the basics, then this blog has already published quite a bit of content on the topic. A sampling of some of the content is given below:

Lets get started!

Start Kubernetes cluster

Kubernetes cluster can be easily started on a Linux machine using the usual scripts. There are Getting Started Guides for different platforms such as Fedora, CoreOS, Amazon Web Services, and others. Running a Kubernetes cluster on Mac OS X require to use the Vagrant image which is also explained in Getting Started with Vagrant. This blog will use the Vagrant box.

  1. By default, Kubernetes cluster management scripts assumes you are running on Google Compute Engine. Kubernetes can be configured to run with a variety of providers: gce, gke, aws, azure, vagrant, local, vsphere. So lets set our provider to vagrant as:

    This means, your Kubernetes cluster is running inside a Fedora VM created by Vagrant.
  2. Start the cluster as:

    Notice, this command is given from the kubernetes directory where it is already compiled as explained in Build Kubernetes on Mac OS X.

    By default, the Vagrant setup will create a single kubernetes-master and 1 kubernetes-minion. This involves creating Fedora VM, installing dependencies, creating master and minion, setting up connectivity between them, and a whole lot of other things. As a result, this step can take a few minutes (~10 mins on my machine).

Verify Kubernetes cluster

Now that the cluster has started, lets make sure we verify it does everything that its supposed to.

  1. Verify the that your Vagrant images are up correctly as:

    This can also be verified by verifying the status in Virtual Box console as shown:

    Kubernetes Virtual Machines in Virtual Box
    Kubernetes Virtual Machines in Virtual Box

    boot2docker-vm is the Boot2Docker VM. Then there is Kubernetes master and minion VM. Two additional VMs are shown here but they not relevant to the example.

  2. Log in to the master as:

    Verify that different Kubernetes components have started up correctly. Start with Kubernetes API server:

    Then Kube Controller Manager:

    Similarly you can verify etcd and nginx as well.

    Docker and Kubelet are running in the minion and can be verified by logging in to the minion and using systemctl scripts as:

  3. Check the minions as:

    Only one minion is created. This can be manipulated by setting an environment variable NUM_MINIONS variable to an integer before invoking kube-up.sh script.

    Finally check the pods as:

    This shows a single pod is created by default and has three containers running:

    • skydns: SkyDNS is a distributed service for announcement and discovery of services built on top of etcd. It utilizes DNS queries to discover available services.
    • etcd: A distributed, consistent key value store for shared configuration and service discovery with a focus on being simple, secure, fast, reliable. This is used for storing state information for Kubernetes.
    • kube2sky: A bridge between Kubernetes and SkyDNS. This will watch the kubernetes API for changes in Services and then publish those changes to SkyDNS through etcd.

    No pods have been created by our application so far, lets do that next.

Start WildFly and Java EE 7 application Pod

Pod is created by using the kubectl script and providing the details in a JSON configuration file. The source code for our configuration file is available at github.com/arun-gupta/kubernetes-java-sample, and looks like:

The exact payload and attributes of this configuration file are documented at kubernetes.io/third_party/swagger-ui/#!/v1beta1/createPod_0. Complete docs of all the possible APIs are at kubernetes.io/third_party/swagger-ui/. The key attributes in this fie particularly are:

  • A pod is created. API allows other types such as “service”, “replicationController” etc. to be created.
  • Version of the API is “v1beta1″.
  • Docker image arungupta/javaee7-hol used to run the container.
  • Exposes port 8080 and 9090, as they are originally exposed in the base image Dockerfile. This require further debugging on how the list of ports can be cleaned up.
  • Pod is given a label “wildfly”. In this case, its not used much but would be more meaningful when services are created in a subsequent blog.

As mentioned earlier, this tech tip will spin up a single pod, with one container. Our container will be using a pre-built image (arungupta/javaee7-hol) that deploys a typical 3-tier Java EE 7 application to WildFly.

Start the WildFly pod as:

Check the status of the created pod as:

The WildFly pod is now created and shown in the list. The HOST column shows the IP address on which the application is accessible.

The image below explains how all the components fit with each other:

Java EE 7/WildFly in Kubernetes on Mac OS X

As only one minion is created by default, this pod will be created on that minion. The blog will show how multiple minions can be created. Kubernetes of course picks the minion where the pods are created.

Running the pod ensures that the Java EE 7 application is deployed to WildFly.

Access Java EE 7 Application

From the kubectl.sh get pods output, HOST column shows the IP address where the application is externally accessible. In our case, the IP address is 10.245.1.3. So, access the application in the browser to see output as:

Java EE 7 Application on Kubernetes


This confirms that your Java EE 7 application is now accessible.

Kubernetes Debugging Tips

Once the Kubernetes cluster is created, you’ll need to debug it and see what’s going on under the hood.

First of all, lets log in to the minion:

List of Docker containers on Minion

Lets take a look at all the Docker containers running on minion-1:

The first container is specific to our application, everything else is started by Kubernetes.

Details about each Docker container

More details about each container can be found by using their container id as:

In our case, the output is shown as:

Logs from the Docker container

Logs from the container can be seen using the command:

In our case, the output is shown as:

WildFly startup log, including the application deployment, is shown here.

Log into the Docker container

Log into the container and show WildFly logs. There are a couple of ways to do that.

First is to use the container id and use “exec”:

In our case, log into the container as:

Other, more classical way, is to get the process id of the container as:

In our case, the output is:

And now log into the container as:

And now the complete WildFly distribution is available at:

Clean up the cluster

Entire Kubernetes cluster can be cleaned either using Virtual Box console, or using the command line as:

So we learned how to run a Java EE 7 application deployed in WildFly and hosted using Kubernetes and Docker.

Enjoy!

Docker container linking across multiple hosts (Tech Tip #69)

Docker container linking is important concept to understand since any application in production will typically run on a cluster of containers across multiple hosts. But simple container linking does not allow cross-host communication.

Whats the issue with Docker container linking?

Docker containers can communicate with each other be manually linking as shown in Tech Tip #66 or orchestrated using Fig as shown in Tech Tip #68. Both of these using container linking but that has an inherent disadvantage that it is restricted to a single host. Linking does not work if containers are running across multiple hosts.

What is the solution?

This Tech Tip will evolve the sample built in Tech Tip #66 and #68 and show the containers can be connected if they are running across multiple hosts.

Docker container linking across multiple hosts can be easily done by explicitly publishing the host/port and using it from a container on a different host.

Lets get started!

  1. Start MySQL container as:

    The MySQL container is explicitly forwarding the port 3306 to port 5506.
  2. Git repo has customization/execute.sh that creates the MySQL data source. The command looks like:

    This command creates the JDBC resource for WildFly using jboss-cli. It is using $DB_PORT_3306_TCP_ADDR and $DB_PORT_3306_TCP_PORT variables which are defined per Container Linking Environment Variables. The scheme by which the environment variables for containers are created is rather weird. It exposes the port number in the variable name itself. I hope this improves in subsequent releases.

    This command needs to be updated such that an explicit host/port can be used instead.

    So update the command to:

    The only change in the command is to use $MYSQL_HOST and $MYSQL_PORT variables. This command already exists in the file but is commented. So just comment the previous one and uncomment this one.

  3. Build the image and run it as:

    Make sure to substitute <IP_ADDRESS> with the IP address of your host. For convenience, I ran it on the same host. The IP address in this case can be easily obtained using boot2docker ip.

  4. A quick verification of the deployment can be done by accessing the REST endpoint:

With this, your WildFly and MySQL can run on two separate hosts, no special configuration required.

Enjoy!

Docker allows cross-host container linking using Ambassador Containers but that adds a redundant hop for the service to be accessed. A cleaner solution would to use Kubernetes or Swarm, more on that later.

Marek also blogged about a more elaborate solution in Connecting Docker Containers on Multiple Hosts.


Docker orchestration using Fig (Tech Tip #68)

Tech Tip #66 showed how to run a Java EE 7 application using WildFly and MySQL in two separate containers. It required to explicitly start the two containers, and link them using --link. This defining and controlling a multi-container service is a common design pattern in order to get an application up and going.

Meet Fig – Docker Orchestration Tool.

Fig allows to:

  • Define multiple containers in a single configuration file
  • Create dependencies between two containers by creating links between them
  • Start containers in the right sequence

Let’s get started!

  1. Install Fig as:
  2. Entry point to Fig is a configuration file that defines the containers and their dependencies. The equivalent configuration file from Tech Tip #65 is:

    This YML-based configuration file has:

    1. Two containers defined by the name “mysqldb” and “mywildfly”
    2. Image names are defined using “image”
    3. Environment variables for the MySQL container are defined in “environment”
    4. MySQL container is linked with WildFly container using “links”
    5. Port forwarding is achieved using “ports”
  3. All the containers can be started, in detached mode, by giving the command:

    The output is shown as:

    Fig commands allow to monitor and update the status of the containers:

    1. Logs can be seen as:
    2. Container status can be seen by giving the command:

      to show the output as:
    3. Containers can be stopped as:
    4. Alternatively, containers can be started in foreground by giving the command:

      and the output is seen as:
  4. Find out the IP address using boot2docker ip and access the app as:

Complete list of Fig commands can be seen by typing fig:

Particularly interesting is scale command, and we’ll take a look at it in a subsequent blog.

File issues on github.

Enjoy!

WildFly/JavaEE7 and MySQL linked on two Docker containers (Tech Tip #66)

Tech Tip #61 showed how to run Java EE 7 hands-on lab on WildFly Docker container. A couple of assumptions were made in that case:

  • WildFly bundles H2 in-memory database. The Java EE 7 application uses the default database resource, which in case of WildFly, gets resolved to a JDBC connection to that in-memory database. This is a good way to start building your application but pretty soon you want to start using a real database, like MySQL.
  • Typically, Application Server and Database may not be residing on the same host. This reduces the risk by avoiding a single point of failure. And so WildFly and MySQL would be on to separate host.

There is plethora of material available to show how to configure WildFly and MySQL on separate hosts. What are the design patterns, and anti-patterns, if you were to do that using Docker?

Lets take a look!

In simplified steps:

  1. Run the MySQL container as:
  2. Run the WildFly container, with MySQL JDBC resource pre-configured, as:
  3. Find the IP address of the WildFly container:

    If you are on a Mac, then use boot2docker ip to find the IP address.
  4. Access the application as:

    to see the output as:

    The application is a trivial Java EE 7 application that publishes a REST endpoint. Access it as:

    to see:

If you are interested in nitty gritty, read further details.

Linking Containers

The first concept we need to understand is how Docker allows linking containers. Creating a link between two containers creates a conduit between a source container and a target container and securely transfer information about source container to target container. In our case, target container (WildFly) can see information about source container (MySQL). The important part to understand here is that none of this information needs to be publicly exposed by the source container, and is only made available to the target container.

The magic switch to enable link is, intuitively, --link. So for example, if MySQL and WildFly containers are run as shown above, then --link mysqldb:db links the MySQL container named mysqldb with an alias db to the WildFly target container. This defines some environment variables, following the defined protocol, in the target container which can then be used to access information about the source container. For example, IP address, exposed ports, username, passwords, etc. The complete list of environment variables can be seen as:

So you can see there are DB_* environment variables providing plenty of information about source container.

Linking only works if all the containers are running on the same host. A better solution will be shown in the subsequent blog, stay tuned.

Override default Docker command

Dockerfile for this image inherits from jboss/wildfly:latest and starts the WildFly container. Docker containers can only run one command but we need to install JDBC driver, create JDBC resource using the correct IP address and port, and deploy the WAR file. So we will override the command by inheriting from jboss/wildfly:latest and use a custom command. This command will do everything that we want to do, and then start WildFly as well.

The custom command does the following:

  • Add MySQL module
  • Add MySQL JDBC driver
  • Add the JDBC data source using IP address and port of the linked MySQL container
  • Deploy the WAR file
  • Start WildFly container

Note, WildFly is starting with -b 0.0.0.0 that allows it to be bound to any IP address. Also, the command needs to run in foreground so that the container stays active.

Customizing security

Ideally, you’ll poke holes in the firewall to enable connection to specific host/ports. But these instructions were tried on Fedora 20 running in Virtual Box. So for convenience, the complete firewall was disabled as:

In addition, a Host-only adapter was added using Virtual Box settings and looks like:

techtip65-host-only-adapter

That’s it, that should get you going to to use WildFly and MySQL on two separate containers.

Also verified the steps on boot2docker, and it worked seamlessly there too:

Source code for the image is at github.com/arun-gupta/docker-images/tree/master/wildfly-mysql-javaee7.

Enjoy!

Run Java EE Tests on Docker using Arquillian Cube (Tech Tip #62)

Tech Tip #61 showed how to run Java EE 7 Hands-on Lab using Docker. The Dockerfile used there can be used to create a new image that can deploy any Java EE 7 WAR file to the WildFly instance running in the container.

For example github.com/arun-gupta/docker-images/blob/master/javaee7-test/Dockerfile can be copied to the root directory of javaee7-samples and be used to deploy jaxrs-client.war file to the container. Of course, you first need to build the sample as:

The exact Dockerfile is shown here:

If you want to deploy another Java EE 7 application, then you need to do the following steps:

  • Create the WAR file of the sample
  • Change the Dockerfile
  • Build the image
  • Stop the previous container
  • Start the new container

Now, if you want to run tests against this instance then mvn test alone will not do it because either you need to bind the IP address of the Docker container statically, or dynamically find out the address and then patch it at runtime. Anyway, the repeated cycle is little too cumbersome. How do you solve it?

Meet Arquillian Cube!

Arquillian Cube allows you to control the lifecycle of Docker images as part of the test lifecyle, either automatically or manually.

The blog entry provide more details about getting started with Arquillian Cube, and this functionality has now been enabled in “docker” branch of javaee7-samples. Arquillian Cube Extension Alpha2 was recently released and is used to provide integration. Here are the key concepts:

  • A new “wildfly-docker-arquillian” profile is being introduced
  • The profile adds a dependency on:
  • Uses Docker REST API to talk to the container. Complete API docs shows the sample payloads and explains the query parameters and status codes.
  • Uses WildFly remote adapter to talk to the application server running within the container
  • Configuration for Docker image is specified as part of maven-surefire-plugin.:

    Username and password are specified are for the WildFly in arungupta/javaee7-samples-wildfly image. All the configuration values can be overridden by arquillian.xml for each test case, as explained here.

How do you try out this functionality?

Here is a complete log of running simple-servlet test:

REST payload from the client to Docker server are shown here. This was verified on a Fedora 20 Virtual Box image. Here are some quick notes on setting it up there:

  1. Install the required packages
  2. Configure Docker
  3. Verify Docker TCP configuration

Boot2docker on Mac still has issue #49, this is Alpha2 after all :-)

Try some other Java EE 7 tests and file bugs here.

Enjoy!

Java EE 7 Hands-on Lab on WildFly and Docker (Tech Tip #61)

Java EE 7 Hands-on Lab has been delivered all around the world and is a pretty standard application that shows design patterns and anti-patterns for a typical Java EE 7 application. It shows how the following technologies can be used in a close-to-real-world application:

  • WebSocket 1.0
  • JSON Processing 1.0
  • Batch 1.0
  • Contexts & Dependency Injection 1.1
  • Java Message Service 2.0
  • Java API for RESTFul Services 2.0
  • Java Persistence API 2.0
  • Enterprise JavaBeans 3.1
  • JavaSever Faces 2.2

However the lab requires you to download NetBeans (Java EE 7 tooling) and WildFly or GlassFish (Java EE 7 runtime).

If you don’t want to follow the instructions and create the app, a pre-built solution zip file is available. But this still requires you to download Maven and build the app. You still have to download the runtime, which is pretty straight forward for WildFly, but still an extra task.

Maven step can be reduced using a pre-built WAR file, but runtime is still required.

Docker containers allows you to simplify application delivery by packaging all the key components together in an image. So how do you get the first feel of Java EE 7 hands-on lab with Docker ?

If you are new to Docker, Tech Tip #39 provide more background and details on how to get started. After initial setup, you can pull the Docker image that contains WildFly and pre-built Java EE 7 hands-on lab WAR file as shown:

And then you can run it as:

Find out the IP address where your container is hosted using boot2docker ip command. And now access your Java EE 7 application at http://<IP>/movieplex7. The app would look like:

techtip61-output

Here is the complete log shown by the Docker container:

Source code for this Dockerfile is pretty straight forward and at github.com/arun-gupta/docker-images/blob/master/javaee7-hol/Dockerfile.

Enjoy!