RFC 6455 provide a complete list of security considerations for WebSockets. Some of them are baked in the protocol itself, and others need more explanation on how they can be achieved on a particular server. Lets talk about some of the security built into the protocol itself:
- The Origin header in HTTP request includes only the information required to identify the principal (web page, JavaScript or any other client) that initiated the request (typically the scheme, host, and port of initiating origin). For WebSockets, this header field is included in the client’s opening handshake. This is used to inform server of the script origin generating the WebSocket connection request. The server may then decide to accept or reject the handshake request accordingly. This allows the server to protect against unauthorized cross-origin use of a WebSocket server by scripts using the WebSocket API in a browser. For example, if Java EE 7 WebSocket Chat sample is deployed to WildFly and accessed at localhost:8080/chat/ then the Origin header is “http://localhost:8080″. Non-browser clients may use the Origin header to specify the origin of the request. WebSocket servers should be careful about receiving such requests.
- WebSocket opening handshake from client must include Sec-WebSocket-Key and Sec-WebSocket-Version HTTP header field. XMLHttpRequest can be used to make HTTP requests, and allows to set headers as part of that request as:
12345678910111213xhr.onreadystatechange = function (){if (xhr.readyState == 4 && xhr.status == 200){document.getElementById("myDiv").innerHTML = xhr.responseText;}}xhr.open("GET", "http://localhost:8080", true);xhr.setRequestHeader("foo", "bar");xhr.setRequestHeader("Sec-WebSocket-Key", "myKey");xhr.send();
If XMLHttpRequest tries to set any header fields starting with Sec- then they are ignored. So a malicious user cannot simulate a WebSocket connection to a server by using HTML and JavaScript APIs.
In addition to these two primary ways, WebSockets can be secured using client authentication mechanism available to any HTTP servers. This Tech Tip will show how to authenticate Java EE 7 WebSockets deployed on WildFly.
Lets get started!
- Clone Java EE 7 Samples workspace:
123git clone https://github.com/javaee-samples/javaee7-samples.git - The “websocket/endpoint-security” sample shows how client authentication can be done before the WebSocket handshake is initiated from the client. This is triggered by including the following deployment descriptor:
123456789101112131415161718192021<security-constraint><web-resource-collection><web-resource-name>WebSocket Endpoint</web-resource-name><url-pattern>/*</url-pattern><http-method>GET</http-method></web-resource-collection><auth-constraint><role-name>g1</role-name></auth-constraint></security-constraint><login-config><auth-method>BASIC</auth-method><realm-name>file</realm-name></login-config><security-role><role-name>g1</role-name></security-role>
Some key points to understand about this descriptor:- <url-pattern> indicates that any request made to this application will be prompted for authentication
- <auth-constraint> defines the security role that can access this resource
- <login-config> shows that file-based realm is used with basic authentication
- <security-role> defines the security roles referenced by this application
In our particular case, the page that creates the WebSocket connection is protected by basic authentication.
- Download WildFly 8.1, unzip, and add a new user by invoking the following script:
123./bin/add-user.sh -a -u u1 -p p1 -g g1
This will add user “u1″ with password “p1″ in group “g1″. The group specified here needs to match as defined in <role-name> in the deployment descriptor.
- Deploy the sample by giving the command:
123mvn wildfly:deploy
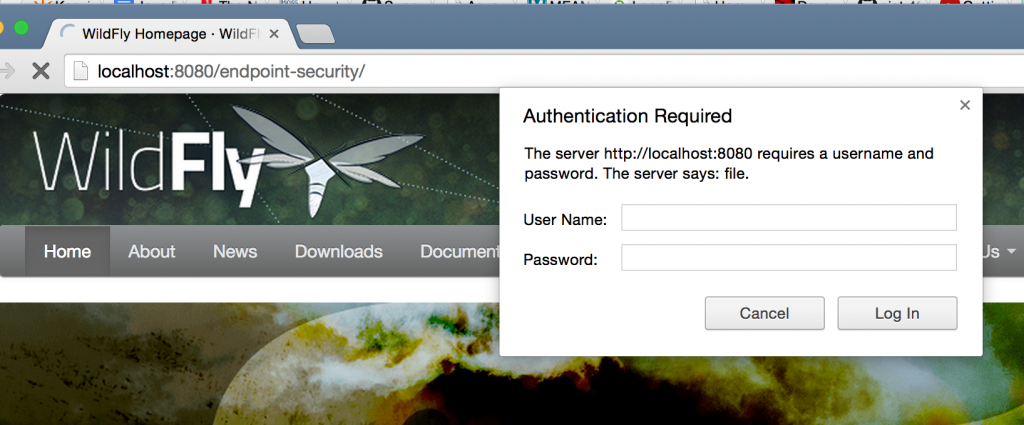
Now when the application is accessed at localhost:8080/endpoint-security then a security dialog box pops up as shown:
Enter “u1″ as the username and “p1″ as the password to authenticate. These credentials are defined in the group “g1″ which is referenced in the deployment descriptor. Any other credentials will keep bringing the dialog back.
As soon as the request is successfully authenticated, the WebSocket connection is established and a message is shown on the browser.
If you are interested in securing only the WebSocket URL then change the URL pattern from
|
1
2
3
|
/*
|
to
|
1
2
3
|
/websocket
|
In websocket.js, change the URL to create WebSocket endpoint from:
|
1
2
3
|
var wsUri = "ws://" + document.location.host + document.location.pathname + "websocket";
|
to
|
1
2
3
|
var wsUri = "ws://u1:p1@" + document.location.host + document.location.pathname + "websocket";
|
Note, how credentials are passed in the URL itself. As of Google Chrome 38.0.2125.104, a browser popup does not appear if only WebSocket URL requires authentication.
Next Tech Tip will explain how to secure WebSocket using wss:// protocol.


One thought on “Securing WebSockets using Username/Password and Servlet Security (Tech Tip #49)”