Monthly Archives: October 2016

Docker Container Anti Patterns

This blog will explain 10 containers anti-patterns that I’ve seen over the past few months:

  1. Data or logs in containers – Containers are ideal for stateless applications and are meant to be ephemeral. This means no data or logs should be stored in the container otherwise they’ll be lost when the container terminates. Instead use volume mapping to persist them outside the containers. ELK stack could be used to store and process logs. If managed volumes are used during early testing process, then remove them using -v switch with the docker rm command.
  2.  IP addresses of container – Each container is assigned an IP address. Multiple containers communicate with each other to create an application, for example an application deployed on an application server will need to talk with a database. Existing containers are terminated and new containers are started all the time. Relying upon the IP address of the container will require constantly updating the application configuration. This will make the application fragile. Instead create services. This will provide a logical name that can be referred independent of the growing and shrinking number of containers. And it also provides a basic load balancing as well.
  3. Run a single process in a container – A Dockerfile has use one CMD and ENTRYPOINT. Often, CMD will use a script that will perform some configuration of the image and then start the container. Don’t try to start multiple processes using that script. Its important to follow separation of concerns pattern when creating Docker images. This will make managing your containers, collecting logs, updating each individual process that much harder. You may consider breaking up application into multiple containers and manage them independently.
  4. Don’t use docker exec – The docker exec command starts a new command in a running container. This is useful for attaching a shell using the docker exec -it {cid} bash. But other than that the container is already running the process that its supposed to be running.
  5. Keep your image lean – Create a new directory and include Dockerfile and other relevant files in that directory. Also consider using .dockerignore to remove any logs, source code, logs etc before creating the image. Make sure to remove any downloaded artifacts after they are unzipped.
  6. Create image from a running container – A new image can be created using the docker commit command. This is useful when any changes in the container have been made. But images created using this are non-reproducible. Instead make changes in the Dockerfile, terminate existing containers and start a new container with the updated image.
  7. Security credentials in Docker image – Do not store security credentials in the Dockerfile. They are in clear text and checked into a repository. This makes them completely vulnerable. Use -e to specify passwords as runtime environment variable. Alternatively --env-file can be used to read environment variables from a file. Another approach is to used CMD or ENTRYPOINT to specify a script. This script will pull the credentials from a third party and then configure your application.
  8. latest tag: Starting with an image like couchbase is tempting. If no tags are specified then a container is started using the image couchbase:latest.  This image may not actually be latest and instead refer to an older version. Taking an application into production requires a fully controller environment with exact version of the image. Read this Docker: The latest confusion post by fellow Docker Captain @adrianmouat.  Make sure to always use tag when running a container. For example, use couchbase:enterprise-4.5.1 instead of just couchbase.
  9. Impedance mismatch – Don’t use different images, or even different tags in dev, test, staging and production environment. The image that is the “source of truth” should be created once and pushed to a repo. That image should be used for different environments going forward. In some cases, you may consider running your unit tests on the WAR file as part of maven build and then create the image. But any system integration testing should be done on the image that will be pushed in production.
  10. Publishing ports – Don’t use -P to publish all the exposed ports. This will allow you to run multiple containers and publish their exposed ports. But this also means that all the ports will be published. Instead use -p to publish specific ports.

Adding more based upon discussion on twitter …

  1. Root user – Don’t run containers as root user. The host and the container share the same kernel. If the container is compromised, a root user can do more damage to the underlying hosts. Use RUN groupadd -r couchbase && useradd -r -g couchbase couchbase to create a group and a user in it. Use the USER instruction to switch to that user. Each USER creates a new layer in the image. Avoid switching the user back and forth to reduce the number of layers. Thanks to @Aleksandar_78 for this tip!
  2. Dependency between containers – Often applications rely upon containers to be started in a certain order. For example, a database container must be up before an application can connect to it. The application should be resilient to such changes as the containers may be terminated or started at any time. In this case, have the application container wait for the database connection to succeed before proceeding further. Do not use wait-for scripts in Dockerfile for the containers to startup in a specific order. Particularly waiting for a certain number of seconds for a particular container to start is very fragile. Thanks to @ratnopam for this tip!

What other anti-patterns do you follow?

Docker for Java developers is a self-paced hands-on workshop that explains how to get started with Docker for Java developers.

Interested in a more deep dive tutorial? Watch this 2-hours tutorial from JavaOne!

couchbase.com/containers shows how to run Couchbase in a variety of frameworks.

Source: blog.couchbase.com/2016/october/docker-container-anti-patterns
Docker on Windows 2016 Server

This blog is the first part of a multi-part series. The first part showed how to set up Windows Server 2016 as a VirtualBox VM. This second part will show how to configure Docker on Windows 2016 VM.

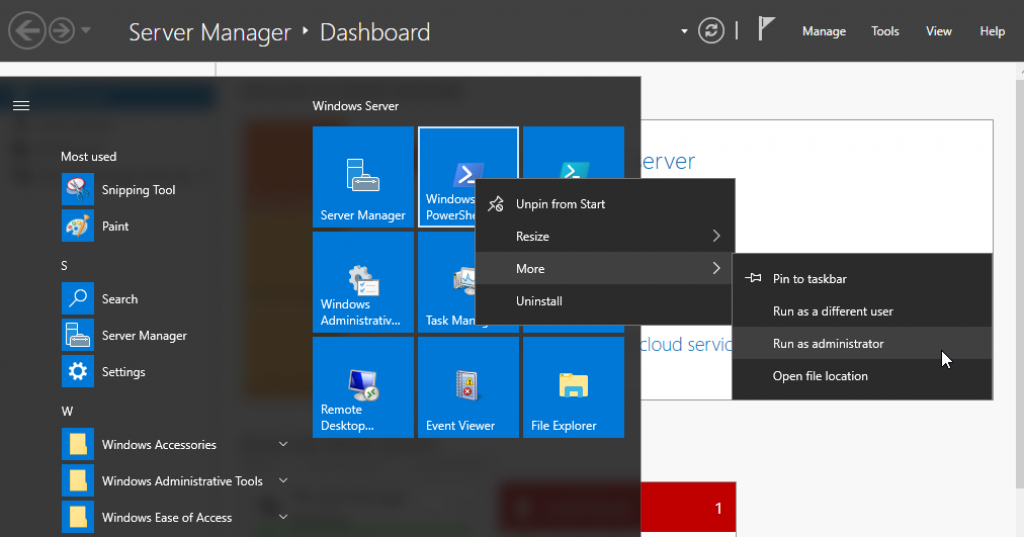
  1. Start an elevated PowerShell session:docker-windows-2016-22
  2. Run the script to install Docker:
    This will install the PowerShell module, enable containers feature and install Docker.

    docker-windows-2016-23

    The VM needs to be restarted in order for the containers to be enabled. Refer to Container Host Deployment – Windows Server for more detailed instructions.

  3. The VM reboots. Start a PowerShell and check Docker version using docker version command:docker-windows-2016-24More details about Docker can be found using the docker info command:docker-windows-2016-25
  4. Run your first Docker container using the docker run -it -p 80:80 microsoft/iis command:docker-windows-2016-26This will download the Microsoft IIS server Docker image. This is going to take a while so please be patient!
  5. Once the 8.9 GB image is downloaded (after a while), the IIS server is started for you. Check the list of images using the docker images command and the list of running containers using the docker ps command:docker-windows-2016-27More details about the container can be found using the docker inspect command:

  6. The exact IP address of the container can be found using the command:

    IIS main page is accessible at http://<container-ip>, as shown below:

    docker-windows-2016-28

The next part will show how to create your own Docker image on Windows Server 2016.

Source: blog.couchbase.com/2016/october/docker-on-windows-2016-server

Persisting Couchbase Data Across Container Restarts

Best Practices for Virtualized Platforms provide best practices for running Couchbase on a virtualized platform like Amazon Web Services and Azure. In addition, it also provide some recommendations for running it as Docker container.

One of the recommendations is to map Couchbase node specific data to a local folder. Let’s understand that in more detail.

Implicit Per-Container Storage

If a Couchbase container is started as:

This container:

  • Starts in a detached mode using -d
  • Different query, caching and administration ports are mapped using -p
  • A name is provided using --name
  • Image is couchbase/server:sandbox

By default, the data for the container is stored in a managed volume. Checking volume mounts using the docker inspect command shows:

The data for Couchbase is stored in the container filesystem defined by the value of Source attribute. This can be verified by logging into the root filesystem:

Now you can see the data directory:

A new directory is created for a new run of the container. This directory is still around when the container is stopped and removed but no longer easily accessible. Thus no data is preserved across container restarts.

The volume can be explicitly removed, along with container, using the command:

If the container terminates then the entire state of the application is lost.

Explicit Host Directory Mapping

Now, let’s start a Couchbase container with explicit volume mapping:

This container is very similar to the container started earlier. The main difference is that a directory from host ~/couchbase is mapped to a directory in the container /opt/couchbase/var.

Couchbase container persists any data in /opt/couchbase/var directory in the container filesystem. Now that directory is mapped to a directory on the host filesystem. This allows to persist state of the container outside on the host filesystem. The bypasses the union filesystem used by Docker and exposes the host filesystem to the container. This allows the state to persist across container restarts. The new container only needs to start with the exact same volume mapping.

More details about the container can be seen as:

jq is a JSON processor that needs to be installed separately. And the output is shown as:

This shows the source and destination directory. RW shows that the volume is read/write.

If the container is started using Docker for Mac, then Couchbase Web Console is accessible at http://localhost:8091. The Data Buckets tab shows the default travel-sample bucket:

docker-volume-couchbase-01

Click on Create New Data Bucket to create a new data bucket. Give it the name sample:

docker-volume-couchbase-02

The Data Buckets tab is updated with this newly created bucket:

docker-volume-couchbase-03

Now stop and remove the container:

Start the container again using the same command:

Data Buckets tab will show the same two buckets in the Couchbase Web Console.


In this case, if the container is started on a different host then the state would not be available. Or if the host dies then the state is lost.

An alternative and a more robust and foolproof way to manage persistence in containers is using a shared network filesystem such as Ceph, GlusterFS or Network Filesystem. Some other common approaches are to use Docker Volume Plugins like Flocker from ClusterHQ or Software Defined Storage such as PortWorx. All of these storage technique simplify how state of a container can be saved in a multi-container multi-host environment. A future blog will cover these techniques in detail.

Read more details in Managing data in containers.

couchbase.com/containers provide more details about how to run Couchbase in different container frameworks.

More information about Couchbase:

  • Couchbase Developer Portal
  • Couchbase Forums
  • @couchbasedev or @couchbase

Source: blog.couchbase.com/2016/october/persisting-couchbase-data-across-container-restarts

Windows Server 2016 Using VirtualBox – Getting Ready for Docker

Windows  Server 2016 was announced a few weeks ago.  Download Windows 2016 Server Evaluation version. This blog is the first part of a multi-part series. The first part will show how to set up Windows Server 2016 as a VirtualBox VM. This is an update to Windows Server 2016 using VirtualBox for Docker Containers.

  1. Download Windows 2016 Server Evaluation version.  Its ~5GB download so try on a reliable and fast Internet connection.
  2. Create a new VM using Virtual Box:

    docker-windows-2016-1

  3. Set up a dynamically allocated HDD, make sure to choose 30GB (as shown):

    docker-windows-2016-2
    The installed operating system is ~17GB. The base windowsservercore image is 3.8GB. So if you chose the default 20GB HDD, then no Docker containers can run on it.

  4. Point to the downloaded ISO:

    docker-windows-2016-3

  5. Start the VM, take default settings:

    docker-windows-2016-4

  6. Click on Next:

    docker-windows-2016-5

    Click on Install now.

  7. Select the Desktop Experience version otherwise the standard Windows desktop will not be available after Windows is booted:
    docker-windows-2016-6

    Click on Next.

  8. Accept the license terms:

    docker-windows-2016-7

  9. Select Custom Install as we are installing as a VM:

    docker-windows-2016-8

  10. Take the default for the allocated space:

    docker-windows-2016-9

  11. Click on Next to start the installation:

    docker-windows-2016-10

    Wait for a few minutes for the installation to complete:

    docker-windows-2016-11

    It will take a few minutes for the install to complete.

  12. Enter the administrator’s password:

    docker-windows-2016-13

    Seems like it requires alphabets, numbers and special characters. The dialog expects to meet the password criteria without showing the criteria, this is weird!

  13. Entering the credentials shows the Windows login screen:

    docker-windows-2016-14

  14. In a classical Windows, you do a three-finger salute of Ctrl+Alt+Del to view Desktop. This key combination needs to be sent to Windows VM using  Virtual Box menu:

    docker-windows-2016-15

  15. Server Manager Dashboard shows up:

    docker-windows-2016-16

  16. Latest updates need to be installed. Click on the Start icon, and search for update:

    docker-windows-2016-17Select Check for Updates.

  17. Update window looks like:

    docker-windows-2016-18Select Check for updates again.

  18. Latest updates are downloaded and installed:

    docker-windows-2016-19

  19. Once the updates are downloaded and installed, then the VM needs to be restarted:

    docker-windows-2016-20Click on Restart now to restart the VM.

  20. Restarted VM looks like as shown:

    docker-windows-2016-21


This shows that Windows Server 2016 VM is now ready. Subsequent parts of this multi-part blog will show how to configure Docker containers and run a multi-container application using Docker Compose.

Source: blog.couchbase.com/2016/october/windows-server-2016-using-virtualbox-getting-ready-docker