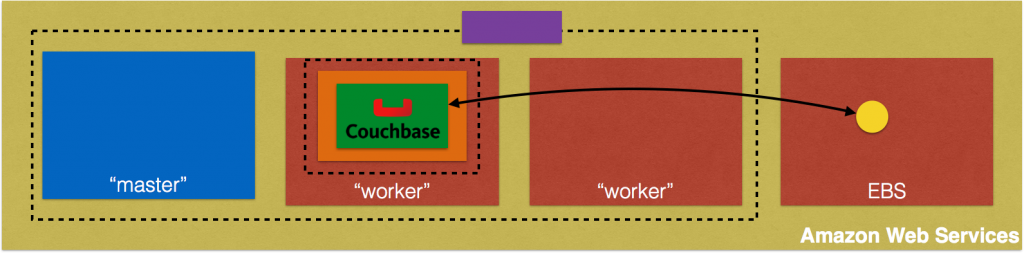
Creating a Kubernetes cluster using Kops requires a top-level domain or a sub domain and setting up Route 53 hosted zones. This domain allows the worker nodes to discover the master and the master to discover all the etcd servers. This is also needed for kubectl to be able to talk directly with the master. This worked well but an additional hassle for the developers.
![]()
Kops 1.6.2 adds an experimental support for gossip-based, uses Weave Mesh, discovery of nodes. This makes the process of setting up Kubernetes cluster using Kops DNS-free, and much more simplified.
Let’s take a look!
- Install or upgrade kops:
123brew upgrade kops - Check the version:
1234~ $ kops versionVersion 1.6.2 - Create an S3 bucket as “state store”:
1234aws s3api create-bucket --bucket kubernetes-arungupta-meexport KOPS_STATE_STORE=s3://kubernetes-arungupta-me - Create a Kubernetes cluster:
It shows the output as:123kops create cluster cluster.k8s.local --zones us-east-1a --yes
Wait for a few minutes for the cluster to be created.123456789101112131415161718192021222324252627282930I0622 16:52:07.494558 83656 create_cluster.go:655] Inferred --cloud=aws from zone "us-east-1a"I0622 16:52:07.495012 83656 create_cluster.go:841] Using SSH public key: /Users/argu/.ssh/id_rsa.pubI0622 16:52:08.540445 83656 subnets.go:183] Assigned CIDR 172.20.32.0/19 to subnet us-east-1aI0622 16:52:16.327523 83656 apply_cluster.go:396] Gossip DNS: skipping DNS validationI0622 16:52:25.539755 83656 executor.go:91] Tasks: 0 done / 67 total; 32 can runI0622 16:52:29.843320 83656 vfs_castore.go:422] Issuing new certificate: "kubecfg"I0622 16:52:30.108046 83656 vfs_castore.go:422] Issuing new certificate: "kubelet"I0622 16:52:30.139629 83656 vfs_castore.go:422] Issuing new certificate: "kube-scheduler"I0622 16:52:31.072229 83656 vfs_castore.go:422] Issuing new certificate: "kube-proxy"I0622 16:52:31.082560 83656 vfs_castore.go:422] Issuing new certificate: "kube-controller-manager"I0622 16:52:31.579158 83656 vfs_castore.go:422] Issuing new certificate: "kops"I0622 16:52:32.742807 83656 executor.go:91] Tasks: 32 done / 67 total; 13 can runI0622 16:52:43.057189 83656 executor.go:91] Tasks: 45 done / 67 total; 18 can runI0622 16:52:50.047375 83656 executor.go:91] Tasks: 63 done / 67 total; 3 can runI0622 16:53:02.047610 83656 vfs_castore.go:422] Issuing new certificate: "master"I0622 16:53:03.027007 83656 executor.go:91] Tasks: 66 done / 67 total; 1 can runI0622 16:53:04.197637 83656 executor.go:91] Tasks: 67 done / 67 total; 0 can runI0622 16:53:04.884362 83656 update_cluster.go:229] Exporting kubecfg for clusterKops has set your kubectl context to cluster.k8s.localCluster is starting. It should be ready in a few minutes.Suggestions:* validate cluster: kops validate cluster* list nodes: kubectl get nodes --show-labels* ssh to the master: ssh -i ~/.ssh/id_rsa admin@api.cluster.k8s.localThe admin user is specific to Debian. If not using Debian please use the appropriate user based on your OS.* read about installing addons: https://github.com/kubernetes/kops/blob/master/docs/addons.md - Validate the cluster:
12345678910111213141516171819~ $ kops validate clusterUsing cluster from kubectl context: cluster.k8s.localValidating cluster cluster.k8s.localINSTANCE GROUPSNAME ROLE MACHINETYPE MIN MAX SUBNETSmaster-us-east-1a Master m3.medium 1 1 us-east-1anodes Node t2.medium 2 2 us-east-1aNODE STATUSNAME ROLE READYip-172-20-36-52.ec2.internal node Trueip-172-20-38-117.ec2.internal master Trueip-172-20-49-179.ec2.internal node TrueYour cluster cluster.k8s.local is ready - Get the list of nodes using
kubectl:
1234567~ $ kubectl get nodesNAME STATUS AGE VERSIONip-172-20-36-52.ec2.internal Ready,node 4h v1.6.2ip-172-20-38-117.ec2.internal Ready,master 4h v1.6.2ip-172-20-49-179.ec2.internal Ready,node 4h v1.6.2 - Deleting a cluster is pretty straight forward as well:
123kops delete cluster cluster.k8s.local --yes
That’s it!
github.com/arun-gupta/kubernetes-java-sample provide several examples of getting started with Kubernetes.
File issues at github.com/kubernetes/kops/issues.
 Let’s move on!


 Click on

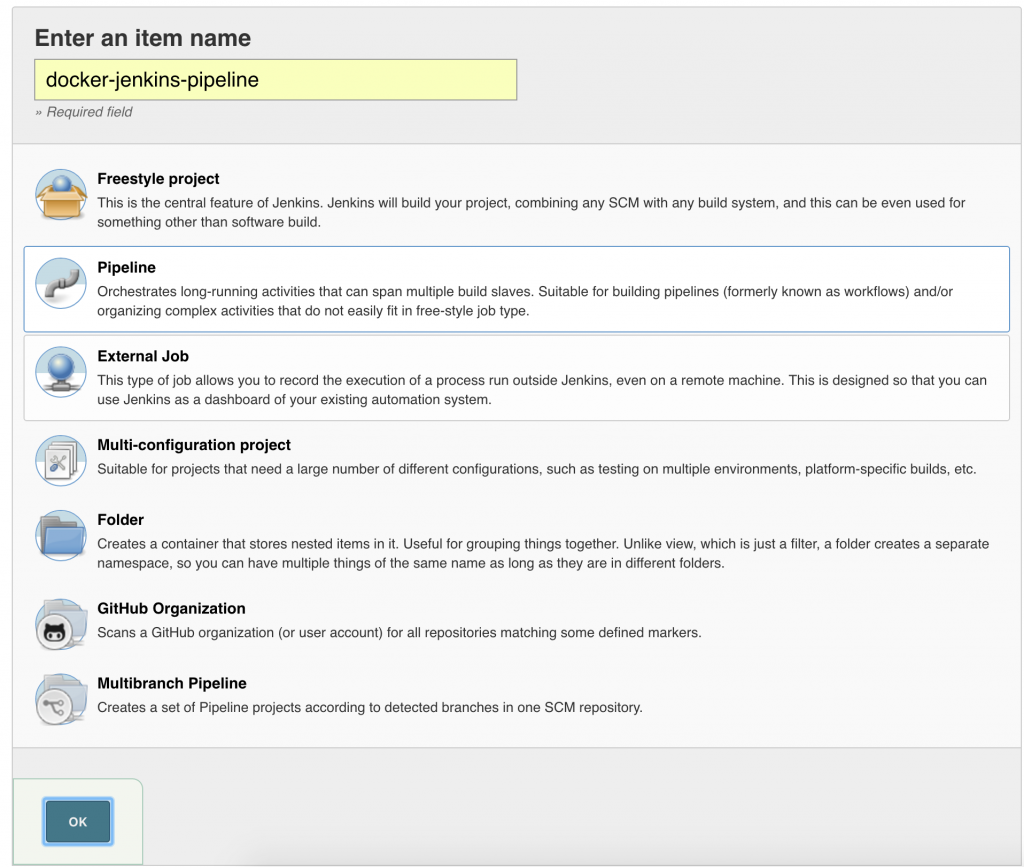 Click on OK.
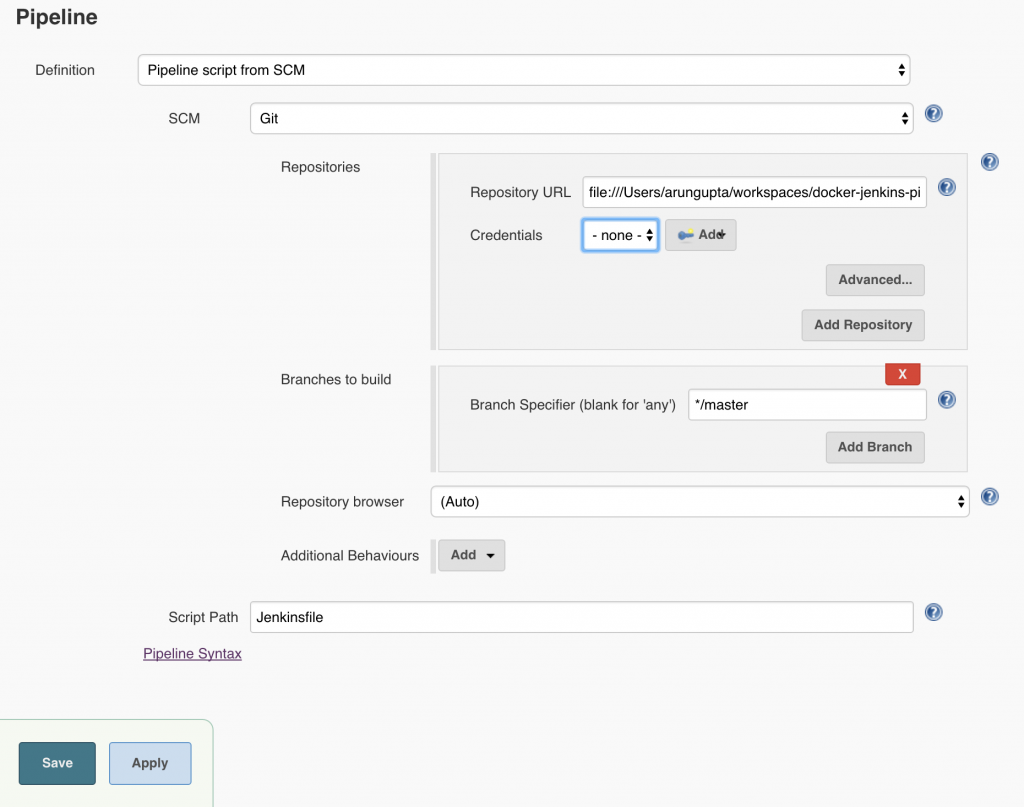 Local git repo is used in this case. You can certainly choose a repo hosted on github. Further, this repo can be configured with a git hook or poll at a constant interval to trigger the pipeline.Click on