Miles to go …

August 30, 2009

TOTD #99: Creating a Java EE 6 application using MySQL, JPA 2.0 and Servlet 3.0 with GlassFish Tools Bundle for Eclipse

Filed under: eclipse, general, javaee, totd — Tags: , , , , — arungupta @ 11:00 am

TOTD #97 showed how to install GlassFish Tools Bundle for Eclipse 1.1. Basically there are two options – either install Eclipse 3.4.2 with WTP and pre-bundled/configured with GlassFish v2/v3, MySQL JDBC driver and other features. Or if you are using Eclipse 3.5, then you can install the plug-in separately and get most of the functionality.

TOTD #98 showed how to create a simple Metro/JAX-WS compliant Web service using that bundle and deploy on GlassFish.

This Tip Of The Day (TOTD) shows how to create a simple Java EE 6 application that reads data from a MySQL database using JPA 2.0 and Servlet 3.0 and display the results. A more formal support of Java EE 6/Servlet 3.0 is coming but in the meanwhile the approach mentioned below will work.

Lets get started!

  1. Configure database connection – The key point to notice here is that the MySQL Connector/J driver is already built into the tool so there is no need to configure it explicitly.

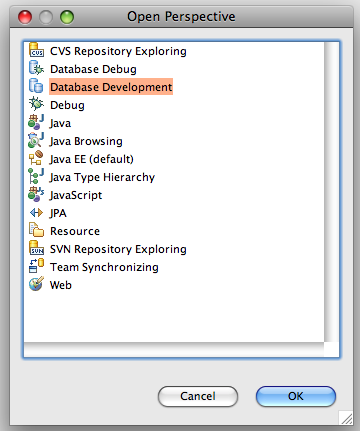
    1. From "Window", "Show Perspective", change to the database perspective as shown below:

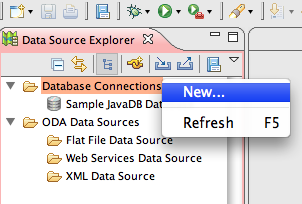
    2. In the "Data Source Explorer", right-click and click on "Database Connections" and select "New …":

    3. Search for "mysql" and type the database name as "sakila":

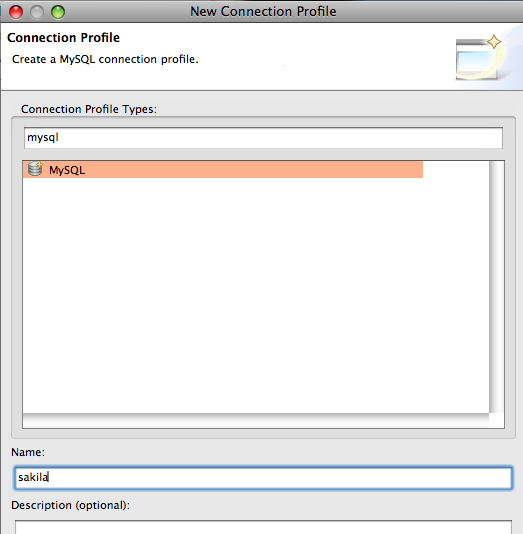
      This blog uses MySQL sample database sakila. So please download and install the sample database before proceeding further.

    4. Click on "Next >" and specify the database configuration:

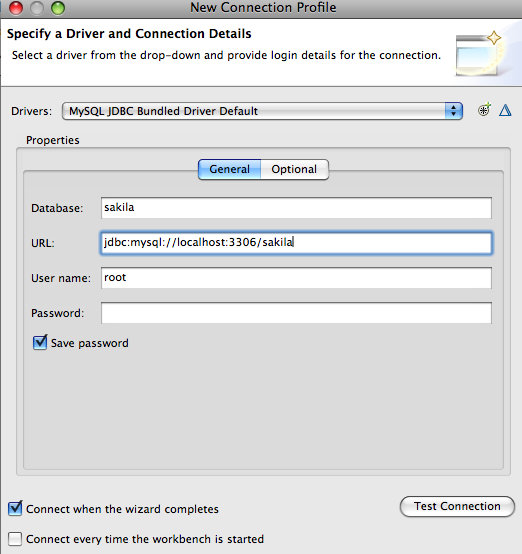
      Notice the "Drivers" indicate that the JDBC driver is pre-bundled so there is no extra configuration required. If you are using a stand-alone Eclipse bunde and installing the plugin separately, then you need to configure the MySQL JDBC driver explictily.

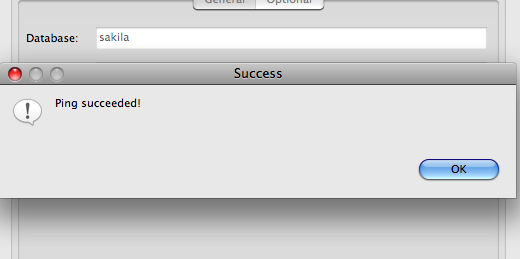
      The URL indicates the application is connecting to the sakila database. Click on "Test Connection" to test connection with the database and see the output as:

      and click on "Finish" to complete. The expanded database in the explorer looks like:

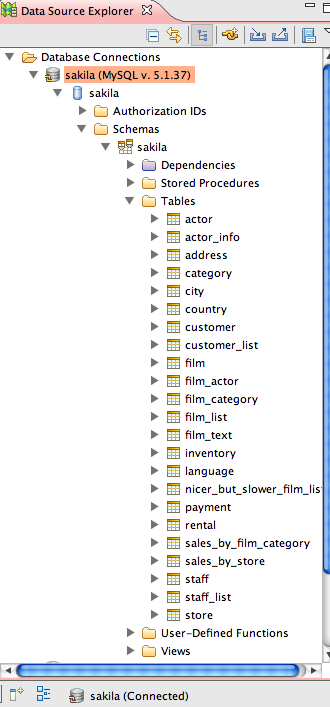
      The expanded view shows all the tables in the database.

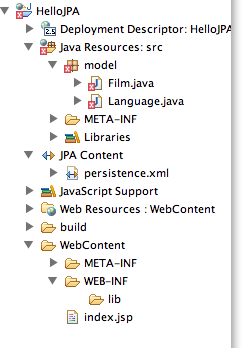
  2. Create the Web project & configure JPA

    1. Switch to JavaEE perspective by clicking "Window", "Choose Perspective", "Other …" and choosing "Java EE".
    2. Create a new dynamic web project with the following settings:

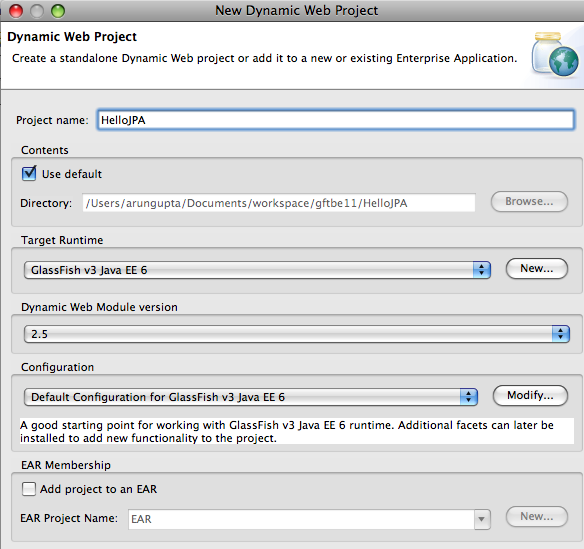
      Only the project name needs to be specified and everything else is default. Notice the target runtime indicates that this is a Java EE 6 application. Click on "Finish".

    3. Right-click on the project, search for "facets" and enable "Java Persistence" as shown below:

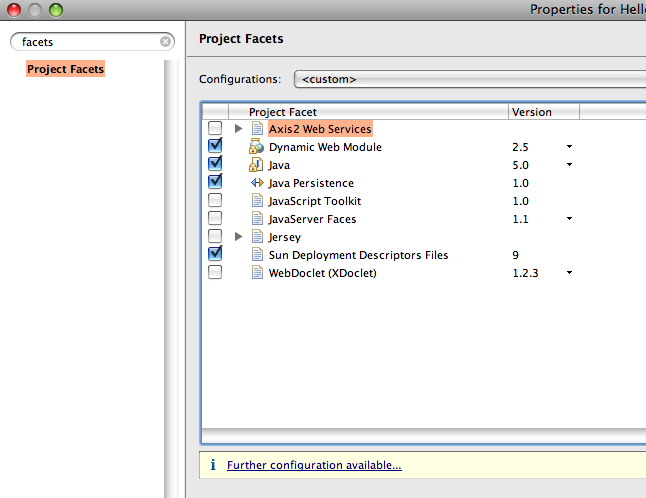
    4. Click on "Further configuration available …" and modify the facet as shown below:

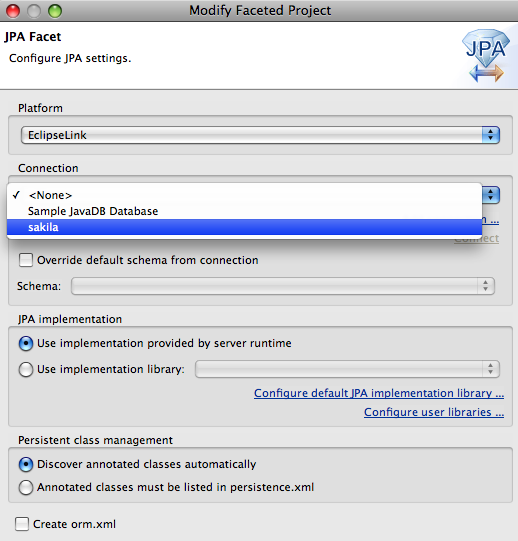
      Make sure to disable "orm.xml" since we are generating a standard Java EE 6 web application. Choose "sakila" as the database. Click on "OK" and again on "OK" to complete the dialog.

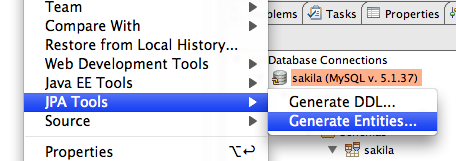
  3. Generate the JPA entities

    1. Right-click on the project, select "JPA Tools", "Generate Entities" as shown:

    2. Choose the schema "sakila":

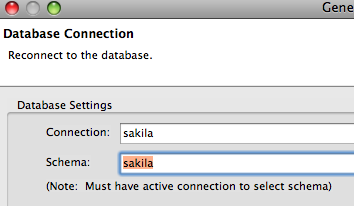
      and click on "Next >". If no values are shown in the schema drop-down, then click on "Reconnect …".

    3. Specify a package name for the generated entities as "model" and select "film" and "language" table:

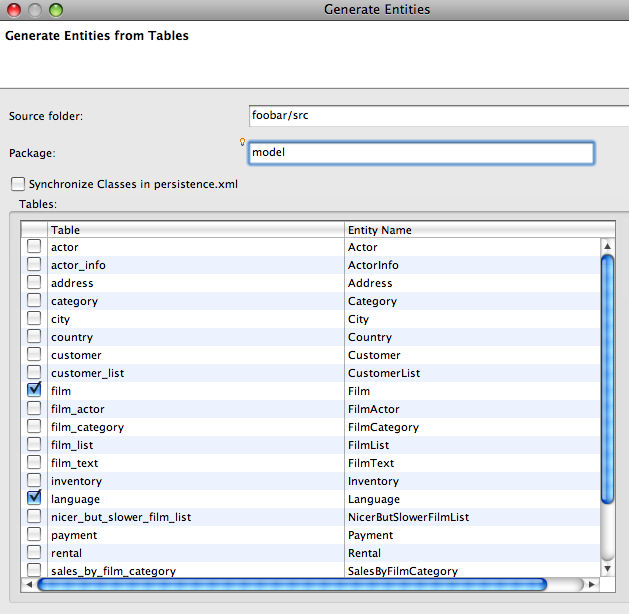
      and click on "Finish". The "film" and "language" table are related so it would be nice if all the related tables can be identified and picked accordingly.

      Anyway this generates "model.Film" and "model.Language" classes and "persistence.xml" as shown below:

      Also notice that "web.xml" and "sun-web.xml" have been explicitly removed since they are not required by a Java EE 6 application.

    4. "model.Film" class needs to modified slightly because one of the columns is mapped to "Object" which is not a Serializable obect. So change the type of "specialFeatures" from Object to String and also change the corresponding getters/setters accordingly. The error message clearly conveyed during the initial deployment and so could be fixed. But it would be nice to generate the classes that will work out-of-the-box.
  4. Create a Servlet client to retrieve/display data from the database

    1. Right-click on the project, select "New", "Class" and specify the values as:

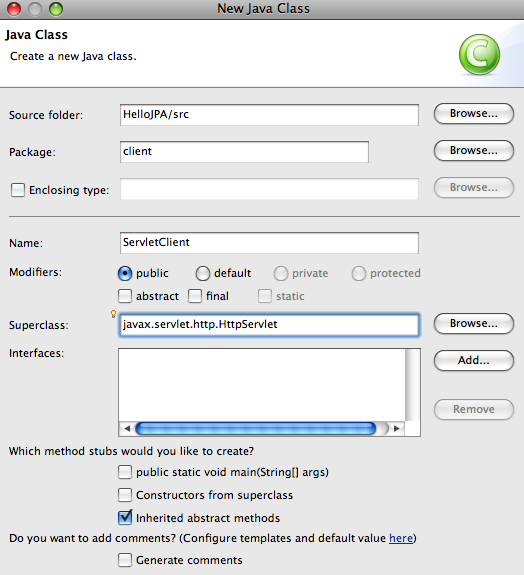
      and click on "Finish". This class will be our Servlet client.

    2. Change the class such that it looks like:
      @WebServlet(urlPatterns="/ServletClient")
      public class ServletClient extends HttpServlet {
        @PersistenceUnit
        EntityManagerFactory factory;
      
        protected void doGet(HttpServletRequest req, HttpServletResponse resp)
               throws ServletException, IOException {
          ServletOutputStream out = resp.getOutputStream();
          List list = factory.createEntityManager().createQuery("select f from Film f where f.title like 'GL%';").getResultList();
          out.println("<html><table>");
          for (Object film : list) {
            out.print("<tr><td>" + ((Film)film).getTitle() + "</tr></td>");
          }
          out.println("</table></html>");
        }
      }
      

      and the imports as:

      import java.io.IOException;
      import java.util.List;
      
      import javax.persistence.EntityManagerFactory;
      import javax.persistence.PersistenceUnit;
      import javax.servlet.ServletException;
      import javax.servlet.ServletOutputStream;
      import javax.servlet.annotation.WebServlet;
      import javax.servlet.http.HttpServlet;
      import javax.servlet.http.HttpServletRequest;
      import javax.servlet.http.HttpServletResponse;
      
      import model.Film;
      

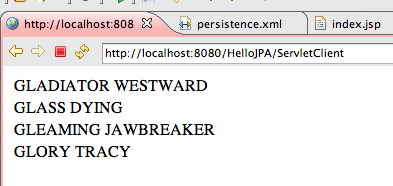
      Basically, this is a Servlet 3.0 specification compliant Servlet that uses @WebServlet annotation. It uses @PersistenceUnit to inject the generated JPA Persistence Unit which is then used to query the database. The database query return all the movies whose title start with "GL" and the response is displayed in an HTML formatted table.

    3. Right-click on the project and select "Run As", "Run on Server" and select GlassFish v3 latest promoted build (this blog used build 61) as:

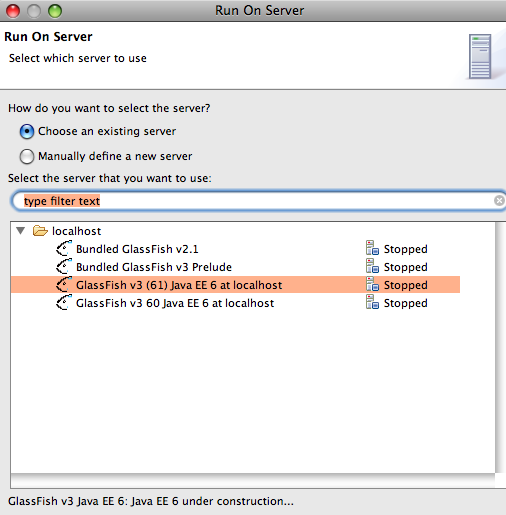
      and click on "Finish". The output at "http://localhost:8080/HelloJPA/ServletClient" looks like:

Simple, easy and clean!

How are you using Eclipse and GlassFish – the consolidated bundle or standalone Eclipse + GlassFish plugin ?

Download GlassFish Tools Bundle for Eclipse now.

Please send your questions and comments to .

Please leave suggestions on other TOTD that you’d like to see. A complete archive of all the tips is available here.

Technorati: glassfish eclipse mysql jpa database

Share and Enjoy:
  • Print
  • Digg
  • Sphinn
  • del.icio.us
  • Facebook
  • Google Bookmarks
  • DZone
  • StumbleUpon
  • Technorati
  • Twitter
  • Slashdot

August 17, 2009

TOTD #95: EJB 3.1 + Java Server Faces 2.0 + JPA 2.0 web application – Getting Started with Java EE 6 using NetBeans 6.8 M1 & GlassFish v3

Filed under: glassfish, javaserverfaces, netbeans, totd — Tags: , , , , — arungupta @ 3:00 am

TOTD #93 showed how to get started with Java EE 6 using NetBeans 6.8 M1 and GlassFish v3 by building a simple Servlet 3.0 + JPA 2.0 web application. TOTD #94 built upon it by using Java Server Faces 2 instead of Servlet 3.0 for displaying the results. However we are still using a POJO for all the database interactions. This works fine if we are only reading values from the database but that’s not how a typical web application behaves. The web application would typically perform all CRUD operations. More typically they like to perform one or more CRUD operations within the context of a transaction. And how do you do transactions in the context of a web application ? Java EE 6 comes to your rescue.

The EJB 3.1 specification (another new specification in Java EE 6) allow POJO classes to be annotated with @EJB and bundled within WEB-INF/classes of a WAR file. And so you get all transactional capabilities in your web application very easily.

This Tip Of The Day (TOTD) shows how to enhance the application created in TOTD #94 and use EJB 3.1 instead of the JSF managed bean for performing the business logic. There are two ways to achieve this pattern as described below.

Lets call this TOTD #95.1

  1. The easiest way to back a JSF page with an EJB is to convert the managed bean into an EJB by adding @javax.ejb.Stateless annotation. So change the  “StateList” class from TOTD #94 as shown below:
    @javax.ejb.Stateless
    @ManagedBean
    public class StateList {
    @PersistenceUnit
    EntityManagerFactory emf;

    public List<States> getStates() {
    return emf.createEntityManager().createNamedQuery(“States.findAll”).getResultList();
    }
    }

    The change is highlighted in bold, and that’s it!

Because of “Deploy-on-save” feature in NetBeans and GlassFish v3, the application is autodeployed. Otherwise right-click on the project and select Run (default shortcut “F6″). As earlier, the results can be seen at “http://localhost:8080/HelloEclipseLink/forwardToJSF.jsp” or “http://localhost:8080/HelloEclipseLink/faces/template-client.xhtml” and looks like:

The big difference this time is that the business logic is executed by an EJB in a fully transactional manner. Even though the logic in this case is a single read-only operation to the database, but you get the idea :)

Alternatively, you can use the delegate pattern in the managed bean as described below. Lets call this #95.2.

  1. Right-click on the project, select “New”, “Session Bean …” and create a stateless session bean by selecting the options as shown below:

    This creates a stateless session with the name “StateBeanBean” (bug #170392 for redundant “Bean” in the name).

  2. Simplify your managed bean by refactoring all the business logic to the EJB as shown below:
    @Stateless
    public class StateBeanBean {
    @PersistenceUnit
    EntityManagerFactory emf;

    public List<States> getStates() {
    return emf.createEntityManager().createNamedQuery(“States.findAll”).getResultList();
    }
    }

    and

    @ManagedBean
    public class StateList {
    @EJB StateBeanBean bean;

    public List<States> getStates() {
    return bean.getStates();
    }
    }

    In fact the EJB code can be further simplified to:

    @Stateless
    public class StateBeanBean {
    @PersistenceContext
    EntityManager em;

    public List<States> getStates() {
    return em.createNamedQuery(“States.findAll”).getResultList();
    }
    }

    The changes are highlighted in bold.

If the application is already running then Deploy-on-Save would have automatically deployed the entire application. Otherwise right-click on the project and select Run (default shortcut “F6″). Again, the results can be seen at “http://localhost:8080/HelloEclipseLink/forwardToJSF.jsp” or “http://localhost:8080/HelloEclipseLink/faces/template-client.xhtml” and are displayed as shown in the screenshot above.

The updated directory structure looks like:

The important point to note is that our EJB is bundled in the WAR file and no additional deployment descriptors were added or existing ones modified to achieve that. Now, that’s really clean :)

The next blog in this series will show how managed beans can be replaced with WebBeans, err JCDI.

Also refer to other Java EE 6 blog entries.

Please leave suggestions on other TOTD that you’d like to see. A complete archive of all the tips is available here.

Technorati: totd glassfish v3 mysql javaee6 javaserverfaces jpa2 ejb netbeans

Share and Enjoy:
  • Print
  • Digg
  • Sphinn
  • del.icio.us
  • Facebook
  • Google Bookmarks
  • DZone
  • StumbleUpon
  • Technorati
  • Twitter
  • Slashdot

August 14, 2009

TOTD #94: A simple Java Server Faces 2.0 + JPA 2.0 application – Getting Started with Java EE 6 using NetBeans 6.8 M1 & GlassFish v3

Filed under: glassfish, javaserverfaces, netbeans, totd — Tags: , , , , — arungupta @ 3:00 am

TOTD #93 showed how to get started with Java EE 6 using NetBeans 6.8 M1 and GlassFish v3 by building a simple Servlet 3.0 + JPA 2.0 web application. JPA 2.0 + Eclipselink was used for the database connectivity and Servlet 3.0 was used for displaying the results to the user. The sample demonstrated how the two technologies can be mixed to create a simple web application. But Servlets are meant for server-side processing rather than displaying the results to end user. JavaServer Faces 2 (another new specification in Java EE 6) is designed to fulfill that purpose.

This Tip Of The Day (TOTD) shows how to enhance the application created in TOTD #93 and use JSF 2 for displaying the results.

  1. Right-click on the project, select “Properties”, select “Frameworks”, click on “Add …” as shown below:

    Select “JavaServer Faces” and click on “OK”. The following configuration screen is shown:

    Click on “OK” to complete the dialog. This generates a whole bunch of files (7 to be accurate) in your project. Most of these files are leftover from previous version of NetBeans and will be cleaned up. For example, “faces-config.xml” is now optional and “forwardToJSF.jsp” is redundant.

  2. Anyway, lets add a POJO class that will be our managed bean. Right-click on “server” package and select “New”, “Java Class …”, give the name as “StateList”. Change the class such that it looks like:
    package server;

    import java.util.List;
    import javax.faces.bean.ManagedBean;
    import javax.persistence.EntityManagerFactory;
    import javax.persistence.PersistenceUnit;
    import states.States;

    /**
    * @author arungupta
    */
    @ManagedBean
    public class StateList {
    @PersistenceUnit
    EntityManagerFactory emf;

    public List<States> getStates() {
    return emf.createEntityManager().createNamedQuery(“States.findAll”).getResultList();
    }
    }

    Here are the main characterisitcs of this class:

    1. This is a POJO class with @ManagedBean annotation. This annotation makes this class a managed bean that can be used in the JSF pages. As no other annotations or parameters are specified, this is a request-scoped managed bean with the name “stateList” and lazily initialized. More details about this annotation are available in the javadocs.
    2. The persistence unit created in TOTD #93 is injected using @PersistenceUnit annotation.
    3. The POJO has one getter method that queries the database and return the list of all the states.
  3. In the generated file “template-client.xhtml”, change the “head” template to:
    Show States

    and “body” template to:

    <h:dataTable var=”state” value=”#{stateList.states}” border=”1″>
    <h:column><h:outputText value=”#{state.abbrev}”/></h:column>
    <h:column><h:outputText value=”#{state.name}”/></h:column>
    </h:dataTable>

    This uses the standard JSF “dataTable”, “column”, and “outputText” tags and uses the value expression to fetch the values from the managed bean.

If the application is already running from TOTD #93, then Deploy-on-Save would have automatically deployed the entire application. Otherwise right-click on the project and select Run (default shortcut “F6″). The results can be seen at “http://localhost:8080/HelloEclipseLink/forwardToJSF.jsp” or “http://localhost:8080/HelloEclipseLink/faces/template-client.xhtml” and looks like:

The updated directory structure looks like:

There were multiple files added by the JSF framework support in NetBeans. But as I said earlier, they will be cleaned up before the final release.

Also refer to other Java EE 6 blog entries.

Please leave suggestions on other TOTD that you’d like to see. A complete archive of all the tips is available here.

Technorati: totd glassfish v3 mysql javaee6 javaserverfaces jpa2 netbeans

Share and Enjoy:
  • Print
  • Digg
  • Sphinn
  • del.icio.us
  • Facebook
  • Google Bookmarks
  • DZone
  • StumbleUpon
  • Technorati
  • Twitter
  • Slashdot

August 13, 2009

TOTD #93: Getting Started with Java EE 6 using NetBeans 6.8 M1 & GlassFish v3 – A simple Servlet 3.0 + JPA 2.0 app

Filed under: glassfish, javaserverfaces, netbeans, totd — Tags: , , , , — arungupta @ 3:00 am

NetBeans 6.8 M1 introduces support for creating Java EE 6 applications … cool!

This Tip Of The Day (TOTD) shows how to create a simple web application using JPA 2.0 and Servlet 3.0 and deploy on GlassFish v3 latest promoted build (58 as of this writing). If you can work with the one week older build then NetBeans 6.8 M1 comes pre-bundled with 57. The example below should work fine on that as well.

  1. Create the database, table, and populate some data into it as shown below:
    ~/tools/glassfish/v3/58/glassfishv3/bin >sudo mysql –user root
    Password:
    Welcome to the MySQL monitor.  Commands end with ; or \g.
    Your MySQL connection id is 1592
    Server version: 5.1.30 MySQL Community Server (GPL)

    Type ‘help;’ or ‘\h’ for help. Type ‘\c’ to clear the buffer.

    mysql> create database states;
    Query OK, 1 row affected (0.02 sec)

    mysql> CREATE USER duke IDENTIFIED by ‘glassfish’;
    Query OK, 0 rows affected (0.00 sec)

    mysql> GRANT ALL on states.* TO duke;
    Query OK, 0 rows affected (0.24 sec)

    mysql> use states;
    Database changed

    mysql> CREATE TABLE STATES (
    ->       id INT,
    ->       abbrev VARCHAR(2),
    ->       name VARCHAR(50),
    ->       PRIMARY KEY (id)
    -> );
    Query OK, 0 rows affected (0.16 sec)

    mysql> INSERT INTO STATES VALUES (1, “AL”, “Alabama”);
    INSERT INTO STATES VALUES (2, “AK”, “Alaska”);

    . . .

    mysql> INSERT INTO STATES VALUES (49, “WI”, “Wisconsin”);
    Query OK, 1 row affected (0.00 sec)

    mysql> INSERT INTO STATES VALUES (50, “WY”, “Wyoming”);
    Query OK, 1 row affected (0.00 sec)

    The complete INSERT statement is available in TOTD #38. Most of this step can be executed from within the IDE as well as explained in TOTD #38.

  2. Download and unzip GlassFish v3 build 58. Copy the latest MySQL Connector/J jar in “domains/domain1/lib” directory of GlassFish and start the application server as:
    ~/tools/glassfish/v3/58/glassfishv3/bin >asadmin start-domain
  3. Create JDBC connection pool and JNDI resource as shown below:
    ~/tools/glassfish/v3/58/glassfishv3/bin >./asadmin create-jdbc-connection-pool –datasourceclassname com.mysql.jdbc.jdbc2.optional.MysqlConnectionPoolDataSource –restype javax.sql.DataSource –property “User=duke:Password=glassfish:URL=jdbc\:mysql\://localhost/states” jdbc/states

    Command create-jdbc-connection-pool executed successfully.
    ~/tools/glassfish/v3/58/glassfishv3/bin >./asadmin ping-connection-pool jdbc/states

    Command ping-connection-pool executed successfully.
    ~/tools/glassfish/v3/58/glassfishv3/bin >./asadmin create-jdbc-resource –connectionpoolid jdbc/states jdbc/jndi_states

    Command create-jdbc-resource executed successfully.

  4. Download NetBeans 6.8 M1 and install “All” version. Expand “Servers” node and add the recently installed GlassFish server.
  5. Create a new Web project and name it “HelloEclipseLink”. Make sure to choose “GlassFish v3″ as the server and “Java EE 6 Web” as the Java EE version as shown below:

    Take defaults elsewhere.

  6. Create the Persistence Unit
    1. Right-click on the newly created project and select “New”, “Entity Classes from Database …”. Choose the earlier created data source “jdbc/jndi_states” as shown below:

    2. Select “STATES” table in “Available Tables:” and click on “Add >” and then “Next >”.
    3. Click on “Create Persistence Unit …”, take all the defaults and click on “Create”. “EclipseLink” is the Reference Implementation for JPA 2.0 is the default choosen Persistence Provider as shown below:
    4. Enter the package name as “server” and click on “Finish”.
  7. Create a Servlet to retrieve and display all the information from the database
    1. Right click on the project, “New”, “Servlet …”.
    2. Give the Servlet name “ShowStates” and package “server”.
    3. Even though you can take all the defaults and click on “Finish” but instead click on “Next >” and the following screen is shown:

      Notice “Add information to deployment descriptor (web.xml)” checkbox. Servlet 3.0 makes “web.xml” optional in most of the common cases by providing corresponding annotations and NetBeans 6.8 leverages that functionality. As a result, no “web.xml” will be bundled in our WAR file. Click on “Finish” now.

      The generated servlet code looks like:

      Notice @WebServlet annotation, this makes “web.xml” optional. TOTD #82 provide another example on how to use Servlet 3.0 with EJB 3.1.

    4. Inject the Persistence Unit as:
      @PersistenceUnit
      EntityManagerFactory emf;

      right above “processRequest” method.

    5. Change the “try” block of “processRequest” method to:
      List<States> list = emf.createEntityManager().createNamedQuery(“States.findAll”).getResultList();
      out.println(“<table border=\”1\”>”);
      for (States state : list) {
      out.println(“<tr><td>” + state.getAbbrev() +
      “</td><td>” + state.getName() +
      “</td></tr>”);
      }
      out.println(“</table>”);

      This uses a predefined query to retrieve all rows from the table and then display them in a simple formatted HTML table.

  8. Run the project
      1. Right click on the project, select “Properties” and change the “Relative URL” to “/ShowStates”. This is the exact URL that you specified earlier.

      2. Right-click on the project and select “Run” to see the following output:

    So we created a simple web application that uses Servlet 3.0, JPA 2.0, EclipseLink and deployed on GlassFish v3 using NetBeans 6.8 M1. NetBeans provides reasonable defaults making you a lazy programmer. Believe this is more evident when you start playing with Java EE support in other IDEs ;-)

    Finally, lets look at the structure of the generated WAR file:

    It’s very clean – no “web.xml”, only the relevant classes and “persistence.xml”.

    Also refer to other Java EE 6 blog entries. A future blog entry will show how to use JSF 2.0 instead of Servlet for displaying the results.

    Please leave suggestions on other TOTD that you’d like to see. A complete archive of all the tips is available here.

    Technorati: totd glassfish v3 mysql javaee6 servlet3 jpa2 netbeans

    Share and Enjoy:
    • Print
    • Digg
    • Sphinn
    • del.icio.us
    • Facebook
    • Google Bookmarks
    • DZone
    • StumbleUpon
    • Technorati
    • Twitter
    • Slashdot

    The views expressed on this blog are my own and do not necessarily reflect the views of Oracle.
    Powered by WordPress