wildfly-mysql-javaee7> fig up
Creating wildflymysqljavaee7_mysqldb_1...
Creating wildflymysqljavaee7_mywildfly_1...
Attaching to wildflymysqljavaee7_mysqldb_1, wildflymysqljavaee7_mywildfly_1
mywildfly_1 | => Starting WildFly server
mywildfly_1 | => Waiting for the server to boot
mysqldb_1 | 2014-12-23 18:28:10 0 [Warning] TIMESTAMP with implicit DEFAULT value is deprecated. Please use --explicit_defaults_for_timestamp server option (see documentation for more details).
mysqldb_1 | 2014-12-23 18:28:10 12 [Note] InnoDB: Using atomics to ref count buffer pool pages
mysqldb_1 | 2014-12-23 18:28:10 12 [Note] InnoDB: The InnoDB memory heap is disabled
mysqldb_1 | 2014-12-23 18:28:10 12 [Note] InnoDB: Mutexes and rw_locks use GCC atomic builtins
mysqldb_1 | 2014-12-23 18:28:10 12 [Note] InnoDB: Memory barrier is not used
mysqldb_1 | 2014-12-23 18:28:10 12 [Note] InnoDB: Compressed tables use zlib 1.2.3
mysqldb_1 | 2014-12-23 18:28:10 12 [Note] InnoDB: Using Linux native AIO
mysqldb_1 | 2014-12-23 18:28:10 12 [Note] InnoDB: Not using CPU crc32 instructions
mysqldb_1 | 2014-12-23 18:28:10 12 [Note] InnoDB: Initializing buffer pool, size = 128.0M
mysqldb_1 | 2014-12-23 18:28:10 12 [Note] InnoDB: Completed initialization of buffer pool
mysqldb_1 | 2014-12-23 18:28:10 12 [Note] InnoDB: The first specified data file ./ibdata1 did not exist: a new database to be created!
mysqldb_1 | 2014-12-23 18:28:10 12 [Note] InnoDB: Setting file ./ibdata1 size to 12 MB
mysqldb_1 | 2014-12-23 18:28:10 12 [Note] InnoDB: Database physically writes the file full: wait...
mysqldb_1 | 2014-12-23 18:28:10 12 [Note] InnoDB: Setting log file ./ib_logfile101 size to 48 MB
mysqldb_1 | 2014-12-23 18:28:10 12 [Note] InnoDB: Setting log file ./ib_logfile1 size to 48 MB
mysqldb_1 | 2014-12-23 18:28:10 12 [Note] InnoDB: Renaming log file ./ib_logfile101 to ./ib_logfile0
mysqldb_1 | 2014-12-23 18:28:10 12 [Warning] InnoDB: New log files created, LSN=45781
mysqldb_1 | 2014-12-23 18:28:10 12 [Note] InnoDB: Doublewrite buffer not found: creating new
mysqldb_1 | 2014-12-23 18:28:10 12 [Note] InnoDB: Doublewrite buffer created
mysqldb_1 | 2014-12-23 18:28:10 12 [Note] InnoDB: 128 rollback segment(s) are active.
mysqldb_1 | 2014-12-23 18:28:10 12 [Warning] InnoDB: Creating foreign key constraint system tables.
mysqldb_1 | 2014-12-23 18:28:10 12 [Note] InnoDB: Foreign key constraint system tables created
mysqldb_1 | 2014-12-23 18:28:10 12 [Note] InnoDB: Creating tablespace and datafile system tables.
mysqldb_1 | 2014-12-23 18:28:10 12 [Note] InnoDB: Tablespace and datafile system tables created.
mysqldb_1 | 2014-12-23 18:28:10 12 [Note] InnoDB: Waiting for purge to start
mysqldb_1 | 2014-12-23 18:28:10 12 [Note] InnoDB: 5.6.22 started; log sequence number 0
mywildfly_1 | =========================================================================
mywildfly_1 |
mywildfly_1 | JBoss Bootstrap Environment
mywildfly_1 |
mywildfly_1 | JBOSS_HOME: /opt/jboss/wildfly
mywildfly_1 |
mywildfly_1 | JAVA: /usr/lib/jvm/java/bin/java
mywildfly_1 |
mywildfly_1 | JAVA_OPTS: -server -Xms64m -Xmx512m -XX:MaxPermSize=256m -Djava.net.preferIPv4Stack=true -Djboss.modules.system.pkgs=org.jboss.byteman -Djava.awt.headless=true
mywildfly_1 |
mywildfly_1 | =========================================================================
mywildfly_1 |
mysqldb_1 | 2014-12-23 18:28:10 12 [Note] Binlog end
mysqldb_1 | 2014-12-23 18:28:10 12 [Note] InnoDB: FTS optimize thread exiting.
mysqldb_1 | 2014-12-23 18:28:10 12 [Note] InnoDB: Starting shutdown...
mywildfly_1 | 18:28:11,257 INFO [org.jboss.modules] (main) JBoss Modules version 1.3.3.Final
mywildfly_1 | 18:28:11,543 INFO [org.jboss.msc] (main) JBoss MSC version 1.2.2.Final
mywildfly_1 | 18:28:11,631 INFO [org.jboss.as] (MSC service thread 1-6) JBAS015899: WildFly 8.2.0.Final "Tweek" starting
mysqldb_1 | 2014-12-23 18:28:12 12 [Note] InnoDB: Shutdown completed; log sequence number 1625977
mywildfly_1 | 18:28:12,621 INFO [org.jboss.as.server] (Controller Boot Thread) JBAS015888: Creating http management service using socket-binding (management-http)
mywildfly_1 | 18:28:12,642 INFO [org.xnio] (MSC service thread 1-10) XNIO version 3.3.0.Final
mywildfly_1 | 18:28:12,652 INFO [org.xnio.nio] (MSC service thread 1-10) XNIO NIO Implementation Version 3.3.0.Final
mywildfly_1 | 18:28:12,697 INFO [org.jboss.as.clustering.infinispan] (ServerService Thread Pool -- 32) JBAS010280: Activating Infinispan subsystem.
mywildfly_1 | 18:28:12,698 INFO [org.wildfly.extension.io] (ServerService Thread Pool -- 31) WFLYIO001: Worker 'default' has auto-configured to 16 core threads with 128 task threads based on your 8 available processors
mywildfly_1 | 18:28:12,880 INFO [org.jboss.as.connector.subsystems.datasources] (ServerService Thread Pool -- 27) JBAS010403: Deploying JDBC-compliant driver class org.h2.Driver (version 1.3)
mywildfly_1 | 18:28:12,917 INFO [org.jboss.as.naming] (ServerService Thread Pool -- 40) JBAS011800: Activating Naming Subsystem
mywildfly_1 | 18:28:12,987 WARN [org.jboss.as.txn] (ServerService Thread Pool -- 46) JBAS010153: Node identifier property is set to the default value. Please make sure it is unique.
mywildfly_1 | 18:28:13,002 INFO [org.jboss.as.security] (ServerService Thread Pool -- 45) JBAS013171: Activating Security Subsystem
mywildfly_1 | 18:28:13,082 INFO [org.jboss.as.connector.logging] (MSC service thread 1-7) JBAS010408: Starting JCA Subsystem (IronJacamar 1.1.9.Final)
mywildfly_1 | 18:28:13,084 INFO [org.jboss.as.jsf] (ServerService Thread Pool -- 38) JBAS012615: Activated the following JSF Implementations: [main]
mywildfly_1 | 18:28:13,088 INFO [org.jboss.as.security] (MSC service thread 1-15) JBAS013170: Current PicketBox version=4.0.21.Final
mywildfly_1 | 18:28:13,097 INFO [org.wildfly.extension.undertow] (ServerService Thread Pool -- 47) JBAS017502: Undertow 1.1.0.Final starting
mywildfly_1 | 18:28:13,098 INFO [org.wildfly.extension.undertow] (MSC service thread 1-8) JBAS017502: Undertow 1.1.0.Final starting
mywildfly_1 | 18:28:13,109 INFO [org.jboss.as.connector.deployers.jdbc] (MSC service thread 1-6) JBAS010417: Started Driver service with driver-name = h2
mywildfly_1 | 18:28:13,132 INFO [org.jboss.as.webservices] (ServerService Thread Pool -- 48) JBAS015537: Activating WebServices Extension
mywildfly_1 | 18:28:13,355 INFO [org.jboss.remoting] (MSC service thread 1-10) JBoss Remoting version 4.0.6.Final
mywildfly_1 | 18:28:13,502 INFO [org.jboss.as.naming] (MSC service thread 1-13) JBAS011802: Starting Naming Service
mywildfly_1 | 18:28:13,503 INFO [org.jboss.as.mail.extension] (MSC service thread 1-4) JBAS015400: Bound mail session [java:jboss/mail/Default]
mysqldb_1 | OK
mysqldb_1 |
mywildfly_1 | 18:28:14,161 INFO [org.wildfly.extension.undertow] (ServerService Thread Pool -- 47) JBAS017527: Creating file handler for path /opt/jboss/wildfly/welcome-content
mysqldb_1 | Filling help tables...2014-12-23 18:28:14 0 [Warning] TIMESTAMP with implicit DEFAULT value is deprecated. Please use --explicit_defaults_for_timestamp server option (see documentation for more details).
mysqldb_1 | 2014-12-23 18:28:14 35 [Note] InnoDB: Using atomics to ref count buffer pool pages
mysqldb_1 | 2014-12-23 18:28:14 35 [Note] InnoDB: The InnoDB memory heap is disabled
mysqldb_1 | 2014-12-23 18:28:14 35 [Note] InnoDB: Mutexes and rw_locks use GCC atomic builtins
mysqldb_1 | 2014-12-23 18:28:14 35 [Note] InnoDB: Memory barrier is not used
mysqldb_1 | 2014-12-23 18:28:14 35 [Note] InnoDB: Compressed tables use zlib 1.2.3
mysqldb_1 | 2014-12-23 18:28:14 35 [Note] InnoDB: Using Linux native AIO
mysqldb_1 | 2014-12-23 18:28:14 35 [Note] InnoDB: Not using CPU crc32 instructions
mysqldb_1 | 2014-12-23 18:28:14 35 [Note] InnoDB: Initializing buffer pool, size = 128.0M
mywildfly_1 | 18:28:14,190 INFO [org.wildfly.extension.undertow] (MSC service thread 1-9) JBAS017525: Started server default-server.
mysqldb_1 | 2014-12-23 18:28:14 35 [Note] InnoDB: Completed initialization of buffer pool
mysqldb_1 | 2014-12-23 18:28:14 35 [Note] InnoDB: Highest supported file format is Barracuda.
mysqldb_1 | 2014-12-23 18:28:14 35 [Note] InnoDB: 128 rollback segment(s) are active.
mysqldb_1 | 2014-12-23 18:28:14 35 [Note] InnoDB: Waiting for purge to start
mywildfly_1 | 18:28:14,271 INFO [org.wildfly.extension.undertow] (MSC service thread 1-16) JBAS017531: Host default-host starting
mysqldb_1 | 2014-12-23 18:28:14 35 [Note] InnoDB: 5.6.22 started; log sequence number 1625977
mywildfly_1 | 18:28:14,366 INFO [org.wildfly.extension.undertow] (MSC service thread 1-9) JBAS017519: Undertow HTTP listener default listening on /0.0.0.0:8080
mysqldb_1 | 2014-12-23 18:28:14 35 [Note] Binlog end
mysqldb_1 | 2014-12-23 18:28:14 35 [Note] InnoDB: FTS optimize thread exiting.
mysqldb_1 | 2014-12-23 18:28:14 35 [Note] InnoDB: Starting shutdown...
mywildfly_1 | 18:28:14,548 INFO [org.jboss.as.server.deployment.scanner] (MSC service thread 1-7) JBAS015012: Started FileSystemDeploymentService for directory /opt/jboss/wildfly/standalone/deployments
mywildfly_1 | 18:28:14,584 INFO [org.jboss.as.connector.subsystems.datasources] (MSC service thread 1-14) JBAS010400: Bound data source [java:jboss/datasources/ExampleDS]
mywildfly_1 | 18:28:14,697 INFO [org.jboss.ws.common.management] (MSC service thread 1-15) JBWS022052: Starting JBoss Web Services - Stack CXF Server 4.3.2.Final
mywildfly_1 | 18:28:14,766 INFO [org.jboss.as] (Controller Boot Thread) JBAS015961: Http management interface listening on http://127.0.0.1:9990/management
mywildfly_1 | 18:28:14,766 INFO [org.jboss.as] (Controller Boot Thread) JBAS015951: Admin console listening on http://127.0.0.1:9990
mywildfly_1 | 18:28:14,768 INFO [org.jboss.as] (Controller Boot Thread) JBAS015874: WildFly 8.2.0.Final "Tweek" started in 3852ms - Started 184 of 234 services (82 services are lazy, passive or on-demand)
mywildfly_1 | => Executing the commands
mywildfly_1 | => MYSQL_HOST:
mywildfly_1 | => MYSQL_PORT:
mywildfly_1 | => MYSQL (host): 172.17.0.4
mywildfly_1 | => MYSQL (port): 3306
mysqldb_1 | 2014-12-23 18:28:16 35 [Note] InnoDB: Shutdown completed; log sequence number 1625987
mywildfly_1 | [standalone@localhost:9990 /] batch
mywildfly_1 | [standalone@localhost:9990 / #]
mywildfly_1 | [standalone@localhost:9990 / #] # Add MySQL module
mywildfly_1 | [standalone@localhost:9990 / #] module add --name=com.mysql --resources=/opt/jboss/wildfly/customization/mysql-connector-java-5.1.31-bin.jar --dependencies=javax.api,javax.transaction.api
mywildfly_1 | [standalone@localhost:9990 / #]
mywildfly_1 | [standalone@localhost:9990 / #] # Add MySQL driver
mywildfly_1 | [standalone@localhost:9990 / #] /subsystem=datasources/jdbc-driver=mysql:add(driver-name=mysql,driver-module-name=com.mysql,driver-xa-datasource-class-name=com.mysql.jdbc.jdbc2.optional.MysqlXADataSource)
mywildfly_1 | [standalone@localhost:9990 / #]
mywildfly_1 | [standalone@localhost:9990 / #] # Add the datasource
mywildfly_1 | [standalone@localhost:9990 / #] #data-source add --name=mysqlDS --driver-name=mysql --jndi-name=java:jboss/datasources/ExampleMySQLDS --connection-url=jdbc:mysql://:/sample?useUnicode=true&characterEncoding=UTF-8 --user-name=mysql --password=mysql --use-ccm=false --max-pool-size=25 --blocking-timeout-wait-millis=5000 --enabled=true
mywildfly_1 | [standalone@localhost:9990 / #]
mywildfly_1 | [standalone@localhost:9990 / #] data-source add --name=mysqlDS --driver-name=mysql --jndi-name=java:jboss/datasources/ExampleMySQLDS --connection-url=jdbc:mysql://172.17.0.4:3306/sample?useUnicode=true&characterEncoding=UTF-8 --user-name=mysql --password=mysql --use-ccm=false --max-pool-size=25 --blocking-timeout-wait-millis=5000 --enabled=true
mywildfly_1 | [standalone@localhost:9990 / #]
mywildfly_1 | [standalone@localhost:9990 / #] # Execute the batch
mywildfly_1 | [standalone@localhost:9990 / #] run-batch
mywildfly_1 | 18:28:16,957 INFO [org.jboss.as.connector.subsystems.datasources] (management-handler-thread - 4) JBAS010404: Deploying non-JDBC-compliant driver class com.mysql.jdbc.Driver (version 5.1)
mywildfly_1 | 18:28:16,963 INFO [org.jboss.as.connector.deployers.jdbc] (MSC service thread 1-11) JBAS010417: Started Driver service with driver-name = mysql
mywildfly_1 | 18:28:16,976 INFO [org.jboss.as.connector.subsystems.datasources] (MSC service thread 1-5) JBAS010400: Bound data source [java:jboss/datasources/ExampleMySQLDS]
mywildfly_1 | The batch executed successfully
mywildfly_1 | [standalone@localhost:9990 /]
mywildfly_1 | => Shutting down WildFly
mysqldb_1 | OK
mysqldb_1 |
mysqldb_1 | To start mysqld at boot time you have to copy
mysqldb_1 | support-files/mysql.server to the right place for your system
mysqldb_1 |
mysqldb_1 | PLEASE REMEMBER TO SET A PASSWORD FOR THE MySQL root USER !
mysqldb_1 | To do so, start the server, then issue the following commands:
mysqldb_1 |
mysqldb_1 | ./bin/mysqladmin -u root password 'new-password'
mysqldb_1 | ./bin/mysqladmin -u root -h 8aca3b20ca40 password 'new-password'
mysqldb_1 |
mysqldb_1 | Alternatively you can run:
mysqldb_1 |
mysqldb_1 | ./bin/mysql_secure_installation
mysqldb_1 |
mysqldb_1 | which will also give you the option of removing the test
mysqldb_1 | databases and anonymous user created by default. This is
mysqldb_1 | strongly recommended for production servers.
mysqldb_1 |
mysqldb_1 | See the manual for more instructions.
mysqldb_1 |
mysqldb_1 | You can start the MySQL daemon with:
mysqldb_1 |
mysqldb_1 | cd . ; ./bin/mysqld_safe &
mysqldb_1 |
mysqldb_1 | You can test the MySQL daemon with mysql-test-run.pl
mysqldb_1 |
mysqldb_1 | cd mysql-test ; perl mysql-test-run.pl
mysqldb_1 |
mysqldb_1 | Please report any problems at http://bugs.mysql.com/
mysqldb_1 |
mysqldb_1 | The latest information about MySQL is available on the web at
mysqldb_1 |
mysqldb_1 | http://www.mysql.com
mysqldb_1 |
mysqldb_1 | Support MySQL by buying support/licenses at http://shop.mysql.com
mysqldb_1 |
mysqldb_1 | New default config file was created as ./my.cnf and
mysqldb_1 | will be used by default by the server when you start it.
mysqldb_1 | You may edit this file to change server settings
mysqldb_1 |
mysqldb_1 | 2014-12-23 18:28:17 0 [Warning] TIMESTAMP with implicit DEFAULT value is deprecated. Please use --explicit_defaults_for_timestamp server option (see documentation for more details).
mysqldb_1 | 2014-12-23 18:28:17 1 [Note] Plugin 'FEDERATED' is disabled.
mysqldb_1 | 2014-12-23 18:28:17 1 [Note] InnoDB: Using atomics to ref count buffer pool pages
mysqldb_1 | 2014-12-23 18:28:17 1 [Note] InnoDB: The InnoDB memory heap is disabled
mysqldb_1 | 2014-12-23 18:28:17 1 [Note] InnoDB: Mutexes and rw_locks use GCC atomic builtins
mysqldb_1 | 2014-12-23 18:28:17 1 [Note] InnoDB: Memory barrier is not used
mysqldb_1 | 2014-12-23 18:28:17 1 [Note] InnoDB: Compressed tables use zlib 1.2.3
mysqldb_1 | 2014-12-23 18:28:17 1 [Note] InnoDB: Using Linux native AIO
mysqldb_1 | 2014-12-23 18:28:17 1 [Note] InnoDB: Not using CPU crc32 instructions
mysqldb_1 | 2014-12-23 18:28:17 1 [Note] InnoDB: Initializing buffer pool, size = 128.0M
mysqldb_1 | 2014-12-23 18:28:17 1 [Note] InnoDB: Completed initialization of buffer pool
mysqldb_1 | 2014-12-23 18:28:17 1 [Note] InnoDB: Highest supported file format is Barracuda.
mysqldb_1 | 2014-12-23 18:28:17 1 [Note] InnoDB: 128 rollback segment(s) are active.
mysqldb_1 | 2014-12-23 18:28:17 1 [Note] InnoDB: Waiting for purge to start
mysqldb_1 | 2014-12-23 18:28:17 1 [Note] InnoDB: 5.6.22 started; log sequence number 1625987
mysqldb_1 | 2014-12-23 18:28:17 1 [Warning] No existing UUID has been found, so we assume that this is the first time that this server has been started. Generating a new UUID: 76e25b07-8ad1-11e4-9167-0242ac110004.
mysqldb_1 | 2014-12-23 18:28:17 1 [Note] Server hostname (bind-address): '*'; port: 3306
mysqldb_1 | 2014-12-23 18:28:17 1 [Note] IPv6 is available.
mysqldb_1 | 2014-12-23 18:28:17 1 [Note] - '::' resolves to '::';
mysqldb_1 | 2014-12-23 18:28:17 1 [Note] Server socket created on IP: '::'.
mysqldb_1 | 2014-12-23 18:28:17 1 [Note] Event Scheduler: Loaded 0 events
mysqldb_1 | 2014-12-23 18:28:17 1 [Note] Execution of init_file '/tmp/mysql-first-time.sql' started.
mysqldb_1 | 2014-12-23 18:28:17 1 [Note] Execution of init_file '/tmp/mysql-first-time.sql' ended.
mysqldb_1 | 2014-12-23 18:28:17 1 [Note] mysqld: ready for connections.
mysqldb_1 | Version: '5.6.22' socket: '/tmp/mysql.sock' port: 3306 MySQL Community Server (GPL)
mywildfly_1 | {"outcome" => "success"}
mywildfly_1 | => Restarting WildFly
mywildfly_1 | 18:28:17,931 INFO [org.jboss.as.connector.subsystems.datasources] (MSC service thread 1-15) JBAS010409: Unbound data source [java:jboss/datasources/ExampleMySQLDS]
mywildfly_1 | 18:28:17,931 INFO [org.jboss.as.connector.subsystems.datasources] (MSC service thread 1-11) JBAS010409: Unbound data source [java:jboss/datasources/ExampleDS]
mywildfly_1 | 18:28:17,942 INFO [org.wildfly.extension.undertow] (MSC service thread 1-5) JBAS017532: Host default-host stopping
mywildfly_1 | 18:28:17,946 INFO [org.jboss.as.connector.deployers.jdbc] (MSC service thread 1-11) JBAS010418: Stopped Driver service with driver-name = mysql
mywildfly_1 | 18:28:17,956 INFO [org.jboss.as.connector.deployers.jdbc] (MSC service thread 1-8) JBAS010418: Stopped Driver service with driver-name = h2
mywildfly_1 | 18:28:17,981 INFO [org.wildfly.extension.undertow] (MSC service thread 1-8) JBAS017521: Undertow HTTP listener default suspending
mywildfly_1 | 18:28:18,004 INFO [org.wildfly.extension.undertow] (MSC service thread 1-8) JBAS017520: Undertow HTTP listener default stopped, was bound to /0.0.0.0:8080
mywildfly_1 | 18:28:18,007 INFO [org.wildfly.extension.undertow] (MSC service thread 1-5) JBAS017506: Undertow 1.1.0.Final stopping
mywildfly_1 | =========================================================================
mywildfly_1 |
mywildfly_1 | JBoss Bootstrap Environment
mywildfly_1 |
mywildfly_1 | JBOSS_HOME: /opt/jboss/wildfly
mywildfly_1 |
mywildfly_1 | JAVA: /usr/lib/jvm/java/bin/java
mywildfly_1 |
mywildfly_1 | JAVA_OPTS: -server -Xms64m -Xmx512m -XX:MaxPermSize=256m -Djava.net.preferIPv4Stack=true -Djboss.modules.system.pkgs=org.jboss.byteman -Djava.awt.headless=true
mywildfly_1 |
mywildfly_1 | =========================================================================
mywildfly_1 |
mywildfly_1 | 18:28:18,082 INFO [org.jboss.as] (MSC service thread 1-10) JBAS015950: WildFly 8.2.0.Final "Tweek" stopped in 148ms
mywildfly_1 | 18:28:18,438 INFO [org.jboss.modules] (main) JBoss Modules version 1.3.3.Final
mywildfly_1 | 18:28:18,691 INFO [org.jboss.msc] (main) JBoss MSC version 1.2.2.Final
mywildfly_1 | 18:28:18,769 INFO [org.jboss.as] (MSC service thread 1-7) JBAS015899: WildFly 8.2.0.Final "Tweek" starting
mywildfly_1 | 18:28:19,737 INFO [org.jboss.as.server] (Controller Boot Thread) JBAS015888: Creating http management service using socket-binding (management-http)
mywildfly_1 | 18:28:19,756 INFO [org.xnio] (MSC service thread 1-12) XNIO version 3.3.0.Final
mywildfly_1 | 18:28:19,765 INFO [org.xnio.nio] (MSC service thread 1-12) XNIO NIO Implementation Version 3.3.0.Final
mywildfly_1 | 18:28:19,798 INFO [org.jboss.as.clustering.infinispan] (ServerService Thread Pool -- 32) JBAS010280: Activating Infinispan subsystem.
mywildfly_1 | 18:28:19,802 INFO [org.wildfly.extension.io] (ServerService Thread Pool -- 31) WFLYIO001: Worker 'default' has auto-configured to 16 core threads with 128 task threads based on your 8 available processors
mywildfly_1 | 18:28:19,834 INFO [org.jboss.as.naming] (ServerService Thread Pool -- 40) JBAS011800: Activating Naming Subsystem
mywildfly_1 | 18:28:19,837 INFO [org.jboss.as.security] (ServerService Thread Pool -- 45) JBAS013171: Activating Security Subsystem
mywildfly_1 | 18:28:19,843 WARN [org.jboss.as.txn] (ServerService Thread Pool -- 46) JBAS010153: Node identifier property is set to the default value. Please make sure it is unique.
mywildfly_1 | 18:28:19,846 INFO [org.jboss.as.security] (MSC service thread 1-9) JBAS013170: Current PicketBox version=4.0.21.Final
mywildfly_1 | 18:28:19,868 INFO [org.jboss.as.jsf] (ServerService Thread Pool -- 38) JBAS012615: Activated the following JSF Implementations: [main]
mywildfly_1 | 18:28:19,892 INFO [org.jboss.as.connector.logging] (MSC service thread 1-10) JBAS010408: Starting JCA Subsystem (IronJacamar 1.1.9.Final)
mywildfly_1 | 18:28:19,902 INFO [org.jboss.as.webservices] (ServerService Thread Pool -- 48) JBAS015537: Activating WebServices Extension
mywildfly_1 | 18:28:19,943 INFO [org.wildfly.extension.undertow] (ServerService Thread Pool -- 47) JBAS017502: Undertow 1.1.0.Final starting
mywildfly_1 | 18:28:19,943 INFO [org.wildfly.extension.undertow] (MSC service thread 1-15) JBAS017502: Undertow 1.1.0.Final starting
mywildfly_1 | 18:28:19,969 INFO [org.jboss.as.connector.subsystems.datasources] (ServerService Thread Pool -- 27) JBAS010403: Deploying JDBC-compliant driver class org.h2.Driver (version 1.3)
mywildfly_1 | 18:28:19,980 INFO [org.jboss.as.connector.deployers.jdbc] (MSC service thread 1-8) JBAS010417: Started Driver service with driver-name = h2
mywildfly_1 | 18:28:20,027 INFO [org.jboss.as.mail.extension] (MSC service thread 1-3) JBAS015400: Bound mail session [java:jboss/mail/Default]
mywildfly_1 | 18:28:20,027 INFO [org.jboss.as.naming] (MSC service thread 1-1) JBAS011802: Starting Naming Service
mywildfly_1 | 18:28:20,139 INFO [org.jboss.as.connector.subsystems.datasources] (ServerService Thread Pool -- 27) JBAS010404: Deploying non-JDBC-compliant driver class com.mysql.jdbc.Driver (version 5.1)
mywildfly_1 | 18:28:20,141 INFO [org.jboss.as.connector.deployers.jdbc] (MSC service thread 1-13) JBAS010417: Started Driver service with driver-name = mysql
mywildfly_1 | 18:28:20,155 INFO [org.jboss.remoting] (MSC service thread 1-12) JBoss Remoting version 4.0.6.Final
mywildfly_1 | 18:28:20,391 INFO [org.wildfly.extension.undertow] (ServerService Thread Pool -- 47) JBAS017527: Creating file handler for path /opt/jboss/wildfly/welcome-content
mywildfly_1 | 18:28:20,408 INFO [org.wildfly.extension.undertow] (MSC service thread 1-14) JBAS017525: Started server default-server.
mywildfly_1 | 18:28:20,429 INFO [org.wildfly.extension.undertow] (MSC service thread 1-14) JBAS017531: Host default-host starting
mywildfly_1 | 18:28:20,560 INFO [org.wildfly.extension.undertow] (MSC service thread 1-4) JBAS017519: Undertow HTTP listener default listening on /0.0.0.0:8080
mywildfly_1 | 18:28:20,696 INFO [org.jboss.as.server.deployment.scanner] (MSC service thread 1-13) JBAS015012: Started FileSystemDeploymentService for directory /opt/jboss/wildfly/standalone/deployments
mywildfly_1 | 18:28:20,697 INFO [org.jboss.as.server.deployment] (MSC service thread 1-16) JBAS015876: Starting deployment of "temp.war" (runtime-name: "temp.war")
mywildfly_1 | 18:28:20,701 INFO [org.jboss.as.server.deployment] (MSC service thread 1-15) JBAS015876: Starting deployment of "employees.war" (runtime-name: "employees.war")
mywildfly_1 | 18:28:20,719 INFO [org.jboss.as.connector.subsystems.datasources] (MSC service thread 1-4) JBAS010400: Bound data source [java:jboss/datasources/ExampleMySQLDS]
mywildfly_1 | 18:28:20,720 INFO [org.jboss.as.connector.subsystems.datasources] (MSC service thread 1-2) JBAS010400: Bound data source [java:jboss/datasources/ExampleDS]
mywildfly_1 | 18:28:20,815 INFO [org.jboss.as.jpa] (MSC service thread 1-6) JBAS011401: Read persistence.xml for MyPU
mywildfly_1 | 18:28:20,867 INFO [org.jboss.as.jpa] (ServerService Thread Pool -- 50) JBAS011409: Starting Persistence Unit (phase 1 of 2) Service 'employees.war#MyPU'
mywildfly_1 | 18:28:20,880 INFO [org.hibernate.jpa.internal.util.LogHelper] (ServerService Thread Pool -- 50) HHH000204: Processing PersistenceUnitInfo [
mywildfly_1 | name: MyPU
mywildfly_1 | ...]
mywildfly_1 | 18:28:20,959 INFO [org.jboss.ws.common.management] (MSC service thread 1-10) JBWS022052: Starting JBoss Web Services - Stack CXF Server 4.3.2.Final
mywildfly_1 | 18:28:20,980 INFO [org.hibernate.Version] (ServerService Thread Pool -- 50) HHH000412: Hibernate Core {4.3.7.Final}
mywildfly_1 | 18:28:20,984 INFO [org.hibernate.cfg.Environment] (ServerService Thread Pool -- 50) HHH000206: hibernate.properties not found
mywildfly_1 | 18:28:20,986 INFO [org.hibernate.cfg.Environment] (ServerService Thread Pool -- 50) HHH000021: Bytecode provider name : javassist
mywildfly_1 | 18:28:21,081 INFO [org.jboss.weld.deployer] (MSC service thread 1-9) JBAS016002: Processing weld deployment employees.war
mywildfly_1 | 18:28:21,127 INFO [org.hibernate.validator.internal.util.Version] (MSC service thread 1-9) HV000001: Hibernate Validator 5.1.3.Final
mywildfly_1 | 18:28:21,180 INFO [org.wildfly.extension.undertow] (MSC service thread 1-4) JBAS017534: Registered web context: /temp
mywildfly_1 | 18:28:21,264 INFO [org.jboss.weld.deployer] (MSC service thread 1-13) JBAS016005: Starting Services for CDI deployment: employees.war
mywildfly_1 | 18:28:21,298 INFO [org.jboss.weld.Version] (MSC service thread 1-13) WELD-000900: 2.2.6 (Final)
mywildfly_1 | 18:28:21,310 INFO [org.jboss.weld.deployer] (MSC service thread 1-10) JBAS016008: Starting weld service for deployment employees.war
mywildfly_1 | 18:28:21,452 INFO [org.jboss.as.jpa] (ServerService Thread Pool -- 50) JBAS011409: Starting Persistence Unit (phase 2 of 2) Service 'employees.war#MyPU'
mywildfly_1 | 18:28:21,521 INFO [org.hibernate.annotations.common.Version] (ServerService Thread Pool -- 50) HCANN000001: Hibernate Commons Annotations {4.0.4.Final}
mysqldb_1 | 2014-12-23 18:28:21 1 [Warning] IP address '172.17.0.5' could not be resolved: Name or service not known
mywildfly_1 | 18:28:21,845 INFO [org.hibernate.dialect.Dialect] (ServerService Thread Pool -- 50) HHH000400: Using dialect: org.hibernate.dialect.MySQL5Dialect
mywildfly_1 | 18:28:21,940 INFO [org.hibernate.hql.internal.ast.ASTQueryTranslatorFactory] (ServerService Thread Pool -- 50) HHH000397: Using ASTQueryTranslatorFactory
mywildfly_1 | 18:28:22,276 INFO [org.hibernate.dialect.Dialect] (ServerService Thread Pool -- 50) HHH000400: Using dialect: org.hibernate.dialect.MySQL5Dialect
mywildfly_1 | 18:28:22,282 INFO [stdout] (ServerService Thread Pool -- 50) Hibernate: drop table if exists EMPLOYEE_SCHEMA
mywildfly_1 | 18:28:22,289 INFO [stdout] (ServerService Thread Pool -- 50) Hibernate: drop table if exists hibernate_sequence
mywildfly_1 | 18:28:22,290 INFO [stdout] (ServerService Thread Pool -- 50) Hibernate: create table EMPLOYEE_SCHEMA (id integer not null, name varchar(40), primary key (id))
mywildfly_1 | 18:28:22,300 INFO [stdout] (ServerService Thread Pool -- 50) Hibernate: create table hibernate_sequence ( next_val bigint )
mywildfly_1 | 18:28:22,310 INFO [stdout] (ServerService Thread Pool -- 50) Hibernate: insert into hibernate_sequence values ( 1 )
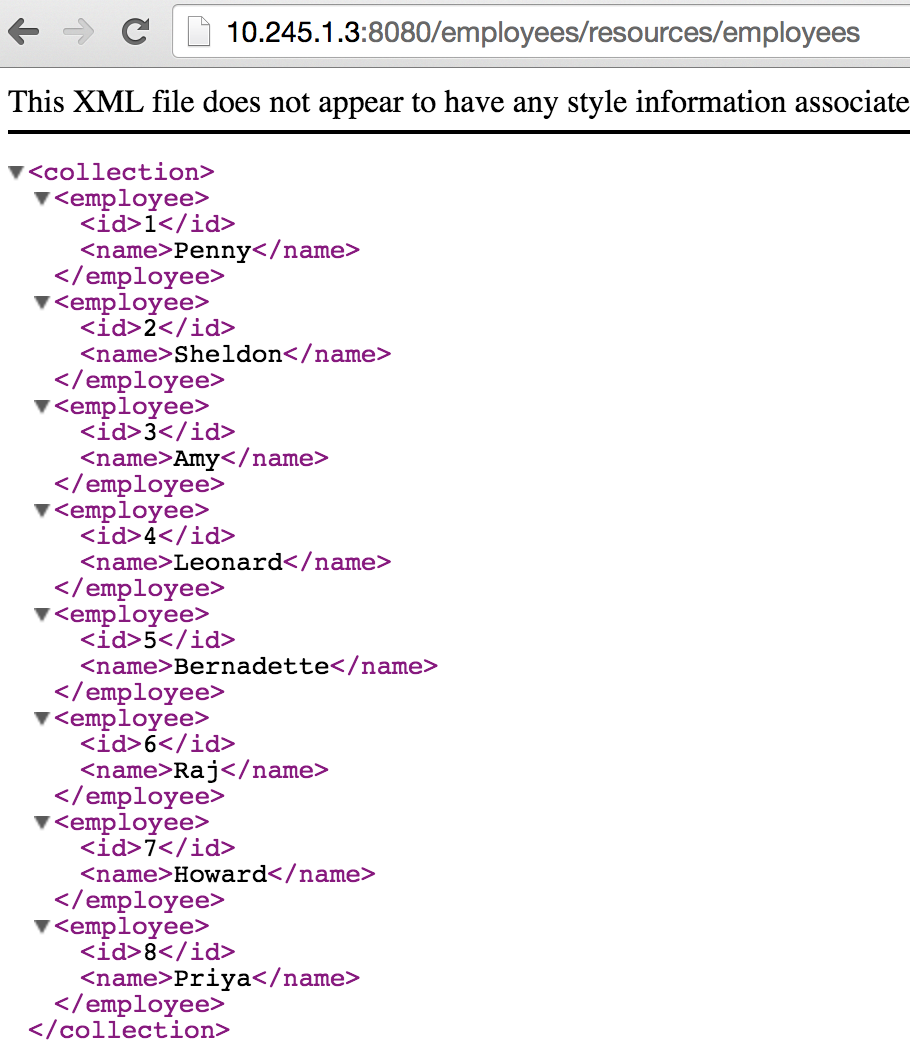
mywildfly_1 | 18:28:22,312 INFO [stdout] (ServerService Thread Pool -- 50) Hibernate: INSERT INTO EMPLOYEE_SCHEMA(ID, NAME) VALUES (1, 'Penny')
mywildfly_1 | 18:28:22,314 INFO [stdout] (ServerService Thread Pool -- 50) Hibernate: INSERT INTO EMPLOYEE_SCHEMA(ID, NAME) VALUES (2, 'Sheldon')
mywildfly_1 | 18:28:22,317 INFO [stdout] (ServerService Thread Pool -- 50) Hibernate: INSERT INTO EMPLOYEE_SCHEMA(ID, NAME) VALUES (3, 'Amy')
mywildfly_1 | 18:28:22,320 INFO [stdout] (ServerService Thread Pool -- 50) Hibernate: INSERT INTO EMPLOYEE_SCHEMA(ID, NAME) VALUES (4, 'Leonard')
mywildfly_1 | 18:28:22,323 INFO [stdout] (ServerService Thread Pool -- 50) Hibernate: INSERT INTO EMPLOYEE_SCHEMA(ID, NAME) VALUES (5, 'Bernadette')
mywildfly_1 | 18:28:22,324 INFO [stdout] (ServerService Thread Pool -- 50) Hibernate: INSERT INTO EMPLOYEE_SCHEMA(ID, NAME) VALUES (6, 'Raj')
mywildfly_1 | 18:28:22,328 INFO [stdout] (ServerService Thread Pool -- 50) Hibernate: INSERT INTO EMPLOYEE_SCHEMA(ID, NAME) VALUES (7, 'Howard')
mywildfly_1 | 18:28:22,330 INFO [stdout] (ServerService Thread Pool -- 50) Hibernate: INSERT INTO EMPLOYEE_SCHEMA(ID, NAME) VALUES (8, 'Priya')
mywildfly_1 | 18:28:23,361 INFO [org.jboss.resteasy.spi.ResteasyDeployment] (MSC service thread 1-1) Deploying javax.ws.rs.core.Application: class org.javaee7.samples.employees.MyApplication
mywildfly_1 | 18:28:23,396 INFO [org.wildfly.extension.undertow] (MSC service thread 1-1) JBAS017534: Registered web context: /employees
mywildfly_1 | 18:28:23,433 INFO [org.jboss.as.server] (ServerService Thread Pool -- 28) JBAS018559: Deployed "employees.war" (runtime-name : "employees.war")
mywildfly_1 | 18:28:23,434 INFO [org.jboss.as.server] (ServerService Thread Pool -- 28) JBAS018559: Deployed "temp.war" (runtime-name : "temp.war")
mywildfly_1 | 18:28:23,452 INFO [org.jboss.as] (Controller Boot Thread) JBAS015961: Http management interface listening on http://127.0.0.1:9990/management
mywildfly_1 | 18:28:23,453 INFO [org.jboss.as] (Controller Boot Thread) JBAS015951: Admin console listening on http://127.0.0.1:9990
mywildfly_1 | 18:28:23,453 INFO [org.jboss.as] (Controller Boot Thread) JBAS015874: WildFly 8.2.0.Final "Tweek" started in 5330ms - Started 344 of 404 services (102 services are lazy, passive or on-demand)
mywildfly_1 | 18:28:30,954 INFO [stdout] (default task-1) Hibernate: select employee0_.id as id1_0_, employee0_.name as name2_0_ from EMPLOYEE_SCHEMA employee0_