This blog will explain how to get started with Docker for AWS and deploy a multi-host Swarm cluster on Amazon.
Many thanks to @friism for helping me debug through the basics!
boot2docker -> Docker Machine -> Docker for Mac
Are you packaging your applications using Docker and using boot2docker for running containers in development? Then you are really living under a rock!
It is highly recommended to upgrade to Docker Machine for dev/testing of Docker containers. It encapsulates boot2docker and allows to create one or more light-weight VMs on your machine. Each VM acts as a Docker Engine and can run multiple Docker Containers. Running multiple VMs allows you to setup multi-host Docker Swarm cluster on your local laptop easily.
Docker Machine is now old news as well. DockerCon 2016 announced public beta of Docker for Mac. This means anybody can sign up for Docker for Mac at docker.com/getdocker and use it for dev/test of Docker containers. Of course, there is Docker for Windows too!
Docker for Mac is still a single host but has a swarm mode that allows to initialize it as a single node Swarm cluster.
What is Docker for AWS?
So now that you are using Docker for Mac for development, what would be your deployment platform? DockerCon 2016 also announced Docker for AWS and Azure Beta.
Docker for AWS and Azure both start a fleet of Docker 1.12 Engines with swarm mode enabled out of the box. Swarm mode means that the individual Docker engines form into a self-organizing, self-healing swarm, distributed across availability zones for durability.
Only AWS and Azure charges apply, Docker for AWS and Docker for Azure are free at this time. Sign up for Docker for AWS and Azure at beta.docker.com. Note, that it is a restricted availability at this time.
Once your account is enabled, then you’ll get an invitation email as shown below:
Docker for AWS CloudFormation Values
Click on Launch Stack to be redirected to the CloudFormation template page.
S3 template URL will be automatically populated, and is hidden here.
Click on Next. This page allows you to specify details for the CloudFormation template:

The following changes may be made:
- Template name
- Number of manager and worker nodes, 1 and 3 in this case. Note that only odd number of managers can be specified. By default, the containers are scheduled on the worker nodes only.
- AMI size of master and worker nodes
- A key already configured in your AWS account
Click on Next and take the defaults:

Click on Next, confirm the settings:

Select IAM resources checkbox and click on Create button to create the CloudFormation template.
It took ~10 mins to create a 4 node cluster (1 manager + 3 worker):
More details about the cluster can be seen in EC2 Console:
Docker for AWS Swarm Cluster Details
Output tab of EC2 Console shows more details about the cluster:
More details about the cluster can be obtained in two ways:
- Log into the cluster using SSH
- Create a tunnel and then configure local Docker CLI
Create SSH Connection to Docker for AWS
Login using command shown in the Value column of the Output tab.
Create a SSH connection as:
|
1
2
3
4
5
6
|
ssh -i ~/.ssh/aruncouchbase.pem docker@Docker4AWS-ELB-SSH-945956453.us-west-1.elb.amazonaws.com
The authenticity of host 'docker4aws-elb-ssh-945956453.us-west-1.elb.amazonaws.com (52.9.246.163)' can't be established.
ECDSA key fingerprint is SHA256:C71MHTErrgOO336qAuLXah7+nc6dnRSEHFgYzmXoGyQ.
Are you sure you want to continue connecting (yes/no)? yes
|
Note, that we are using the same key here that was specified during CloudFormation template. The list of containers can then be seen using docker ps command:
|
1
2
3
4
5
6
7
|
docker ps
CONTAINER ID IMAGE COMMAND CREATED STATUS PORTS NAMES
b7be5c7066a8 docker4x/controller:aws-v1.12.0-rc3-beta1 "controller run --log" 48 minutes ago Up 48 minutes 8080/tcp editions_controller
3846a869c502 docker4x/shell-aws:aws-v1.12.0-rc3-beta1 "/entry.sh /usr/sbin/" 48 minutes ago Up 48 minutes 0.0.0.0:22->22/tcp condescending_almeida
82aa5473f692 docker4x/watchdog-aws:aws-v1.12.0-rc3-beta1 "/entry.sh" 48 minutes ago Up 48 minutes naughty_swartz
|
Create SSH Tunnel to Docker for AWS
Alternatively, a SSH tunnel can be created as:
|
1
2
3
|
ssh -i ~/.ssh/aruncouchbase.pem -NL localhost:2375:/var/run/docker.sock docker@Docker4AWS-ELB-SSH-945956453.us-west-1.elb.amazonaws.com &
|
Setup DOCKER_HOST:
|
1
2
3
|
export DOCKER_HOST=localhost:2375
|
The list of containers can be seen as above using docker ps command. In addition, more information about the cluster can be obtained using docker info command:
|
1
2
3
4
5
6
7
8
9
10
11
12
13
14
15
16
17
18
19
20
21
22
23
24
25
26
27
28
29
30
31
32
33
34
35
36
37
38
39
40
41
42
43
44
45
46
47
48
|
docker info
Containers: 4
Running: 3
Paused: 0
Stopped: 1
Images: 4
Server Version: 1.12.0-rc3
Storage Driver: aufs
Root Dir: /var/lib/docker/aufs
Backing Filesystem: extfs
Dirs: 32
Dirperm1 Supported: true
Logging Driver: json-file
Cgroup Driver: cgroupfs
Plugins:
Volume: local
Network: host bridge overlay null
Swarm: active
NodeID: 02rdpg58s1eh3d7n3lc3xjr9p
IsManager: Yes
Managers: 1
Nodes: 4
CACertHash: sha256:4b2ab1280aa1e9113617d7588d97915b30ea9fe81852b4f6f2c84d91f0b63154
Runtimes: runc
Default Runtime: runc
Security Options: seccomp
Kernel Version: 4.4.13-moby
Operating System: Alpine Linux v3.4
OSType: linux
Architecture: x86_64
CPUs: 1
Total Memory: 993.8 MiB
Name: ip-192-168-33-110.us-west-1.compute.internal
ID: WHSE:7WRF:WWGP:62LP:7KSZ:NOLT:OKQ2:NPFH:BQZN:MCIC:IA6L:6VB7
Docker Root Dir: /var/lib/docker
Debug Mode (client): false
Debug Mode (server): true
File Descriptors: 46
Goroutines: 153
System Time: 2016-07-07T04:03:11.344531471Z
EventsListeners: 0
Username: arungupta
Registry: https://index.docker.io/v1/
Experimental: true
Insecure Registries:
127.0.0.0/8
|
Here are some key details from this output:
- 4 nodes and 1 manager, and so that means 3 worker nodes
- All nodes are running Docker Engine version 1.12.0-rc3
- Each VM is created using Alpine Linux 3.4
Scaling Worker Nodes in Docker for AWS
All worker nodes are configured in an AWS AutoScaling Group. Manager node is configured in a separate AWS AutoScaling Group.
This first release allows you to scale the worker count using the the Autocaling group. Docker will automatically join or remove new instances to the Swarm. Changing manager count live is not supported in this release.
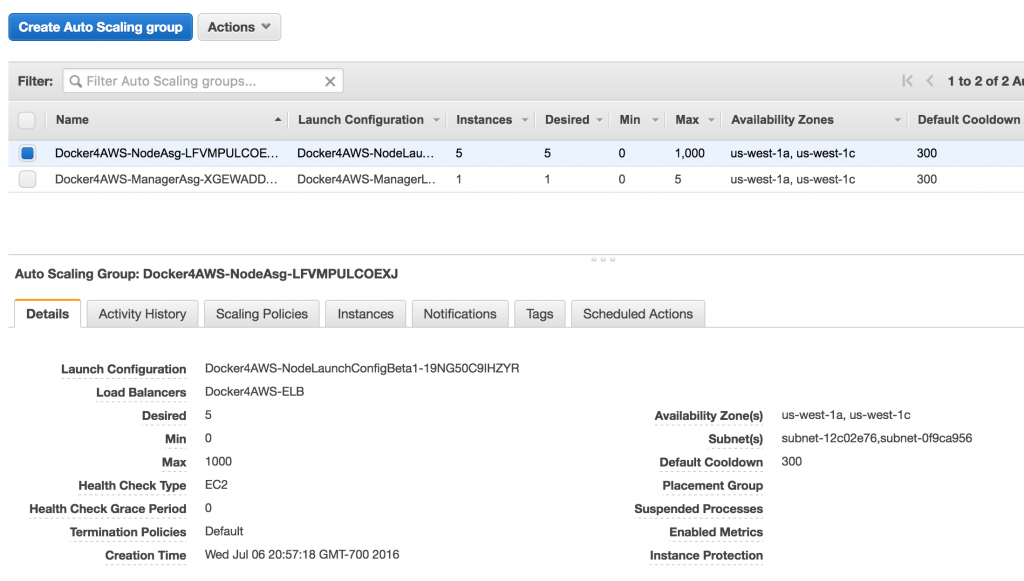
Select the AutoScaling group for worker nodes to see complete details about the group:
Click on Edit button to change the number of desired instances to 5, and save the configuration by clicking on Save button:
It takes a few seconds for the new instances to be provisioned and auto included in the Docker Swarm cluster. The refreshed Autoscaling group is shown as:
And now docker info command shows the updated output as:
|
1
2
3
4
5
6
7
8
9
10
11
12
13
14
15
16
17
18
19
20
21
22
23
24
25
26
27
28
29
30
31
32
33
34
35
36
37
38
39
40
41
42
43
44
45
46
47
48
|
docker info
Containers: 4
Running: 3
Paused: 0
Stopped: 1
Images: 4
Server Version: 1.12.0-rc3
Storage Driver: aufs
Root Dir: /var/lib/docker/aufs
Backing Filesystem: extfs
Dirs: 32
Dirperm1 Supported: true
Logging Driver: json-file
Cgroup Driver: cgroupfs
Plugins:
Volume: local
Network: overlay null host bridge
Swarm: active
NodeID: 02rdpg58s1eh3d7n3lc3xjr9p
IsManager: Yes
Managers: 1
Nodes: 6
CACertHash: sha256:4b2ab1280aa1e9113617d7588d97915b30ea9fe81852b4f6f2c84d91f0b63154
Runtimes: runc
Default Runtime: runc
Security Options: seccomp
Kernel Version: 4.4.13-moby
Operating System: Alpine Linux v3.4
OSType: linux
Architecture: x86_64
CPUs: 1
Total Memory: 993.8 MiB
Name: ip-192-168-33-110.us-west-1.compute.internal
ID: WHSE:7WRF:WWGP:62LP:7KSZ:NOLT:OKQ2:NPFH:BQZN:MCIC:IA6L:6VB7
Docker Root Dir: /var/lib/docker
Debug Mode (client): false
Debug Mode (server): true
File Descriptors: 48
Goroutines: 169
System Time: 2016-07-07T04:12:34.53634316Z
EventsListeners: 0
Username: arungupta
Registry: https://index.docker.io/v1/
Experimental: true
Insecure Registries:
127.0.0.0/8
|
This shows that there are a total of 6 nodes with 1 manager.
Docker for AWS References
- Docker for AWS and Azure Announcement Blog
- Docker for AWS and Azure
- Docker for AWS Release Notes
Source: blog.couchbase.com/2016/july/docker-for-aws-getting-started-scaling-nodes


I am completely learnt all the ideas through this online tutorial and get to know all the process http://windowstuts.net/connections how to connect Bluetooth device with my computer system.Thank you.