Tag Archives: aws

Bye Bye Couchbase, Hello Amazon Web Services!

After spending a little over 18 months at Couchbase, the future is cloudy, very cloudy!

Friday, April 7th, 2017, was my last day at Couchbase. This Monday, April 10th, 2017, is my first day at Amazon.

aws

What will I be doing?

I’ll be part of the newly formed Open Source team at Amazon Web Services. I’m super excited to be working with Adrian Cockroft (@adrianco) and Zaheda Bhorat (@zahedab).

As a Principal Open Source Technologist, my initial focus will be to make sure AWS continues to be the best platform for running your containerized solutions. Yes, we’d like you to use EC2 Container Service. But if you want to use Docker, Kubernetes, DC/OS or any other open source orchestration framework, so be it! We will continue to work with our partners and the open source community, including contributing to these projects, to make sure AWS remains the best place to run your containerized workloads.

In addition, there are numerous other opportunities around open source and AWS like mxnet, Blox and likely many more to be created.

Why change?

I had a lot of fun working at a Silicon Valley startup. The amount of learning in terms of implementing the pipeline from adoption -> engagement -> monetization was immense. Working with different teams very closely, learning their machinery and helping them understand the relevance of community was quite a thrilling experience. Having significant part of the company colocated in a single location allowed a different level of interaction altogether. Working with Developer Advocacy team to meet, and quite often exceed, the metrics every month was a lot of fun.

However, for those who’ve followed me speaking at conferences and read my content over the past couple of years know that I’m passionate about containers. As Oprah Winfrey said:

Passion is energy!

Feel the power that comes from focusing on what excites you

This opportunity at AWS allows me to follow my heart and passion.

Some other quotes that truly symbolize my state of mind at this time …

passion1 passion3

This personal change is by no means any indication on the quality of Couchbase products. Both Couchbase Server and Couchbase Mobile are very well positioned for enterprise adoption. N1QL allows database developers to leverage their SQL skills and apply them to a NoSQL document database. Couchbase Mobile is a unique offering that provides offline capability for mobile applications and synchronization with a backend database when online. It will continue to blaze new trails and bring new types of customers. I wish all of them good luck!

A popular saying is “change is the only constant”. And so here I go again making another change in my career. Looking forward to see you at conferences and meetups around the world.

This also means, the blog title will change to Miles to go 4.0 now (2.0, 3.0)!

Where will you see me?

Some upcoming speaking engagements are DockerCon (Austin), GIDS (Bangalore), OSCON (Austin). Amazon Web Services is a gold sponsor at DockerCon and OSCON and so you can find me at the booth as well.

You’ll also see me at some AWS Summits and re:Invent.

And of course, you can follow me on twitter @arungupta to find out what’s keeping me busy!

In the meanwhile, here are some links for you to learn more about AWS:

  • AWS on Twitch
  • This is My Architecture that shows innovative architectural solutions on the AWS Cloud
  • AWS Blog
  • Follow @awscloud

Looking forward to AWSome and exciting weeks/months/years ahead!


Analyze Donald Trump Tweets with Couchbase and N1QL

AWS Serverless Lambda Scheduled Events to Store Tweets in Couchbase explained how to store tweets in Couchbase using AWS Serverless Lambda. Now, this Lambda Function has been running for a few days and has collected 269 tweets from @realDonaldTrump. This blog , inspired by SQL on Twitter: Analysis Made Easy Using N1QL, will show how these tweets can be analyzed using N1QL.

trump-tweets
N1QL is a SQL-like query language from Couchbase that operates on JSON documents. N1QL and SQL Differences provide differences between N1QL and SQL. Let’s use N1QL to reveal some interesting information from @realDonaldTrump‘s tweets.

Many thanks to Sitaram from N1QL team to help hack the queries.

How Many Tweets

First query is to find out how many tweets are available in the database. The query is pretty simple:

Query:

As you notice, the syntax is very similar to SQL. SELECT, COUNT and FROM clauses are what you are already familiar with from SQL syntax. tweet_count is an alias defined for the returned result. twitter is the bucket where all the JSON documents are stored.

Results:

The result is a JSON document as well.

Tweet Sample JSON Document

In order to write queries on a JSON document, you need to know the structure of the document. The next query will give you that.

Query:

The new clause introduced here is LIMIT. This allows to restrict the number of objects that are returned in a result set of SELECT.

Results:

Top 5 Tweeting Days

After the basic queries are out of the way, let’s look at some interesting data now.

What are the top 5 days on which @realDonaldTrump tweeted and the tweet count?

Query:

Usual GROUP BY and ORDER BY SQL clauses perform the same function.

N1QL Functions apply a function to values. The createdAt field is returned a number as a String. TO_NUM function converts the String to a number. MILLIS_TO_STR function converts the String to a date. Finally, SUBSTR function extracts the relevant part of the date.

Results:

Jan 17th, 2017 is the most tweeted day. Now, this result is of course restricted to the data from the JSON documents stored in the database.

Does anybody have a more comprehensive database of @realDonaldTrump tweets?

Tweet Frequency

OK, our database shows that that maximum number of tweets in a day were 13. How do I find out how many days @realDonaldTrump tweeted a certain number of times?

Query:

This is easily achieved using N1QL nested queries.

Results:

In 47 days, there is only one day with a single tweet. A sum total of tweet_count shows that there is no single day without a tweet :)

Most Common Hour In a Day To Tweet

@realDonaldTrump is known to tweet at 3am. Let’s take a look what are the most common hours for him to tweet.

Query:

Results:

Now seems like the controversial tweets come at 3am. But 39 tweets are coming at 1pm ET, likely right after lunch and while having a dessert 😉

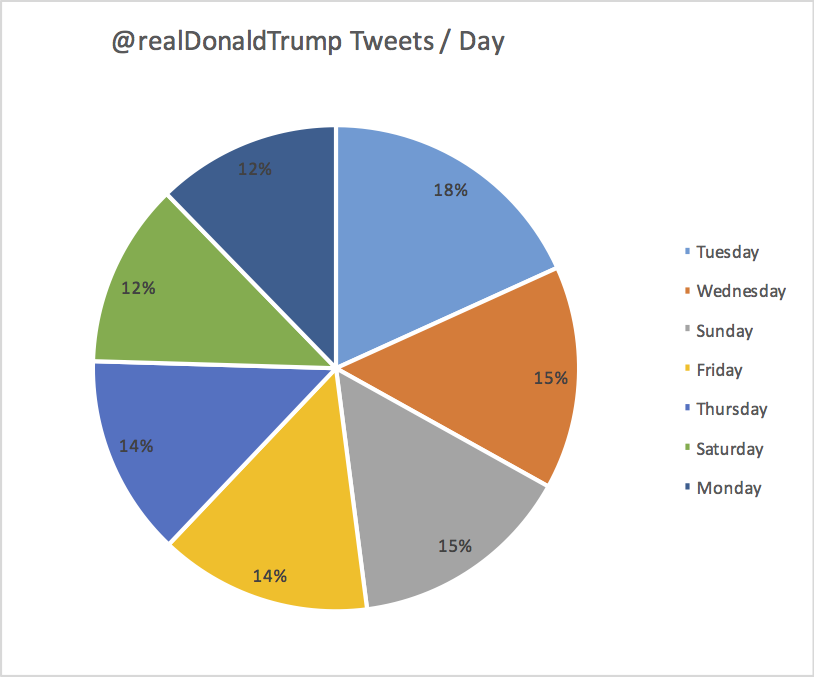
Common Day of The Week to Tweet

Let’s find out what are the most common day of the week to tweet.

Query:

DATE_PART_STR is a new function returns date part of the date. Further day_of_week attribute is used to get day of the week.

Results:

Seems like Tuesday is the most common day to tweet. Then comes Sunday and Wednesday at the same level. The performance tends to fizzle out closer to the weekend.

Here is a nice chart that shows the same trend:

realdonaldtrump-tweets-per-day

#22417 should allow to report the weekday part in English.

Top 5 Mentions in Tweets

Query:

userMentionEntities is a nested array in the JSON document. UNNEST conceptually performs a join of the nested array with its parent object. Each resulting joined object becomes an input to the query.

Results:

Needless to say, he mentions his own name the most in tweets! And his two favorite TV stations Fox News and CNN.

Top 5 Tweets with RTs

Lambda Function wakes up every 3 hours and fetches the latest tweets. So the database is a snapshot of tweets and associated information such as RTs and Favorites. So depending upon when the tweet was archived, the RTs and Favorites may not be an accurate representation. But given this information, let’s take a look at the tweets with most RTs.

Query:

Pretty straight forward query.

Results:

Original vs RTs

How many of tweets were written vs retweeted?

Query:

Results:

Most of the tweets are original with only a few RTs.

Most Common Words in Tweet

Query:

This query uses SPLIT function that

Results:

Frequency of words “media”, “fake” and “America” in tweets

Query:

LOWER function is used to compare words independent of the case.

Result:

Lambda function will continue to store tweets in the database.

Try these queries yourself?

N1QL References

  • N1QL Interactive Tutorial
  • N1QL Cheatsheet
  • N1QL Language Reference
  • Run Your First N1QL Query

Source: https://blog.couchbase.com/2017/january/analyze-donald-trump-tweets-couchbase-n1ql

AWS Serverless Lambda Scheduled Events to Store Tweets in Couchbase

This blog has explained a few Serverless concepts with code samples:

  • Serverless FaaS with AWS Lambda and Java
  • AWS IoT Button, Lambda and Couchbase
  • Microservice using AWS API Gateway, AWS Lambda and Couchbase
  • Microservice using AWS Serverless Application Model and Couchbase

This particular blog entry will show how to use AWS Lambda to store tweets of a tweeter in Couchbase. Here are the high level components:


lambda-twitter-couchbase

The key concepts are:

  • Lambda Function deployed using Serverless Application Model
  • Triggered every 3 hours using Scheduled Events
  • Uses Twitter4J API to query new tweets since the last fetch
  • Use Couchbase Java SDK API to store JSON documents in the Couchbase Server

Complete sample code for this blog is available at github.com/arun-gupta/twitter-n1ql.

Serverless Application Model

Serverless Application Model, or SAM, defines simplified syntax for expressing serverless resources. SAM extends AWS CloudFormation to add support for API Gateway, AWS Lambda and Amazon DynamoDB. Read more details in Microservice using AWS Serverless Application Model and Couchbase.

For our application, SAM template is available at github.com/arun-gupta/twitter-n1ql/blob/master/template-example.yml and shown below:

What do we see here?

  • Function is packaged and available in a S3 bucket
  • Handler class is org.sample.twittter.TwitterRequestHandler and is at github.com/arun-gupta/twitter-n1ql/blob/master/twitter-feed/src/main/java/org/sample/twitter/TwitterRequestHandler.java. It looks like:
    By default, this class reads the twitter handle of Donald Trump. More fun on that coming in a subsequent blog.
  • COUCHBASE_HOST and COUCHBASE_BUCKET_PASSWORD are environment variables that provide EC2 host where Couchbase database is running and the password of the bucket.
  • Function can be triggered by different events. In our case, this is triggered every three hours. More details about the expression used here are at Schedule Expressions Using Rate or Cron.

Fetching Tweets using Twitter4J

Tweets are read using Twitter4J API. It is an unofficial Twitter API that provides a Java abstraction over Twitter REST API. Here is a simple example:


Twitter4J Docs and Javadocs are pretty comprehensive.

Twitter API allows to read only last 200 tweets. Lambda function is invoked every 3 hours. The tweet frequency of @realDonaldTrump is not 200 every 3 hours, at least yet. If it does reach that dangerous level then we can adjust the rate to trigger Lambda function more frequently.

JSON representation of each tweet is stored in Couchbase server using Couchbase Java SDK. AWS Lambda supports Node, Python and C#. And so you can use Couchbase Node SDK, Couchbase Python SDK or Couchbase .NET SDK to write these functions as well.

Twitter4J API allows to fetch tweets since the id of a particular tweet. This allows to ensure that duplicate tweets are not fetched. This requires us to sort all tweets in a particular order and then pick the id of the most recent tweet. This was solved using the simple N1QL query:

The syntax is very SQL-like. More on this in a subsequent blog.

Store Tweets in Couchbase

The final item is to store the retrieved tweets in Couchbase.

Value of COUCHABSE_HOST environment variable is used to connect to the Couchbase instance. The value of COUCHBASE_BUCKET_PASSWORD environment variable is to connect to the secure bucket where all JSON documents are stored. Its very critical that the bucket be password protected and not directly specified in the source code. More on this in a subsequent blog.

The JSON document is upserted (insert or update) in Couchbase using the Couchbase Java API:


This Lambda Function has been running for a few days now and has captured 258 tweets from @realDonaldTrump.

serverless-lambda-couchbase-twitter-bucket

An interesting analysis of his tweets is coming shortly!

Talk to us:

  • Couchbase Forums
  • Couchbase Database Developer Portal
  • @couchbasedev and @couchbase

Complete sample code for this blog is available at github.com/arun-gupta/twitter-n1ql.

Source: https://blog.couchbase.com/2017/january/aws-serverless-lambda-scheduled-events-tweets-couchbase

Starting a Kubernetes 1.5.x cluster

Kubernetes

Kubernetes 1.5.0 was released just about a month ago! Key theme for the release are:

  • StatefulSets (ex-PetSets)
    • StatefulSets are beta now (fixes and stabilization)
  • Improved Federation Support
    • New command: kubefed
    • DaemonSets
    • Deployments
    • ConfigMaps
  • Simplified Cluster Deployment
    • Improvements to kubeadm
    • HA Setup for Master
  • Node Robustness and Extensibility
    • Windows Server Container support
    • CRI for pluggable container runtimes
    • kubelet API supports authentication and authorization

Read CHANGELOG for complete details.

Up until 1.5.0, starting up a Kubernetes cluster on Amazon Web Services was pretty straight forward.

But with 1.5.0 and 1.5.1, the command fails with the error:

What happened?

Basically, Kubernetes binaries was getting bigger than 1GB. The binary was broken into a basic install bundle and client and server binaries. The updated installation process requires to download the basic install bundle of of 4.57 MB (yes, MB instead of GB). It includes cluster scripts like kubectl, kube-up.sh and kube-down.sh, examples, docs and other scripts. This then downloads client and server binaries. Server binary is the base image that is used to start EC2 instances. But instead of automating the download of binaries, somebody decided to add a README in the server directory.

This was a big user experience change, and no links in the README bundled with the release or the release blog. Ouch!

Anyway, this was filed as #38728 and fixed promptly. But it missed the 1.5.1 release and now finally showed up in the 1.5.2 release today.

So, how do you run a Kubernetes 1.5.2 cluster on AWS?

It is more seamlessly integrated now but you need to hit Enter key a couple of times to accept the default value:

After the usual Kubernetes cluster is created, the output is shown as:

Even though your Kubernetes cluster on AWS starts up fine, but kube-up.sh script is going to be deprecated soon. The recommended way is to use Kubernetes Cluster on Amazon using Kops.

Now that your Kubernetes cluster is up, what do you do next?

  • Follow the detailed steps for Kubernetes for Java Developers workshop.
  • Run a Couchbase cluster in Kubernetes
  • Learn more about Couchbase cluster in Containers

Source: https://blog.couchbase.com/2017/january/starting-kubernetes-1.5.x-cluster

Microservice using AWS Serverless Application Model and Couchbase

Amazon Web Services introduced Serverless Application Model, or SAM, a couple of months ago. It defines simplified syntax for expressing serverless resources. SAM extends AWS CloudFormation to add support for API Gateway, AWS Lambda and Amazon DynamoDB. This blog will show how to create a simple microservice using SAM. Of course, we’ll use Couchbase instead of DynamoDB!

This blog will also use the basic concepts explained in Microservice using AWS API Gateway, AWS Lambda and Couchbase. SAM will show the ease with which the entire stack for microservice can be deployed and managed.

As a refresher, here are key components in the architecture:

serverless-microservice

  • Client could be curl, AWS CLI/Console, Postman client or any other tool/API that can invoke a REST endpoint.
  • AWS API Gateway is used to provision APIs. The top level resource is available at path /books. HTTP GET and POST methods are published for the resource.
  • Each API triggers a Lambda function. Two Lambda functions are created, book-list function for listing all the books available and book-create function to create a new book.
  • Couchbase is used as a persistence store in EC2. All the JSON documents are stored and retrieved from this database.

Other blogs on serverless:

  • Microservice using AWS API Gateway, AWS Lambda and Couchbase
  • AWS IoT Button, Lambda and Couchbase
  • Serverless FaaS with Lambda and Java

Let’s get started!

Serverless Application Model (SAM) Template

An AWS CloudFormation template with serverless resources conforming to the AWS SAM model is referred to as a SAM file or template. It is deployed as a CloudFormation stack.

Let’s take a look at our SAM template:

This template is available at github.com/arun-gupta/serverless/blob/master/aws/microservice/template.yml.

SAM template Specification provide complete details about contents in the template. The key parts of the template are:

  • Defines two resources, both of Lambda Function type identified by AWS::Serverless::Function attribute. Name of the Lambda function is defined by Resources.<resource>.
  • Class for each handler is defined by the value of Resources.<resource>.Properties.Handler attribute
  • Java 8 runtime is used to run the Function defined by Resources.<resource>.Properties.Runtime attribute
  • Code for the class is uploaded to an S3 bucket, in our case to s3://serverless-microservice/microservice-http-endpoint-1.0-SNAPSHOT.jar
  • Resources.<resource>.Properties.Environment.Variables.COUCHBASE_HOST attribute value defines the host where Couchbase is running. This can be easily deployed on EC2 as explained at Setup Couchbase.
  • Each Lambda function is triggered by an API. It is deployed using AWS API Gateway. The path is defined by Events.GetResource.Properties.Path. HTTP method is defined using Events.GetResource.Properties.Method attribute.

Java Application

The Java application that contains the Lambda functions is at github.com/arun-gupta/serverless/tree/master/aws/microservice/microservice-http-endpoint.

Lambda function that is triggered by HTTP GET method is shown:

A little bit of explanation:

  • Each Lambda function needs to implement the interface com.amazonaws.services.lambda.runtime.RequestHandler.
  • API Gateway and Lambda integration require a specific input format and output format. These formats are defined as GatewayRequest and GatewayResponse classes.
  • Function logic uses Couchbase Java SDK to query the Couchbase database. N1QL query is used to query the database. The results and exception are then wrapped in GatewayRequest and GatewayResponse.

Lambda function triggered by HTTP POST method is pretty straightforward as well:

A bit of explanation:

  • Incoming request payload is retrieved from GatewayRequest
  • Document inserted in Couchbase is returned as response.
  • Like the previous method, Function logic uses Couchbase Java SDK to query the Couchbase database. The results and exception are then wrapped in GatewayRequest and GatewayResponse.

Build the Java application as:

Upload Lambda Function to S3

SAM template reads the code from an S3 bucket. Let’s create a S3 bucket:

us-west-2 region is one of the supported regions for API Gateway. S3 bucket names are globally unique but their location is region specific.

Upload the code to S3 bucket:

The code is now uploaded to S3 bucket. SAM template is ready to be deployed!

Deploy SAM Template

Deploy the SAM template:

It shows the output:

This one command deploys Lambda functions and REST Resource/APIs that trigger these Lambda functions.

Invoke the Microservice

API Gateway publishes a REST API that can be invoked by curl, wget, AWS CLI/Console, Postman or any other app that can call a REST API. This blog will use AWS Console to show the interaction.

API Gateway home at us-west-2.console.aws.amazon.com/apigateway/home?region=us-west-2#/apis shows:

AWS SAM Microservice API

Click on the API to see all the APIs in this resource:

AWS SAM Microservice API Resources

Click on POST to see the default page for POST method execution:

AWS SAM Microservice API POST

Click on Test to test the API:

AWS SAM Microservice API POST Input

Add the payload in Request Body and click on Test to invoke the API. The results are shown as below:

AWS SAM Microservice API POST Output

Now click on GET to see the default execution page:

AWS SAM Microservice API GET

Click on Test to test the API:

AWS SAM Microservice API GET Input

No request body is needed, just click on Test the invoke the API. The results are as shown:

AWS SAM Microservice API GET Output

Output from the Couchbase database is shown in the Response Body.

References

  • Deploying Lambda-based Applications
  • Serverless Architectures
  • AWS API Gateway
  • Creating a simple Microservice using Lambda and API Gateway
  • Couchbase Server Docs
  • Couchbase Forums
  • Follow us at @couchbasedev

Source: blog.couchbase.com/2017/january/microservice-aws-serverless-application-model-couchbase

Microservice using AWS API Gateway, AWS Lambda and Couchbase

This blog has explained the following concepts for serverless applications so far:

  • Serverless FaaS with AWS Lambda and Java
  • AWS IoT Button, Lambda and Couchbase

The third blog in serverless series will explain how to create a simple microservice using Amazon API Gateway, AWS Lambda and Couchbase.

Read previous blogs for more context on AWS Lambda.

Amazon API Gateway is a fully managed service that makes it easy for developers to create, publish, maintain, monitor, and secure APIs at any scale. Amazon API Gateway handles all the tasks involved in accepting and processing up to hundreds of thousands of concurrent API calls, including traffic management, authorization and access control, monitoring, and API version management.

Here are the key components in this architecture:

serverless-microservice

  • Client could be curl, AWS CLI, Postman client or any other tool/API that can invoke a REST endpoint.
  • API Gateway is used to provision APIs. The top level resource is available at path /books. HTTP GET and POST methods are published for the resource.
  • Each API triggers a Lambda function. Two Lambda functions are created, book-list function for listing all the books available and book-create function to create a new book.
  • Couchbase is used as a persistence store in EC2. All the JSON documents are stored and retrieved from this database.

Let’s get started!

Create IAM Role

IAM roles will have policies and trust relationships that will allow this role to be used in API Gateway and execute Lambda function.

Let’s create a new IAM role:

--assume-role-policy-document defines the trust relationship policy document that grants an entity permission to assume the role. trust.json is at github.com/arun-gupta/serverless/blob/master/aws/microservice/trust.json and looks like:

This trust relationship allows Lambda functions and API Gateway to assume this role during execution.

Associate policies with this role as:

policy.json is at github.com/arun-gupta/serverless/blob/master/aws/microservice/policy.json and looks like:

This generous policy allows any permissions over logs generated in CloudWatch for all resources. In addition it allows all Lambda and API Gateway permissions to all resources. In general, only required policy would be given to specific resources.

Create Lambda Functions

Detailed steps to create Lambda functions are explained in Serverless FaaS with AWS Lambda and Java. Let’s create the two Lambda functions as required in our case:

Couple of key items to note in this function are:

  • IAM role microserviceRole created in previous step is explicitly specified here
  • Handler is org.sample.serverless.aws.couchbase.BucketGetAll class. This class queries the Couchbase database defined using the COUCHBASE_HOST environment variable.

Create the second Lambda function:

The handler for this function is org.sample.serverless.aws.couchbase.BucketPost class. This class creates a new JSON document in the Couchbase database identified by COUCHBASE_HOST environment variable.

The complete source code for these classes is at github.com/arun-gupta/serverless/tree/master/aws/microservice/microservice-http-endpoint.

API Gateway Resource

Create an API using Amazon API Gateway and Test It and Build an API to Expose a Lambda Function provide detailed steps and explanation on how to use API Gateway and Lambda Functions to build powerful backend systems. This blog will do a quick run down of the steps in case you want to cut the chase.

Let’s create API Gateway resources.

  1. The first step is to create an API:
    This shows the output as:
    The value of id attribute is API ID. In our case, this is lb2qgujjif.
  2. Find ROOT ID of the created API as this is required for the next AWS CLI invocation:
    This shows the output:
    Value of id attribute is ROOT ID. This is also the PARENT ID for the top level resource.
  3. Create a resource
    This shows the output:
    Value of id attribute is RESOURCE ID.

API ID and RESOURCE ID are used for subsequent AWS CLI invocations.

API Gateway POST Method

Now that the resource is created, let’s create HTTP POST method on this resource.

  1. Create a POST method
    to see the response:
  2. Set Lambda function as destination of the POST method:
    Make sure to replace <act-id> with your AWS account id. API ID and RESOURCE ID from previous section are used here as well. --uri is used to specify the URI of integration input. The format of the URI is fixed. This CLI will show the result as:
  3. Set content-type of POST method response:
    to see the response:
  4. Set content-type of POST method integration response:
    to see the response:
  5. Deploy the API
    to see the response
  6. Grant permission to allow API Gateway to invoke Lambda Function:
    Also, grant permission to the deployed API:
  7. Test the API method:
    to see the response:
    Value of status attribute is 200 and indicates this was a successful invocation. Value of log attribute shows the log statement from CloudWatch Logs. Detailed logs can also be obtained using aws logs filter-log-events --log-group /aws/lambda/MicroservicePost.
  8. This command stores a single JSON document in Couchbase. This can be easily verified using the Couchbase CLI Tool cbq.Connect to the Couchbase server as:
    Create a primary index on default bucket as this is required to query the bucket with no clauses:
  9. Write a N1QL query to access the data:
    The results show the JSON document that was stored by our Lambda function.

API Gateway GET Method

Let’s create HTTP GET method on the resource:

  1. Create a GET method:
  2. Set correct Lambda function as destination of GET:
  3. Set content-type of GET method response:
  4. Set content-type of GET method integration response:
  5. Grant permission to allow API Gateway to invoke Lambda Function
  6. Grant permission to the deployed API:
  7. Test the method:
    to see the output:
    Once again, 200 status code shows a successful invocation. Detailed logs can be obtained using aws logs filter-log-events --log-group /aws/lambda/MicroservicePost.

This blog only shows one simple POST and GET methods. Other HTTP methods can be very easily included in this microservice as well.

API Gateway and Lambda References

  • Serverless Architectures
  • AWS API Gateway
  • Creating a simple Microservice using Lambda and API Gateway
  • Couchbase Server Docs
  • Couchbase Forums
  • Follow us at @couchbasedev

Source: blog.couchbase.com/2016/december/microservice-aws-api-gateway-lambda-couchbase

AWS IoT Button, Lambda and Couchbase

Getting Started with Serverless FaaS and AWS Lambda shows how to use a simple Java function to store a JSON document to Couchbase using AWS Lambda. This blog builds upon that and shows how an AWS IoT Button can be used as a trigger for that Lambda function.

By end of this blog, you’ll learn:

  • How to configure AWS IoT Button
  • Use IoT Button as trigger for Lambda Function
  • Test IoT button

The overall flow will be:

serverless-iot-couchbase

Iot button click will invoke HelloCouchbaseLambda Lambda function. This function is uses Couchbase Java SDK to create a JSON document in Couchbase.

This blog is also playing catch up with Collecting iBeacon Data with Couchbase and Raspberry Pi IoT Devices by Nic and The CouchCase by Matthew on their summer projects. One last blog will be published in this series. That will show how multiple AWS IoT buttons can be used for some fun.

Let’s get started!

Configure IoT Button

The fastest way to configure IoT button  is using the mobile app for iOS or Android.


More details about configuring IoT Button using mobile app.

Here are some snapshots from configuring button using the mobile app.

Bring up the app, click on + to start configuring a new button:

aws-iot-button-configure-1

Enter button’s serial number:

aws-iot-button-configure-2

Register the button:

aws-iot-button-configure-3

Configure the button with wifi network:

aws-iot-button-configure-4

Upload all the certificates etc:

aws-iot-button-configure-5

After this, the button is configured and ready to use. This blog skipped the part where a template Lambda Function is associated with the button click.

If  mobile app cannot be used then the button can be configured manually.

Use IoT Button as Trigger for Lambda Function

The aws lambda create-event-source-mapping CLI allows to create an event source for Lambda function. As of AWS CLI version 1.11.21, only Amazon Kinesis stream or an Amazon DynamoDB stream can be used. But for this blog, we’ll use IoT button as a trigger. And this has to be configured using AWS Lambda Console.

IoT Button is only supported in a limited number of regions. For example, it is not supported in the us-west-1 region but us-west-2 region works.

The list of regions not supported are greyed out in the following list:

aws-iot-buttons-supported-region

Lambda Function can be triggered by several events. Lambda Function is invoked when any of these events occur. By default, no triggers are associated with a Lambda Function. For our HelloCouchbaseLambda function, these can be seen at us-west-2.console.aws.amazon.com/lambda/home?region=us-west-2#/functions/HelloCouchbaseLambda?tab=triggers.

AWS Lambda Default Triggers

Click on Add trigger to add a new trigger:

AWS Lambda Add Trigger

Select on the empty square to create a new trigger, and select AWS IoT:

AWS Lambda Add IoT Trigger

For the button previously registered, get the serial number from us-west-2.console.aws.amazon.com/iotv2/home?region=us-west-2#/thinghub:

aws-iot-things-hub

Specify the serial number of the button in the AWS IoT trigger:

aws-iot-add-trigger

Click on Submit to create the trigger:

aws-iot-added-trigger

And this confirms that the trigger has been added.

Test IoT Button

Before testing the button, let’s login to the Couchbase instance and verify the number of JSON documents in the bucket:

aws-iot-button-couchbase-console-default

This can be verified at http://<EC2-IP-Address>:8091/index.html#sec=buckets. As expected, no documents exists in the bucket.

Press the button once, and refresh the page. It shows that one document is now stored in the bucket. This is verified in the Couchbase Web Console:

aws-iot-button-couchbase-console-one-document

Click on Documents to see the complete list of documents:

aws-iot-button-couchbase-one-document-2

Click on the document ID to see more details about the document:

aws-iot-button-couchbase-one-document-details

Only timestamp is stored in this JSON document.

Now, let’s update HelloCouchbaseLambda code to include request id in the document as well. This can be achieved by adding the following line of code in the Java class:

A new deployment package can be built and uploaded using the following command:

Now clicking the button will update the number of documents. But the updated document will have an additional attribute populated as shown:

aws-iot-button-couchbase-second-document-details

How are you going to take AWS IoT button and use it with Lambda and Couchbase? Let us know at Couchbase Forums.

References

  • AWS IoT Button
  • AWS IoT Button Developer Guide
  • Couchbase Server Docs
  • Couchbase Forums
  • Follow us at @couchbasedev

Source: https://blog.couchbase.com/2016/december/aws-iot-button-lambda-couchbase

Docker for AWS – Getting Started Video

Want to create a highly-available Docker cluster on Amazon Web Services? Run multi-container applications on it using Docker Services?

Docker Logo
amazon-web-services-logo
Couchbase Logo

Docker for AWS allows you to exactly do that! This video shows:

  • Create a highly-available Docker cluster on Amazon Web Services (0:00)
  • Check configuration (5:43)
  • Use Docker services to create a Couchbase cluster (8:23)

Enjoy!

couchbase.com/containers provide more details about how to run Couchbase in different container frameworks. More information about Couchbase:

  • Couchbase Developer Portal
  • Couchbase Forums
  • @couchbasedev or @couchbase

Source: blog.couchbase.com/2016/november/docker-for-aws-getting-started-video

Getting Started with Docker for AWS and Scaling Nodes

This blog will explain how to get started with Docker for AWS and deploy a multi-host Swarm cluster on Amazon.

Docker Logo

amazon-web-services-logo

Many thanks to @friism for helping me debug through the basics!

boot2docker -> Docker Machine -> Docker for Mac

Are you packaging your applications using Docker and using boot2docker for running containers in development? Then you are really living under a rock!

It is highly recommended to upgrade to Docker Machine for dev/testing of Docker containers. It encapsulates boot2docker and allows to create one or more light-weight VMs on your machine. Each VM acts as a Docker Engine and can run multiple Docker Containers. Running multiple VMs allows you to setup multi-host Docker Swarm cluster on your local laptop easily.

Docker Machine is now old news as well. DockerCon 2016 announced public beta of Docker for Mac. This means anybody can sign up for Docker for Mac at docker.com/getdocker and use it for dev/test of Docker containers. Of course, there is Docker for Windows too!

Docker for Mac is still a single host but has a swarm mode that allows to initialize it as a single node Swarm cluster.

What is Docker for AWS?

So now that you are using Docker for Mac for development, what would be your deployment platform? DockerCon 2016 also announced Docker for AWS and Azure Beta.

Docker for AWS and Azure both start a fleet of Docker 1.12 Engines with swarm mode enabled out of the box. Swarm mode means that the individual Docker engines form into a self-organizing, self-healing swarm, distributed across availability zones for durability.

Only AWS and Azure charges apply, Docker for AWS and Docker for Azure are free at this time. Sign up for Docker for AWS and Azure at beta.docker.com. Note, that it is a restricted availability at this time.

Once your account is enabled, then you’ll get an invitation email as shown below:

docker-aws-invite

Docker for AWS CloudFormation Values

Click on Launch Stack to be redirected to the CloudFormation template page.

Take the defaults:
docker4aws-1

S3 template URL will be automatically populated, and is hidden here.

Click on Next. This page allows you to specify details for the CloudFormation template:
docker4aws-2

The following changes may be made:

  • Template name
  • Number of manager and worker nodes, 1 and 3 in this case. Note that only odd number of managers can be specified. By default, the containers are scheduled on the worker nodes only.
  • AMI size of master and worker nodes
  • A key already configured in your AWS account

Click on Next and take the defaults:
docker4aws-3

Click on Next, confirm the settings:
docker4aws-4

docker4aws-5

Select IAM resources checkbox and click on Create button to create the CloudFormation template.

It took ~10 mins to create a 4 node cluster (1 manager + 3 worker):docker4aws-6

More details about the cluster can be seen in EC2 Console:docker4aws-7

Docker for AWS Swarm Cluster Details

Output tab of EC2 Console shows more details about the cluster:docker4aws-8

More details about the cluster can be obtained in two ways:

  • Log into the cluster using SSH
  • Create a tunnel and then configure local Docker CLI

Create SSH Connection to Docker for AWS

Login using command shown in the Value column of the Output tab.

Create a SSH connection as:

Note, that we are using the same key here that was specified during CloudFormation template. The list of containers can then be seen using docker ps command:

Create SSH Tunnel to Docker for AWS

Alternatively, a SSH tunnel can be created as:

Setup DOCKER_HOST:

The list of containers can be seen as above using docker ps command. In addition, more information about the cluster can be obtained using docker info command:

Here are some key details from this output:

  • 4 nodes and 1 manager, and so that means 3 worker nodes
  • All nodes are running Docker Engine version 1.12.0-rc3
  • Each VM is created using Alpine Linux 3.4

Scaling Worker Nodes in Docker for AWS

All worker nodes are configured in an AWS AutoScaling Group. Manager node is configured in a separate AWS AutoScaling Group.

docker4aws-9

This first release allows you to scale the worker count using the the Autocaling group. Docker will automatically join or remove new instances to the Swarm. Changing manager count live is not supported in this release.

Select the AutoScaling group for worker nodes to see complete details about the group:

docker4aws-10

Click on Edit button to change the number of desired instances to 5, and save the configuration by clicking on Save button:

docker4aws-11

It takes a few seconds for the new instances to be provisioned and auto included in the Docker Swarm cluster. The refreshed Autoscaling group is shown as:

docker4aws-12

And now docker info command shows the updated output as:

This shows that there are a total of 6 nodes with 1 manager.

Docker for AWS References

  • Docker for AWS and Azure Announcement Blog
  • Docker for AWS and Azure
  • Docker for AWS Release Notes

Source: blog.couchbase.com/2016/july/docker-for-aws-getting-started-scaling-nodes