Tag Archives: amazon

Microservice using AWS Serverless Application Model and Couchbase

Amazon Web Services introduced Serverless Application Model, or SAM, a couple of months ago. It defines simplified syntax for expressing serverless resources. SAM extends AWS CloudFormation to add support for API Gateway, AWS Lambda and Amazon DynamoDB. This blog will show how to create a simple microservice using SAM. Of course, we’ll use Couchbase instead of DynamoDB!

This blog will also use the basic concepts explained in Microservice using AWS API Gateway, AWS Lambda and Couchbase. SAM will show the ease with which the entire stack for microservice can be deployed and managed.

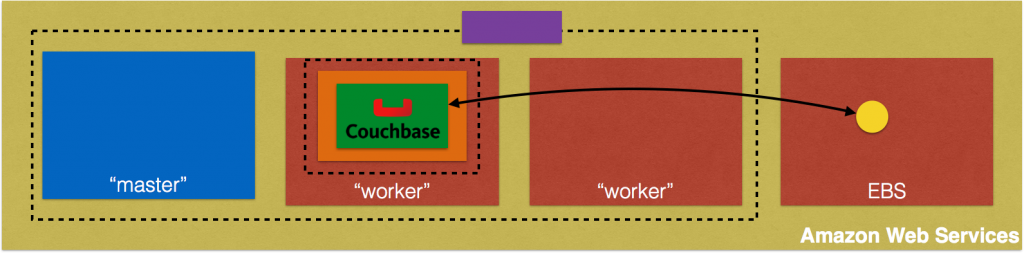
As a refresher, here are key components in the architecture:

serverless-microservice

  • Client could be curl, AWS CLI/Console, Postman client or any other tool/API that can invoke a REST endpoint.
  • AWS API Gateway is used to provision APIs. The top level resource is available at path /books. HTTP GET and POST methods are published for the resource.
  • Each API triggers a Lambda function. Two Lambda functions are created, book-list function for listing all the books available and book-create function to create a new book.
  • Couchbase is used as a persistence store in EC2. All the JSON documents are stored and retrieved from this database.

Other blogs on serverless:

  • Microservice using AWS API Gateway, AWS Lambda and Couchbase
  • AWS IoT Button, Lambda and Couchbase
  • Serverless FaaS with Lambda and Java

Let’s get started!

Serverless Application Model (SAM) Template

An AWS CloudFormation template with serverless resources conforming to the AWS SAM model is referred to as a SAM file or template. It is deployed as a CloudFormation stack.

Let’s take a look at our SAM template:

This template is available at github.com/arun-gupta/serverless/blob/master/aws/microservice/template.yml.

SAM template Specification provide complete details about contents in the template. The key parts of the template are:

  • Defines two resources, both of Lambda Function type identified by AWS::Serverless::Function attribute. Name of the Lambda function is defined by Resources.<resource>.
  • Class for each handler is defined by the value of Resources.<resource>.Properties.Handler attribute
  • Java 8 runtime is used to run the Function defined by Resources.<resource>.Properties.Runtime attribute
  • Code for the class is uploaded to an S3 bucket, in our case to s3://serverless-microservice/microservice-http-endpoint-1.0-SNAPSHOT.jar
  • Resources.<resource>.Properties.Environment.Variables.COUCHBASE_HOST attribute value defines the host where Couchbase is running. This can be easily deployed on EC2 as explained at Setup Couchbase.
  • Each Lambda function is triggered by an API. It is deployed using AWS API Gateway. The path is defined by Events.GetResource.Properties.Path. HTTP method is defined using Events.GetResource.Properties.Method attribute.

Java Application

The Java application that contains the Lambda functions is at github.com/arun-gupta/serverless/tree/master/aws/microservice/microservice-http-endpoint.

Lambda function that is triggered by HTTP GET method is shown:

A little bit of explanation:

  • Each Lambda function needs to implement the interface com.amazonaws.services.lambda.runtime.RequestHandler.
  • API Gateway and Lambda integration require a specific input format and output format. These formats are defined as GatewayRequest and GatewayResponse classes.
  • Function logic uses Couchbase Java SDK to query the Couchbase database. N1QL query is used to query the database. The results and exception are then wrapped in GatewayRequest and GatewayResponse.

Lambda function triggered by HTTP POST method is pretty straightforward as well:

A bit of explanation:

  • Incoming request payload is retrieved from GatewayRequest
  • Document inserted in Couchbase is returned as response.
  • Like the previous method, Function logic uses Couchbase Java SDK to query the Couchbase database. The results and exception are then wrapped in GatewayRequest and GatewayResponse.

Build the Java application as:

Upload Lambda Function to S3

SAM template reads the code from an S3 bucket. Let’s create a S3 bucket:

us-west-2 region is one of the supported regions for API Gateway. S3 bucket names are globally unique but their location is region specific.

Upload the code to S3 bucket:

The code is now uploaded to S3 bucket. SAM template is ready to be deployed!

Deploy SAM Template

Deploy the SAM template:

It shows the output:

This one command deploys Lambda functions and REST Resource/APIs that trigger these Lambda functions.

Invoke the Microservice

API Gateway publishes a REST API that can be invoked by curl, wget, AWS CLI/Console, Postman or any other app that can call a REST API. This blog will use AWS Console to show the interaction.

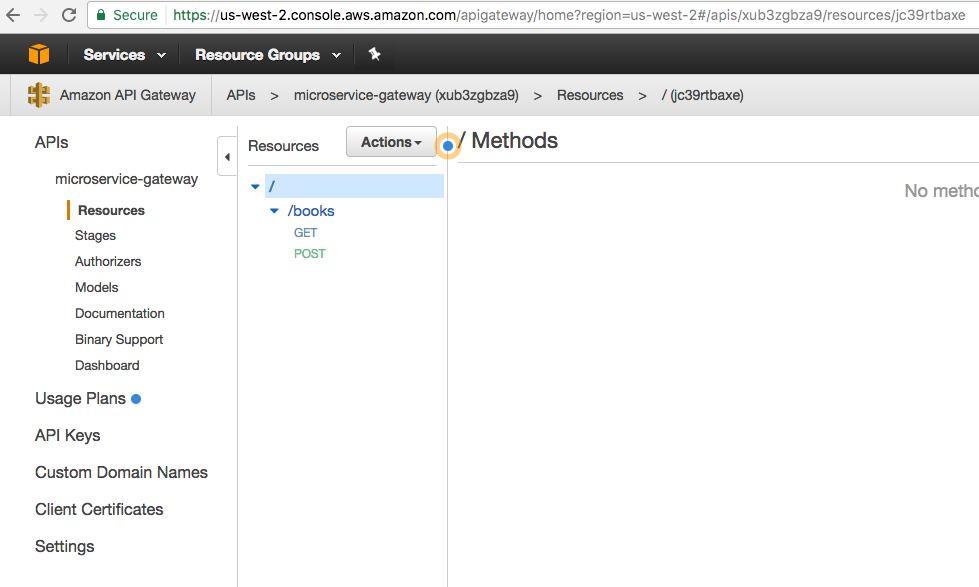
API Gateway home at us-west-2.console.aws.amazon.com/apigateway/home?region=us-west-2#/apis shows:

AWS SAM Microservice API

Click on the API to see all the APIs in this resource:

AWS SAM Microservice API Resources

Click on POST to see the default page for POST method execution:

AWS SAM Microservice API POST

Click on Test to test the API:

AWS SAM Microservice API POST Input

Add the payload in Request Body and click on Test to invoke the API. The results are shown as below:

AWS SAM Microservice API POST Output

Now click on GET to see the default execution page:

AWS SAM Microservice API GET

Click on Test to test the API:

AWS SAM Microservice API GET Input

No request body is needed, just click on Test the invoke the API. The results are as shown:

AWS SAM Microservice API GET Output

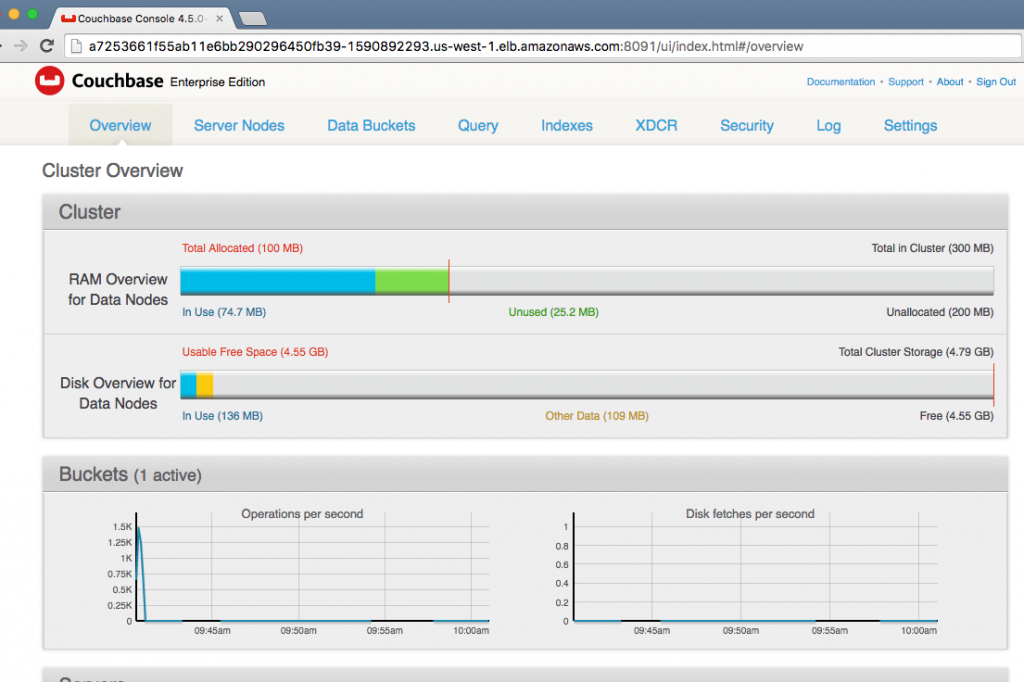
Output from the Couchbase database is shown in the Response Body.

References

  • Deploying Lambda-based Applications
  • Serverless Architectures
  • AWS API Gateway
  • Creating a simple Microservice using Lambda and API Gateway
  • Couchbase Server Docs
  • Couchbase Forums
  • Follow us at @couchbasedev

Source: blog.couchbase.com/2017/january/microservice-aws-serverless-application-model-couchbase

Microservice using AWS API Gateway, AWS Lambda and Couchbase

This blog has explained the following concepts for serverless applications so far:

  • Serverless FaaS with AWS Lambda and Java
  • AWS IoT Button, Lambda and Couchbase

The third blog in serverless series will explain how to create a simple microservice using Amazon API Gateway, AWS Lambda and Couchbase.

Read previous blogs for more context on AWS Lambda.

Amazon API Gateway is a fully managed service that makes it easy for developers to create, publish, maintain, monitor, and secure APIs at any scale. Amazon API Gateway handles all the tasks involved in accepting and processing up to hundreds of thousands of concurrent API calls, including traffic management, authorization and access control, monitoring, and API version management.

Here are the key components in this architecture:

serverless-microservice

  • Client could be curl, AWS CLI, Postman client or any other tool/API that can invoke a REST endpoint.
  • API Gateway is used to provision APIs. The top level resource is available at path /books. HTTP GET and POST methods are published for the resource.
  • Each API triggers a Lambda function. Two Lambda functions are created, book-list function for listing all the books available and book-create function to create a new book.
  • Couchbase is used as a persistence store in EC2. All the JSON documents are stored and retrieved from this database.

Let’s get started!

Create IAM Role

IAM roles will have policies and trust relationships that will allow this role to be used in API Gateway and execute Lambda function.

Let’s create a new IAM role:

--assume-role-policy-document defines the trust relationship policy document that grants an entity permission to assume the role. trust.json is at github.com/arun-gupta/serverless/blob/master/aws/microservice/trust.json and looks like:

This trust relationship allows Lambda functions and API Gateway to assume this role during execution.

Associate policies with this role as:

policy.json is at github.com/arun-gupta/serverless/blob/master/aws/microservice/policy.json and looks like:

This generous policy allows any permissions over logs generated in CloudWatch for all resources. In addition it allows all Lambda and API Gateway permissions to all resources. In general, only required policy would be given to specific resources.

Create Lambda Functions

Detailed steps to create Lambda functions are explained in Serverless FaaS with AWS Lambda and Java. Let’s create the two Lambda functions as required in our case:

Couple of key items to note in this function are:

  • IAM role microserviceRole created in previous step is explicitly specified here
  • Handler is org.sample.serverless.aws.couchbase.BucketGetAll class. This class queries the Couchbase database defined using the COUCHBASE_HOST environment variable.

Create the second Lambda function:

The handler for this function is org.sample.serverless.aws.couchbase.BucketPost class. This class creates a new JSON document in the Couchbase database identified by COUCHBASE_HOST environment variable.

The complete source code for these classes is at github.com/arun-gupta/serverless/tree/master/aws/microservice/microservice-http-endpoint.

API Gateway Resource

Create an API using Amazon API Gateway and Test It and Build an API to Expose a Lambda Function provide detailed steps and explanation on how to use API Gateway and Lambda Functions to build powerful backend systems. This blog will do a quick run down of the steps in case you want to cut the chase.

Let’s create API Gateway resources.

  1. The first step is to create an API:
    This shows the output as:
    The value of id attribute is API ID. In our case, this is lb2qgujjif.
  2. Find ROOT ID of the created API as this is required for the next AWS CLI invocation:
    This shows the output:
    Value of id attribute is ROOT ID. This is also the PARENT ID for the top level resource.
  3. Create a resource
    This shows the output:
    Value of id attribute is RESOURCE ID.

API ID and RESOURCE ID are used for subsequent AWS CLI invocations.

API Gateway POST Method

Now that the resource is created, let’s create HTTP POST method on this resource.

  1. Create a POST method
    to see the response:
  2. Set Lambda function as destination of the POST method:
    Make sure to replace <act-id> with your AWS account id. API ID and RESOURCE ID from previous section are used here as well. --uri is used to specify the URI of integration input. The format of the URI is fixed. This CLI will show the result as:
  3. Set content-type of POST method response:
    to see the response:
  4. Set content-type of POST method integration response:
    to see the response:
  5. Deploy the API
    to see the response
  6. Grant permission to allow API Gateway to invoke Lambda Function:
    Also, grant permission to the deployed API:
  7. Test the API method:
    to see the response:
    Value of status attribute is 200 and indicates this was a successful invocation. Value of log attribute shows the log statement from CloudWatch Logs. Detailed logs can also be obtained using aws logs filter-log-events --log-group /aws/lambda/MicroservicePost.
  8. This command stores a single JSON document in Couchbase. This can be easily verified using the Couchbase CLI Tool cbq.Connect to the Couchbase server as:
    Create a primary index on default bucket as this is required to query the bucket with no clauses:
  9. Write a N1QL query to access the data:
    The results show the JSON document that was stored by our Lambda function.

API Gateway GET Method

Let’s create HTTP GET method on the resource:

  1. Create a GET method:
  2. Set correct Lambda function as destination of GET:
  3. Set content-type of GET method response:
  4. Set content-type of GET method integration response:
  5. Grant permission to allow API Gateway to invoke Lambda Function
  6. Grant permission to the deployed API:
  7. Test the method:
    to see the output:
    Once again, 200 status code shows a successful invocation. Detailed logs can be obtained using aws logs filter-log-events --log-group /aws/lambda/MicroservicePost.

This blog only shows one simple POST and GET methods. Other HTTP methods can be very easily included in this microservice as well.

API Gateway and Lambda References

  • Serverless Architectures
  • AWS API Gateway
  • Creating a simple Microservice using Lambda and API Gateway
  • Couchbase Server Docs
  • Couchbase Forums
  • Follow us at @couchbasedev

Source: blog.couchbase.com/2016/december/microservice-aws-api-gateway-lambda-couchbase

AWS IoT Button, Lambda and Couchbase

Getting Started with Serverless FaaS and AWS Lambda shows how to use a simple Java function to store a JSON document to Couchbase using AWS Lambda. This blog builds upon that and shows how an AWS IoT Button can be used as a trigger for that Lambda function.

By end of this blog, you’ll learn:

  • How to configure AWS IoT Button
  • Use IoT Button as trigger for Lambda Function
  • Test IoT button

The overall flow will be:

serverless-iot-couchbase

Iot button click will invoke HelloCouchbaseLambda Lambda function. This function is uses Couchbase Java SDK to create a JSON document in Couchbase.

This blog is also playing catch up with Collecting iBeacon Data with Couchbase and Raspberry Pi IoT Devices by Nic and The CouchCase by Matthew on their summer projects. One last blog will be published in this series. That will show how multiple AWS IoT buttons can be used for some fun.

Let’s get started!

Configure IoT Button

The fastest way to configure IoT button  is using the mobile app for iOS or Android.


More details about configuring IoT Button using mobile app.

Here are some snapshots from configuring button using the mobile app.

Bring up the app, click on + to start configuring a new button:

aws-iot-button-configure-1

Enter button’s serial number:

aws-iot-button-configure-2

Register the button:

aws-iot-button-configure-3

Configure the button with wifi network:

aws-iot-button-configure-4

Upload all the certificates etc:

aws-iot-button-configure-5

After this, the button is configured and ready to use. This blog skipped the part where a template Lambda Function is associated with the button click.

If  mobile app cannot be used then the button can be configured manually.

Use IoT Button as Trigger for Lambda Function

The aws lambda create-event-source-mapping CLI allows to create an event source for Lambda function. As of AWS CLI version 1.11.21, only Amazon Kinesis stream or an Amazon DynamoDB stream can be used. But for this blog, we’ll use IoT button as a trigger. And this has to be configured using AWS Lambda Console.

IoT Button is only supported in a limited number of regions. For example, it is not supported in the us-west-1 region but us-west-2 region works.

The list of regions not supported are greyed out in the following list:

aws-iot-buttons-supported-region

Lambda Function can be triggered by several events. Lambda Function is invoked when any of these events occur. By default, no triggers are associated with a Lambda Function. For our HelloCouchbaseLambda function, these can be seen at us-west-2.console.aws.amazon.com/lambda/home?region=us-west-2#/functions/HelloCouchbaseLambda?tab=triggers.

AWS Lambda Default Triggers

Click on Add trigger to add a new trigger:

AWS Lambda Add Trigger

Select on the empty square to create a new trigger, and select AWS IoT:

AWS Lambda Add IoT Trigger

For the button previously registered, get the serial number from us-west-2.console.aws.amazon.com/iotv2/home?region=us-west-2#/thinghub:

aws-iot-things-hub

Specify the serial number of the button in the AWS IoT trigger:

aws-iot-add-trigger

Click on Submit to create the trigger:

aws-iot-added-trigger

And this confirms that the trigger has been added.

Test IoT Button

Before testing the button, let’s login to the Couchbase instance and verify the number of JSON documents in the bucket:

aws-iot-button-couchbase-console-default

This can be verified at http://<EC2-IP-Address>:8091/index.html#sec=buckets. As expected, no documents exists in the bucket.

Press the button once, and refresh the page. It shows that one document is now stored in the bucket. This is verified in the Couchbase Web Console:

aws-iot-button-couchbase-console-one-document

Click on Documents to see the complete list of documents:

aws-iot-button-couchbase-one-document-2

Click on the document ID to see more details about the document:

aws-iot-button-couchbase-one-document-details

Only timestamp is stored in this JSON document.

Now, let’s update HelloCouchbaseLambda code to include request id in the document as well. This can be achieved by adding the following line of code in the Java class:

A new deployment package can be built and uploaded using the following command:

Now clicking the button will update the number of documents. But the updated document will have an additional attribute populated as shown:

aws-iot-button-couchbase-second-document-details

How are you going to take AWS IoT button and use it with Lambda and Couchbase? Let us know at Couchbase Forums.

References

  • AWS IoT Button
  • AWS IoT Button Developer Guide
  • Couchbase Server Docs
  • Couchbase Forums
  • Follow us at @couchbasedev

Source: https://blog.couchbase.com/2016/december/aws-iot-button-lambda-couchbase

Serverless FaaS with AWS Lambda and Java

What is Serverless Architecture?

Serverless architecture runs custom code in ephemeral containers that are fully managed by a 3rd party. The custom code is typically a small part of a complete application. It is also called as function. This gives another name for serverless architecture as Function as a Service (FaaS). The container is ephemeral because it may only last for one invocation. The container may be reused but that’s not something you can rely upon. As a developer, you upload the code to FaaS platform, the service then handles all the capacity, scaling, patching and administration of the infrastructure to run your code.

An application built using Serverless Architecture follows the event-driven approach. For example, an activity happened in the application such as a click. This is

This is very different from a classical architecture where the application code is typically deployed in an application server such as Tomcat or WildFly. Scaling your application means starting additional instances of the application server or spinning up additional containers with the packaged application server. The Load Balancer need to be updated with the new IP addresses. Operating system need to be patched, upgraded and maintained.

Serverless Architectures explain the difference between the classical programming model and this new serverless architecture.

FaaS platform takes your application is divided into multiple functions. Each function is deployed in FaaS. The service spins up additional compute instances to meet the scalability demands of your application. FaaS platform provides the execution environment and takes care of starting and tearing down the containers to run your function.

Read Serverless Architectures for more details about these images.

One of the big advantages of FaaS is that you are only charged for the compute time, i.e. the time your code is running. There is no charge when your code is not running.

Another way to look at how Functions are different from VMs and Containers:

vm-containers-serverless

Note that Linux containers instead of Docker containers are used as an implementation for AWS Lambda.

How is FaaS different from PaaS?

As quoted at Serverless Architectures, a quick answer is provided by the following tweet:

In other words most PaaS applications are not geared towards bringing entire applications up and down for every request, whereas FaaS platforms do exactly this.

Abstracting the Back-end with FaaS explain the difference with different *aaS offerings. The image from the blog is captured below:

faas

Serverless Architectures also provide great details about what FaaS is and is not.

AWS Lambda, Google Cloud Functions and Azure Functions are some of the options for running serverless applications.

This blog will show how to write your first AWS Lambda function.

What is AWS Lambda?

AWS Lambda is FaaS service from Amazon Web Services. It runs your code on a high-availability compute infrastructure and performs all of the administration of the compute resources, including server and operating system maintenance, capacity provisioning and automatic scaling, code monitoring and logging.

AWS Lambda charges you for the duration your code runs in increments of 100ms. There is no cost associated with storing the Lambda function in AWS. First million requests per month are free and the pricing after that is nominal. Read more details on Lambda pricing. It also provides visibility into performance by providing real time metrics and logs to AWS CloudWatch. All you need to do is write the code!

Here is a quick introduction:

Also check out What’s New in AWS Lambda from AWS ReInvent 2016:

Also checkout Serverless Architectural Patterns and Best Practices from AWS ReInvent 2016:

The code you run on AWS Lambda is called a Lambda Function. You upload your code as a zip file or design it using the AWS Lambda Management Console. There is a built-in support for AWS SDK and this simplifies the ability to call other AWS services.

In short, Lambda is scalable, serverless, compute in the cloud.

AWS Lambda provides several execution environments:

  • Node.js – v0.10.36, v4.3.2 (recommended)
  • Java – Java 8
  • Python – Python 2.7
  • .NET Core – .NET Core 1.0.1 (C#)

This blog will show:

  • Build a Java application that stores a JSON document to Couchbase
  • Use Maven to create a deployment package for Java application
  • Create a Lambda Function
  • Update the Lambda Function

The complete code in this blog is available at github.com/arun-gupta/serverless/tree/master/aws/hellocouchbase.

Java Application for AWS Lambda

First, lets look at a Java application that will be used for this Lambda function. Programming Model for Lambda Functions in Java provide more details about how to write your Lambda function code in Java.

Our Lambda function will implemented the pre-defined interface com.amazonaws.services.lambda.runtime.RequestHandler. The code looks like:

handleRequest method is where the function code is implemented. Context provides useful information about Lambda execution environment. Some of the information from the context is stored a JSON document. Finally, Couchbase Java SDK API upsert is used to write a JSON document to the identified Couchbase instance. Couchbase on Amazon EC2 provide complete instructions to install Couchbase on AWS EC2.

Information about the Couchbase server is obtained as:

This is once again using Couchbase Java API CouchbaseCluster as a main entry point to the Couchbase cluster. The COUCHBASE_HOST environment variable is passed when the Lambda function is created. In our case, this would point to a single node Couchbase cluster running on AWS EC2. Environment variables were recently introduced in AWS Lambda.

Finally, you need to access bucket in the server:

The bucket name is serverless and all JSON documents are stored in this.

A simple Hello World application may be used for creating this function as well.

Create AWS Lambda Deployment Package

AWS Lambda function needs a deployment package. This package is either a .zip or .jar file that contains all the dependencies of the function. Our application is packaged using Maven, and so we’ll use a Maven plugin to create a deployment package.

The application has pom.xml with the following plugin fragment:

More details about Maven configuration are available in Creating a .jar Deployment Package Using Maven without any IDE. The maven-shade-plugin allows to create an uber-jar including all the dependencies. The shade goal is tied to the package phase. So the mvn package command will generate a single deployment jar.

Package the application using mvn package command. This will show the output:

The target/hello-couchbase-1.0-SNAPSHOT.jar is the shaded jar that will be deployed to AWS Lambda.

More details about creating a deployment package are at Creating a Deployment Package.

Create AWS Lambda Function

Create AWS Lambda Function using AWS CLI. The CLI command in this case looks like:

In this CLI:

  • create-function creates a Lambda function
  • --function-name provides the function name. The function name is case sensitive.
  • --role specifies Amazon Resource Name (ARN) of an IAM role that Lambda assume when it executes your function to access any other AWS resources. If you’ve executed a Lambda function using AWS Console then this role is created for you.
  • --zip-file points to the deployment package that was created in previous step. fileb is an AWS CLI specific protocol to indicate that the content uploaded is binary.
  • --handler is the Java class that is called to begin execution of the function
  • --publish request AWS Lambda to create the Lambda function and publish a version as an atomic operation. Otherwise multiple versions may be created and may be published at a later point.

Lambda Console shows:

servleress-couchbase-lambda-function

Test AWS Lambda Function

Test the AWS Lambda Function using AWS CLI.

It shows the output as:

The output from the command is stored in hellocouchbase.out and looks like:

Invoking this function stores a JSON document in Couchbase. Documents stored in Couchbase can be seen using Couchbase Web Console. The password is Administrator and password is the EC2 instance id.

All data buckets in this Couchbase instance are shown below:

serverless-couchbase-bucket-overview

Note that the serverless bucket is manually created.

Clicking on Documents shows details of different documents stored in the bucket:

serverless-couchbase-bucket-documents

Clicking on each document shows more details about the JSON document:

serverless-couchbase-bucket-document

Lambda function can also be tested using the Console:

serverless-couchbase-console-test

Update AWS Lambda Function

If the application logic changes then a new deployment package needs to be uploaded for the Lambda function. In this case, mvn package will create a deployment package and aws lambda CLI command is used to update the function code:

Shows the result:

The function can then be invoked again.

During writing of this blog, this was often used to debug the function as well. This is because Lambda functions do not have any state or box associated with them. And so you cannot log in to a box to check out if the function did not deploy correctly. You can certainly use CloudWatch log statements once the function is working.

AWS Lambda References

  • Serverless Architectures
  • AWS Lambda: How it works
  • Couchbase Server Docs
  • Couchbase Forums
  • Follow us at @couchbasedev

Source: https://blog.couchbase.com/2016/december/serverless-faas-aws-lambda-java

Stateful Containers on Kubernetes using Persistent Volume and Amazon EBS

This blog will show how to create stateful containers in Kubernetes using Amazon EBS.

Couchbase is a stateful container. This means that state of the container needs to be carried with it. In Kubernetes, the smallest atomic unit of running a container is a pod. So a Couchbase container will run as a pod. And by default, all data stored in Couchbase is stored on the same host.

stateful containers

This figure is originally explained in Kubernetes Cluster on Amazon and Expose Couchbase Service. In addition, this figure shows storage local to the host.

Pods are ephemeral and may be restarted on a different host. A Kubernetes Volume outlives any containers that run within the pod, and data is preserved across container restarts. However the volume will cease to exist when a pod ceases to exist. This is solved by Persistent Volumes that provide persistent, cluster-scoped storage for applications that require long lived data.

Creating and using a persistent volume is a three step process:

  1. Provision: Administrator provision a networked storage in the cluster, such as AWS ElasticBlockStore volumes. This is called as PersistentVolume.
  2. Request storage: User requests storage for pods by using claims. Claims can specify levels of resources (CPU and memory), specific sizes and access modes (e.g. can be mounted once read/write or many times write only). This is called as PersistentVolumeClaim.
  3. Use claim: Claims are mounted as volumes and used in pods for storage.

Specifically, this blog will show how to use an AWS ElasticBlockStore as PersistentVolume, create a PersistentVolumeClaim, and then claim it in a pod.

stateful containers

Complete source code for this blog is at: github.com/arun-gupta/couchbase-kubernetes.

Provision AWS Elastic Block Storage

Following restrictions need to be met if Amazon ElasticBlockStorage is used as a PersistentVolume with Kubernetes:

  • the nodes on which pods are running must be AWS EC2 instances
  • those instances need to be in the same region and availability-zone as the EBS volume
  • EBS only supports a single EC2 instance mounting a volume

Create an AWS Elastic Block Storage:

The region us-west-2 region and us-west-2a availability zone is used here. And so Kubernetes cluster need to start in the same region and availability zone as well.

This shows the output as:

Check if the volume is available as:

It shows the output as:

Note the unique identifier for the volume in VolumeId attribute. You can also verify the EBS block in AWS Console:

kubernetes-pv-couchbase-amazon-ebs

Start Kubernetes Cluster

Download Kubernetes 1.3.3, untar it and start the cluster on Amazon:

Three points to note here:

  • Zone in which the cluster is started is explicitly set to us-west-1a. This matches the zone where EBS storage volume was created.
  • By default, each node size is m3.medium. Here is is set to m3.large.
  • By default, 1 master and 4 worker nodes are created. Here only 3 worker nodes are created.

This will show the output as:

Read more details about starting a Kubernetes cluster on Amazon.

Couchbase Pod w/o Persistent Storage

Let’s create a Couchbase pod without persistent storage. This means that if the pod is rescheduled on a different host then it will not have access to the data created on it.

Here are quick steps to run a Couchbase pod and expose it outside the cluster:

Read more details at Kubernetes cluster at Amazon.

The last command shows the ingress load balancer address. Access Couchbase Web Console at <ip>:8091.

kubernetes-pv-couchbase-amazon-elb

Login to the console using Administrator login and password password.

The main page of Couchbase Web Console shows up:

kubernetes-pv-couchbase-amazon-web-console

A default travel-sample bucket is already created by arungupta/couchbase image. This bucket is shown in the Data Buckets tab:

kubernetes-pv-couchbase-amazon-databucket

Click on Create New Data Bucket button to create a new data bucket. Give it a name k8s, take all the defaults, and click on Create button to create the bucket:

kubernetes-pv-couchbase-amazon-k8s-bucket

Created bucket is shown in the Data Buckets tab:

kubernetes-pv-couchbase-amazon-k8s-bucket-created

Check status of the pod:

Delete the pod:

Watch the new pod being created:

Access the Web Console again and see that the bucket does not exist:

kubernetes-pv-couchbase-amazon-k8s-bucket-gone

Let’s clean up the resources created:

Couchbase Pod with Persistent Storage

Now, lets expose a Couchbase pod with persistent storage. As discussed above, lets create a PersistentVolume and claim the volume.

Request storage

Like any other Kubernetes resources, a persistent volume is created by using a resource description file:

The important pieces of information here are:

  • Creating a storage of 5 GB
  • Storage can be mounted by only one node for reading/writing
  • specifies the volume id created earlier

Read more details about definition of this file at kubernetes.io/docs/user-guide/persistent-volumes/.

This file is available at: github.com/arun-gupta/couchbase-kubernetes/blob/master/pv/couchbase-pv.yml.

The volume itself can be created as:

and shows the output:

Use claim

A PersistentVolumeClaim can be created using this resource file:

In our case, both PersistentVolume and PersistentVolumeClaim are 5 GB but they don’t have to be.

Read more details about definition of this file at kubernetes.io/docs/user-guide/persistent-volumes/#persistentvolumeclaims.

This file is at github.com/arun-gupta/couchbase-kubernetes/blob/master/pv/couchbase-pvc.yml.

The claim can be created as:

and shows the output:

Create RC with Persistent Volume Claim

Create a Couchbase Replication Controller using this resource file:

Key parts here are:

  • Resource defines a Replication Controller using arungupta/couchbase Docker image
  • volumeMounts define which volumes are going to be mounted. /opt/couchbase/var is the directory where Couchbase stores all the data.
  • volumes define different volumes that can be used in this RC definition

Create the RC as:

and shows the output:

Check for pod as kubectl.sh get -w po to see:

Expose RC as a service:

Get all the services:

Describe the service as kubectl.sh describe svc couchbase to see:

Wait for ~3 mins for the load balancer to settle. Access the Couchbase Web Console at <ingress-lb>:8091. Once again, only travel-sample bucket exists. This is created by arungupta/couchbase image used in the RC definition.

Show Stateful Containers

Lets create a new bucket. Give it a name kubernetes-pv, take all defaults and click on Create button to create the bucket.

kubernetes-pv-couchbase-amazon-kubernetes-pv-bucket

The bucket now shows up in the console:

kubernetes-pv-couchbase-amazon-kubernetes-pv-bucket-created

Terminate Couchbase pod and see the state getting restored.

Get the pods again:

Delete the pod:

Pod gets recreated:

And now when you access the Couchbase Web Console, the earlier created bucket still exists:

kubernetes-pv-couchbase-amazon-kubernetes-pv-bucket-still-thereThat’s because the data was stored in the backing EBS storage.

Cleanup Kubernetes Cluster

Shutdown Kubernetes cluster:

And detach the volume:

Complete source code for this blog is at: github.com/arun-gupta/couchbase-kubernetes.

Enjoy!

Source: blog.couchbase.com/2016/july/stateful-containers-kubernetes-amazon-ebs

Couchbase Docker Container on Amazon ECS

This blog will explain how to run a Couchbase Docker container using Amazon EC2 Container Service (Amazon ECS).

Many thanks to @moviolone for helping understand the concepts and getting this setup running.

What is Amazon ECS?

Amazon ECS is a container management service that makes it easy to run, stop, and manage Docker containers on a cluster of Amazon EC2 instances. Amazon ECS integrates well with rest of the AWS infrastructure and eliminates the need to operate your own cluster or configuration management systems.

ec2-container-service

One obvious question to wonder is how is this different from other container orchestration frameworks like Docker Swarm, Kubernetes, or Mesos. The first big difference is that each of these frameworks are open source. Amazon uses a proprietary orchestration framework at this time.

A big advantage of ECS is that just like rest of the AWS infrastructure, this is a managed service. And so you only need to worry about deploying your containers without worrying about the infrastructure.

A better comparison of ECS is with Docker for AWS/Azure (backed by newly introduced Swarm Mode in Docker), Google Container Engine (backed by Kubernetes), DC/OS (backed by Mesos) as they are managed services as well.

An advantage point of ECS is that it seamlessly integrates with AWS infrastructure such as deploying container instances using CloudFormation templates, scaling containers using Autoscaling Group, port mapping using Security Groups, manage incoming container traffic using Elastic Load Balancer, viewing logs using CloudWatch and others.

If you are already bought in the Amazon infrastructure, then ECS sounds like a good fit. Docker for AWS, announced at DockerCon, is also a similar offering in this space.

However, there are a couple of cons that you need to be aware of as well:

  • Portability – Application designed Docker Swarm, Kubernetes and Mesos can run on a variety of platforms, such as Amazon, Azure, GCE, OpenStack, on-prem, VMWare, bare metal data centers, etc. But ECS is tied to Amazon only. Do you consider that as a vendor lock-in?
    Amazon may release their orchestration platform or scheduler as a standalone product, but that’s not very typical.
  • Container format – ECS service is focused on Docker containers only. For all practical purposes, at least today, this may be perfectly fine. I’ve not heard or seen any deployments of Rkt or any other container formats. However, this may change once OCI-compliant runtimes start showing up in the future.

One last thing, before we dig in the concepts and code, there is no additional charge for Amazon EC2 Container Service. You pay for AWS resources (e.g. EC2 instances or EBS volumes) you create to store and run your application.

Amazon ECS Concepts

Here is an overview of the key concepts in ECS:

amazon-ecs-concepts

  • Container Instance: An AMI instance that is primed for running containers. By default, each Amazon instance uses Amazon ECS-Optimized Linux AMI. This is the recommended image to run ECS container service. The key components of this base image are:
    • Amazon Linux AMI
    • Amazon ECS Container Agent – It manages containers lifecycle on behalf of ECS and allows them to connect to the cluster.
    • Docker Engine (as of this writing, this is version 1.11.1)

    Other images like CoreOS, Suse or Ubuntu can be configured to meet Container Instance AMI specification. This can be done because ECS Agent code is available in open source.

  • Task: A task is defined as a JSON file and describes an application that contains one or more container definitions. This usually points to Docker images from a registry, port/volume mapping, etc.
  • Service: ECS maintains the “desired state” of your application. This is achieved by creating a service. A service specifies the number of instances of a task definition that needs to run at a given time. If the task in a service becomes unhealthy or stop running, then the service scheduler will bounce the task. It ensures that the desired and actual state are match. This is what provides resilience in ECS.New tasks within a Service are balanced across Availability Zones in your cluster. Service scheduler figures out which container instances can meet the needs of a service and schedules it on a valid container instance in an optimal Availability Zone (one with the fewest number of tasks running).

Getting Started with Amazon EC2 Container Service

Login to your AWS EC2 console and click on the EC2 Container Service:

aws-ec2-container-1

Click on the Get started button to define your application.

Create ECS Task

In ECS, Docker workloads are defined as tasks. A task can contain multiple containers. All containers for a task are co-located on the same machine.

Enter the values as shown:

aws-ec2-container-2

Few items specified in this step:

  • Task definition is description of an application that contains one or more container definitions.
  • Container name is the name that will be given to the container started as part of this task.
  • Image allows to specify one or more images that need to be started as containers as part of this application. The image specified here uses couchbase:latest as the base image and uses Couchbase REST API to configure the server. Dockerfile for this image provide more details about how this image is prepared.
  • Maximum memory is the memory that needs to be allocated for the container (equivalent to -m Docker CLI switch). Couchbase needs 1GB for running in dev and so that is specified here.
  • And finally the port mappings (-p on Docker CLI). Port 8091 is needed for Couchbase administration.

More details about these is available in Task Definition Parameters.

Create ECS Service


Click on Next step to configure a service.

aws-ec2-container-3

Give a service name. The desired state can be specified here. For now, we’ll keep it simple and launch a single node Couchbase container. And since the desired state is run a single container, no ELB is required.

More details about these is available in Service Definition Parameters.

Create ECS Cluster

Tasks run on a container instance, and these instances need to register in a cluster. This allows us to scale the cluster up/down later to accommodate for running more containers.

Click on Next step to configure the cluster.

aws-ec2-container-4

In this image:

  • Take the default cluster name
  • A homogenous cluster of container instances is created. m3.medium is a good size to run Couchbase node
  • Choose a previously created security key. This will allow to open a ssh connection to the container instance
  • A new IAM role will be created to allow ECS agent to communicate with ECS service

Container instances in a cluster can span multiple availability zones and be balanced with ELB.

Review all the specified options:

aws-ec2-container-5

Click on Launch instance & run service button to start the service.

The following status is shown after the service is created:

aws-ec2-container-6

The output shows that the cluster, service and task definitions are created. It takes a few minutes for the instances to be provisioned and initializedand tasks to run on them.

View ECS Service and Task

Click on View Service button to see the newly created service.

aws-ec2-container-7

Few things in this image:

  • The service shows the task definition couchbase:6. Each service is assigned a task definition and multiple versions are indicated by the trailing number at the end. In this case, a few versions were created earlier but otherwise the version number starts from 1.
  • Desired and Running count is shown as 1.
  • Minimum healthy percent and Maximum percent are used if a new version of task definition needs to be deployed. With 100% and 200% corresponding values, a new version of the task will be deployed first and then the older versions will be terminated. We’ll play with these numbers in a subsequent blog.
  • Running task is shown towards bottom of the screen. Click on the UUID to learn more about the running task.

aws-ec2-container-8

Task definition shows EC2 instance where it is running, current status, port mapping and several other useful information. The critical piece that we need to look at is the External Link. This URL is where our Couchbase Web Console will be accessible.

Couchbase Web Console

Clicking on this link will open a new tab with Couchbase Web Console:

aws-ec2-container-10


Enter the login as Administrator and password as password. These are configured in arungupta/couchbase image.

And here you see Couchbase Web Console in full glory!

aws-ec2-container-11

This blog explained how to run a Couchbase Docker container using Amazon ECS.

Future blogs will show …

  • Setup a Couchbase cluster using ECS
  • Deploy a multi-container application using Docker Compose (v2 is now supported)
  • Setup ECS cluster using CLI

Amazon ECS and Couchbase References

  • EC2 Container Service Docs
  • Getting Started with ECS Tutorial
  • ECS Application Architecture
  • Couchbase on Containers
  • Couchbase Server Portal

Source: blog.couchbase.com/2016/july/couchbase-docker-container-amazon-ecs

Getting Started with Docker for AWS and Scaling Nodes

This blog will explain how to get started with Docker for AWS and deploy a multi-host Swarm cluster on Amazon.

Docker Logo

amazon-web-services-logo

Many thanks to @friism for helping me debug through the basics!

boot2docker -> Docker Machine -> Docker for Mac

Are you packaging your applications using Docker and using boot2docker for running containers in development? Then you are really living under a rock!

It is highly recommended to upgrade to Docker Machine for dev/testing of Docker containers. It encapsulates boot2docker and allows to create one or more light-weight VMs on your machine. Each VM acts as a Docker Engine and can run multiple Docker Containers. Running multiple VMs allows you to setup multi-host Docker Swarm cluster on your local laptop easily.

Docker Machine is now old news as well. DockerCon 2016 announced public beta of Docker for Mac. This means anybody can sign up for Docker for Mac at docker.com/getdocker and use it for dev/test of Docker containers. Of course, there is Docker for Windows too!

Docker for Mac is still a single host but has a swarm mode that allows to initialize it as a single node Swarm cluster.

What is Docker for AWS?

So now that you are using Docker for Mac for development, what would be your deployment platform? DockerCon 2016 also announced Docker for AWS and Azure Beta.

Docker for AWS and Azure both start a fleet of Docker 1.12 Engines with swarm mode enabled out of the box. Swarm mode means that the individual Docker engines form into a self-organizing, self-healing swarm, distributed across availability zones for durability.

Only AWS and Azure charges apply, Docker for AWS and Docker for Azure are free at this time. Sign up for Docker for AWS and Azure at beta.docker.com. Note, that it is a restricted availability at this time.

Once your account is enabled, then you’ll get an invitation email as shown below:

docker-aws-invite

Docker for AWS CloudFormation Values

Click on Launch Stack to be redirected to the CloudFormation template page.

Take the defaults:
docker4aws-1

S3 template URL will be automatically populated, and is hidden here.

Click on Next. This page allows you to specify details for the CloudFormation template:
docker4aws-2

The following changes may be made:

  • Template name
  • Number of manager and worker nodes, 1 and 3 in this case. Note that only odd number of managers can be specified. By default, the containers are scheduled on the worker nodes only.
  • AMI size of master and worker nodes
  • A key already configured in your AWS account

Click on Next and take the defaults:
docker4aws-3

Click on Next, confirm the settings:
docker4aws-4

docker4aws-5

Select IAM resources checkbox and click on Create button to create the CloudFormation template.

It took ~10 mins to create a 4 node cluster (1 manager + 3 worker):docker4aws-6

More details about the cluster can be seen in EC2 Console:docker4aws-7

Docker for AWS Swarm Cluster Details

Output tab of EC2 Console shows more details about the cluster:docker4aws-8

More details about the cluster can be obtained in two ways:

  • Log into the cluster using SSH
  • Create a tunnel and then configure local Docker CLI

Create SSH Connection to Docker for AWS

Login using command shown in the Value column of the Output tab.

Create a SSH connection as:

Note, that we are using the same key here that was specified during CloudFormation template. The list of containers can then be seen using docker ps command:

Create SSH Tunnel to Docker for AWS

Alternatively, a SSH tunnel can be created as:

Setup DOCKER_HOST:

The list of containers can be seen as above using docker ps command. In addition, more information about the cluster can be obtained using docker info command:

Here are some key details from this output:

  • 4 nodes and 1 manager, and so that means 3 worker nodes
  • All nodes are running Docker Engine version 1.12.0-rc3
  • Each VM is created using Alpine Linux 3.4

Scaling Worker Nodes in Docker for AWS

All worker nodes are configured in an AWS AutoScaling Group. Manager node is configured in a separate AWS AutoScaling Group.

docker4aws-9

This first release allows you to scale the worker count using the the Autocaling group. Docker will automatically join or remove new instances to the Swarm. Changing manager count live is not supported in this release.

Select the AutoScaling group for worker nodes to see complete details about the group:

docker4aws-10

Click on Edit button to change the number of desired instances to 5, and save the configuration by clicking on Save button:

docker4aws-11

It takes a few seconds for the new instances to be provisioned and auto included in the Docker Swarm cluster. The refreshed Autoscaling group is shown as:

docker4aws-12

And now docker info command shows the updated output as:

This shows that there are a total of 6 nodes with 1 manager.

Docker for AWS References

  • Docker for AWS and Azure Announcement Blog
  • Docker for AWS and Azure
  • Docker for AWS Release Notes

Source: blog.couchbase.com/2016/july/docker-for-aws-getting-started-scaling-nodes

Couchbase Cluster on Amazon using CLI

Couchbase on Amazon Marketplace showed how to setup a single Couchbase node using EC2 Console. But typically you provision these nodes en masse, and more commonly create a cluster of them. Couchbase clusters are homogenous, scales horizontally and thus ensure that database does not become a bottleneck for your high performing application.

This blog will show how to create, scale, and rebalance a Couchbase cluster using AWS Command Line Interface (CLI).

Install AWS CLI

Install the AWS CLI provide complete details, but here is what worked on my machine:

Configure the CLI:

Enter your access key id and secret access key. These can be obtained as explained in Getting Your Access Key Id and Secret Access Key.

Create AWS Security Group

If you provisioned a server earlier using Amazon 1-click then a security group by the name Couchbase Server Community Edition-4-0-0-AutogenByAWSMP- is created for you. This security group has all the ports authorized required for creating a Couchbase cluster and can be used for creating the instance.

Alternatively, you can create a new security group and explicitly authorize ports.

Create a security group:

Authorize ports in the security group:

Create an AWS Key Pair

Read more about creating key pair. Create a key pair:

Note the key name as that will be used later.

Create Couchbase Nodes on Amazon

Create two instances using the newly created security group as:

Note, the number of instances are specified using --count 2.

AMI ID can be obtained using EC2 console: https://us-west-1.console.aws.amazon.com/ec2/v2/home?region=us-west-1#Images:visibility=public-images;search=couchbase;sort=desc:name.

Or create two instances using the pre-created security group as:

This will show the output as:

Status of the instances can be checked as:

And shows the output as:

Here the status is shown as initializing. It takes a few minutes for the instances to be provisioned. Instances that have passed all the checks can be verified as:

At first, it shows the result as:

But once all the instances pass the check, then the results look like:

Here the status is shown as passed.

Configure Couchbase Nodes

Each Couchbase node needs to be provisioned with the following details:

  • Memory
  • Services (index, data and query)
  • Auth credentials (username: Administrator, password: password)
  • Loads travel-sample bucket

This can be done using the script:

This is available at: https://github.com/arun-gupta/couchbase-amazon/blob/master/configure-instance.sh.

It can be invoked as:

And shows the output as:

This is invoking Couchbase REST API to configure each Couchbase node.

Now that each Couchbase node is configured, lets access them. Find public IP address of the instances:

It shows the output as:

Pick one of the IP addresses and access it at <public-ip-1>:8091 to see the output:
couchbase-aws-cli-1

Each Couchbase node is configured with username as Administrator and password as password. Entering the credentials shows Couchbase Web Console:
couchbase-aws-cli-2

Click on Server Nodes to see that only a single node is in the cluster:
couchbase-aws-cli-3

Create and Rebalance Couchbase Cluster

All Couchbase server nodes are created equal. This allows the Couchbase cluster to truly scale horizontally to meet your growing application demands. Independently running Couchbase nodes can be added to a cluster by invoking the server-add CLI command.

This is typically a two step process. The first step is to add one or more nodes. The second step is to rebalance the cluster where data on the existing nodes is rebalanced across the updated cluster.

In our case, a Couchbase node is running on each AMI. Lets pick IP address of any one Couchbase node and add IP address of the other node. This can be done using the script:

This script is available at https://github.com/arun-gupta/couchbase-amazon/blob/master/create-cluster.sh and can be invoked as:

And shows the output as:

Couchbase Web Console is updated to show:
couchbase-aws-cli-4

Finally, rebalance the cluster using the script:

This shows the output as:

Couchbase Web Console is now updated:

couchbase-aws-cli-5

Once the cluster is up and running, try out Hello Couchbase Example.

Terminate Couchbase Nodes

Finally, killing the cluster is fairly straight forward:

This blog showed how to spin up, scale and rebalance a Couchbase cluster using AWS CLI. All scripts are available at https://github.com/arun-gupta/couchbase-amazon.

Further references …

  • Couchbase Server Developer Portal
  • Hello Couchbase Example
  • Questions on StackOverflow, Forums or Slack Channel
  • Follow us @couchbasedev
  • Couchbase 4.5 Beta

Source: http://blog.couchbase.com/2016/may/couchbase-cluster-amazon-using-cli

Couchbase on Amazon Marketplace

Couchbase Server can be easily downloaded and installed on your local machine. However a common way to run it is on Amazon. This blog will explain how you can run Couchbase on Amazon.

Couchbase Server can be easily launched on Amazon Web Services using Couchbase on AWS Marketplace. Click on Continue and review the settings in 1-Click Launch as shown below:

couchbase-amazon-oneclick-1

This is using Couchbase Server 4.0 Community Edition and an m3.large instance.

couchbase-amazon-oneclick-2

A new security group with all the relevant ports exposed will be automatically created. This group’s name is Couchbase Server Community Edition-4-0-0-AutogenByAWSMP-. This group is created once and can be repurposed if you launch another instance.

You may have to create a new key pair as explained here.

Click on “Accept Software Terms and Launch with 1-click”. The following confirmation window will be shown:

couchbase-amazon-oneclick-3

Wait for a few minutes for the image to be provisioned. AWS EC2 Console should show the status as  “2/2 checks passed” as shown:

couchbase-amazon-oneclick-4

Get the public DNS address and access Couchbase at http://<public-dns-address>:8091. In our case, this will be http://ec2-54-153-6-241.us-west-1.compute.amazonaws.com:8091/index.html. Note, that this instance is now shutdown and so is not available 😉

Couchbase on Amazon Usage Instructions provide more details about how to use Couchbase on Amazon.

<public-ip-address>:8091 shows a login screen. A default username is Administrator and the password is your instance id:

couchbase-amazon-oneclick-5

And clicking on Sign In shows the Couchbase Web Console:

couchbase-amazon-oneclick-6

Further references …

  • Couchbase Server Developer Portal
  • Couchbase Downloads
  • Couchbase Server Developer Portal
  • Questions on StackOverflow, Forums or Slack Channel
  • Follow us @couchbasedev
  • Couchbase 4.5 Beta

Enjoy!

Run #Couchbase on #Amazon Market Place using 1-click Click To Tweet

Source: https://blog.couchbase.com/2016/may/couchbase-amazon-marketplace

Kubernetes Cluster on Amazon and Expose Couchbase Service

This blog is part of a multi-part blog series that shows how to run your applications on Kubernetes. It will use the Couchbase, an open source NoSQL distributed document database, as the  Docker container.

The first part (Couchbase on Kubernetes) explained how to start the Kubernetes cluster using Vagrant. That is a simple and easy way to develop, test, and deploy Kubernetes cluster on your local machine. But this could be of limited use rather soon as the resources are constrained by the local machine. So what do you do?

Kubernetes cluster can be installed on Amazon as well. This second part will show:

  • How to setup and start the Kubernetes cluster on Amazon Web Services
  • Run Docker container in the Kubernetes cluster
  • Expose Pod on Kubernetes as Service
  • Shutdown the cluster

Here is a quick overview:

Kubernetes Cluster on Amazon with Couchbase

Let’s dig into the details!

Setup Kubernetes Cluster on Amazon Web Services

Getting Started on AWS EC2 provide complete instructions to start Kubernetes cluster on Amazon. Make sure to have the pre-requisites (AWS account, AWS CLI, Full EC2 access) met before you follow these instructions.

Kubernetes cluster can be created on Amazon as:

By default, this provisions a new VPC and a 4 node Kubernetes cluster in us-west-2a (Oregon) with t2.micro instances running on Ubuntu. This means 5 AMIs (one for master and 4 for the worker nodes) are created. Some properties that are worth updating:

  • Set NUM_MINIONS environment variable to whatever number of nodes are required in the cluster. Set it to 2 if you want only two worker nodes to be created.
  • Each instance size is 1.1.x is t2.micro. Set MASTER_SIZE and MINION_SIZE environment variables to m3.medium otherwise the nodes are going to crawl.

If you downloaded Kubernetes from github.com/kubernetes/kubernetes/releases, then all the values can be changed in cluster/aws/config-default.sh.

Starting Kubernetes on Amazon shows the following log:

Amazon Console shows:

Kubernetes Cluster on Amazon

Three instances are created as shown – one for master node and two for worker nodes.

Username and password for the Kubernetes master are stored in /Users/arungupta/.kube/config. Look for a section like:

Run Docker container in Kubernetes Cluster on Amazon

Now that the cluster is up and running, get a list of all the nodes:

It shows two worker nodes.

Create a new Couchbase pod:

Notice, how the image name can be specified on the CLI. This command creates a Replication Controller with a single pod. The pod uses arungupta/couchbase Docker image that provides a pre-configured Couchbase server. Any Docker image can be specified here.

Get all the RC resources:

This shows the Replication Controller that is created for you.

Get all the Pods:

The output shows the Pod that is created as part of the Replication Controller.

Get more details about the Pod:

Expose Pod on Kubernetes as Service

Now that our pod is running, how do I access the Couchbase server?

You need to expose it outside the Kubernetes cluster.

The kubectl expose command takes a pod, service or replication controller and expose it as a Kubernetes Service. Let’s expose the replication controller previously created and expose it:

Get more details about the Service:

The Loadbalancer attribute Ingress gives you the address of the load balancer that is now publicly accessible.

Wait for 3 minutes to let the load balancer settle down. Access it using port 8091 and the login page for Couchbase Web Console shows up:

Kubernetes on Amazon - Couchbase Login Page

Enter the credentials as “Administrator” and “password” to see the Web Console:

Kubernetes on Amazon - Couchbase Web Console

And so you just accessed your pod outside the Kubernetes cluster.

Shutdown Kubernetes Cluster

Finally, shutdown the cluster using cluster/kube-down.sh script.

For a complete clean up, you still need to explicitly delete the S3 bucket where Kubernetes binaries are stored.

Enjoy!

Source: http://blog.couchbase.com/2016/march/kubernetes-cluster-amazon-expose-service

Couchbase Cloud Recipes – Pick your favorite!

Couchbase 4.x Quick Installation provide instructions to install Couchbase on your local machine.

Would you like to run Couchbase 4.x in cloud? There are plenty of recipes available!

Couchbase Cloud Recipes

Looking for detailed instructions on Couchbase Cloud Recipes?

  • Digital Ocean
  • Jelastic
  • OpenShift
  • Docker
  • BigStep
  • Vagrant
  • Kubernetes
  • Joyent Triton
  • Amazon Web Services
  • Microsoft Azure
  • CoreOS and Kubernetes

Read more about it in Couchbase Cloud Deployments. Are there any other cloud/hosting solution where you you would like to see Couchbase running? Did I miss one where Couchbase already runs?

How is your experience of running Couchbase in the cloud?

Couchbase partners provide a complete list of partners.

As always, talk to us using StackOverflow or Forums.