This blog will show how to create stateful containers in Kubernetes using Amazon EBS.
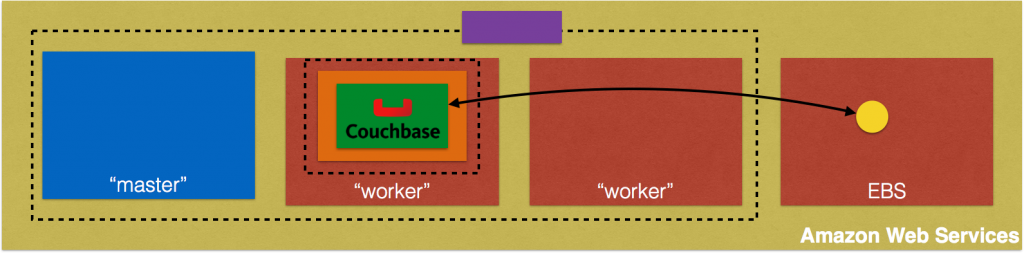
Couchbase is a stateful container. This means that state of the container needs to be carried with it. In Kubernetes, the smallest atomic unit of running a container is a pod. So a Couchbase container will run as a pod. And by default, all data stored in Couchbase is stored on the same host.

This figure is originally explained in Kubernetes Cluster on Amazon and Expose Couchbase Service. In addition, this figure shows storage local to the host.
Pods are ephemeral and may be restarted on a different host. A Kubernetes Volume outlives any containers that run within the pod, and data is preserved across container restarts. However the volume will cease to exist when a pod ceases to exist. This is solved by Persistent Volumes that provide persistent, cluster-scoped storage for applications that require long lived data.
Creating and using a persistent volume is a three step process:
- Provision: Administrator provision a networked storage in the cluster, such as AWS ElasticBlockStore volumes. This is called as
PersistentVolume. - Request storage: User requests storage for pods by using claims. Claims can specify levels of resources (CPU and memory), specific sizes and access modes (e.g. can be mounted once read/write or many times write only). This is called as
PersistentVolumeClaim. - Use claim: Claims are mounted as volumes and used in pods for storage.
Specifically, this blog will show how to use an AWS ElasticBlockStore as PersistentVolume, create a PersistentVolumeClaim, and then claim it in a pod.
Complete source code for this blog is at: github.com/arun-gupta/couchbase-kubernetes.
Provision AWS Elastic Block Storage
Following restrictions need to be met if Amazon ElasticBlockStorage is used as a PersistentVolume with Kubernetes:
- the nodes on which pods are running must be AWS EC2 instances
- those instances need to be in the same region and availability-zone as the EBS volume
- EBS only supports a single EC2 instance mounting a volume
Create an AWS Elastic Block Storage:
|
1
2
3
|
aws ec2 create-volume --region us-west-2 --availability-zone us-west-2a --size 5 --volume-type gp2
|
The region us-west-2 region and us-west-2a availability zone is used here. And so Kubernetes cluster need to start in the same region and availability zone as well.
This shows the output as:
|
1
2
3
4
5
6
7
8
9
10
11
12
13
|
{
"AvailabilityZone": "us-west-2a",
"Encrypted": false,
"VolumeType": "gp2",
"VolumeId": "vol-47f59cce",
"State": "creating",
"Iops": 100,
"SnapshotId": "",
"CreateTime": "2016-07-29T21:57:43.343Z",
"Size": 5
}
|
Check if the volume is available as:
|
1
2
3
|
aws --region us-west-2 ec2 describe-volumes --volume-id vol-47f59cce
|
It shows the output as:
|
1
2
3
4
5
6
7
8
9
10
11
12
13
14
15
16
17
18
|
{
"Volumes": [
{
"AvailabilityZone": "us-west-2a",
"Attachments": [],
"Encrypted": false,
"VolumeType": "gp2",
"VolumeId": "vol-47f59cce",
"State": "available",
"Iops": 100,
"SnapshotId": "",
"CreateTime": "2016-07-29T21:57:43.343Z",
"Size": 5
}
]
}
|
Note the unique identifier for the volume in VolumeId attribute. You can also verify the EBS block in AWS Console:

Start Kubernetes Cluster
Download Kubernetes 1.3.3, untar it and start the cluster on Amazon:
|
1
2
3
4
|
export KUBERNETES_PROVIDER=aws
KUBE_AWS_ZONE=us-west-2a NODE_SIZE=m3.large NUM_NODES=3 ./kubernetes/cluster/kube-up.sh
|
Three points to note here:
- Zone in which the cluster is started is explicitly set to
us-west-1a. This matches the zone where EBS storage volume was created. - By default, each node size is
m3.medium. Here is is set tom3.large. - By default, 1 master and 4 worker nodes are created. Here only 3 worker nodes are created.
This will show the output as:
|
1
2
3
4
5
6
7
8
9
10
11
12
13
14
15
16
17
18
19
20
21
22
23
24
25
26
27
28
29
30
31
32
33
34
35
36
37
38
39
40
41
42
43
44
45
46
47
48
49
50
51
52
53
54
55
56
57
58
59
60
61
62
63
64
65
66
67
68
69
70
71
72
73
74
75
76
77
78
79
80
81
82
83
84
85
86
87
88
89
90
91
92
93
94
95
96
97
98
99
100
101
102
103
104
105
106
107
108
109
110
111
112
113
114
115
116
117
118
119
120
121
122
123
124
125
126
127
128
129
130
131
|
... Starting cluster in us-west-2a using provider aws
... calling verify-prereqs
... calling kube-up
Starting cluster using os distro: jessie
Uploading to Amazon S3
+++ Staging server tars to S3 Storage: kubernetes-staging-0eaf81fbc51209dd47c13b6d8b424149/devel
upload: ../../../../../var/folders/81/ttv4n16x7p390cttrm_675y00000gn/T/kubernetes.XXXXXX.ISohbaGM/s3/bootstrap-script to s3://kubernetes-staging-0eaf81fbc51209dd47c13b6d8b424149/devel/bootstrap-script
Uploaded server tars:
SERVER_BINARY_TAR_URL: https://s3.amazonaws.com/kubernetes-staging-0eaf81fbc51209dd47c13b6d8b424149/devel/kubernetes-server-linux-amd64.tar.gz
SALT_TAR_URL: https://s3.amazonaws.com/kubernetes-staging-0eaf81fbc51209dd47c13b6d8b424149/devel/kubernetes-salt.tar.gz
BOOTSTRAP_SCRIPT_URL: https://s3.amazonaws.com/kubernetes-staging-0eaf81fbc51209dd47c13b6d8b424149/devel/bootstrap-script
INSTANCEPROFILE arn:aws:iam::598307997273:instance-profile/kubernetes-master 2016-07-29T15:13:35Z AIPAJF3XKLNKOXOTQOCTkubernetes-master /
ROLES arn:aws:iam::598307997273:role/kubernetes-master 2016-07-29T15:13:33Z / AROAI3Q2KFBD5PCKRXCRM kubernetes-master
ASSUMEROLEPOLICYDOCUMENT 2012-10-17
STATEMENT sts:AssumeRole Allow
PRINCIPAL ec2.amazonaws.com
INSTANCEPROFILE arn:aws:iam::598307997273:instance-profile/kubernetes-minion 2016-07-29T15:13:39Z AIPAIYSH5DJA4UPQIP4Bkubernetes-minion /
ROLES arn:aws:iam::598307997273:role/kubernetes-minion 2016-07-29T15:13:37Z / AROAIQ57MPQYSHRPQCT2Q kubernetes-minion
ASSUMEROLEPOLICYDOCUMENT 2012-10-17
STATEMENT sts:AssumeRole Allow
PRINCIPAL ec2.amazonaws.com
Using SSH key with (AWS) fingerprint: SHA256:dX/5wpWuUxYar2NFuGwiZuRiydiZCyx4DGoZ5/jL/j8
Creating vpc.
Adding tag to vpc-fa3d6c9e: Name=kubernetes-vpc
Adding tag to vpc-fa3d6c9e: KubernetesCluster=kubernetes
Using VPC vpc-fa3d6c9e
Adding tag to dopt-3aad625e: Name=kubernetes-dhcp-option-set
Adding tag to dopt-3aad625e: KubernetesCluster=kubernetes
Using DHCP option set dopt-3aad625e
Creating subnet.
Adding tag to subnet-e11f5985: KubernetesCluster=kubernetes
Using subnet subnet-e11f5985
Creating Internet Gateway.
Using Internet Gateway igw-5c748f38
Associating route table.
Creating route table
Adding tag to rtb-84fcf1e0: KubernetesCluster=kubernetes
Associating route table rtb-84fcf1e0 to subnet subnet-e11f5985
Adding route to route table rtb-84fcf1e0
Using Route Table rtb-84fcf1e0
Creating master security group.
Creating security group kubernetes-master-kubernetes.
Adding tag to sg-91590bf7: KubernetesCluster=kubernetes
Creating minion security group.
Creating security group kubernetes-minion-kubernetes.
Adding tag to sg-9d590bfb: KubernetesCluster=kubernetes
Using master security group: kubernetes-master-kubernetes sg-91590bf7
Using minion security group: kubernetes-minion-kubernetes sg-9d590bfb
Creating master disk: size 20GB, type gp2
Adding tag to vol-def79e57: Name=kubernetes-master-pd
Adding tag to vol-def79e57: KubernetesCluster=kubernetes
Allocated Elastic IP for master: 52.40.216.69
Adding tag to vol-def79e57: kubernetes.io/master-ip=52.40.216.69
Generating certs for alternate-names: IP:52.40.216.69,IP:172.20.0.9,IP:10.0.0.1,DNS:kubernetes,DNS:kubernetes.default,DNS:kubernetes.default.svc,DNS:kubernetes.default.svc.cluster.local,DNS:kubernetes-master
Starting Master
Adding tag to i-5a7cebf5: Name=kubernetes-master
Adding tag to i-5a7cebf5: Role=kubernetes-master
Adding tag to i-5a7cebf5: KubernetesCluster=kubernetes
Waiting for master to be ready
Attempt 1 to check for master nodeWaiting for instance i-5a7cebf5 to be running (currently pending)
Sleeping for 3 seconds...
Waiting for instance i-5a7cebf5 to be running (currently pending)
Sleeping for 3 seconds...
Waiting for instance i-5a7cebf5 to be running (currently pending)
Sleeping for 3 seconds...
Waiting for instance i-5a7cebf5 to be running (currently pending)
Sleeping for 3 seconds...
[master running]
Attaching IP 52.40.216.69 to instance i-5a7cebf5
Attaching persistent data volume (vol-def79e57) to master
2016-07-29T22:00:36.909Z /dev/sdb i-5a7cebf5 attaching vol-def79e57
cluster "aws_kubernetes" set.
user "aws_kubernetes" set.
context "aws_kubernetes" set.
switched to context "aws_kubernetes".
user "aws_kubernetes-basic-auth" set.
Wrote config for aws_kubernetes to /Users/arungupta/.kube/config
Creating minion configuration
Creating autoscaling group
0 minions started; waiting
0 minions started; waiting
0 minions started; waiting
0 minions started; waiting
3 minions started; ready
Waiting for cluster initialization.
This will continually check to see if the API for kubernetes is reachable.
This might loop forever if there was some uncaught error during start
up.
..........................................................................................................................................................................................................Kubernetes cluster created.
Sanity checking cluster...
Attempt 1 to check Docker on node @ 52.42.0.65 ...not working yet
Attempt 2 to check Docker on node @ 52.42.0.65 ...not working yet
Attempt 3 to check Docker on node @ 52.42.0.65 ...working
Attempt 1 to check Docker on node @ 52.36.195.201 ...working
Attempt 1 to check Docker on node @ 52.43.35.173 ...working
Kubernetes cluster is running. The master is running at:
https://52.40.216.69
The user name and password to use is located in /Users/arungupta/.kube/config.
... calling validate-cluster
Found 3 node(s).
NAME STATUS AGE
ip-172-20-0-26.us-west-2.compute.internal Ready 1m
ip-172-20-0-27.us-west-2.compute.internal Ready 1m
ip-172-20-0-28.us-west-2.compute.internal Ready 1m
Validate output:
NAME STATUS MESSAGE ERROR
controller-manager Healthy ok
scheduler Healthy ok
etcd-0 Healthy {"health": "true"}
etcd-1 Healthy {"health": "true"}
Cluster validation succeeded
Done, listing cluster services:
Kubernetes master is running at https://52.40.216.69
Elasticsearch is running at https://52.40.216.69/api/v1/proxy/namespaces/kube-system/services/elasticsearch-logging
Heapster is running at https://52.40.216.69/api/v1/proxy/namespaces/kube-system/services/heapster
Kibana is running at https://52.40.216.69/api/v1/proxy/namespaces/kube-system/services/kibana-logging
KubeDNS is running at https://52.40.216.69/api/v1/proxy/namespaces/kube-system/services/kube-dns
kubernetes-dashboard is running at https://52.40.216.69/api/v1/proxy/namespaces/kube-system/services/kubernetes-dashboard
Grafana is running at https://52.40.216.69/api/v1/proxy/namespaces/kube-system/services/monitoring-grafana
InfluxDB is running at https://52.40.216.69/api/v1/proxy/namespaces/kube-system/services/monitoring-influxdb
To further debug and diagnose cluster problems, use 'kubectl cluster-info dump'.
|
Read more details about starting a Kubernetes cluster on Amazon.
Couchbase Pod w/o Persistent Storage
Let’s create a Couchbase pod without persistent storage. This means that if the pod is rescheduled on a different host then it will not have access to the data created on it.
Here are quick steps to run a Couchbase pod and expose it outside the cluster:
|
1
2
3
4
5
|
kubectl.sh run couchbase --image=arungupta/couchbase
kubectl.sh expose deployment couchbase --target-port=8091 --port=8091 --type=LoadBalancer
kubectl.sh describe svc couchbase
|
Read more details at Kubernetes cluster at Amazon.
The last command shows the ingress load balancer address. Access Couchbase Web Console at <ip>:8091.
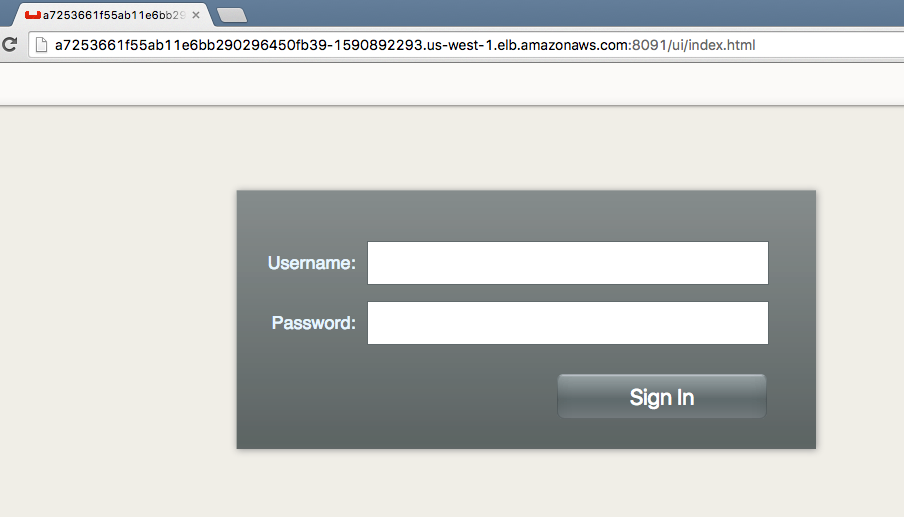
Login to the console using Administrator login and password password.
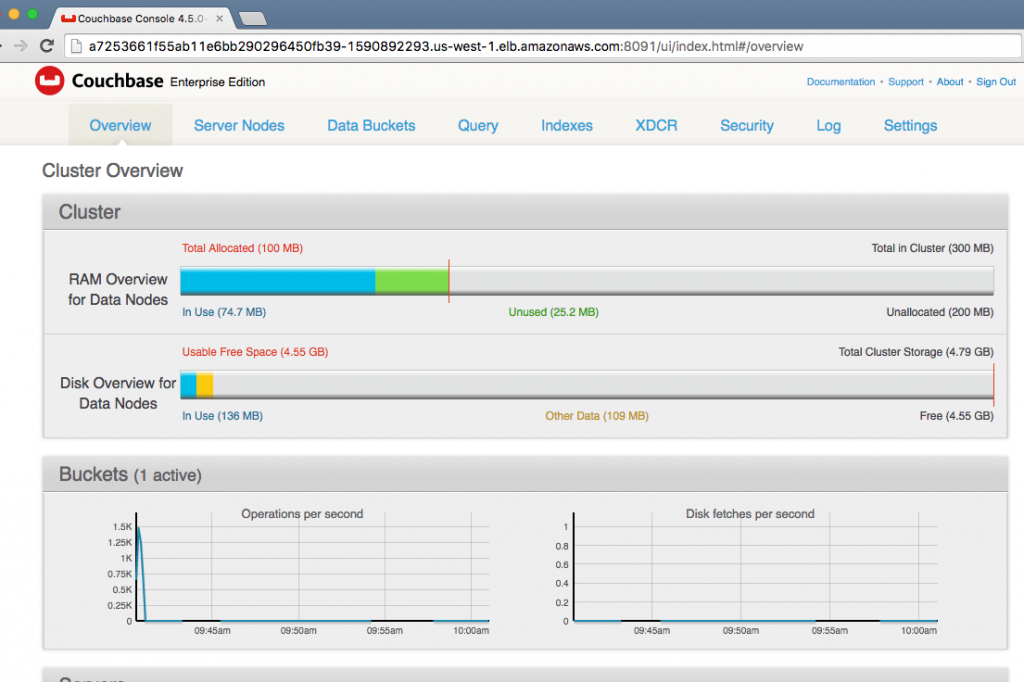
The main page of Couchbase Web Console shows up:
A default travel-sample bucket is already created by arungupta/couchbase image. This bucket is shown in the Data Buckets tab:

Click on Create New Data Bucket button to create a new data bucket. Give it a name k8s, take all the defaults, and click on Create button to create the bucket:

Created bucket is shown in the Data Buckets tab:

Check status of the pod:
|
1
2
3
4
5
|
kubectl.sh get po
NAME READY STATUS RESTARTS AGE
couchbase-2646907196-memz2 1/1 Running 0 53m
|
Delete the pod:
|
1
2
3
4
|
kubectl.sh delete po couchbase-2646907196-memz2
pod "couchbase-2646907196-memz2" deleted
|
Watch the new pod being created:
|
1
2
3
4
5
6
|
kubectl.sh get -w po
NAME READY STATUS RESTARTS AGE
couchbase-2646907196-memz2 1/1 Terminating 0 53m
couchbase-2646907196-wo6ve 1/1 Running 0 3s
|
Access the Web Console again and see that the bucket does not exist:

Let’s clean up the resources created:
|
1
2
3
4
|
kubectl.sh delete svc couchbase
kubectl.sh delete deployment couchbase
|
Couchbase Pod with Persistent Storage
Now, lets expose a Couchbase pod with persistent storage. As discussed above, lets create a PersistentVolume and claim the volume.
Request storage
Like any other Kubernetes resources, a persistent volume is created by using a resource description file:
|
1
2
3
4
5
6
7
8
9
10
11
12
13
14
15
16
|
kind: PersistentVolume
apiVersion: v1
metadata:
name: couchbase-pv
labels:
type: amazonEBS
spec:
capacity:
storage: 5Gi
accessModes:
- ReadWriteOnce
awsElasticBlockStore:
volumeID: vol-47f59cce
fsType: ext4
|
The important pieces of information here are:
- Creating a storage of 5 GB
- Storage can be mounted by only one node for reading/writing
- specifies the volume id created earlier
Read more details about definition of this file at kubernetes.io/docs/user-guide/persistent-volumes/.
This file is available at: github.com/arun-gupta/couchbase-kubernetes/blob/master/pv/couchbase-pv.yml.
The volume itself can be created as:
|
1
2
3
|
kubectl create -f couchbase-pv.yml
|
and shows the output:
|
1
2
3
|
persistentvolume "couchbase-pv" created
|
Use claim
A PersistentVolumeClaim can be created using this resource file:
|
1
2
3
4
5
6
7
8
9
10
11
12
13
14
|
kind: PersistentVolumeClaim
apiVersion: v1
metadata:
name: couchbase-pvc
labels:
type: amazonEBS
spec:
accessModes:
- ReadWriteOnce
resources:
requests:
storage: 5Gi
|
Read more details about definition of this file at kubernetes.io/docs/user-guide/persistent-volumes/#persistentvolumeclaims.
This file is at github.com/arun-gupta/couchbase-kubernetes/blob/master/pv/couchbase-pvc.yml.
The claim can be created as:
|
1
2
3
|
kubectl create -f couchbase-pvc.yml
|
and shows the output:
|
1
2
3
|
persistentvolumeclaim "couchbase-pvc" created
|
Create RC with Persistent Volume Claim
Create a Couchbase Replication Controller using this resource file:
|
1
2
3
4
5
6
7
8
9
10
11
12
13
14
15
16
17
18
19
20
21
22
23
24
25
26
27
28
29
30
|
apiVersion: v1
kind: ReplicationController
metadata:
name: couchbase
spec:
replicas: 1
template:
metadata:
name: couchbase-rc-pod
labels:
name: couchbase-rc-pod
context: couchbase-pv
spec:
containers:
- name: couchbase-rc-pod
image: arungupta/couchbase
volumeMounts:
- mountPath: "/opt/couchbase/var"
name: mypd
ports:
- containerPort: 8091
- containerPort: 8092
- containerPort: 8093
- containerPort: 11210
volumes:
- name: mypd
persistentVolumeClaim:
claimName: couchbase-pvc
|
- Resource defines a Replication Controller using
arungupta/couchbaseDocker image volumeMountsdefine which volumes are going to be mounted./opt/couchbase/varis the directory where Couchbase stores all the data.volumesdefine different volumes that can be used in this RC definition
Create the RC as:
|
1
2
3
|
kubectl create -f couchbase-rc.yml
|
and shows the output:
|
1
2
3
|
replicationcontroller "couchbase" created
|
Check for pod as kubectl.sh get -w po to see:
|
1
2
3
4
5
6
7
|
kubectl.sh get -w po
NAME READY STATUS RESTARTS AGE
couchbase-jx3fn 0/1 ContainerCreating 0 3s
NAME READY STATUS RESTARTS AGE
couchbase-jx3fn 1/1 Running 0 20s
|
Expose RC as a service:
|
1
2
3
4
|
kubectl.sh expose rc couchbase --target-port=8091 --port=809--type=LoadBalancer
service "couchbase" exposed
|
Get all the services:
|
1
2
3
4
5
6
|
kubectl.sh get svc
NAME CLUSTER-IP EXTERNAL-IP PORT(S) AGE
couchbase 10.0.49.129 a6179426155e2... 8091/TCP 19s
kubernetes 10.0.0.1 <none> 443/TCP 1h
|
Describe the service as kubectl.sh describe svc couchbase to see:
|
1
2
3
4
5
6
7
8
9
10
11
12
13
14
15
16
17
18
19
|
Name: couchbase
Namespace: default
Labels: context=couchbase-pv
name=couchbase-pod
Selector: context=couchbase-pv,name=couchbase-pod
Type: LoadBalancer
IP: 10.0.49.129
LoadBalancer Ingress: a6179426155e211e6b664022b850255f-1850736155.us-west-2.elb.amazonaws.com
Port: <unset> 8091/TCP
NodePort: <unset> 31636/TCP
Endpoints: 10.244.1.3:8091
Session Affinity: None
Events:
FirstSeen LastSeen Count From SubobjectPath Type Reason Message
--------- -------- ----- ---- ------------- -------- ------ -------
31s 31s 1 {service-controller } Normal CreatingLoadBalancer Creating load balancer
29s 29s 1 {service-controller } Normal CreatedLoadBalancer Created load balancer
|
Wait for ~3 mins for the load balancer to settle. Access the Couchbase Web Console at <ingress-lb>:8091. Once again, only travel-sample bucket exists. This is created by arungupta/couchbase image used in the RC definition.
Show Stateful Containers
Lets create a new bucket. Give it a name kubernetes-pv, take all defaults and click on Create button to create the bucket.

The bucket now shows up in the console:

Terminate Couchbase pod and see the state getting restored.
Get the pods again:
|
1
2
3
4
5
|
kubectl.sh get po
NAME READY STATUS RESTARTS AGE
couchbase-jx3fn 1/1 Running 0 7m
|
Delete the pod:
|
1
2
3
4
|
kubectl.sh delete po couchbase-jx3fn
pod "couchbase-jx3fn" deleted
|
Pod gets recreated:
|
1
2
3
4
5
6
7
8
|
kubectl.sh get -w po
NAME READY STATUS RESTARTS AGE
couchbase-jx3fn 1/1 Terminating 0 8m
couchbase-qq6wu 0/1 ContainerCreating 0 4s
NAME READY STATUS RESTARTS AGE
couchbase-qq6wu 1/1 Running 0 5s
|
And now when you access the Couchbase Web Console, the earlier created bucket still exists:
 That’s because the data was stored in the backing EBS storage.
Cleanup Kubernetes Cluster
Shutdown Kubernetes cluster:
|
1
2
3
4
5
6
7
8
9
10
11
12
13
14
15
16
17
18
19
20
21
22
23
24
25
26
27
28
29
30
31
32
33
34
35
36
37
38
39
40
41
42
43
44
45
46
47
48
49
50
51
52
53
54
55
56
57
58
59
60
61
62
63
|
KUBE_AWS_ZONE=us-west-2a NODE_SIZE=m3.large NUM_NODES=3 ./kubernetes/cluster/kube-down.sh
Bringing down cluster using provider: aws
Deleting ELBs in: vpc-fa3d6c9e
Waiting for ELBs to be deleted
All ELBs deleted
Deleting instances in VPC: vpc-fa3d6c9e
Deleting auto-scaling group: kubernetes-minion-group-us-west-2a
Deleting auto-scaling launch configuration: kubernetes-minion-group-us-west-2a
Deleting auto-scaling group: kubernetes-minion-group-us-west-2a
Deleting auto-scaling group: kubernetes-minion-group-us-west-2a
Waiting for instances to be deleted
Waiting for instance i-8b7aed24 to be terminated (currently shutting-down)
Sleeping for 3 seconds...
Waiting for instance i-8b7aed24 to be terminated (currently shutting-down)
Sleeping for 3 seconds...
Waiting for instance i-8b7aed24 to be terminated (currently shutting-down)
Sleeping for 3 seconds...
Waiting for instance i-8b7aed24 to be terminated (currently shutting-down)
Sleeping for 3 seconds...
Waiting for instance i-8b7aed24 to be terminated (currently shutting-down)
Sleeping for 3 seconds...
Waiting for instance i-8b7aed24 to be terminated (currently shutting-down)
Sleeping for 3 seconds...
Waiting for instance i-8b7aed24 to be terminated (currently shutting-down)
Sleeping for 3 seconds...
Waiting for instance i-8b7aed24 to be terminated (currently shutting-down)
Sleeping for 3 seconds...
Waiting for instance i-8b7aed24 to be terminated (currently shutting-down)
Sleeping for 3 seconds...
Waiting for instance i-8b7aed24 to be terminated (currently shutting-down)
Sleeping for 3 seconds...
Waiting for instance i-8b7aed24 to be terminated (currently shutting-down)
Sleeping for 3 seconds...
Waiting for instance i-8b7aed24 to be terminated (currently shutting-down)
Sleeping for 3 seconds...
Waiting for instance i-8b7aed24 to be terminated (currently shutting-down)
Sleeping for 3 seconds...
Waiting for instance i-8b7aed24 to be terminated (currently shutting-down)
Sleeping for 3 seconds...
Waiting for instance i-8b7aed24 to be terminated (currently shutting-down)
Sleeping for 3 seconds...
Waiting for instance i-8b7aed24 to be terminated (currently shutting-down)
Sleeping for 3 seconds...
Waiting for instance i-8b7aed24 to be terminated (currently shutting-down)
Sleeping for 3 seconds...
Waiting for instance i-8b7aed24 to be terminated (currently shutting-down)
Sleeping for 3 seconds...
Waiting for instance i-8b7aed24 to be terminated (currently shutting-down)
Sleeping for 3 seconds...
All instances deleted
Releasing Elastic IP: 52.40.216.69
Deleting volume vol-def79e57
Cleaning up resources in VPC: vpc-fa3d6c9e
Cleaning up security group: sg-91590bf7
Cleaning up security group: sg-9d590bfb
Cleaning up security group: sg-e97b298f
Deleting security group: sg-91590bf7
Deleting security group: sg-9d590bfb
Deleting security group: sg-e97b298f
Deleting VPC: vpc-fa3d6c9e
Done
|
And detach the volume:
|
1
2
3
|
aws ec2 delete-volume --region us-west-2 --volume-id vol-47f59cce
|
Complete source code for this blog is at: github.com/arun-gupta/couchbase-kubernetes.
Enjoy!
Source: blog.couchbase.com/2016/july/stateful-containers-kubernetes-amazon-ebs


If you are a windows operator and you can know about where to install fonts windows 10 system in without facing any interruption, i really like it and always prefer to use this https://windowsclassroom.com/install-fonts-windows-10 latest fonts.