![]()
This blog is part of a multi-part blog series that shows how to run your applications on Kubernetes. It will use the Couchbase, an open source NoSQL distributed document database, as the Docker container.
- Part 1 explained how to start Kubernetes cluster using Vagrant – Kubernetes on Vagrant
- Part 2 did the same for Amazon Web Services – Kubernetes on Amazon Web Services
- Part 3 did the same for Google Cloud – Kubernetes on Google Cloud
This fourth part will show:
- How to setup and start the Kubernetes cluster on Azure
- Run Docker container in the Kubernetes cluster
- Expose Pod on Kubernetes as Service
- Shutdown the cluster

Many thanks to @colemickens for helping me through this recipe. This blog content is heavily based upon the instructions at colemickens.github.io/docs/getting-started-guides/azure/.
Install and Configure Azure CLI
Azure CLI is a command-line interface to develop, deploy and manage Azure applications. This is needed in order to install Kubernetes cluster on Azure.
- Install Node:
1234567891011121314151617brew install node==> Downloading https://homebrew.bintray.com/bottles/node-6.2.0.yosemite.bottle.tar.gz######################################################################## 100.0%==> Pouring node-6.2.0.yosemite.bottle.tar.gz==> CaveatsPlease note by default only English locale support is provided. If you needfull locale support you should either rebuild with full icu:`brew reinstall node --with-full-icu`or add full icu data at runtime following:https://github.com/nodejs/node/wiki/Intl#using-and-customizing-the-small-icu-buildBash completion has been installed to:/usr/local/etc/bash_completion.d==> Summary🍺 /usr/local/Cellar/node/6.2.0: 3,979 files, 40.4M - Install Azure CLI:
123456789101112131415161718192021222324252627282930313233343536373839404142434445464748495051525354555657585960616263646566676869707172737475767778798081828384858687888990919293949596979899100101102103104105106107108109110111112113114115116117118119120121122123124125126127128129130131132133134135136137138139140141142143144145146147148149150151152153154155156157158159160161162163164165166167168169170171172173174175176177178179180181182183184185186187188189190191192193194195196197198199200201202203204205206207208209210211212213214215216217218219220221222223224225226227228229230231232233234235236237238239240241242243244245246247248249250251252253254255256257258259260261262263264265266267268269270271272273274275276277278279280281282283284285286287288npm install -g azure-cli/usr/local/bin/azure -> /usr/local/lib/node_modules/azure-cli/bin/azure> fibers@1.0.13 install /usr/local/lib/node_modules/azure-cli/node_modules/fibers> node build.js || nodejs build.js`darwin-x64-v8-5.0` exists; testingBinary is fine; exiting/usr/local/lib└─┬ azure-cli@0.10.0├─┬ adal-node@0.1.17│ ├── date-utils@1.2.21│ ├─┬ jws@3.1.3│ │ ├─┬ base64url@1.0.6│ │ │ └─┬ meow@2.0.0│ │ │ ├─┬ camelcase-keys@1.0.0│ │ │ │ ├── camelcase@1.2.1│ │ │ │ └── map-obj@1.0.1│ │ │ ├─┬ indent-string@1.2.2│ │ │ │ ├── get-stdin@4.0.1│ │ │ │ └─┬ repeating@1.1.3│ │ │ │ └── is-finite@1.0.1│ │ │ ├── minimist@1.2.0│ │ │ └── object-assign@1.0.0│ │ └─┬ jwa@1.1.3│ │ ├── buffer-equal-constant-time@1.0.1│ │ └─┬ ecdsa-sig-formatter@1.0.5│ │ └── base64-url@1.2.2│ ├── node-uuid@1.4.1│ ├── xmldom@0.1.22│ └── xpath.js@1.0.6├── applicationinsights@0.15.12├── async@1.4.2├── azure-arm-authorization@2.0.0├── azure-arm-batch@0.1.0├── azure-arm-cdn@0.1.0-preview├── azure-arm-commerce@0.1.1├── azure-arm-compute@0.18.0├── azure-arm-datalake-analytics@0.3.2├── azure-arm-datalake-store@0.3.0├── azure-arm-dns@0.10.1├── azure-arm-hdinsight@0.2.0├── azure-arm-hdinsight-jobs@0.1.0├── azure-arm-insights@0.11.1├── azure-arm-network@0.13.1├── azure-arm-rediscache@0.2.1├── azure-arm-resource@1.4.4-preview├── azure-arm-storage@0.13.1-preview├── azure-arm-trafficmanager@0.10.5├─┬ azure-arm-website@0.10.0│ ├─┬ azure-common@0.9.12│ │ ├─┬ request@2.45.0│ │ │ ├── aws-sign2@0.5.0│ │ │ ├── bl@0.9.5│ │ │ ├── caseless@0.6.0│ │ │ ├── forever-agent@0.5.2│ │ │ ├─┬ form-data@0.1.4│ │ │ │ ├── async@0.9.2│ │ │ │ └─┬ combined-stream@0.0.7│ │ │ │ └── delayed-stream@0.0.5│ │ │ ├─┬ hawk@1.1.1│ │ │ │ ├── boom@0.4.2│ │ │ │ ├── cryptiles@0.2.2│ │ │ │ ├── hoek@0.9.1│ │ │ │ └── sntp@0.2.4│ │ │ ├─┬ http-signature@0.10.1│ │ │ │ ├── asn1@0.1.11│ │ │ │ └── assert-plus@0.1.5│ │ │ ├── mime-types@1.0.2│ │ │ ├── node-uuid@1.4.7│ │ │ ├── oauth-sign@0.4.0│ │ │ └── qs@1.2.2│ │ └── xml2js@0.2.7│ └── moment@2.6.0├── azure-asm-compute@0.15.0├── azure-asm-hdinsight@0.10.2├── azure-asm-mgmt@0.10.1├── azure-asm-network@0.11.0├── azure-asm-sb@0.10.1├── azure-asm-sql@0.10.1├── azure-asm-storage@0.10.1├── azure-asm-subscription@0.10.1├── azure-asm-trafficmanager@0.10.3├─┬ azure-asm-website@0.10.1│ └── moment@2.6.0├── azure-batch@0.3.0├─┬ azure-common@0.9.16│ ├── dateformat@1.0.2-1.2.3│ ├── duplexer@0.1.1│ ├── envconf@0.0.4│ ├─┬ request@2.45.0│ │ ├── aws-sign2@0.5.0│ │ ├── bl@0.9.5│ │ ├── caseless@0.6.0│ │ ├── forever-agent@0.5.2│ │ ├─┬ form-data@0.1.4│ │ │ ├── async@0.9.2│ │ │ ├─┬ combined-stream@0.0.7│ │ │ │ └── delayed-stream@0.0.5│ │ │ └── mime@1.2.11│ │ ├─┬ hawk@1.1.1│ │ │ ├── boom@0.4.2│ │ │ ├── cryptiles@0.2.2│ │ │ ├── hoek@0.9.1│ │ │ └── sntp@0.2.4│ │ ├─┬ http-signature@0.10.1│ │ │ ├── asn1@0.1.11│ │ │ ├── assert-plus@0.1.5│ │ │ └── ctype@0.5.3│ │ ├── mime-types@1.0.2│ │ ├── node-uuid@1.4.7│ │ ├── oauth-sign@0.4.0│ │ └── qs@1.2.2│ ├── validator@3.22.2│ └── xml2js@0.2.7├── azure-gallery@2.0.0-pre.18├── azure-graph@0.1.1├─┬ azure-keyvault@0.10.1│ └── node-uuid@1.4.7├─┬ azure-monitoring@0.10.2│ └── moment@2.6.0├─┬ azure-storage@0.7.0│ ├── browserify-mime@1.2.9│ ├── extend@1.2.1│ ├── node-uuid@1.4.7│ ├─┬ readable-stream@2.0.6│ │ ├── isarray@1.0.0│ │ ├── process-nextick-args@1.0.7│ │ └── util-deprecate@1.0.2│ ├─┬ request@2.57.0│ │ ├── aws-sign2@0.5.0│ │ ├─┬ bl@0.9.5│ │ │ └─┬ readable-stream@1.0.34│ │ │ └── isarray@0.0.1│ │ ├── caseless@0.10.0│ │ ├─┬ form-data@0.2.0│ │ │ ├── async@0.9.2│ │ │ └─┬ combined-stream@0.0.7│ │ │ └── delayed-stream@0.0.5│ │ ├─┬ har-validator@1.8.0│ │ │ ├── bluebird@2.10.2│ │ │ └── commander@2.9.0│ │ ├── hawk@2.3.1│ │ ├─┬ http-signature@0.11.0│ │ │ ├── asn1@0.1.11│ │ │ └── assert-plus@0.1.5│ │ ├─┬ mime-types@2.0.14│ │ │ └── mime-db@1.12.0│ │ └── qs@3.1.0│ ├── validator@3.22.2│ └── xml2js@0.2.7├─┬ caller-id@0.1.0│ └── stack-trace@0.0.9├── colors@0.6.2├─┬ commander@1.0.4│ └── keypress@0.1.0├── easy-table@0.0.1├─┬ event-stream@3.1.5│ ├── from@0.1.3│ ├── map-stream@0.1.0│ ├── pause-stream@0.0.11│ ├── split@0.2.10│ └── stream-combiner@0.0.4├── eyes@0.1.8├── fast-json-patch@0.5.6├── github@0.1.6├── js2xmlparser@1.0.0├── jsrsasign@4.8.2├─┬ kuduscript@1.0.6│ ├── commander@1.1.1│ └── streamline@0.4.11├── moment@2.13.0├── ms-rest@1.14.2├─┬ ms-rest-azure@1.14.2│ ├── async@0.2.7│ └── uuid@2.0.1├── node-forge@0.6.23├── node-uuid@1.2.0├── number-is-nan@1.0.0├── omelette@0.1.0├─┬ openssl-wrapper@0.2.1│ ├── debug@0.7.4│ └── q@0.9.7├─┬ read@1.0.7│ └── mute-stream@0.0.6├─┬ readable-stream@1.0.34│ ├── core-util-is@1.0.2│ ├── inherits@2.0.1│ ├── isarray@0.0.1│ └── string_decoder@0.10.31├─┬ request@2.69.0│ ├── aws-sign2@0.6.0│ ├── aws4@1.4.1│ ├─┬ bl@1.0.3│ │ └─┬ readable-stream@2.0.6│ │ └── isarray@1.0.0│ ├── caseless@0.11.0│ ├─┬ combined-stream@1.0.5│ │ └── delayed-stream@1.0.0│ ├── extend@3.0.0│ ├── forever-agent@0.6.1│ ├─┬ form-data@1.0.0-rc4│ │ └── async@1.5.2│ ├─┬ har-validator@2.0.6│ │ ├─┬ chalk@1.1.3│ │ │ ├── ansi-styles@2.2.1│ │ │ ├── escape-string-regexp@1.0.5│ │ │ ├─┬ has-ansi@2.0.0│ │ │ │ └── ansi-regex@2.0.0│ │ │ ├── strip-ansi@3.0.1│ │ │ └── supports-color@2.0.0│ │ ├─┬ commander@2.9.0│ │ │ └── graceful-readlink@1.0.1│ │ ├─┬ is-my-json-valid@2.13.1│ │ │ ├── generate-function@2.0.0│ │ │ ├─┬ generate-object-property@1.2.0│ │ │ │ └── is-property@1.0.2│ │ │ ├── jsonpointer@2.0.0│ │ │ └── xtend@4.0.1│ │ └─┬ pinkie-promise@2.0.1│ │ └── pinkie@2.0.4│ ├─┬ hawk@3.1.3│ │ ├── boom@2.10.1│ │ ├── cryptiles@2.0.5│ │ ├── hoek@2.16.3│ │ └── sntp@1.0.9│ ├─┬ http-signature@1.1.1│ │ ├── assert-plus@0.2.0│ │ ├─┬ jsprim@1.2.2│ │ │ ├── extsprintf@1.0.2│ │ │ ├── json-schema@0.2.2│ │ │ └── verror@1.3.6│ │ └─┬ sshpk@1.8.3│ │ ├── asn1@0.2.3│ │ ├── assert-plus@1.0.0│ │ ├─┬ dashdash@1.13.1│ │ │ └── assert-plus@1.0.0│ │ ├── ecc-jsbn@0.1.1│ │ ├─┬ getpass@0.1.6│ │ │ └── assert-plus@1.0.0│ │ ├── jodid25519@1.0.2│ │ ├── jsbn@0.1.0│ │ └── tweetnacl@0.13.3│ ├── is-typedarray@1.0.0│ ├── isstream@0.1.2│ ├── json-stringify-safe@5.0.1│ ├─┬ mime-types@2.1.11│ │ └── mime-db@1.23.0│ ├── node-uuid@1.4.7│ ├── oauth-sign@0.8.2│ ├── qs@6.0.2│ ├── stringstream@0.0.5│ ├── tough-cookie@2.2.2│ └── tunnel-agent@0.4.3├─┬ ssh-key-to-pem@0.11.0│ ├── asn1@0.1.11│ └── ctype@0.5.2├─┬ streamline@0.10.17│ ├── fibers@1.0.13│ ├── galaxy@0.1.12│ └─┬ source-map@0.1.43│ └── amdefine@1.0.0├── streamline-streams@0.1.5├─┬ sync-request@3.0.0│ ├─┬ concat-stream@1.4.10│ │ ├── readable-stream@1.1.14│ │ └── typedarray@0.0.6│ ├── http-response-object@1.1.0│ └─┬ then-request@2.2.0│ ├── http-basic@2.5.1│ ├─┬ promise@7.1.1│ │ └── asap@2.0.4│ └── qs@6.2.0├── through@2.3.4├── tunnel@0.0.2├── underscore@1.4.4├── validator@3.1.0├─┬ winston@0.6.2│ ├── async@0.1.22│ ├── cycle@1.0.3│ ├── pkginfo@0.2.3│ └── request@2.9.203├── wordwrap@0.0.2├─┬ xml2js@0.1.14│ └── sax@0.5.2└── xmlbuilder@0.4.3 - Sign up for free trial at https://azure.microsoft.com/en-us/free/.
- Login to Azure using the command
azure login:
123456789azure logininfo: Executing command login\info: To sign in, use a web browser to open the page https://aka.ms/devicelogin. Enter the code BS5P64ANU to authenticate.|info: Added subscription Free Trialinfo: Setting subscription "Free Trial" as default+info: login command OK - Get account information using
azure account showcommand:
123456789101112131415azure account showinfo: Executing command account showdata: Name : Free Trialdata: ID : XXXdata: State : Enableddata: Tenant ID : YYYdata: Is Default : truedata: Environment : AzureClouddata: Has Certificate : Nodata: Has Access Token : Yesdata: User name : arun.gupta@gmail.comdata:info: account show command OK
Note the value shown instead of XXX and YYY. These will be used to configure the Kubernetes cluster.
Start Kubernetes Cluster
- Download Kubernetes 1.2.4 and extract it.
- Kubernetes cluster on Azure can be started as:
123456export KUBERNETES_PROVIDER=azureexport AZURE_SUBSCRIPTION_ID=XXXexport AZURE_TENANT_ID=YYY./cluster/kube-up.sh
Make sure to specify the appropriate values forXXXandYYYfrom the previous command.AZURE_SUBSCRIPTION_IDandAZURE_TENANT_IDare specific to Azure.These values can also be edited in
cluster/azure/config-default.sh. - Start Kubernetes cluster:
1234567891011121314151617181920212223242526272829303132333435363738394041424344454647484950./kubernetes/cluster/kube-up.sh... Starting cluster using provider: azure... calling verify-prereqs... calling kube-up++> AZURE KUBE-UP STARTED: Tue May 31 16:15:26 PDT 2016This will be interactive. (export AZURE_AUTH_METHOD=client_secret to avoid the prompt)hyperkube-amd64:v1.2.4 was found in the gcr.io/google_containers repositoryFlag --tenant-id has been deprecated, tenant-id is deprecated. it is now determined automatically from the subscription idWARN[0000] --resource-group is unset. Derived one from --deployment-name: "kube-20160531-161525"WARN[0000] --master-fqdn is unset. Derived one from input: "kube-20160531-161525.westus.cloudapp.azure.com".To sign in, use a web browser to open the page https://aka.ms/devicelogin. Enter the code BPRLH2ARJ to authenticate.INFO[0034] Starting ARM Deployment. This will take some time. deployment="kube-20160531-161525-1464736561"INFO[0279] Finished ARM Deployment. deployment="kube-20160531-161525-1464736561"INFO[0279] Validating Kubernetes cluster.WARN[0279] Failed to validate components: Get https://kube-20160531-161525.westus.cloudapp.azure.com:6443/api/v1/componentstatuses: dial tcp 23.99.60.138:6443: getsockopt: connection refusedINFO[0294] Validating Kubernetes cluster.WARN[0294] Failed to validate components: Get https://kube-20160531-161525.westus.cloudapp.azure.com:6443/api/v1/componentstatuses: dial tcp 23.99.60.138:6443: getsockopt: connection refusedINFO[0309] Validating Kubernetes cluster.WARN[0309] Failed to validate components: Get https://kube-20160531-161525.westus.cloudapp.azure.com:6443/api/v1/componentstatuses: dial tcp 23.99.60.138:6443: getsockopt: connection refusedINFO[0324] Validating Kubernetes cluster.WARN[0347] validate: incorrect healthy count. expected=3 actual=4INFO[0347] Deployment Complete!INFO[0347] master: "https://kube-20160531-161525.westus.cloudapp.azure.com:6443"INFO[0347] output: "/opt/azkube/_deployments/kube-20160531-161525"cluster "kube-20160531-161525" set.user "kube-20160531-161525_user" set.context "kube-20160531-161525" set.switched to context "kube-20160531-161525".++> AZURE KUBE-UP FINISHED: Tue May 31 16:21:15 PDT 2016 (duration: -349 seconds)... calling validate-clusterDetected 4 ready nodes, found 4 nodes out of expected 3. Found more nodes than expected, your cluster may not behave correctly.Found 4 node(s).NAME STATUS AGEkube-20160531-161525-vm-master Ready,SchedulingDisabled 21skube-20160531-161525-vm-node-0 Ready 18skube-20160531-161525-vm-node-1 Ready 19skube-20160531-161525-vm-node-2 Ready 19sFlag --api-version has been deprecated, flag is no longer respected and will be deleted in the next releaseValidate output:NAME STATUS MESSAGE ERRORscheduler Healthy okcontroller-manager Healthy oketcd-1 Healthy {"health": "true"}etcd-0 Healthy {"health": "true"}Cluster validation succeededDone, listing cluster services:Kubernetes master is running at https://kube-20160531-161525.westus.cloudapp.azure.com:6443
It starts four nodes of
Standard_A1size. Each node gives you 1 core, 1.75 GB RAM, and 40GB HDD.
Run Docker Container in Kubernetes Cluster on Azure
Now that the cluster is up and running, get a list of all the nodes:
|
1
2
3
4
5
6
7
8
|
./kubernetes/cluster/kubectl.sh get no
NAME STATUS AGE
kube-20160531-161525-vm-master Ready,SchedulingDisabled 3m
kube-20160531-161525-vm-node-0 Ready 3m
kube-20160531-161525-vm-node-1 Ready 3m
kube-20160531-161525-vm-node-2 Ready 3m
|
Four instances are created as shown – one for master node and three for worker nodes.
Azure Portal shows all the created artifacts in the Resource Group:

More details about the created nodes is available:

Create a Couchbase pod:
|
1
2
3
4
|
./kubernetes/cluster/kubectl.sh run couchbase --image=arungupta/couchbase
deployment "couchbase" created
|
Notice, how the image name can be specified on the CLI. Kubernetes pre-1.2 versions created a Replication Controller with this command. This is explained in Kubernetes on Amazon Web Services or Kubernetes on Google Cloud. Kubernetes 1.2 introduced Deployments and so this creates a Deployment instead. This enables simplified application deployment and management including versioning, multiple simultaneous rollouts, aggregating status across all pods, maintaining application availability and rollback.
The pod uses arungupta/couchbase Docker image that provides a pre-configured Couchbase server. Any Docker image can be specified here.
Status of the pod can be watched:
|
1
2
3
4
5
6
7
|
./kubernetes/cluster/kubectl.sh get -w po
NAME READY STATUS RESTARTS AGE
couchbase-2830197765-f0s9c 0/1 ContainerCreating 0 5s
NAME READY STATUS RESTARTS AGE
couchbase-2830197765-f0s9c 1/1 Running 0 1m
|
Get more details about the pod:
|
1
2
3
4
5
6
7
8
9
10
11
12
13
14
15
16
17
18
19
20
21
22
23
24
25
26
27
28
29
30
31
32
33
34
35
36
37
38
39
40
|
./kubernetes/cluster/kubectl.sh describe po couchbase-2830197765-f0s9c
Name: couchbase-2830197765-f0s9c
Namespace: default
Node: kube-20160531-161525-vm-node-2/10.0.0.6
Start Time: Tue, 31 May 2016 16:28:02 -0700
Labels: pod-template-hash=2830197765,run=couchbase
Status: Running
IP: 10.2.74.2
Controllers: ReplicaSet/couchbase-2830197765
Containers:
couchbase:
Container ID: docker://eba043085c95645cf650206469be5c7e2d6c7395883a053d197446a14e757440
Image: arungupta/couchbase
Image ID: docker://sha256:f6b013d9694354148ace6804127dadee01c733151b5ff5e169f7c3b0e4faf321
Port:
QoS Tier:
cpu: BestEffort
memory: BestEffort
State: Running
Started: Tue, 31 May 2016 16:29:04 -0700
Ready: True
Restart Count: 0
Environment Variables:
Conditions:
Type Status
Ready True
Volumes:
default-token-ylszs:
Type: Secret (a volume populated by a Secret)
SecretName: default-token-ylszs
Events:
FirstSeen LastSeen Count From SubobjectPath Type Reason Message
--------- -------- ----- ---- ------------- -------- ------ -------
7m 7m 1 {default-scheduler } Normal Scheduled Successfully assigned couchbase-2830197765-f0s9c to kube-20160531-161525-vm-node-2
7m 7m 1 {kubelet kube-20160531-161525-vm-node-2} spec.containers{couchbase} Normal Pulling pulling image "arungupta/couchbase"
6m 6m 1 {kubelet kube-20160531-161525-vm-node-2} spec.containers{couchbase} Normal Pulled Successfully pulled image "arungupta/couchbase"
6m 6m 1 {kubelet kube-20160531-161525-vm-node-2} spec.containers{couchbase} Normal Created Created container with docker id eba043085c95
6m 6m 1 {kubelet kube-20160531-161525-vm-node-2} spec.containers{couchbase} Normal Started Started container with docker id eba043085c95
|
Expose Pod on Kubernetes as Service
Now that our pod is running, how do I access the Couchbase server? You need to expose the Deployment as a Service outside the Kubernetes cluster.
Typically, this will be exposed using the command:
|
1
2
3
|
./kubernetes/cluster/kubectl.sh expose deployment couchbase --target-port=8091 --port=8091 --type=LoadBalancer
|
But Azure does not support --type=LoadBalancer at this time. This feature is being worked upon and will hopefully be available in the near future. So in the meanwhile, we’ll expose the Service as:
|
1
2
3
4
|
./kubernetes/cluster/kubectl.sh expose deployment couchbase --target-port=8091 --port=8091
service "couchbase" exposed
|
Now proxy to this Service using kubectl proxy command:
|
1
2
3
4
|
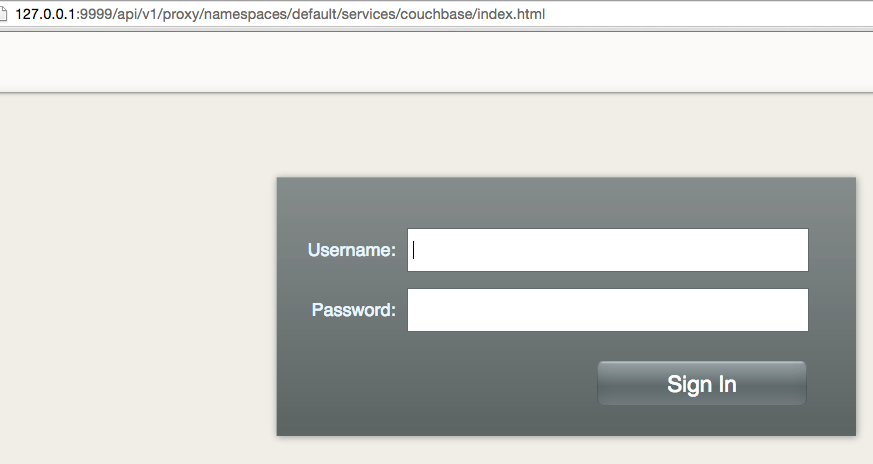
./kubernetes/cluster/kubectl.sh proxy --address='0.0.0.0' --port=9999 --accept-hosts='.*'
Starting to serve on [::]:9999
|
And now this exposed Service is accessible at http://127.0.0.1:9999/api/v1/proxy/namespaces/default/services/couchbase/index.html. This shows the login screen of Couchbase Web Console:
Shutdown Kubernetes Cluster
Finally, shutdown the cluster using cluster/kube-down.sh script.
|
1
2
3
4
5
6
7
8
9
|
./kubernetes/cluster/kube-down.sh
Bringing down cluster using provider: azure
Bringing down cluster
You must do this manually (for now)!
This can be done with:
./kubernetes/cluster/../cluster/../cluster/azure/util.sh: line 246: AZ_RESOURCE_GROUP: unbound variable
|
This script shuts down the cluster but the Azure resource group need to be explicitly removed. This can be done by selecting the Resource Group from portal.azure.com:

This is filed as #26601.
Enjoy!
Further references …
- Couchbase Server Developer Portal
- Couchbase on Containers
- Questions on StackOverflow, Forums or Slack Channel
- Follow us @couchbasedev
- Couchbase 4.5 Beta
Source: http://blog.couchbase.com/2016/june/kubernetes-cluster-azure-couchbase-service


 #Devoxx


 (tentative)