Tag Archives: javaee7

Java EE 7 Video Course on voxxed.com

java-ee-logo voxxed

Voxxed.com is a new initiative by the successful team behind Devoxx. This was announced at Devoxx 2014 Belgium keynote. Some of the key aspects of Voxxed are:
  • It’s a space to share ideas – whether that means submitting articles, tutorials, or blog posts, or telling the Voxxed editorial team about some news or ideas you’ve got that you’d like them to broadcast on your behalf to the whole community.
  • “Devoxx everyday,” bringing together the best of the conversation from the Java ecosystem into one portal.
  • A place to facilitate discussion and wider learning with curated links to wider Parleys presentations and interviews.
  • A new kind of media portal which will be hugely influenced by the community that uses it.

Stephan Janssen (@stephan007), the serial entrepreneur and the man behind Devoxx had to say the following about this initiative:

The Voxxed story starts with Devoxx, which I started in part so that I could get my personal fix of the best tech content around. I’m proud of how important Devoxx has become for developers in this community, but it only happens a few times a year. Where can I go then for a daily community hit, especially with online media so fragmented? So I thought, let’s bring everything together by pulling in blog feeds, reporting news, and housing tutorials, presentations and training courses – everything that people share that makes Devoxx what it is, into one place

There are so many people out there with amazing tech know-how that fly under the radar. I hope Voxxed can be the place where they share their stories. It’s also somewhere for new talent to shine. The Rockstars of our sector probably had their first speaking gig at a local community event. But not everyone enjoys the sometimes terrifying arena of a few hundred people staring back at them. By letting the community publish online, Voxxed gives new voices a platform. Today is just the first stage – a site that looks good, is easy to use and has great content. The next stage is for the community to drive it with excellent content and ideas”

Lucy Carey (@Lucyrushi), editor of Voxxed, says:

I love the creativity and energy of the tech sector, and one of the best parts of my job is being able to share stories from the people behind all the exciting stuff that this huge community is generating. When I heard that there was an opportunity to get involved with a new site developed by the people behind Parleys and Devoxx, I was hugely keen to come on board.

I’m proud and excited to be part of the inaugural launch of voxxed.com with a video course on Learning Java EE 7 Essentials, check out a preview:

The first version of this course provide introduction to the following Java EE 7 technologies:

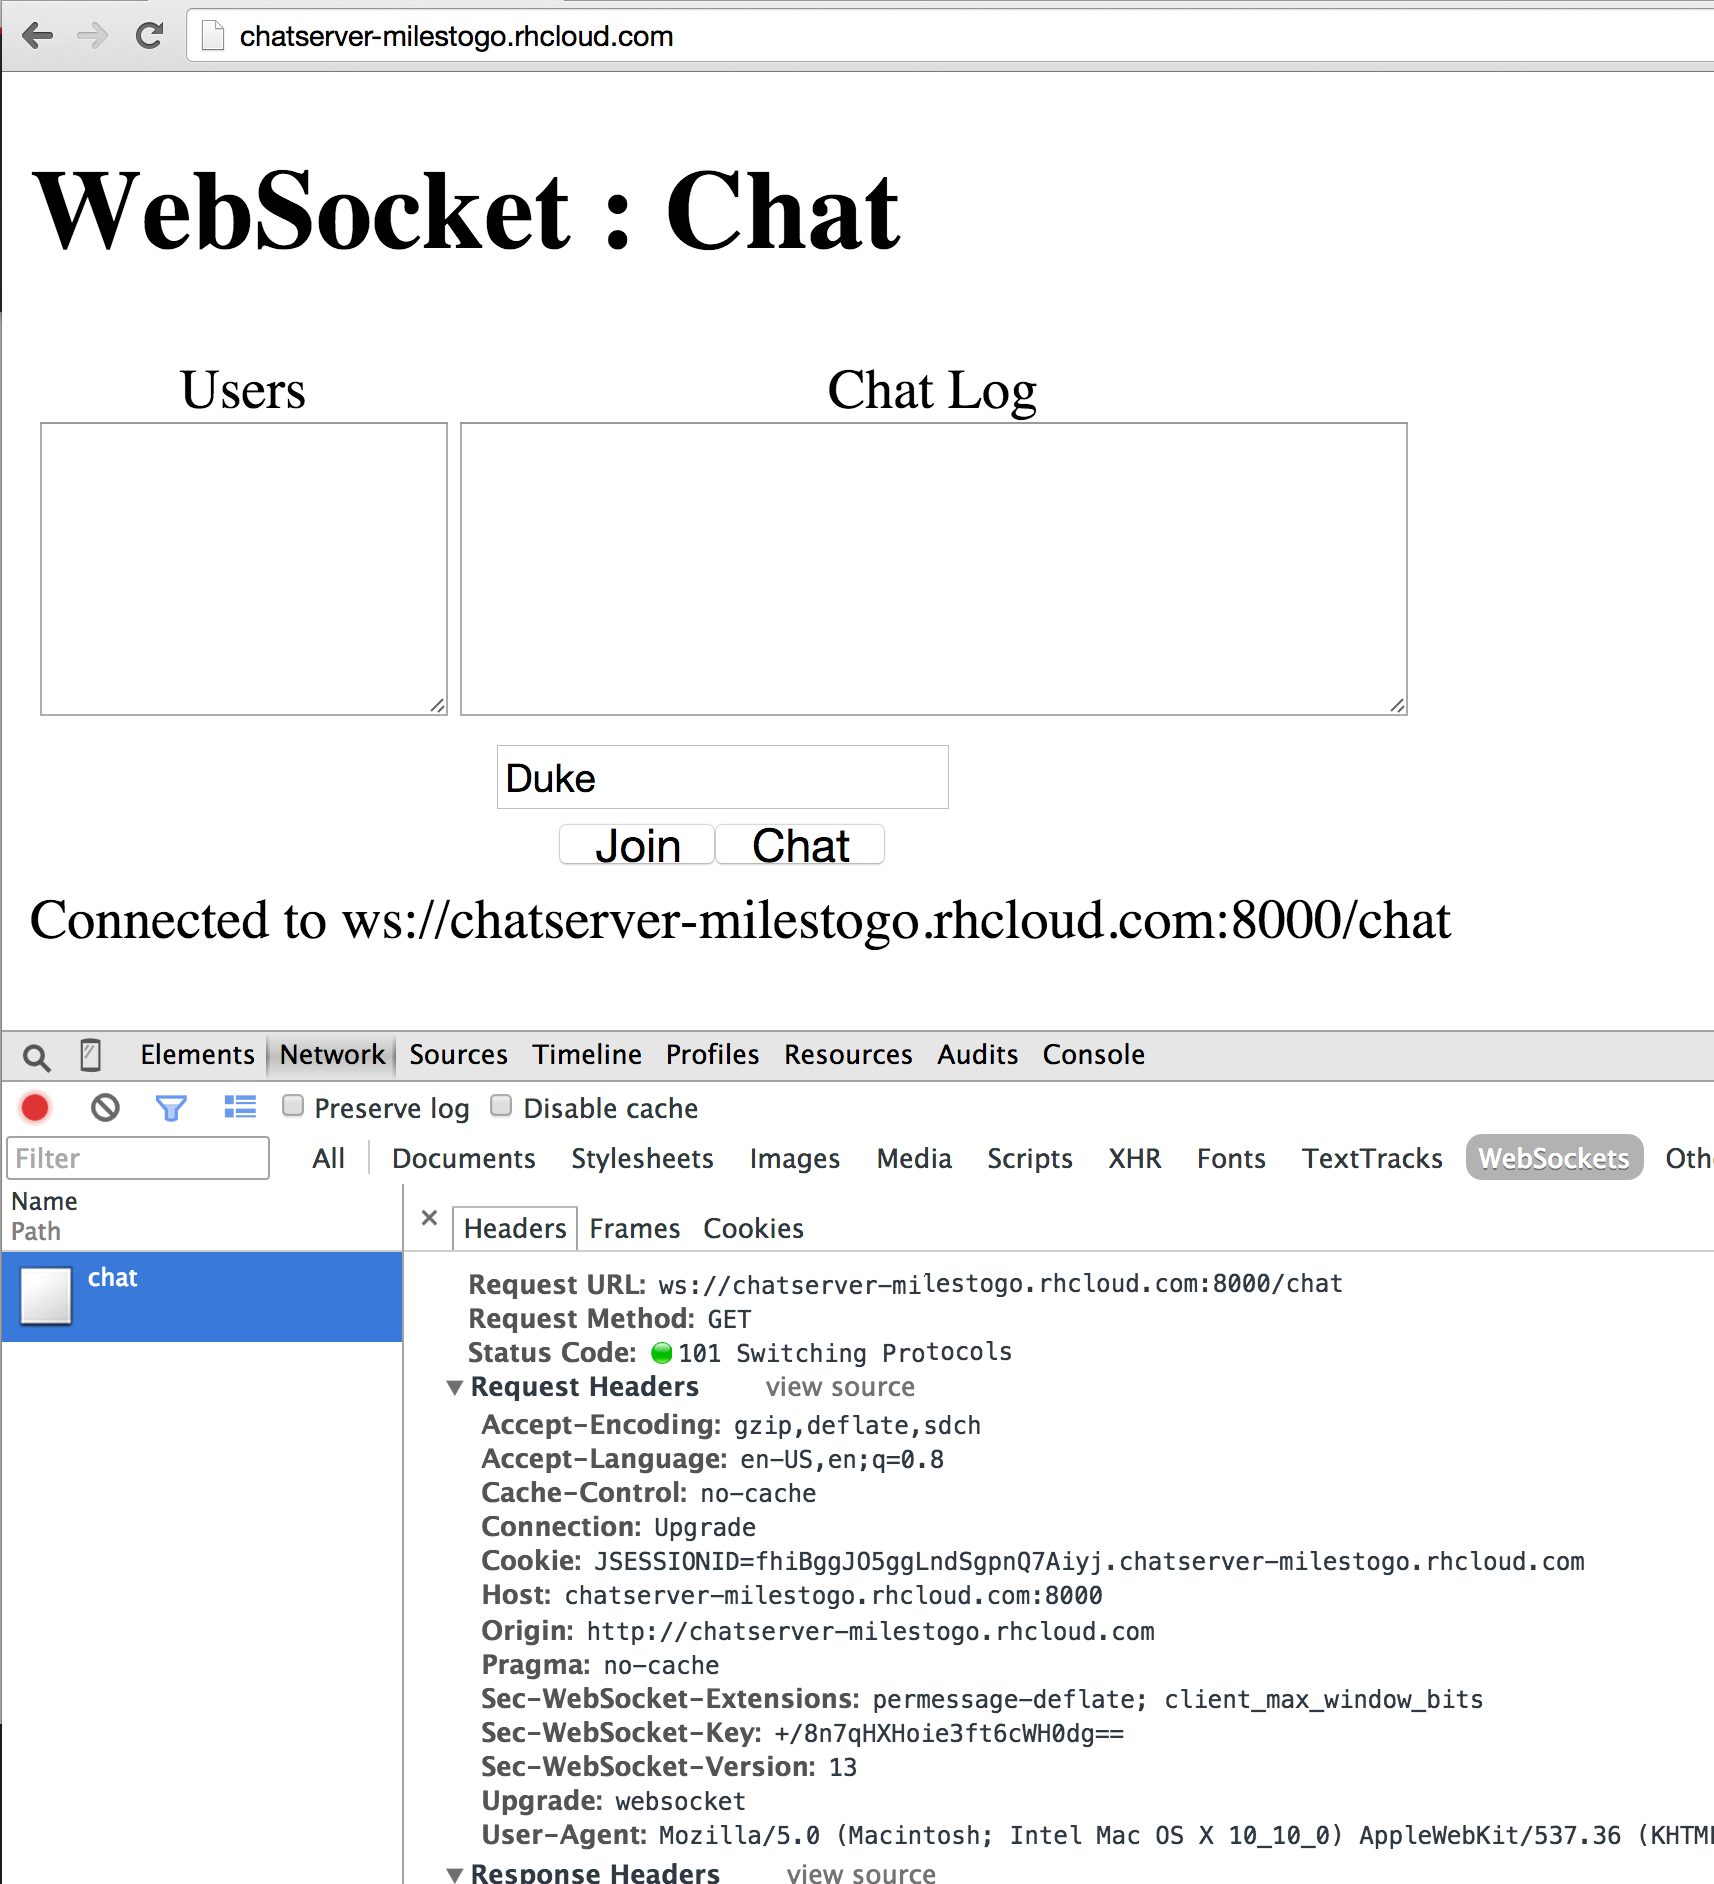
  • Java API for WebSocket (JSR 356)
  • Java API for JSON Processing (JSR 353)
  • Batch Processing for the Java Platform (JSR 352)
  • Concurrency Utilities for Java EE (JSR 353)
  • Java API for RESTful Services (JSR 339)
  • Java Message Service (JSR 343)
  • Contexts & Dependency Injection (JSR 346)

The four new technologies in the course, WebSocket, JSON-P, Batch, and Concurrency, are explained in detail. Key features of JAX-RS 2.0, JMS 2.0, and CDI 1.1 are explained in detail, with a clearly marked emphasis on new features added in Java EE 7.

This is purely a technology-focused course. So whether you are using WildFly, GlassFish, or TmaxSoft JEUS today or will be using JBoss EAP 7+, WebLogic 12.1.4+, WebSphere Liberty Profile or any other Java EE 7 compliant application server, this course would be a great way to understand the key concepts of technology.It discusses the patterns and anti-patterns of different technologies using code-extensive slides.

Buy the course here!

If your team is embarking on a new project that uses Java EE 7 technology, this course will server as a great introduction as well. The usual benefits of parleys.com such as offline viewing, synchronized slides + video, ability to skip slides etc are all available as well.

Future additions planned for this course are:

  • JavaServer Faces (JSR 344)
  • Java Servlets (JSR 340)
  • Java API for Persistence (JSR 338)
  • Enteprise JavaBeans (JSR 345)
  • Develop/Deploy/Debug a Java EE 7 Application Eclipse
  • Develop/Deploy/Debug a Java EE 7 Application using NetBeans
  • Develop/Deploy/Debug a Java EE 7 Application using IntelliJ
  • Java EE 7 Development/Deployment on OpenShift

The course is available at an introductory low price of €69.99. Bulk pricing discounts are also available, drop a comment on the blog for that. However this price will increase as more course items are added in the next few weeks. If you purchase the course today, then future updates/additions are free!

So, act now and purchase this course today :-)

Many thanks to Carlo and rest of the Parleys team for their wonderful support through out the process!

Slides from Nuts and Bolts of WebSocket at #Devoxx 2014

Peter Moskovits from Kaazing (@peterm_kaazing) and I gave a university talk at Devoxx 2014 on Nuts and Bolts of WebSocket. The slides are now available at:

The entire session is recorded and will be made available on parleys.com in the coming weeks/months.

The complete script for the demo is available at github.com/arun-gupta/nuts-and-bolts-of-websocket (including pointers to the demos). Most of the demos are anyway available at the following links:

Positive feedback from twitter overall:

And it was rated the top talk for the day until 6pm:

devoxx14-websocket-talk-rank

With Red Hat spirit, “the more you share, the more you grow”, share the slides and demos all over and spread the love!

Happy Devoxx!

WebSocket Chat on WildFly and OpenShift (Tech Tip #51)

Chat is one of the most canonical sample to explain WebSocket. Its a fairly commonly used interface and allows to explain the fundamental WebSocket concepts very easily. Of course, Java EE 7 WebSocket has one too, available here! You can easily run it on WildFly using the following steps:

And then access it at http://localhost:8080/chat/.

One of the biggest advantage of WebSocket is how it opens up a socket over the same port as HTTP, 8080 in this case. If you want to deploy this application to OpenShift, then WebSocket is available on port 8000 for regular access, and 8443 for secure access. This is explained in the figure below:

openshift-websocket-routing

 If you want to run this Chat application on OpenShift, then use the following steps:

  1. Click here to provision a WildFly instance in OpenShift. Change the name to “chatserver” and everything else as default. Click on “Create Application” to create the application.
  2. Clone the workspace:
  3. Edit the first line of “javaee7-samples/websocket/chat/src/main/webapp/websocket.js”from:

    to
  4. Create the WAR file:
  5. Copy the generated WAR file to the workspace cloned earlier:
  6. Remove existing files and add the WAR file to git repository:

    And this shows the output as:

And now your chat server is available at: http://chatserver-milestogo.rhcloud.com and looks like:

techtip51-websocket-chat-output

Enjoy!

Securing WebSocket using wss and HTTPS/TLS (Tech Tip #50)

50th tip on this blog, yaay!

Tech Tip #49 explained how to secure WebSockets using username/password and Servlet Security mechanisms. This Tech Tip will explain how to secure WebSockets using HTTPS/TLS on WildFly.

Lets get started!

  1. Create a new keystore:

    Used “websocket” as the convenience password.
  2. Download WildFly 8.1, unzip, and copy “websocket.keystore” file in standalone/configuration directory.
  3. Start WildFly as
  4. Connect to it using jboss-cli as:
  5. Add a new security realm as:

    And configure it:
  6. Add a new HTTPS listener as:
  7. A simple sample to show TLS-based security for WebSocket is available at github.com/javaee-samples/javaee7-samples/tree/master/websocket/endpoint-wss. Clone the workspace and change directory to “websocket/endpoint-wss”. The sample’s deployment descriptor has:

    This ensures that any request coming to this application will be auto-directed to an HTTPS URL.
  8. Deploy the sample by giving the command:

Now accessing http://localhost:8080/endpoint-wss redirects to https://localhost:8080/endpoint-wss. The browsers may complain about self-signed certificate. For example, Chrome shows the following warning:

techtip50-certificate-chrome

And Safari shows the following warning:

techtip50-certificate

In either case, click on “Proceed to localhost” or “Continue” to proceed further. And then a secure WebSocket connection is established.

Another relevant point to understand is that a non-secure WebSocket connection cannot be made from an https-protected page. For example the following code in our sample:

will throw the following exception in Chrome Developer Tools:

Enjoy!

Securing WebSockets using Username/Password and Servlet Security (Tech Tip #49)

RFC 6455 provide a complete list of security considerations for WebSockets. Some of them are baked in the protocol itself, and others need more explanation on how they can be achieved on a particular server. Lets talk about some of the security built into the protocol itself:

  • The Origin header in HTTP request includes only the information required to identify the principal (web page, JavaScript or any other client) that initiated the request (typically the scheme, host, and port of initiating origin). For WebSockets, this header field is included in the client’s opening handshake. This is used to inform server of the script origin generating the WebSocket connection request. The server may then decide to accept or reject the handshake request accordingly. This allows the server to protect against unauthorized cross-origin use of a WebSocket server by scripts using the WebSocket API in a browser.

    For example, if Java EE 7 WebSocket Chat sample is deployed to WildFly and accessed at localhost:8080/chat/ then the Origin header is “http://localhost:8080″. Non-browser clients may use the Origin header to specify the origin of the request. WebSocket servers should be careful about receiving such requests.
  • WebSocket opening handshake from client must include Sec-WebSocket-Key and Sec-WebSocket-Version HTTP header field. XMLHttpRequest can be used to make HTTP requests, and allows to set headers as part of that request as:

    If XMLHttpRequest tries to set any header fields starting with Sec- then they are ignored. So a malicious user cannot simulate a WebSocket connection to a server by using HTML and JavaScript APIs.

In addition to these two primary ways, WebSockets can be secured using client authentication mechanism available to any HTTP servers. This Tech Tip will show how to authenticate Java EE 7 WebSockets deployed on WildFly.

Lets get started!

  • Clone Java EE 7 Samples workspace:
  • The “websocket/endpoint-security” sample shows how client authentication can be done before the WebSocket handshake is initiated from the client. This is triggered by including the following deployment descriptor:

    Some key points to understand about this descriptor:

    • <url-pattern> indicates that any request made to this application will be prompted for authentication
    • <auth-constraint> defines the security role that can access this resource
    • <login-config> shows that file-based realm is used with basic authentication
    • <security-role> defines the security roles referenced by this application

    In our particular case, the page that creates the WebSocket connection is protected by basic authentication.

  • Download WildFly 8.1, unzip, and add a new user by invoking the following script:

    This will add user “u1″ with password “p1″ in group “g1″. The group specified here needs to match as defined in <role-name> in the deployment descriptor.

  • Deploy the sample by giving the command:

Now when the application is accessed at localhost:8080/endpoint-security then a security dialog box pops up as shown:

techtip49-browser-security-popup

Enter “u1″ as the username and “p1″ as the password to authenticate. These credentials are defined in the group “g1″ which is referenced in the deployment descriptor. Any other credentials will keep bringing the dialog back.

As soon as the request is successfully authenticated, the WebSocket connection is established and a message is shown on the browser.

If you are interested in securing only the WebSocket URL then change the URL pattern from

to

In websocket.js, change the URL to create WebSocket endpoint from:

to

Note, how credentials are passed in the URL itself. As of Google Chrome 38.0.2125.104, a browser popup does not appear if only WebSocket URL requires authentication.

Next Tech Tip will explain how to secure WebSocket using wss:// protocol.

Log your miles and community runs: Java EE 7 Real World Experience

miles2run-logo

miles2run.org is an easy way to track your running activities and share with friends and families. Day-based or distance-based goals can be created and then tracked. It also allows to create community run goals and have multiple runners participate and track their activities towards that goal. You can also find out local runners and connect with them.

The project was started to help track running activities for #JavaOneStreak. The goal was to run at least a mile every day all the way until JavaOne and use this website to track the runs. There are tons of sophisticated applications and websites that allow you to track running activity. Most of them provide integration with your GPS watch, phone GPS, and other fancy features. Some of them even allow creating a group but none of them is based on Java :-)

The application is hosted as a website and built using HTML5 and Java EE 7. The landing page provides a summary of total runners, their city/country, miles, and hours logged so far.

miles2run-landingpage

The website can be viewed on a desktop, tablet, or a cell phone. The runners can login to the website using common social brokers such as Facebook, Google, and Twitter.

Any body can click on “Community Runs” on the top-right corner to see what all group runs have been created so far. These can only be created by an administrator. The group run page for JavaOne shows how many runners have joined this run and other statistics.

miles2run-javaone-mainpage

Each runner is presented with a dashboard showing how much distance they’ve run so far and total/completed/remaining/missed days.

miles2run-javaone-dashboard1

A visual representation of the progress and a heat map of the activity calendar is shown:

miles2run-javaone-dashboard2

A line chart of mileage over the days is shown:

miles2run-javaone-dashboard3

And then a summary of activities over the past months is shown as well:

miles2run-javaone-dashboard4

Runners also have the opportunity to follow other runners and track their activities.

Here is a conceptual view of the application:

miles2run-architecture

And here is a technology view of the application:

miles2run-tech

Here is a brief description of the technology stack:

  • Presentation
    • Thymeleaf template engine views rendered by JAX-RS
    • Social brokering using native APIs for Facebook, Google, Twitter
  • Middle Tier
    • @Stateless EJB for all transactional JPA interactions, @Asynchronous for posting status to social networks
    • JAX-RS for exposing REST endpoints. ContainerRequestFilter and ContainerResponseFilter for security for cross-cutting concerns like authentication, injecting profile, and CORS.
    • Bean Validation constraints in JAX-RS resources.
    • Bean discovery mode=”all”
  • Backend
    • CDI producers for creating EntityManagers and other configuration objects like Redis connection pool objects or MongoDB configuration object. All NoSQL services are created @ApplicationScoped.
    • Using native drivers for Redis and MongoDB. Jedis is being used for Redis and MongoDB Java driver is used for MongoDB. CDI services wrap these driver API and expose business functionalities that other layers could use.
    • JPA + Bean Validation. Database scripts are generated from JPA model, added to source control, manually applied to the database. Using @Index and Entity Graph.
    • Servlets are used for callback URLs for social brokers.
    • Error pages are configured using <error-page>.
    • MySQL is used for all business entities like Activity, Goal, User Profile etc. Redis is used for storing counters and timeline data. MongoDB is used for location-based user recommendations and follower/following recommendations.

Technologies from outside the platform:

  • JavaScript
    • D3.js and C3.js for visually appealing graphs
    • AngularJS for views
    • Cal Heatmap for calendar heatmap
    • jQuery
  • Google Geocoding API to convert Location Text to latitude and longitude
  • Jadira usertype for storing dates in UTC
  • Joda-Time for working with dates
  • Thymeleaf was used instead of JavaServer Faces because:
    • Allows JAX-RS to be used as an MVC framework to render server side HTML pages and exposing REST services.
    • This application is a Single Page application built using AngularJS. So, we needed a lightweight approach to render server side pages. JAX-RS along with Thyemleaf render the main HTML 5 page and then we use AngularJS to render different partials/views on that page. For example, the main home page is rendered by JAX-RS and Thymeleaf. When you work with different sections of this page all of them are part of a SPA managed by AngualarJS.
    • Thymeleaf documents are valid HTML 5 documents so you can work with them offline for static prototyping.
  • Redis is used for storing all the counters like number of runners, cities, counters specific to goal like total distance covered in a goal etc. To avoid lots of read/write from the database, an an in-memory database is used so all the write and read operations are very performant. Redis counters are atomic, which means there are no concurrency issues associated with it. INCR andINCRBY Redis operations are used to update counters.
  • MongoDB is used for location data.

Toolset

  • JDK 8
  • IntelliJ 13.1 with Maven
  • Wildfly 8.1.0.Final – Development was done using a local WildFly instance and then pushed to scalable WildFly instances on OpenShift for deployment. HA Proxy is used as the load balancer.The advantage of working with OpenShift is that there is no OpenShift specific code in your application. So, it’s the same application that work locally that is deployed to test and production environment. You just have to use environment variables to abstract out environment specific configuration.
  • Github

Planned updates

  • Use Jenkins for Continuous Integration and manage deployments
  • JPA 2.1 converter instead of Jadira
  • Keycloak instead of native social broker
  • Opensource the application

Wish list for Java EE 8

  • Integration with OAuth providers
  • A real MVC framework with support for pluggable template engines
  • Seamless working with NoSQL databases

Download WildFly 8.1 today, learn the technology by reading/trying Java EE 7 samples, browse through Java EE 7 resources.

Or if you want to be on the bleeding edge, check out WildFly 9.0.

Many thanks to Shekhar Gulati (@shekhargulati) for authoring the application and providing all the answers!

Are you using Java EE 7 and WildFly to deploy your projects ? Would love to feature you here! Send me an email or leave a comment on the blog.

Load Balance WebSockets using Apache HTTPD (Tech Tip #48)

JBoss EAP 6.3 provides a technology preview of WebSocket and WildFly have supported them as part of Java EE 7 compliance.

github.com/javaee-samples/javaee7-samples/tree/master/websocket provide tons of Java EE 7 samples that run on WildFly. If you are interested in similar functionality on JBoss EAP 6.3 then github.com/jboss-developer/jboss-eap-quickstarts/tree/6.4.x-develop/websocket-hello is a quickstart. In addition, there are a few more samples at github.com/arun-gupta/jboss-samples/tree/master/eap63.

One of the common questions asked related to WebSockets is how to how to load balance  them. This Tech Tip will explain that for WildFly and JBoss EAP 6.3.

First, what are the main components ?

  • At least Apache HTTPD 2.4.5 is required. Now HTTPD binaries are not available for Mac but fortunately compiling instructions are explained clearly in Tech Tip #45.
  • mod_proxy_wstunnel is an Apache module that provides support for tunneling of Web Socket connections to a backend Web Sockets server, such as WildFly or JBoss EAP. It is a support module to mod_proxy that provide support for a number of popular protocols as well as several different load balancing algorithms. The connection is automagically upgraded to a WebSocket connection.  And all the modules are already included in the modules directory.
  • mod_proxy_balancer module is required that provides load balancing for HTTP and other protocols.

Let’s go!

  1. Download and unzip WildFly 8.1.
  2. Start WildFly 8.1 in domain mode using ./bin/domain.sh.
  3. Download this chat sample, rename the file to “chat.war” and deploy to “main-server-group” as:

    The only difference from the original Java EE 7 WebSocket Chat sample is the addition of System.getProperty("jboss.node.name") to display the name of WildFly instance serving the application. The source code is available at github.com/arun-gupta/wildfly-samples/tree/master/websocket-loadbalance.
  4. Uncomment the following lines in /usr/local/apache2/conf/httpd.conf:

    This will enable all the required modules.
  5. Add the following code fragment at the end of “httpd.conf”:

    Proxy is a container for proxied resources and is creating a load balancing group in this case using balancer directive. BalancerMember adds a member to this load balancing group.  ProxyPass is a standard directive that maps remote servers running on different ports into the space of the local server. In this case, WildFly is started in domain mode and so starts two instances on port 8080 and 8230. Both of these instances are mapped to localhost:80, which is where Apache HTTPD is running by default.

The deployed chat sample is now accessible at localhost:8080/chat (first instance in the managed domain), localhost:8230/chat (second WildFly instance in the managed domain), and localhost/chat (via Apache HTTPD).

Now even if you kill one of the WildFly instances, the other instance will continue to serve the client. Note, this only gives application availability as there is no session failover in this.

This was also verified on JBoss EAP 6.3 and there are a few differences:

  1. Use the sample from github.com/arun-gupta/jboss-samples/tree/master/eap63/websocket-chat instead.
  2. The generated archive name is different and so the command would look slightly different too:
  3. Configure “httpd.conf” as:

And that’s it!

Watch this live in action:

An important point to understand is that there is no concept of “sticky sessions” in WebSocket as, unlike HTTP, there is a direct and “permanent” connection between the client and the server in this case.

Enjoy!

Java EE 7 Real World Experience: Campground Management with Tipi.camp

tipicamp-logo

Tipi.camp provides a simple campground management software and targets 25,000+ independent campgrounds all over Europe. It provides a customer-friendly booking-portal and a RESTful API for partners to integrate. The project was conceived in September 2013 when Christoph returned from vacation, disappointed because of the missed booking for their tent. And now he has created a new solution connecting campers and campgrounds with each other.

The website offers a SaaS where campgrounds can register their camp sites and campers can look at the availability of these campgrounds, check out their calendar, pick a site and make a reservation. It is also available for on-site installation if you prefer running it on your domain. Think of it as koa.com, but available to all the independent campgrounds and much more modern ;)

The landing page is certainly very fancy:

tipicamp-opening-page

Websites of smaller campgrounds are typically characterized by low data maintenance and absence of a booking possibility. tipi.camp has advantages:

  • Easy-to-use portal for campground owners and campers
  • Campground owner administrate and book his sites independently
  • Customer data management
  • External sales channels, for example booking.com, can be connected to sell the log cabins
  • RESTful API it is also possible to handle larger individual installations

Campgrounds get their own portal, reservations, channel management, email and much more for €1/day if they are located in Europe or $1/day if they are in US. Each campground with an Internet connection and browser (whether computer or iPad) can use the software.

In terms of the overall flow, campground owner register their campground with tipi.camp. Traveler checks out the calendar and books the campground using the responsive portal.

tipicamp-architecture


Check out the welcome page:

tipicamp-welcome

Campers can search through the available camps and then look at the calendar of a particular camp:

tipicamp-calendar

Pick a particular site on the campground:

tipicamp-maps

And then checkout to make the payment:

tipicamp-checkout

This website is built using Java EE 7:

tipicamp-technology


Here is a brief description of the technology stack:

  • Presentation
    • JavaServer Faces + Expression Language. Different templates are used for desktop and iPad apps. JSF Template Library might be used to provide a fully customized portal for the campground owners later.
    • Security: JAAS Principal + JDBC realm
    • Bean discovery mode=”all”
  • Middle Tier
    • EJB for business boundaries
    • Servlets with JSON for web hooks: response from Paypal and Sendgrid
    • JAX-RS for exposing API to partners
  • Backend
    • JPA + Bean Validation, use @Index for database generation during development. Flyway API for database migrations in production.
    • Concurrency: Calculation of statistics and sending messages, Sendgrid takes ~1-4 seconds to send messages
    • Using @Startup @Singleton @Schedule to run a job at pre-defined time

Technologies from outside the platform were:

  • Primefaces 5 for the GUI and Bootstrap for the responsive Enduser-Portal.
  • Sendgrid API for sending mails. This is required as opposed to JavaMail because specific meta information needs to be added to each email.
  • Misc apache commons (eq. FileUtils.writeByteArrayToFile or IOUtils.toByteArray) – there are only a few sections.
  • Flyway API for database migrations
  • Junit with Derby – for testing

Toolset

  • JDK 8
  • IntelliJ 13.1 with Maven
  • Wildfly 8.1.0.Final – Single instance of WildFly is used. The app was previously deployed on GlassFish.
  • Apache httpd is used to:
    • performance-tuning with KeepAlive, mod_expires for the images and the compression
    • easy SSL configuration
    • handle more WildFly under 1 hostname with the mod_proxy
    • mod_redirect for redirect all http requests to the app to https
  • Github
  • Jenkins
  • loader.io for Load-Testing
  • Currently the application is deployed on a self-hostet Linux-Server in the hetzner.de data center.

Wish list for Java EE 8

  • Most used Apache Commons Libs
  • @Temporal works with LocalDate and LocalDateTime
  • Batch processing API does support generics

And here are supporting quotes on Java EE 7

And on WildFly:

So, do you want to start on this terrific two combination of Java EE 7 + WildFly ?

Download WildFly 8.1 today, learn the technology by reading/trying Java EE 7 samples, browse through Java EE 7 resources.

Or if you want to be on the bleeding edge, check out WildFly 9.0.

Many thanks to Christoph Gapp () and Adam Bien (@adambien) for providing all the answers!

Are you using Java EE 7 and WildFly to deploy your projects ? Would love to feature you here! Send me an email or leave a comment on the blog.


Java EE 7 Javadocs Download, Online, Tutorial, Samples (Tech Tip #42)

I was surprised when Google could not find Java EE 7 Javadocs download link clearly on the first page. StackOverflow was helpful here again, but even that was the last link on first page.

Now, I do know the location and can find my ways around. But this needs to be simplified and made more accessible for developers around the world.

So here are some usual Java EE 7 references:

  • Java EE 7 Javadocs Download Full Platform (bit.ly/ee7-javadocs), Web Profile
  • Java EE 7 Javadocs Online
  • Java EE 7 Tutorial
  • Java EE 7 Whitepaper
  • Java EE 7 Samples

Javadocs can also be installed on Dash as explained in Antonio’s blog.

And as usual, you can download WildFly or GlassFish to get started with Java EE 7!

Enjoy!

Adding Java EE 7 Batch Addon to JBoss Forge ? – Part 6 (Tech Tip #40)

This is the sixth part (part 1part 2, part 3, part 4, part 5) of a multi-part video series where Lincoln Baxter (@lincolnthree) and I are interactively building a Forge addon to add Java EE 7 Batch functionality.

Part 1 showed how to get started with creating an addon, add relevant POM dependencies, build and install the addon using Forge shell, add a new command batch-new-jobxml, and add --reader--processor--writer parameters to the newly added command.

Part 2 showed how to identify classes for each CLI parameter that already honor the contract required by the Batch specification.

Part 3 showed how parameters can be made required, created templates for reader, processor, and writer, validated the specified parameters.

Part 4 added a new test for the command and showed how Forge can be used in debug mode.

Part 5 fixed a bug reported by a community member and started work to make processor validation optional.

This part shows:

  • Upgrade from Forge 2.6.0 to 2.7.1
  • Fix the failing test
  • Reader, processor, and writer files are now templates instead of source files
  • Reader, processor, and writer are injected appropriately in test’s temp project

Enjoy!

As always, the evolving source code is available at github.com/javaee-samples/forge-addons. The debugging will continue in the next episode.

Adding Java EE 7 Batch Addon to JBoss Forge ? – Part 5 (Tech Tip #38)

This is the fifth part (part 1part 2, part 3, part 4) of a multi-part video series where Lincoln Baxter (@lincolnthree) and I are interactively building a Forge addon to add Java EE 7 Batch functionality.

Part 1 showed how to get started with creating an addon, add relevant POM dependencies, build and install the addon using Forge shell, add a new command batch-new-jobxml, and add --reader--processor--writer parameters to the newly added command.

Part 2 showed how to identify classes for each CLI parameter that already honor the contract required by the Batch specification.

Part 3 showed how parameters can be made required, created templates for reader, processor, and writer, validated the specified parameters.

Part 4 added a new test for the command and showed how Forge can be used in debug mode.

This part shows:

  • Fix a bug reported by a community member
  • Started work another issue to make processor validation optional

Enjoy!

As always, the evolving source code is available at github.com/javaee-samples/forge-addons. The debugging will continue in the next episode.

Defaults in Java EE 7 (Tech Tip #37)

Java EE 7 platform added a few new specifications to the platform:

  • Java API for WebSocket 1.0
  • Batch Applications for Java 1.0
  • Java API for JSON Processing 1.0
  • Concurrency Utilities for Java EE 1.0

This is highlighted in the pancake diagram shown below:

javaee7-pancake

Several of the existing specifications were updated to fill the gaps and provide a more cohesive platform. Some small, but rather significant additions, were made to the platform to provide defaults for different features. These defaults would lower the bar for application developers to build Java EE applications.

Lets take a look at them.

  • Default CDI: Java EE 6 required “beans.xml” in an archive to enable CDI. This was mostly a marker file. So you could bundle a completely empty “beans.xml” in the archive and that would enable injection. Of course, you could specify a lot of other elements in this file such as interceptors, decorators, alternative but the basic dependency injection was enabled by just the mere inclusion of this file.This was one of the biggest source of confusion of why beans were not getting injected in a Java EE 7 archive, and was asked on several forums and other channels.

    Java EE 7 made that “beans.xml” optional and provided a default behavior. Now if this file is not bundled, all CDI-scoped beans are available for injection. So any bean with an explicitly specified scope is available for injection. Scopes defined by the CDI specification are listed at docs.oracle.com/javaee/7/api/javax/enterprise/context/package-summary.html. Specifically, here are the scopes defined by CDI:

    • @ApplicationScoped
    • @ConversationScoped
    • @Dependent
    • @NormalScope
    • @RequestScoped
    • @SessionScoped

    In addition, two new scopes are introduced in Java EE 7:

    • @FlowScoped
    • @TransactionScoped

    So, any bean with these scopes will be available for injection, in other beans only, without the presence of “beans.xml”.

    Check it out in action at github.com/javaee-samples/javaee7-samples/tree/master/cdi/nobeans-xml.

  • Default data source: A Java EE runtime, a.k.a application server, requires to package a database with it. If you are building a Java EE application, you likely will need some sort of data store or RBDMS to store the data. So this makes perfect sense.For example, WildFly bundles in-memory H2 database.Now, you can certainly use another JDBC-compliant database but bundling a database makes it convenient to start with. However, in order to get started, Java EE 6 still required to create JDBC resources in an application server-specific way. This would mean understanding app server-specific tools.

    Java EE 7 simplified it by providing a default data source with a pre-defined JNDI name.This mean you can inject a data source as:

    Also, your persistence.xml can look like:

    Note, no <jta-data-source>.

    In both of these circumstances, a default data source with JNDI name java:comp/DefaultDataSource is bound to your application-server specific JDBC resource.

    The exact data source in WildFly can be verified using jboss-cli script as:

    Check it out in action at github.com/javaee-samples/javaee7-samples/tree/master/jpa/default-datasource.

  • Create JMS connection factory, queues, and topics: An application using JMS topics and queues in Java EE 6 would require a deployment script to create Connection Factory and Queues/Topics. These would again be done in an application server-specific way.Java EE 7 provide annotations @JMSConnectionFactoryDefinition and @JMSConnectionFactoryDefinitions that are read by the Java EE 7 runtime and ensures that the ConnectionFactory specified by these annotations is provisioned in the operational environment.

    Similarly, @JMSDestinationDefinition and @JMSDestinationDefinitions can be used to create Topics/Queues as part of application deployment.So no more deployment scripts, just include annotation in your code ?

    Check it out in action at github.com/javaee-samples/javaee7-samples/tree/master/jms/send-receive.

  • Default JMS connection factory: Just like default data source, a default JMS resource allows you to avoid creating a JMSConnectionFactory in an appserver-specific way to deploy the application using JMS resources.Injection of a JMS Producer or Consumer in Java EE 6 required to get an instance of application-managed or container-managed JMSConnectionFactory. This factory had to be manually created in an application-server specific way.Providing a default JMSConnectionFactory simplifies this step further.

    JMS 2.0 also introduced JMSContext as entry point to the simplified API, and it can be injected simply as:

    Not specifying a ConnectionFactory means the default one will be used. And it has the JNDI name of jms/DefaultJMSConnectionFactory.

    The JNDI name may be mapped to the appserver-specific JMS provider. For example, in case of WildFly it is defined as:

    Check it out in action at github.com/javaee-samples/javaee7-samples/tree/master/jms/send-receive.

  • Default executors: Concurrency Utilities for Java EE introduced four different managed objects:
    • ManagedExecutorService
    • ScheduledManagedExecutorService
    • ContextService
    • ManagedThreadFactory

    These objects allow user to create application threads that are managed by the Java EE server runtime. Once again, a default and pre-configured managed object, with a well-defined JNDI name, is made available for each one of them.

    This allows a user to inject a ManagedExecutorService as:

    instead of:

    Default ManagedExecutorService in WildFly can be found as:

    Similarly other default managed objects can be found.

    Check out different executors in action at github.com/javaee-samples/javaee7-samples/tree/master/concurrency.

With so many simplifications, why would you not like to use Java EE 7 platform ?

And WildFly is a fantastic application server too :-)

Download WildFly now, and get started!

Testable Java EE 7 Maven Archetype, using Arquillian (Tech Tip #34)

There is a Maven archetype to create Java EE 7 application:

It generates a simple “pom.xml” with Java EE 7 API <dependency>. It does the job to get started with building the application. But how do you test this app ?

Of course, you write unit and integration tests. But how do you run these tests, especially in a container-independent manner ?

That’s where Arquillian comes in!

Arquillian guides explain how to write real tests, but you still need to figure out Maven dependencies, create profiles, figure out container dependencies, and more. That’s still too much work :)

Meet a new Maven archetype that generates a Java EE 7 app, with profiles pre-configured for WildFly and GlassFish.

The four profiles are:

  1. wildfly-remote-arquillian
  2. wildfly-managed-arquillian
  3. glassfish-remote-arquillian
  4. glassfish-embedded-arquillian

The first profile is the most natural to start with. It requires to download WildFly 8.1, unzip and start using ./bin/standalone.sh. Then you can run the test as:

to see the result as:

This is useful if tests need to be executed multiple times on the same WildFly instance.

The second profile is the easiest to start with, and does not require any manual downloading. Using the profile downloads WildFly (8.0.0 at this time) to Maven repository, installs it in the “target” directory, starts the server, deploys the WAR file, runs the test, and stops the server.

“glassfish-remote-arquillian” profile is like “wildfly-remote-arquillian” where an instance of GlassFish is started externally and tests are run in the usual manner. This profile does not work at this moment because of ARQ-1596.

“glassfish-embedded-arquillian” is like “wildfly-managed-arquillian” where GlassFish container is downloaded transparently using the Maven dependencies, starts the container, deploys the app, runs the test, and stops the container.

Archetype source code is at: github.com/javaee-samples/javaee7-archetypes/tree/master/javaee7-archetype and the archetype is published at search.maven.org/#search%7Cga%7C1%7Cjavaee7-arquillian-archetype.

Many thanks to @aslakknutsen for publishing this archetype!

A complete working sample can be checked out from github.com/arun-gupta/wildfly-samples/tree/master/arquillian.

Let us know if you find this useful and how would you use it.

Adding Java EE 7 Batch Addon to JBoss Forge ? – Part 3 (Tech Tip #26)

This is the third part (part 1, part 2) of a multi-part video series where Lincoln Baxter (@lincolnthree) and I are interactively building a Forge addon to add Java EE 7 Batch functionality.

Part 1 showed how to get started with creating an addon, add relevant POM dependencies, build and install the addon using Forge shell, add a new command batch-new-jobxml, and add --reader--processor--writer parameters to the newly added command. Part 2 showed how to identify classes for each CLI parameter that already honor the contract required by the Batch specification. This part shows how:

  • Parameters can be made required
  • Add an attribute to accept jobXML name
  • Check that the reader, processor, and writer are annotated with @Named
  • Create templates for reader, processor, writer, and jobXML
  • Use templating language to replace the name of chosen reader, processor, writer

Enjoy!

As earlier, the evolving source code is available at github.com/javaee-samples/forge-addons. The source code is compiling fine but not serving the intended purpose yet. It will be further debugged in the next episode, coming later this week.

Adding Java EE 7 Batch Addon to JBoss Forge ? – Part 2 (Tech Tip #24)

This is the second part (part 1) of a multi-part video series where Lincoln Baxter (@lincolnthree) and I are interactively building a Forge addon to adding Java EE 7 Batch functionality.

Part 1 showed how to get started with creating an addon, add relevant POM dependencies, build and install the addon using Forge shell, and add parameters to the addon. This part shows how to add some meaningful semantics to those parameters.

Java EE 7 Batch define item-oriented processing where an item is read, optionally processed, and then written. Items could be read from an input source, CSV file, JMS destination, REST endpoint, database, or any other source. Similarly items can be written to an output stream, database, or some where else. This logic of reading, processing, and writing is captured in beans that are packaged in your WAR file. These beans need to either extend from a specific interface or extend an abstract class. For example item reader needs to either implement ItemReader interface or extends AbstractItemReader abstract class. Similarly item writer needs to either implement ItemWriter interface or extend <code<AbstractItemWriter abstract class. Item processor need to implement ItemProcessor interface.

Part 1 showed how to add --reader, --processor, --writer parameters to the newly added batch-new-jobxml command. This part will show how to identify classes for each CLI parameter that already honor the contract required by the Batch specification.

Enjoy!

As earlier, the evolving source code is available at github.com/javaee-samples/forge-addons.

The timing for the next recording is unknown at this time because of my travel schedule, but sometime next week.