Miles to go …

October 8, 2009

TOTD #112: Exposing Oracle database tables as RESTful entities using JAX-RS, GlassFish, and NetBeans

Filed under: frameworks, glassfish, javaee, netbeans, totd, webservices — Tags: , , , , — arungupta @ 2:29 am

This Tip Of The Day explains how to expose an existing Oracle database table as a RESTful Web service endpoint using NetBeans tooling and deployed on GlassFish.

Lets get started!

  1. Configure GlassFish v3 10/7 or a later nightly in a recent NetBeans 6.8 build (latest nightly). As issue# 9885 is fixed, so copy ojdbc6.jar in the "domains/domain1/lib/ext" directory.
  2. Create a Web application

    1. Create a new "Web application" and name the project "RestfulOracle":

      click on "Next >".

    2. Choose the newly added server and "Java EE 6 Web" as the Java EE version:

      and click on "Finish".

  3. Create JPA entities for "HR" schema. The steps outlined below uses NetBeans solely for creating the JPA entities. Alternatively, TOTD #108 explains how to define a JDBC connection pool and JDBC resource using "asadmin" CLI and then use that resource from within NetBeans. Either way, the JDBC resource is stored in the underlying "domain.xml".

    1. Right-click on the project and select "New", "Entity Classes from Database…".
    2. In "Data Source:" select "New Data Source…" as shown below:

    3. Specify the JNDI name as "jdbc/hr" and choose the pre-configured database connection as shown below:

      TOTD #107 explains how to configure Oracle database in NetBeans.

    4. In the list of "Available Tables:", select "EMPLOYEES" and click on "Add >" to see the following:

      Notice the list of related tables are included as well. Click on "Next >".

    5. Specify the package name as "model".
    6. Click on "Create Persistence Unit…", take the defaults, and click on "Create":

      and click on "Finish". Notice EclipseLink, the reference implementation for JPA 2.0, is used as the persistence provider. This generates POJOs that provide database access using JPA 2.0 APIs. These APIs are included as part of the Java EE 6 platform.

  4. Create RESTful entities

    1. Right-click on the project and select "RESTful Web Services from Entity Classes…":

    2. Select "Employees (model.Employees)" from "Available Entity Classes:" and click on "Add >" to see the following:

      click on "Next >", take the defaults, and click on "Finish". This generates a bunch of wrapper classes using JAX-RS to expose the JPA Entity classes as RESTful Web services. JAX-RS 1.1 is also included as part of the Java EE 6 platform.

  5. Run the Web service

    1. Right-click the project and select "Test RESTful Web Services":

      This deploys the created Web application on the selected GlassFish build and displays the following page in the default browser:

    2. Click on "deparmentss" and then on "Test" button to see the output as:

      Clicking the "Test" button issues a GET request to "http://localhost:8080/RestfulOracle/resources/departmentss". This uses the generated JAX-RS wrapper classes to talk to the database using JPA entity classes and query the first 10 rows from the "DEPARTMENTS" table. The response is then JSON formatted using JAX-RS wrapper classes and is returned to the requesting page which then displays it nicely formatted in the table. It also shows l-level deep department’s relationship to other entities. If the "expandLevel" on the above page is set to "0", then the following output is shown:

      The "Raw View" (JSON data) of the original output looks like:

      Notice this is the raw JSON output generated by the JAX-RS wrapper classes. The "Http Monitor" traffic looks like:

      The format of data returned can be changed from "application/json" to "application/xml" as shown below:

      And even a POST request can be generated.

Do you have the need to expose your Oracle database tables as RESTful entities ?

A complete archive of all the TOTDs is available here.

This and other similar applications will be demonstrated at the upcoming Oracle Open World.

Technorati: totd oracle database glassfish v3 netbeans javaee jax-rs jpa rest

Share and Enjoy:
  • Print
  • Digg
  • Sphinn
  • del.icio.us
  • Facebook
  • Google Bookmarks
  • DZone
  • StumbleUpon
  • Technorati
  • Twitter
  • Slashdot

August 19, 2009

TOTD #96: GlassFish v3 REST Interface to Monitoring and Management – JSON, XML, and HTML representations

Filed under: admin, totd — Tags: , , , , , , — arungupta @ 11:00 pm

GlassFish Monitoring allows you to monitor the state of various runtime components of the application server. This information is used to identify performance bottlenecks and tuning the system for optimal performance, to aid capacity planning, to predict failures, to do root cause analysis in case of failures and sometimes to just ensure that everything is functioning as expected.

GlassFish Management allows you to manage the running Application Server instance such as query/create/delete resources (JDBC, JMS, etc), stop/restart the instance, rotate the log and other similar functions.

GlassFish v3 exposes Monitoring and Management data using a REST Interface. This Tip Of The Day (TOTD) shows how to play with this new functionality. Rajeshwar’s blog has lot of useful information on this topic.

Most of the functionality available in web-based Admin Console and CLI (asadmin) is now available using the REST interface. Both of these are pre-built tools that ships with the GlassFish bundle. The REST interface is a lower level API that enables toolkit developers and IT administrators to write their custom scripts/clients using language of their choice such as Java, JavaScript, Ruby or Groovy.

The default URL for the REST interface of monitoring is “http://localhost:4848/monitoring/domain” and for the management is “http://localhost:4848/management/domain”. Each URL provides an XML, JSON and HTML representation of the resources. If a web browser is used then a HTML representation is returned and displayed nicely in the browser. Rajeshwar’s blog described a Java client written using Jersey Client APIs that can be used to make all the GET/PUT/POST/DELETE requests. This blog will use something more basic, and extremely popular, to make all the RESTful invocations – cURL.

At this time the monitoring resources are read-only (GET) and management can be done using GET/POST/DELETE methods. POST is used for creating and updating resources/objects and the updates can be partial.

Lets get started.

  1. Download the latest continuous build from the trunk and unzip. This functionality is also available in the Web profile bundle. This blog is using build #2023.
  2. Start the application server as:
    ~/tools/glassfish/v3/2023/glassfishv3 >./bin/asadmin start-domain –verbose

    Aug 19, 2009 9:52:45 AM com.sun.enterprise.admin.launcher.GFLauncherLogger info
    INFO: JVM invocation command line:
    /System/Library/Frameworks/JavaVM.framework/Versions/1.6/Home/bin/java
    -cp

    . . .

    INFO: felix.fileinstall.dir            /Users/arungupta/tools/glassfish/v3/2023/glassfishv3/glassfish/domains/domain1/autodeploy-bundles
    Aug 19, 2009 9:53:05 AM
    INFO: felix.fileinstall.debug          1
    Aug 19, 2009 9:53:05 AM
    INFO: felix.fileinstall.bundles.new.start          true

  3. Monitoring information – Lets monitor this GlassFish instance using the REST interface.
    1. Retrieve JSON information – As mentioned above, the monitoring resources are read-only and so the information can be accessed as:
      ~/tools/glassfish/v3/2023/glassfishv3 >curl -H “Accept: application/json” http://localhost:4848/monitoring/domain -v
      * About to connect() to localhost port 4848 (#0)
      *   Trying ::1… connected
      * Connected to localhost (::1) port 4848 (#0)
      > GET /monitoring/domain HTTP/1.1
      > User-Agent: curl/7.16.3 (powerpc-apple-darwin9.0) libcurl/7.16.3 OpenSSL/0.9.7l zlib/1.2.3
      > Host: localhost:4848
      > Accept: application/json
      >
      < HTTP/1.1 200 OK
      < Content-Type: application/json
      < Transfer-Encoding: chunked
      < Date: Wed, 19 Aug 2009 17:40:29 GMT
      <
      {Domain:{},”child-resources”:["http://localhost:4848/monitoring/domain/server"]}
      * Connection #0 to host localhost left intact
      * Closing connection #0

      The command explicitly asks for JSON representation of the resources. The outbound headers are prepended with “>” and inbound headers with “<”. And the JSON representation is shown in the last line as:

      {Domain:{},”child-resources”:["http://localhost:4848/monitoring/domain/server"]}

      The key element to remember here is “http://localhost:4848/monitoring/domain/server” which can be used to retrieve more monitoring information.

    2. XML represetation: Lets change the command to ask for XML representation as:
      ~/tools/glassfish/v3/2023/glassfishv3 >curl -H “Accept: application/xml” http://localhost:4848/monitoring/domain -v
      * About to connect() to localhost port 4848 (#0)
      *   Trying ::1… connected
      * Connected to localhost (::1) port 4848 (#0)
      > GET /monitoring/domain HTTP/1.1
      > User-Agent: curl/7.16.3 (powerpc-apple-darwin9.0) libcurl/7.16.3 OpenSSL/0.9.7l zlib/1.2.3
      > Host: localhost:4848
      > Accept: application/xml
      >
      < HTTP/1.1 200 OK
      < Content-Type: application/xml
      < Transfer-Encoding: chunked
      < Date: Wed, 19 Aug 2009 17:43:51 GMT
      <
      <Domain>
      <child-resource>http://localhost:4848/monitoring/domain/server</child-resource>
      </Domain>
      * Connection #0 to host localhost left intact
      * Closing connection #0

      The command changes the “Accept” header to “application/xml” and now the XML representation of the monitoring resources is returned as:

      <Domain>
      <child-resource>http://localhost:4848/monitoring/domain/server</child-resource>
      </Domain>
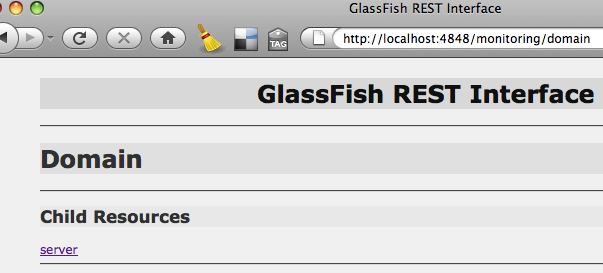
    3. HTML representation: The command can be altered to get the HTML representation as “curl -H “Accept: text/html” http://localhost
      :4848/monitoring/domain -v
      “. But HTML is more pleasant when rendered by a browser and so viewing the page “http://localhost:4848/monitoring/domain” in the browser is shown as:

    4. Get more information: As mentioned above, more information about this GlassFish instance can be accessed by GETing from “http://localhost:4848/monitoring/domain/server” and here is the result:
      </tools/glassfish/v3/2023/glassfishv3 >curl -H “Accept: application/json” http://localhost:4848/monitoring/domain/server -v
      * About to connect() to localhost port 4848 (#0)
      *   Trying ::1… connected
      * Connected to localhost (::1) port 4848 (#0)
      > GET /monitoring/domain/server HTTP/1.1
      > User-Agent: curl/7.16.3 (powerpc-apple-darwin9.0) libcurl/7.16.3 OpenSSL/0.9.7l zlib/1.2.3
      > Host: localhost:4848
      > Accept: application/json
      >
      < HTTP/1.1 200 OK
      < Content-Type: application/json
      < Transfer-Encoding: chunked
      < Date: Wed, 19 Aug 2009 17:56:41 GMT
      <
      {Server:{},”child-resources”:["http://localhost:4848/monitoring/domain/server/webintegration",
      "http://localhost:4848/monitoring/domain/server/transaction-service",
      "http://localhost:4848/monitoring/domain/server/network",
      "http://localhost:4848/monitoring/domain/server/jvm",
      "http://localhost:4848/monitoring/domain/server/web",
      "http://localhost:4848/monitoring/domain/server/realm",
      "http://localhost:4848/monitoring/domain/server/http-service"]}
      * Connection #0 to host localhost left intact
      * Closing connection #0

      An HTML rendering of this representation looks like:

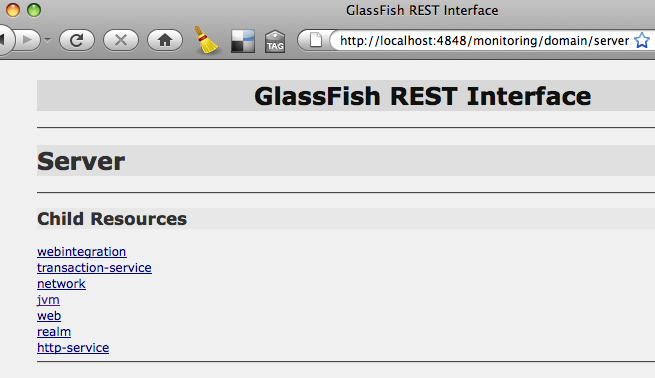
      You can keep clicking on the links and more detailed information about that resource is displayed. This is just one HTML representation and is purposely kept light-weight. You can certainly grab the XML representation and apply an XSLT to generate your own HTML rendering.

      The monitoring levels for different modules can be easily changed using the management REST interface as explained below.

  4. Management of the GlassFish instance
    1. Lets see all the options supported by management REST interface as:
      ~/tools/glassfish/v3/2023/glassfishv3 >curl -X OPTIONS http://localhost:4848/management/domain -v
      * About to connect() to localhost port 4848 (#0)
      *   Trying ::1… connected
      * Connected to localhost (::1) port 4848 (#0)
      > OPTIONS /management/domain HTTP/1.1
      > User-Agent: curl/7.16.3 (powerpc-apple-darwin9.0) libcurl/7.16.3 OpenSSL/0.9.7l zlib/1.2.3
      > Host: localhost:4848
      > Accept: */*
      >
      < HTTP/1.1 200 OK
      < Content-Type: application/json
      < Transfer-Encoding: chunked
      < Date: Wed, 19 Aug 2009 18:07:14 GMT
      <
      {
      “Method”:”GET”

      “Method”:”PUT”
      }
      * Connection #0 to host localhost left intact
      * Closing connection #0

      Specifying “-X OPTIONS” switch displays the various HTTP methods supported by the REST interface. Even though the results show GET and PUT, but it really means GET and POST (issue #9177). Lets try “GET” first.

    2. GET JSON information as:
      ~/tools/glassfish/v3/2023/glassfishv3 >curl -H “Accept: application/json” http://localhost:4848/management/domain -v
      * About to connect() to localhost port 4848 (#0)
      *   Trying ::1… connected
      * Connected to localhost (::1) port 4848 (#0)
      > GET /management/domain HTTP/1.1
      > User-Agent: curl/7.16.3 (powerpc-apple-darwin9.0) libcurl/7.16.3 OpenSSL/0.9.7l zlib/1.2.3
      > Host: localhost:4848
      > Accept: application/json
      >
      < HTTP/1.1 200 OK
      < Content-Type: application/json
      < Transfer-Encoding: chunked
      < Date: Wed, 19 Aug 2009 18:14:46 GMT
      <
      {Domain:{“log-root” : “${com.sun.aas.instanceRoot}/logs”,”application-root” : “${com.sun.aas.instanceRoot}/applications”,”locale” : “”,”version” : “re-continuous”},”child-resources”:["http://localhost:4848/management/domain/configs",
      "http://localhost:4848/management/domain/resources","http://localhost:4848/management/domain/servers",
      "http://localhost:4848/management/domain/property","http://localhost:4848/management/domain/applications",
      "http://localhost:4848/management/domain/system-applications","http://localhost:4848/management/domain/stop",
      "http://localhost:4848/management/domain/restart","http://localhost:4848/management/domain/uptime",
      "http://localhost:4848/management/domain/version","http://localhost:4848/management/domain/rotate-log",
      "http://localhost:4848/management/domain/host-port"]}
      * Connection #0 to host localhost left intact
      * Closing connection #0

      As the result shows, there are several RESTful URLs available (in “child-resources” element) to manage this GlassFish instance. For example:

      1. Show the host/port of GlassFish instance as:
        curl -H “Accept: application/json” http://localhost:4848/management/domain/host-port -v

        will show the result as:

        {“GetHostAndPort”:{“value” : “dhcp-usca14-132-79.SFBay.Sun.COM:8080″}}
      2. Show that web-based Admin Console is pre-installed as system application using:
        curl -H “Accept: application/json” http://localhost:4848/management/domain/system-applications/application/__admingui -v

        will show the result as:

        {__admingui:{“libraries” : “”,”availability-enabled” : “false”,”enabled” : “true”,”context-root” : “”,”location” : “${com.sun.aas.installRootURI}/lib/install/applications/__admingui”,”description” : “”,”name” : “__admingui”,”directory-deployed” : “true”,”object-type” : “system-admin”},”child-resources”:["http://localhost:4848/management/domain/system-applications/application/__admingui/module"]} td>
      3. Query the monitoring levels of different modules as:
        curl -H “Accept: application/json” http://localhost:4848/management/domain/configs/config/server-config/monitoring-service/module-monitoring-levels -v

        to see the result as:

        {ModuleMonitoringLevels:{“transaction-service” : “OFF”,”ejb-container” : “OFF”,”jdbc-connection-pool” : “OFF”,”orb” : “OFF”,”http-service” : “OFF”,”connector-connection-pool” : “OFF”,”jms-service” : “OFF”,”connector-service” : “OFF”,”jvm” : “OFF”,”thread-pool” : “OFF”,”web-container” : “OFF”},”child-resources”:[]}

        And then change the monitoring level of Web container as:

        ~/tools/glassfish/v3/2023/glassfishv3 >curl -X POST -d “web-container=ON” -H “Accept: application/json” http://localhost:4848/management/domain/configs/config/server-config/monitoring-service/module-monitoring-levels -v
        * About to connect() to localhost port 4848 (#0)
        *   Trying ::1… connected
        * Connected to localhost (::1) port 4848 (#0)
        > POST /management/domain/configs/config/server-config/monitoring-service/module-monitoring-levels HTTP/1.1
        > User-Agent: curl/7.16.3 (powerpc-apple-darwin9.0) libcurl/7.16.3 OpenSSL/0.9.7l zlib/1.2.3
        > Host: localhost:4848
        > Accept: application/json
        > Content-Length: 16
        > Content-Type: application/x-www-form-urlencoded
        >
        < HTTP/1.1 200 OK
        < Content-Type: application/json
        < Transfer-Encoding: chunked
        < Date: Wed, 19 Aug 2009 22:01:31 GMT
        <
        * Connection #0 to host localhost left intact
        * Closing connection #0
        “http://localhost:4848/management/domain/configs/config/server-config/monitoring-service/module-monitoring-levels” updated successfully

        The last line shows that the monitoring level is successfull updated and can be verified again as:

        ~/tools/glassfish/v3/2023/glassfishv3 >curl -H “Accept: application/json” http://localhost:4848/management/domain/configs/config/server-config/monitoring-service/module-monitoring-levels -v
        * About to connect() to localhost port 4848 (#0)
        *   Trying ::1… connected
        * Connected to localhost (::1) port 4848 (#0)
        > GET /management/domain/configs/config/server-config/monitoring-service/module-monitoring-levels HTTP/1.1
        > User-Agent: curl/7.16.3 (powerpc-apple-darwin9.0) libcurl/7.16.3 OpenSSL/0.9.7l zlib/1.2.3
        > Host: localhost:4848
        > Accept: application/json
        >
        < HTTP/1.1 200 OK
        < Content-Type: application/json
        < Transfer-Encoding: chunked
        < Date: Wed, 19 Aug 2009 22:36:47 GMT
        <
        * Connection #0 to host localhost left intact
        * Closing connection #0
        {ModuleMonitoringLevels:{“transaction-service” : “OFF”,”ejb-container” : “OFF”,”jdbc-connection-pool” : “OFF”,”orb” : “OFF”,”http-service” : “OFF”,”connector-connection-pool” : “OFF”,”jms-service” : “OFF”,”connector-service” : “OFF”,”jvm” : “OFF”,”thread-pool” : “OFF”,”web-container” : “ON”},”child-resources”:[]}
      4. Stop this GlassFish instance using:
        curl -H “Accept: application/json” http://localhost:4848/management/domain/stop -v

        Or restart the instance using:

        curl -H “Accept: application/json” http://localhost:4848/management/domain/restart -v
      5. Create a JDBC resource using an existing connection pool
        1. Lets see all the resources that are available:
          curl -H “Accept: application/json” http://localhost:4848/management/domain/resources -v

          and the results are shown as:

          {Resources:{},”child-resources”:["http://localhost:4848/management/domain/resources/jdbc-connection-pool",
          "http://localhost:4848/management/domain/resources/jdbc-resource"]}
        2. View all the JDBC connection pools as:
          curl -H “Accept: application/json” http://localhost:4848/management/domain/resources/jdbc/connection-pool -v

          and the results are shown as:

          {JdbcConnectionPool:{},”child-resources”:["http://localhost:4848/management/domain/resources/jdbc-connection-pool/__TimerPool",
          "http://localhost:4848/management/domain/resources/jdbc-connection-pool/DerbyPool"]}
        3. See all the JDBC resources available as:
          curl “Accept: application/json” http://localhost:4848/management/domain/resources/jdbc-resource -v

          and the results are shown as:

          {JdbcResource:{},”child-resources”:["http://localhost:4848/management/domain/resources/jdbc-resource/jdbc/__TimerPool",
          "http://localhost:4848/management/domain/resources/jdbc-resource/jdbc/__default"]}
        4. See all the OPTIONS accepted for JDBC resource creation as:
          curl -X OPTIONS -H “Accept: application/json” http://localhost:4848/management/domain/resources/jdbc-resource -v

          with the result as:

          {
          “Method”:”POST”,
          “Message Parameters”:{
          “id”:{“Acceptable Values”:”",”Default Value”:”",”Type”:”class java.lang.String”,”Optional”:”false”},
          “enabled”:{“Acceptable Values”:”",”Default Value”:”true”,”Type”:”class java.lang.Boolean”,”Optional”:”true”},
          “description”:{“Acceptable Values”:”",”Default Value”:”",”Type”:”class java.lang.String”,”Optional”:”true”},
          “target”:{“Acceptable Values”:”",”Default Value”:”",”Type”:”class java.lang.String”,”Optional”:”true”},
          “property”:{“Acceptable Values”:”",”Default Value”:”",”Type”:”class java.util.Properties”,”Optional”:”true”},
          “connectionpoolid”:{“Acceptable Values”:”",”Default Value”:”",”Type”:”class java.lang.String”,”Optional”:”false”}
          }

          “Method”:”GET”

        5. Finally, create the JDBC resource as:
          ~/tools/glassfish/v3/2023/glassfishv3 >curl -d “id=jdbc/sample&connectionpoolid=DerbyPool” http://localhost:4848/management/domain/resources/jdbc-resource -v
          * About to connect() to localhost port 4848 (#0)
          *   Trying ::1… connected
          * Connected to localhost (::1) port 4848 (#0)
          > POST /management/domain/resources/jdbc-resource HTTP/1.1
          > User-Agent: curl/7.16.3 (powerpc-apple-darwin9.0) libcurl/7.16.3 OpenSSL/0.9.7l zlib/1.2.3
          > Host: localhost:4848
          > Accept: */*
          > Content-Length: 42
          > Content-Type: application/x-www-form-urlencoded
          >
          < HTTP/1.1 201 Created
          < Content-Type: text/html
          < Transfer-Encoding: chunked
          < Date: Wed, 19 Aug 2009 20:45:51 GMT
          <
          * Connection #0 to host localhost left intact
          * Closing connection #0
          “http://localhost:4848/management/domain/resources/jdbc-resource/jdbc/sample” created successfully.

          Note, this is a POST request. The JDBC resource name and JDBC connection pool id are passed as CLI parameters using “-d” switch. The last line shows that the JDBC resource was created successfully.

        6. And finally query the JDBC Resources again as:
          curl -H “Accept: application/json” http://localhost:4848/management/domain/resources/jdbc-resource -v

          to see the updated result as:

          {JdbcResource:{},”child-resources”:["http://localhost:4848/management/domain/resources/jdbc-resource/jdbc/__TimerPool",
          "http://localhost:4848/management/domain/resources/jdbc-resource/jdbc/__default",
          "http://localhost:4848/management/domain/resources/jdbc-resource/jdbc/sample"]}

        Similarly JDBC connection pools can be created.

    3. POST can be used to update the top-level attributes such as “log-root” and “application-root”. The name of these attributes are shown in the result of GET.
    4. As earlier, XML representation of management resources can be obtained as:
      ~/tools/glassfish/v3/2023/glassfishv3 >curl -H “Accept: application/xml” http://localhost:4848/management/domain -v
      * About to connect() to localhost port 4848 (#0)
      *   Trying ::1… connected
      * Connected to localhost (::1) port 4848 (#0)
      > GET /management/domain HTTP/1.1
      > User-Agent: curl/7.16.3 (powerpc-apple-darwin9.0) libcurl/7.16.3 OpenSSL/0.9.7l zlib/1.2.3
      > Host: localhost:4848
      > Accept: application/xml
      >
      < HTTP/1.1 200 OK
      < Content-Type: application/xml
      < Transfer-Encoding: chunked
      < Date: Wed, 19 Aug 2009 18:17:07 GMT
      <
      <Domain log-root=”${com.sun.aas.instanceRoot}/logs” application-root=”${com.sun.aas.instanceRoot}/applications” locale=”" version=”re-continuous”>
      <child-resource>http://localhost:4848/management/domain/configs</child-resource>
      <child-resource>http://localhost:4848/management/domain/resources</child-resource>
      <child-resource>http://localhost:4848/management/domain/servers</child-resource>
      <child-resource>http://localhost:4848/management/domain/property</child-resource>
      <child-resource>http://localhost:4848/management/domain/applications</child-resource>
      <child-resource>http://localhost:4848/management/domain/system-applications</child-resource>
      <child-resource>http://localhost:4848/management/domain/stop</child-resource>
      <child-resource>http://localhost:4848/management/domain/restart</child-resource>
      <child-resource>http://localhost:4848/management/domain/uptime</child-resource>
      <child-resource>http://localhost:4848/management/domain/version</child-resource>
      <child-resource>http://localhost:4848/management/domain/rotate-log</child-resource>
      <child-resource>http://localhost:4848/management/domain/host-port</child-resource>
      * Connection #0 to host localhost left intact
      * Closing connection #0

      Just changing the “Accept” header to “application/xml” did the trick.

    5. And an HTML representation can be obtained by viewing the URL “http://localhost:4848/management/domain” in the browser with result as:

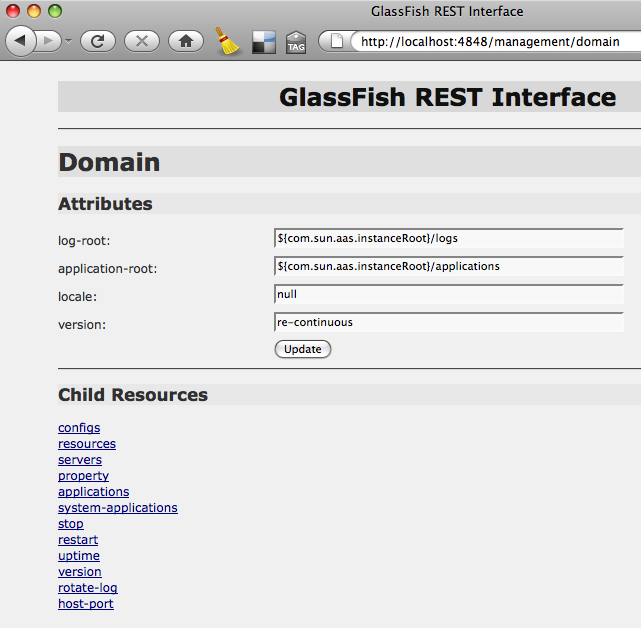
Just like GlassFish v3, the REST interface is extensible as well. So if a new container is plugged in that generates data (possibly through probes) captured in the runtime tree, that is automatically exposed in the RESTful interface.

Now for the Mac users, Safari prefers XML over HTML. Basically a resource, that can be served using both XML and HTML representation (as our Management and Monitoring interface), is served as XML by Safari and HTML by Firefox. So use Firefox on Mac if you want HTML rendering.

How will you use GlassFish RE
ST interface ?

Do your application server provide that level of administration capability ?

Please leave suggestions on other TOTD that you’d like to see. A complete archive of all the tips is available here.

Technorati: totd glassfish v3 rest management monitoring jersey

Share and Enjoy:
  • Print
  • Digg
  • Sphinn
  • del.icio.us
  • Facebook
  • Google Bookmarks
  • DZone
  • StumbleUpon
  • Technorati
  • Twitter
  • Slashdot

December 4, 2008

JavaFX 1.0 launched – access services hosted on embedded GlassFish

Filed under: webservices — Tags: , , — arungupta @ 6:30 am

Today Sun announces the availability of Java FX 1.0.

JavaFX 1.0 is a rich client platform for creating and delivering Rich Internet Applications across all screens (desktop, browser, and mobile) of your life. It consists of the following key components:


    • JavaFX SDK includes JavaFX script compiler and runtime tools, and a host of libraries to create RIAs for desktop, browser and mobile platforms, command-line tools & Ant tasks and other goodies.
    • NetBeans 6.5 support (as plugin or bundled with IDE) that allows to build, preview and debug JavaFX applications using NetBeans IDE. If you prefer CLI support then SDK can be downloaded.
    • Production Suite is a suite of tools and plugins for creative tools (such as Illustrator CS3+) that allows graphical assets to be exported to JavaFX applications.

      The beauty of JavaFX is that its fully integrated with the Java Runtime and takes advantage of the performance and ubiquity of Sun’s Java Runtime Environment that is installed on literally billions of devices worldwide. Hence, JavaFX applications will run on any desktop, browser, mobile device or any other connected device that runs the Java Runtime Environment.

      This blog shows how to create a simple JavaFX application using NetBeans IDE. The application plays a movie, allows the viewer to cast a vote if they liked it, and see aggregate response from other viewers. The application is developed using NetBeans 6.5, JavaFX 1.0 plugin, and coded using JavaFX Script. The voting engine is deployed as a RESTful Web service using Jersey on GlassFish.

      In terms of user experience, running the NetBeans project shows a window playing the movie. The first mouse hover over the window allows the viewer to click on “I love it” or “Not so great” and cast their vote as shown below:

      Any subsequent mouse hover shows aggregated results from other viewers as shown below:

      The results are not interesting if there is a single viewer of the movie. But for a production environment, this movie will be played by multiple users concurrently and the percentage numbers will be more meaningful. You can close the window and run the project again to vote again, as many times as you like :)

      For those who like to see quick results, here is a 4-step guide to get started:

      1. In NetBeans 6.5 IDE, install JavaFX plugin as explained here and RESTful Web services plugin as explained here. Both the plugins may be installed in one step by selecting the required plugins together.
      2. Download NetBeans project for JavaFX client from here and add Jersey dependencies as explained in bullet #5 below. 
      3. Download Web service endpoint Maven project from here and deploy the endpoint as explained in bullet #4 below.
      4. Run the JavaFX application as explained here.

      The remainder of this blog explains the details and shows how to construct the demo from scratch.

      Lets first create the JavaFX application that plays the video movie.

      1. In NetBeans 6.5, install “JavaFX SDK” plugin.  In the “Tools” menu, “Plugins”, search on “JavaFX”, select “JavaFX SDK” and click on “Install”.
      2. Create a new project of type “JavaFX”, “JavaFX Script Application”. Take the default values as shown below:

        and click on “Finish”.

      3. The source code for this class can be downloaded from here or alternatively constructed as explained in the sub-bullets.
        1. In the newly created class, change the Stage (root area for all scene content) to:

          Stage {
             title: “GlassFish Media Player”
             width: 625
             height: 360
             resizable: false
             scene: myScene
          }
        2. Create a scene that contains the view of the media to be played and controls the display of the Vote or Result nodes:
          var myScene: Scene = Scene {
             content: MediaView {
                     fitWidth: 625
                     fitHeight: 360
                     mediaPlayer: bind myPlayer

                     onMouseEntered: function( e: MouseEvent ):Void {
                         println(“mouse entered”);
                         if (voted == false) {
                             insert Vote{} into myScene.content;
                         } else {
                             insert Result{} into myScene.content;
                         }
                     }

              &nbs
          p;      onMouseExited: function( e: MouseEvent ):Void {
                         delete myScene.content[1]
                     }

                 }
          }

        3. Create a Media Player to use with the scene:
          var myPlayer: MediaPlayer = MediaPlayer{
              autoPlay: true
              media: bind myMedia
          };
        4. Create the media object to be used with the Media Player:
          var myMedia: Media = Media {
              source: “http://sun.edgeboss.net/download/sun/media/1460825906/1460825906_2957290001_DayEarth-Bluray.flv”
             };

          You can change the location of the movie here in the media player. For example, changing it to “http://mediacast.sun.com/users/ArunGupta/media/v3prelude-nb65-webapp.flv” will start playing the screencast #27.

        5. Create a Vote class that is a CustomNode and appears when a user’s mouse enters the scene where the video is playing. The user can select whether he likes the clip or not and the vote is recorded making a Web service call using Jersey Client APIs:
          class Vote extends CustomNode {
             override function create():Node {
                 return Group {
                     content: [
                         Rectangle {
                             fill: Color.GREEN
                             x: 185
                             y: 145
                             width: 243
                             height: 38
                             arcWidth: 20
                             arcHeight: 20
                         },

                         Text {
                             x: 195
                             y: 170
                             fill: Color.WHITE
                             font: Font {
                                 size: 18
                             }
                             content: "I love it"
                         },

                         Rectangle{
                             x: 191
                             y: 148
                             smooth: false
                             width: 73
                             height: 32
                             fill: Color.TRANSPARENT

                             onMouseClicked: function( e: MouseEvent ):Void {
                                 println("clicked I love it");
                                 voted = true;
                                 wsClient.voteLoveIt();
                                 delete myScene.content[1]
                             }
                         },

                         Text{
                             x: 305
                             y: 170
                             fill: Color.WHITE
                             font: Font {
                                 size: 18
                             }
                             content: “Not so great”
                             },

                         Rectangle {
                             x: 301
                             y: 148
                             smooth: false
             &nbsp
          ;               width: 118
                             height: 32
                             fill: Color.TRANSPARENT
                            
                             onMouseClicked: function( e: MouseEvent ):Void {
                                 voted = true;
                                 println(“clicked Not so great”);
                                 wsClient.voteNotSoGreat();
                                 delete myScene.content[1]
                             }
                         }
                     ]
                 }
             }
          };

        6. Create a Result class that is a CustomNode and simply reports on how many voters like this clip:
          class Result extends CustomNode {
             override function create():Node {
                 var resultPercent = wsClient.showResults();
                 var resultString = “{resultPercent} voters liked this clip”;

                 return Group {
                     content: [
                         Rectangle {
                             fill: Color.BLUE
                             x: 187
                             y: 145
                             width: 244
                             height: 38
                             arcWidth: 20
                             arcHeight: 20

                             onMouseClicked: function( e: MouseEvent ):Void {
                                 delete myScene.content[1]
                             }
                         },

                         Text {
                             x: 199
                             y: 170
                             fill: Color.WHITE
                             font: Font {
                                 size: 18
                             }
                             content: resultString
                         }
                     ]
                 }
             }
          };

        7. Add two instance variables:
          var voted = false;
          var wsClient = new WebserviceClient;

          The first variable captures if the viewer has already voted and the second variable is an instance to the RESTful Web service client.

        8. Add the following import statements:
          import javafx.scene.*;
          import javafx.scene.input.MouseEvent;
          import javafx.scene.media.Media;
          import javafx.scene.media.MediaPlayer;
          import javafx.scene.media.MediaView;
          import javafx.scene.paint.Color;
          import javafx.scene.shape.Rectangle;
          import javafx.scene.text.Font;
          import javafx.scene.text.Text;
          import javafx.stage.Stage;

          “Fix Imports” should be able to fix them and bug #154307 is already filed for that.

      4. Create a new class that is used to capture the Vote as:
        @javax.xml.bind.annotation.XmlRootElement
        public class VoteBean {
            public static enum VOTE { LOVE_IT, NOT_SO_GREAT };
           
            public VOTE vote;

            public VoteBean() { vote = VOTE.LOVE_IT; }
            public VoteBean(VOTE vote) {
                this.vote = vote;
            }
        }

        This is a simple Javabean with a standard JAXB annotation. This ensures that XML is used as the data format for transfering results between client and endpoint. The source code for this class is available here.

      5. Add Jersey libraries to the project by right-clicking on Project, select Libraries, click on “Add Library…”, select “JAX-RS 1.0″ and “Jersey 1.0 (JAX-RS RI)”, and click on “Add Library”.


        ="" src="/wp-content/uploads/2009/08/javafx1.0-nb65-add-jersey-client-libs.png">

        If these libraries are not available then install the “RESTful Web Services” plugin from the Plugin Center.

      6. And finally add the class that invokes the RESTful Webservice endpoint:
        public class WebserviceClient {

            private static com.sun.jersey.api.client.WebResource createWebResource() {
                return com.sun.jersey.api.client.Client.create().
                        resource(“http://localhost:8080/movie-feedback-webapp/webresources/myresource”);
            }

            public static void voteLoveIt() {
                createWebResource().type(“application/json”).
                        post(new VoteBean(VoteBean.VOTE.LOVE_IT));
            }

            public static void voteNotSoGreat() {
                createWebResource().type(“application/json”).
                        post(new VoteBean(VoteBean.VOTE.NOT_SO_GREAT));
            }

            public static String showResults() {
                return createWebResource().get(String.class);
            }
        }

        The Webservice endpoint will be hosted at “http://localhost:8080/movie-feedback-webapp/webresources/myresource”. A WebResource is created from the Client. The POST methods are used to cast the user vote and GET method is used to retrieve the aggregated results. The source code for this class is available here.

      Now lets create the RESTful endpoint using Jersey and deploy on GlassFish.

      1. Create and deploy a RESTful Web service endpoint
        1. Create a template RESTful Web service endpoint as described in TOTD #56. Lets use the artifactId as “movie-feedback-webapp”.
        2. Create the bean “VoteBean” in “org.glassfish.samples” package. This is the exactly same bean used earlier by the client:
          @javax.xml.bind.annotation.XmlRootElement
          public class VoteBean {
              public static enum VOTE { LOVE_IT, NOT_SO_GREAT };
              public VOTE vote;

              public VoteBean() { vote = VOTE.LOVE_IT; }
              public VoteBean(VOTE vote) {
                  this.vote = vote;
              }
          }

        3. Update the generated resource
          1. Add @com.sun.jersey.spi.resource.Singleton as class annotation so that only one instance of the resource is created for the entire web application. This allows to save state (preferences from other users) in the RESTful resource.
          2. Add two instance variables:
                int loveIt;
                int noSoGreat;
          3. Add a method that will process HTTP POST requests as:
                @POST
                public void postOneVote(VoteBean bean) {
                    if (bean.vote == VoteBean.VOTE.LOVE_IT) {
                        loveIt++;
                    } else {
                        noSoGreat++;
                    }
                    System.out.println(“In POST: ” + bean.vote);
                }

            This method stores the vote in the resource. The handling of POST request messages by Jersey is explained in TOTD #58.

          4. Add a method that will process HTTP GET requests as:
                @GET
                @Produces(“text/plain”)
                public String getOpinion() {
                    if (loveIt == 0 && noSoGreat == 0)
                        return “No votes cast yet!”;
                    return (loveIt * 100) / (loveIt + noSoGreat) + “%”;
                }

            This method calculates the percentage of viewers who liked the movie.

        4. Deploy the endpoint using “mvn glassfish:run” in “movie-feedback-webapp” directory.

      Now run the JavaFX application by right-clicking on the project and selecting “Run Project” and start voting! The percentage results will vary if the movie is voted upon more than once.

      This blog showed:

      • How to install JavaFX capabilities to an existing NetBeans 6.5 installation
      • How to create a simple JavaFX application that plays media files
      • Integrate it with existing Java libraries (Jersey client libraries in this case)
      • Invoke services hosted on GlassFish

      The steps followed in this blog allows for rapid development/debugging of JavaFX application accessing resources using embeddable GlassFish but are not ideal for production deployments. A future blog will show how this JavaFX application can be deployed as a Java Web Start application and scaled for mulitple users.

      The javafx.com/samples has loads of samples and javafx.com/tutorials shows how to build your own applications. The JavaFX Community Wiki is a great place to collaborate.

      Send your Jersey questions to , GlassFish questions to GlassFish Forum, and JavaFX questions to JavaFX Forums.

      Technorati: glassfish v3 jersey webservices javafx netbeans

      Share and Enjoy:
      • Print
      • Digg
      • Sphinn
      • del.icio.us
      • Facebook
      • Google Bookmarks
      • DZone
      • StumbleUpon
      • Technorati
      • Twitter
      • Slashdot

      November 26, 2008

      TOTD #57: Jersey Client API – simple and easy to use

      Filed under: totd, webservices — Tags: , , , , , , , , — arungupta @ 5:00 am

      TOTD #56 explains how to create a RESTful Web service endpoint using Jersey and publish the resource using JSON representation. The blog entry showed how the endpoint can be accessed from a Web browser. This Tip Of The Day explains how to use Jersey Client APIs to invoke the published endpoint.

      Lets get started!

      1. Create a new directory “./src/test/java/org/glassfish/samples”
      2. Add a test
        1. Add a template test file “AppTest.java” as shown below:

          package org.glassfish.samples;

          import junit.framework.Test;
          import junit.framework.TestCase;
          import junit.framework.TestSuite;

          /**
           * Unit test for simple App.
           */
          public class AppTest
              extends TestCase
          {
              /**
               * Create the test case
               *
               * @param testName name of the test case
               */
              public AppTest( String testName )
              {
                  super( testName );
              }

              /**
               * @return the suite of tests being tested
               */
              public static Test suite()
              {
                  return new TestSuite( AppTest.class );
              }

              /**
               * Rigourous Test :-)
               */
              public void testApp()
              {
                  assertTrue(true);
              }
          }

        2. Add a new method “createResource()” as:
              private WebResource createResource() {
                  Client client = Client.create();
                  WebResource resource = client.resource(“http://localhost:8080/helloworld-webapp/webresources/myresource”);
                  return resource;
              }

          This code creates a default instance of Jersey Client and creates a Web resource from that client for the URI passed as an argument.

        3. Change the implementation of “testApp()” method as:
                  Greeting result = createResource().get(Greeting.class);
                  assertTrue(result.greeting.equals(“Hi there!”));

          This invokes the GET method on the resource by passing specific type and compares the returned and expected value.

        4. Add the following “imports”:
          import com.sun.jersey.api.client.Client;
          import com.sun.jersey.api.client.WebResource;
        5. Copy “Greeting.java” from TOTD #56 to ”./src/test/java/org/glassfish/samples” directory.
      3. Run the test
        1. Deploy the endpoint as “mvn glassfish:run”.
        2. Run the test as “mvn test”. The following output is shown:
          ~/samples/jersey/helloworld-webapp >mvn test
          [INFO] Scanning for projects…
          [INFO] ————————————————————————
          [INFO] Building helloworld-webapp Jersey Webapp
          [INFO]    task-segment: [test]
          [INFO] ————————————————————————
          [INFO] [resources:resources]
          [INFO] Using default encoding to copy filtered resources.
          [INFO] [compiler:compile]
          [INFO] Nothing to compile – all classes are up to date
          [INFO] [resources:testResources]
          [INFO] Using default encoding to copy filtered resources.
          [INFO] [compiler:testCompile]
          [INFO] Compiling 1 source file to /Users/arungupta/samples/jersey/helloworld-webapp/target/test-classes
          [INFO] [surefire:test]
          [INFO] Surefire report directory: /Users/arungupta/samples/jersey/helloworld-webapp/target/surefire-reports

          ——————————————————-
           T E S T S
          ——————————————————-
          Running org.glassfish.samples.AppTest
          Tests run: 1, Failures: 0, Errors: 0, Skipped: 0, Time elapsed: 0.587 sec

          Results :

          Tests run: 1, Failures: 0, Errors: 0, Skipped: 0

          [INFO] ————————————————————————
          [INFO] BUILD SUCCESSFUL
          [INFO] ————————————————————————
          [INFO] Total time: 4 seconds
          [INFO] Finished at: Mon Nov 24 16:50:17 PST 2008
          [INFO] Final Memory: 18M/43M
          [INFO] ————————————————————————

      4. View request and response messages
        1. Change the implementation of “createResource()” method as (changes highlighted in bold):

                  Client client = Client.create();
                  WebResource resource = client.resource(“http://localhost:8080/helloworld-webapp/webresources/myresource”);
                  resource.addFilter(new LoggingFilter());
                  return resource;
        2. Running the tests as “mvn test” now shows the output, with request and response messages, as shown below:
          Running org.glassfish.samples.AppTest
          1 * Out-bound request
          1 > GET http://localhost:8080/helloworld-webapp/webresources/myresource
          1 >
          1 < 200
          1 < X-Powered-By: Servlet/2.5
          1 < Transfer-Encoding: chunked
          1 < Content-Type: application/json
          1 < Server: GlassFish/v3
          1 < Date: Tue, 25 Nov 2008 07:07:51 GMT
          1 <
          {“greeting”:”Hi there!”}
          1 * In-bound response
          Tests run: 1, Failures: 0, Errors: 0, Skipped: 0, Time elapsed: 1.074 sec

      Really easy!

      Even though the APIs are used to invoke a RESTful endpoint deployed using Jersey but are very generic and can be used to invoke any RESTful endpoint. Paul’s blog explain in detail on the usage. You can also see how these APIs can be used to consume a service hosted using Apache Abdera.

      com.sun.jersey.api.client, com.sun.jersey.api.client.config, and com.sun.jersey.api.client.filter packages documents all the classes that provide support for client-side communication with HTTP-based RESTful Web services.

      Technorati: totd glassfish v3 embeddable jersey jsr311 rest json webservices

      Share and Enjoy:
      • Print
      • Digg
      • Sphinn
      • del.icio.us
      • Facebook
      • Google Bookmarks
      • DZone
      • StumbleUpon
      • Technorati
      • Twitter
      • Slashdot

      Powered by WordPress