Amazon Web Services introduced Serverless Application Model, or SAM, a couple of months ago. It defines simplified syntax for expressing serverless resources. SAM extends AWS CloudFormation to add support for API Gateway, AWS Lambda and Amazon DynamoDB. This blog will show how to create a simple microservice using SAM. Of course, we’ll use Couchbase instead of DynamoDB!
This blog will also use the basic concepts explained in Microservice using AWS API Gateway, AWS Lambda and Couchbase. SAM will show the ease with which the entire stack for microservice can be deployed and managed.
As a refresher, here are key components in the architecture:
- Client could be curl, AWS CLI/Console, Postman client or any other tool/API that can invoke a REST endpoint.
- AWS API Gateway is used to provision APIs. The top level resource is available at path
/books. HTTPGETandPOSTmethods are published for the resource. - Each API triggers a Lambda function. Two Lambda functions are created,
book-listfunction for listing all the books available andbook-createfunction to create a new book. - Couchbase is used as a persistence store in EC2. All the JSON documents are stored and retrieved from this database.
Other blogs on serverless:
- Microservice using AWS API Gateway, AWS Lambda and Couchbase
- AWS IoT Button, Lambda and Couchbase
- Serverless FaaS with Lambda and Java
Let’s get started!
Serverless Application Model (SAM) Template
An AWS CloudFormation template with serverless resources conforming to the AWS SAM model is referred to as a SAM file or template. It is deployed as a CloudFormation stack.
Let’s take a look at our SAM template:
This template is available at github.com/arun-gupta/serverless/blob/master/aws/microservice/template.yml.
|
1
2
3
4
5
6
7
8
9
10
11
12
13
14
15
16
17
18
19
20
21
22
23
24
25
26
27
28
29
30
31
32
33
34
35
36
37
38
39
40
41
42
|
AWSTemplateFormatVersion : '2010-09-09'
Transform: AWS::Serverless-2016-10-31
Description: Microservice using API Gateway, Lambda and Couchbase
Resources:
MicroserviceGetAllGateway:
Type: AWS::Serverless::Function
Properties:
Handler: org.sample.serverless.aws.couchbase.gateway.BucketGetAll
Runtime: java8
CodeUri: s3://serverless-microservice/microservice-http-endpoint-1.0-SNAPSHOT.jar
Timeout: 30
MemorySize: 1024
Environment:
Variables:
COUCHBASE_HOST: ec2-35-163-21-104.us-west-2.compute.amazonaws.com
Role: arn:aws:iam::598307997273:role/microserviceRole
Events:
GetResource:
Type: Api
Properties:
Path: /books
Method: get
MicroservicePostGateway:
Type: AWS::Serverless::Function
Properties:
Handler: org.sample.serverless.aws.couchbase.gateway.BucketPost
Runtime: java8
CodeUri: s3://serverless-microservice/microservice-http-endpoint-1.0-SNAPSHOT.jar
Timeout: 30
MemorySize: 1024
Environment:
Variables:
COUCHBASE_HOST: ec2-35-163-21-104.us-west-2.compute.amazonaws.com
Role: arn:aws:iam::598307997273:role/microserviceRole
Events:
GetResource:
Type: Api
Properties:
Path: /books
Method: post
|
SAM template Specification provide complete details about contents in the template. The key parts of the template are:
- Defines two resources, both of Lambda Function type identified by
AWS::Serverless::Functionattribute. Name of the Lambda function is defined byResources.<resource>. - Class for each handler is defined by the value of
Resources.<resource>.Properties.Handlerattribute - Java 8 runtime is used to run the Function defined by
Resources.<resource>.Properties.Runtimeattribute - Code for the class is uploaded to an S3 bucket, in our case to
s3://serverless-microservice/microservice-http-endpoint-1.0-SNAPSHOT.jar Resources.<resource>.Properties.Environment.Variables.COUCHBASE_HOSTattribute value defines the host where Couchbase is running. This can be easily deployed on EC2 as explained at Setup Couchbase.- Each Lambda function is triggered by an API. It is deployed using AWS API Gateway. The path is defined by
Events.GetResource.Properties.Path. HTTP method is defined usingEvents.GetResource.Properties.Methodattribute.
Java Application
The Java application that contains the Lambda functions is at github.com/arun-gupta/serverless/tree/master/aws/microservice/microservice-http-endpoint.
Lambda function that is triggered by HTTP GET method is shown:
|
1
2
3
4
5
6
7
8
9
10
11
12
13
14
15
16
17
18
19
20
|
public class BucketGetAll implements RequestHandler<GatewayRequest, GatewayResponse> {
@Override
public GatewayResponse handleRequest(GatewayRequest request, Context context) {
try {
N1qlQuery query = N1qlQuery
.simple(select("*")
.from(i(CouchbaseUtil.getBucketName()))
.limit(10));
String result = CouchbaseUtil.getBucket().query(query).allRows().toString();
return new GatewayResponse(200, result, GatewayResponse.HEADERS_JSON);
} catch (ConfigurationException e) {
return new GatewayResponse(400, e.getMessage(), GatewayResponse.HEADERS_TEXT);
}
}
}
|
A little bit of explanation:
- Each Lambda function needs to implement the interface
com.amazonaws.services.lambda.runtime.RequestHandler. - API Gateway and Lambda integration require a specific input format and output format. These formats are defined as
GatewayRequestandGatewayResponseclasses. - Function logic uses Couchbase Java SDK to query the Couchbase database. N1QL query is used to query the database. The results and exception are then wrapped in
GatewayRequestandGatewayResponse.
Lambda function triggered by HTTP POST method is pretty straightforward as well:
|
1
2
3
4
5
6
7
8
9
10
11
12
13
14
15
|
public class BucketPost implements RequestHandler<GatewayRequest, GatewayResponse> {
@Override
public GatewayResponse handleRequest(GatewayRequest request, Context context) {
try {
JsonDocument document = CouchbaseUtil.getBucket().upsert(Book.fromStringToJson(request.getBody()));
return new GatewayResponse(200, document.content().toString(), GatewayResponse.HEADERS_JSON);
} catch (Exception ex) {
return new GatewayResponse(400, ex.getMessage(), GatewayResponse.HEADERS_TEXT);
}
}
}
|
A bit of explanation:
- Incoming request payload is retrieved from
GatewayRequest - Document inserted in Couchbase is returned as response.
- Like the previous method, Function logic uses Couchbase Java SDK to query the Couchbase database. The results and exception are then wrapped in
GatewayRequestandGatewayResponse.
Build the Java application as:
|
1
2
3
|
mvn -f microservice-http-endpoint/pom.xml clean package
|
Upload Lambda Function to S3
SAM template reads the code from an S3 bucket. Let’s create a S3 bucket:
|
1
2
3
|
aws s3 mb s3://serverless-microservice --region us-west-2
|
us-west-2 region is one of the supported regions for API Gateway. S3 bucket names are globally unique but their location is region specific.
Upload the code to S3 bucket:
|
1
2
3
|
aws s3 cp microservice-http-endpoint/target/microservice-http-endpoint-1.0-SNAPSHOT.jar s3://serverless-microservice/microservice-http-endpoint-1.0-SNAPSHOT.jar
|
The code is now uploaded to S3 bucket. SAM template is ready to be deployed!
Deploy SAM Template
Deploy the SAM template:
|
1
2
3
4
5
6
|
aws cloudformation deploy \
--template-file template.yml \
--stack-name microservice-gateway \
--region us-west-2
|
It shows the output:
|
1
2
3
4
5
|
Waiting for changeset to be created..
Waiting for stack create/update to complete
Successfully created/updated stack - microservice-gateway
|
This one command deploys Lambda functions and REST Resource/APIs that trigger these Lambda functions.
Invoke the Microservice
API Gateway publishes a REST API that can be invoked by curl, wget, AWS CLI/Console, Postman or any other app that can call a REST API. This blog will use AWS Console to show the interaction.
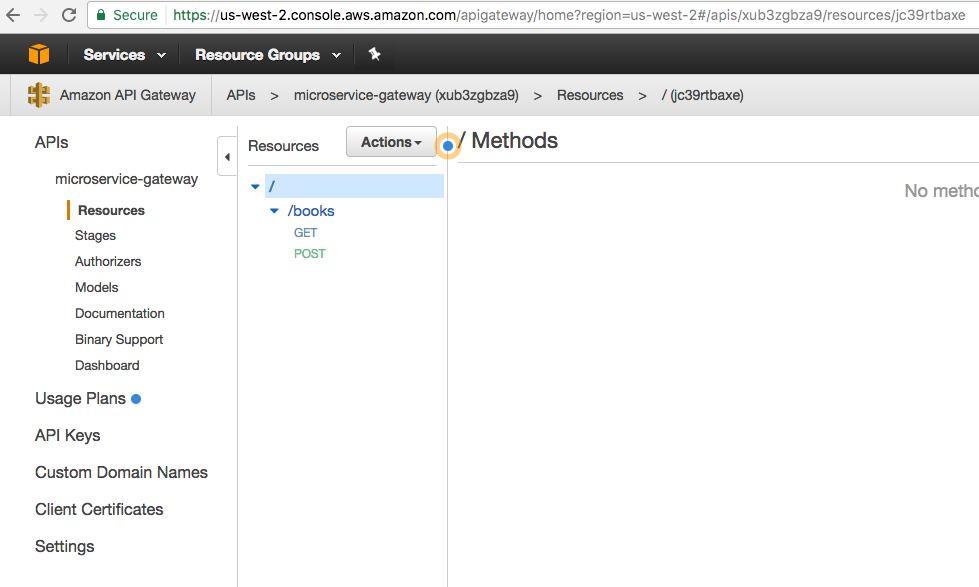
API Gateway home at us-west-2.console.aws.amazon.com/apigateway/home?region=us-west-2#/apis shows:

Click on the API to see all the APIs in this resource:

Click on POST to see the default page for POST method execution:

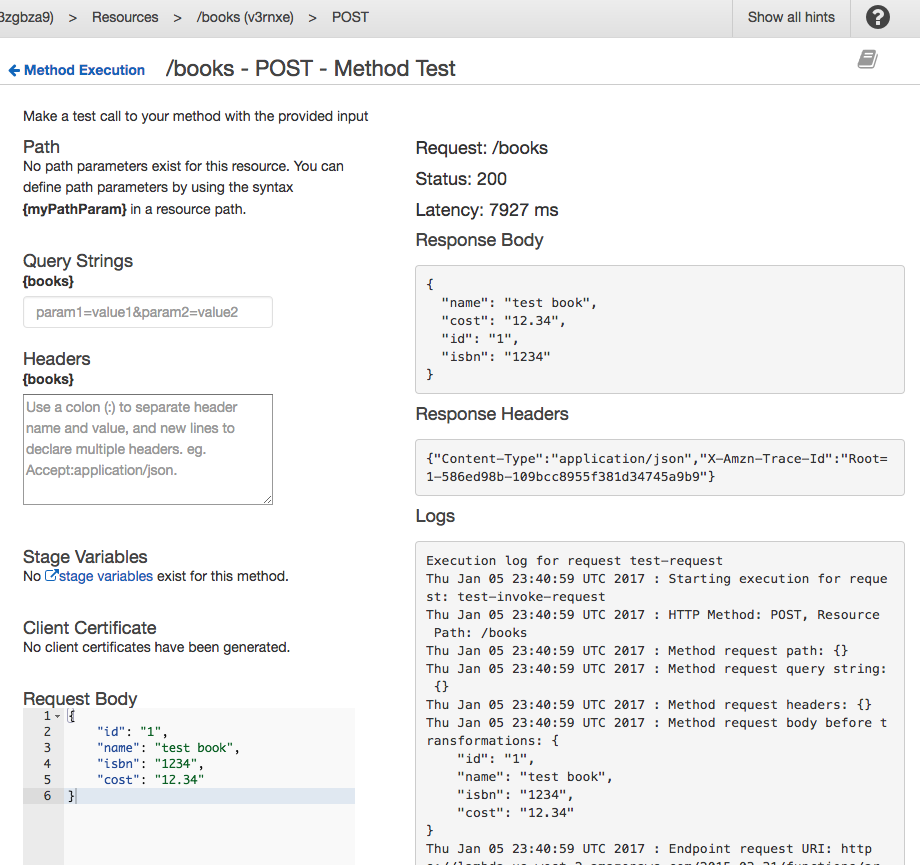
Click on Test to test the API:
Add the payload in Request Body and click on Test to invoke the API. The results are shown as below:
Now click on GET to see the default execution page:

Click on Test to test the API:

No request body is needed, just click on Test the invoke the API. The results are as shown:
Output from the Couchbase database is shown in the Response Body.
References
- Deploying Lambda-based Applications
- Serverless Architectures
- AWS API Gateway
- Creating a simple Microservice using Lambda and API Gateway
- Couchbase Server Docs
- Couchbase Forums
- Follow us at @couchbasedev
Source: blog.couchbase.com/2017/january/microservice-aws-serverless-application-model-couchbase


