Next Page »

August 24, 2009

TOTD #98: Create a Metro JAX-WS Web service using GlassFish Tools Bundle for Eclipse

Now that you’ve installed GlassFish Tools Bundle for Eclipse 1.1, lets use this bundle to create a simple Metro/JAX-WS compliant Web service and deploy on GlassFish. These steps will work with either Eclipse 3.4.2 or 3.5 with WTP Java EE support.

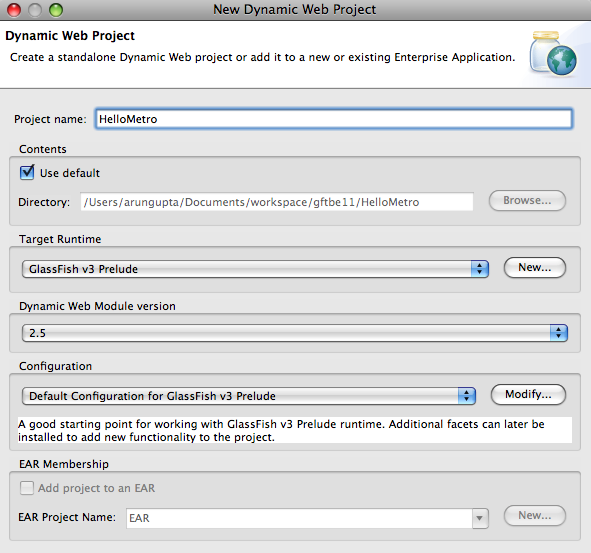
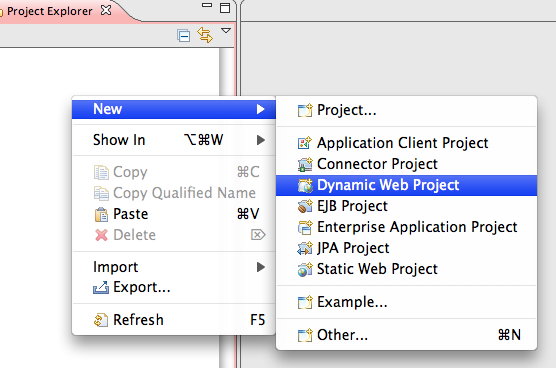
  1. Lets create a simple “Dynamic Web Project” as shown below:

  2. Name the project “HelloMetro” and take all other defaults:

    Click on “Finish” to complete the project creation.

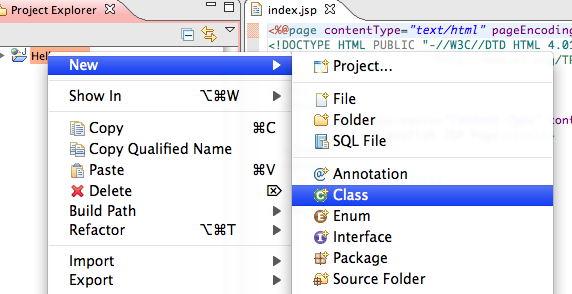
  3. Metro allows to create a Web service from a POJO class. So let’s add a POJO to the project by right-clicking on the project and selecting “New”, “Class” as shown below:


    Specify the package name as “server”, class name as “HelloService” and click on “Finish”.

  4. Add a simple method to the newly generated class as:

    
    public String sayHello(String name) {
          return "Hello " + name + "!!";
    }
    

  5. Expand the project, go to “HelloService.java” in “server” package, right-click, select “Web Services”, “Create Web service”.
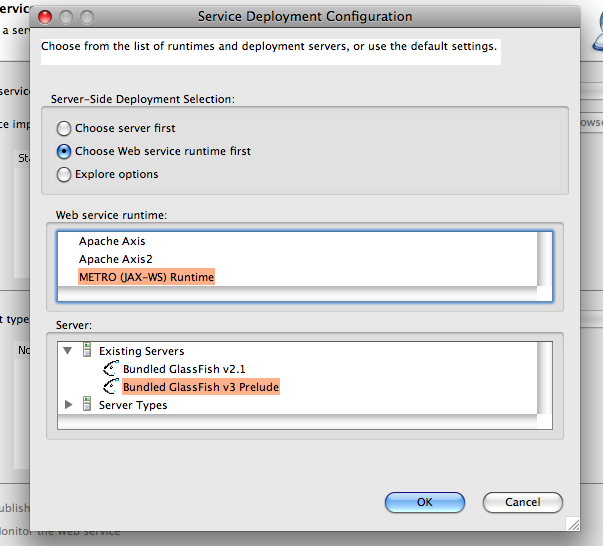
  6. Click on “Web service runtime: Apache Axis” and select “Metro (JAX-WS) Runtime” as the Web service runtime as shown below:

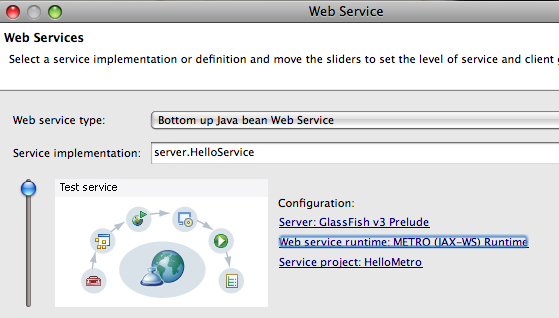
  7. Move the slider on the left to top. This will enable testing of the deployed Web service. The completed configuration looks like:

    and click on “Next >”.

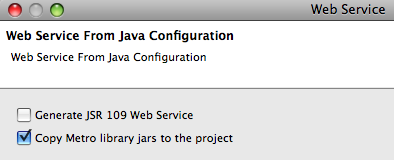
  8. Select the checkbox “Copy Metro library jars to the project” to resolve the references correctly as shown below:

    and click on “Next >”. This bundles the application and deploys to GlassFish and provides an option to test the deployed Web service as shown below:

    Clicking on the “Launch” button shows the following output in the browser:

    The WSDL is hosted at “http://localhost:8083/HelloMetro/HelloServiceService?wsdl”.

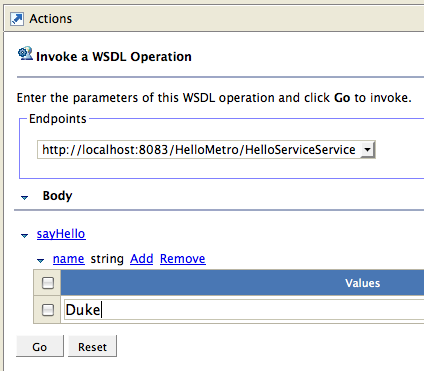
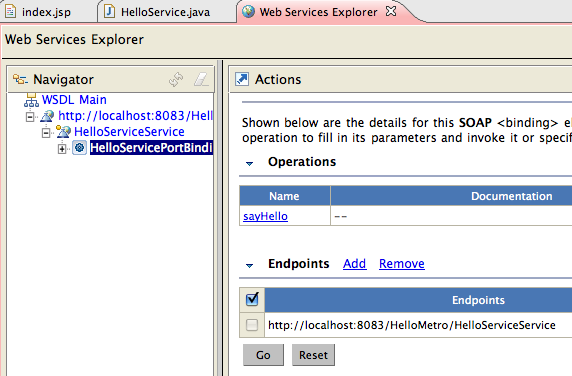
  9. Click on “sayHello” method, click on “Add” and enter the value as “Duke” as shown below:

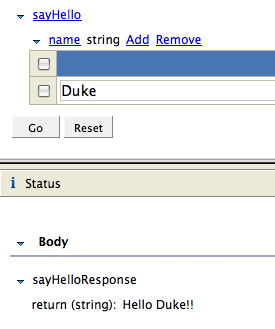
    Click on “Go” and the response is shown as:

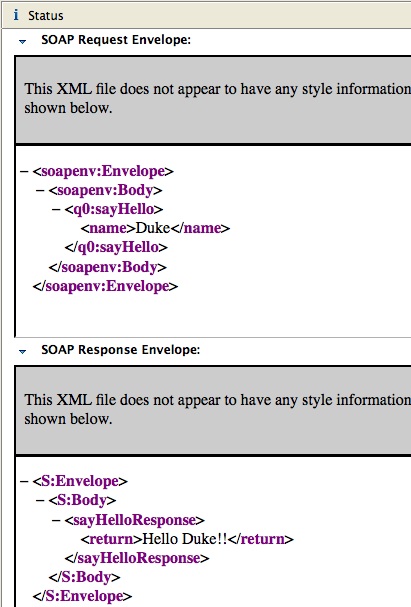
    Clicking on “Source” in the response window shows the SOAP request/response messages as shown below:

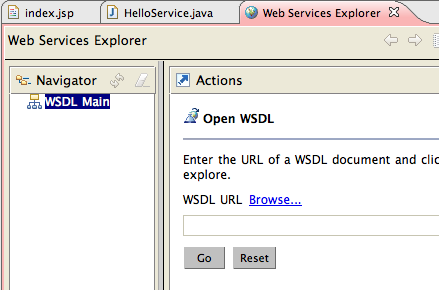
  10. Alternatively, you can click on “Finish” to complete the dialog. Then click on “Run” menu item, “Launch the Web Services Explorer” to see a screen as:

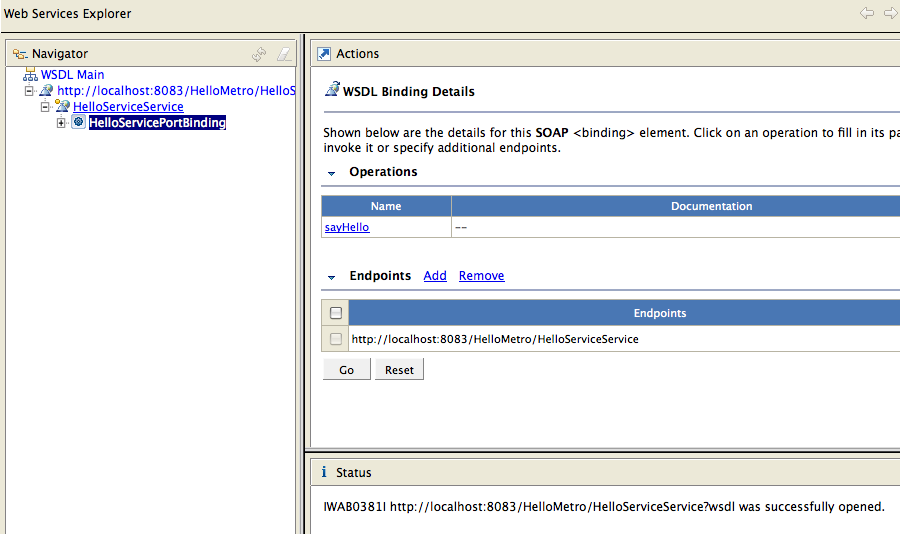
    Enter the URL of the WSDL in “WSDL URL” box as “http://localhost:8083/HelloMetro/HelloServiceService?wsdl” and click on “Go”. Now you are seeing the similar screen to test the Web service within the integrated browser as shown below:

A future blog will cover how to write a database-enabled application using the bundled Dali JPA Tools and MySQL pre-registered JDBC driver.

Please send your questions and comments to .
Please leave suggestions on other TOTD that you’d like to see. A complete archive of all the tips is available here.

Technorati: totd glassfish eclipse galileo webservices metro jax-ws

Share and Enjoy:
  • Print this article!
  • Digg
  • Sphinn
  • del.icio.us
  • Facebook
  • Google Bookmarks
  • DZone
  • E-mail this story to a friend!
  • StumbleUpon
  • Technorati
  • Twitter
  • Slashdot

August 21, 2009

TOTD #97: GlassFish Plugin with Eclipse 3.5

Categories: eclipse, totd
Tags: , , ,

A new version of GlassFish Tools Bundle for Eclipse (ver 1.1) was recently released. The build contains

  • Eclipse 3.4.2 IDE with WTP Java EE support
  • GlassFish v2.1 pre-registered and configured
  • GlassFish v3 Prelude pre-registered and configured
  • JavaDB sample database pre-registered and configured
  • GlassFish Plugin (1.0.29)
  • MySQL JDBC driver registered to the IDE
  • Maven m2 plugins
  • JAX-WS Metro plugin
  • GlassFish documentation
  • And optionally, a JDK 1.6.

The functionality is also available in GlassFish Plugin that can be installed on Eclipse 3.5. However because of the Eclipse bug #280365, the plugin cannot be installed directly using Server Adapters. The alternative is to install explicitly using the Update Site. The instructions to do the same are given below:

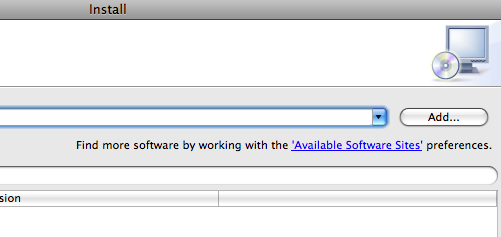
  1. In “Help”, “Install New Software”, click on “Available Software Sites”:
  2. Search for “ajax” to see the output as:
  3. Click on “Enabled” button to enable the site and see the change as below:

    click on “OK”.

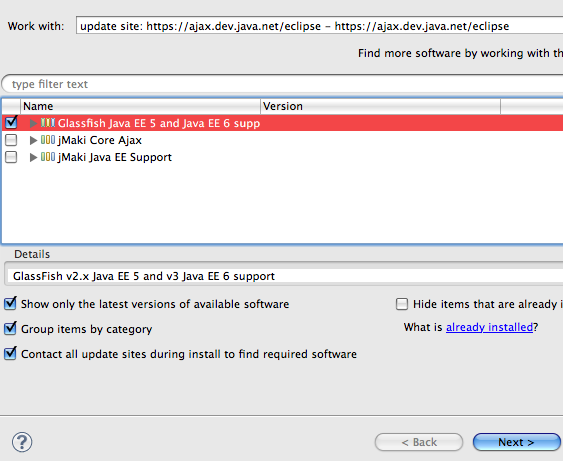
  4. Expand the drop-down list box and chose the recently added “update site” as shown below:

    and it shows all the software available from that site as:

  5. Take the defaults, click on “Next” and it shows the GlassFish plugin version number as shown below:
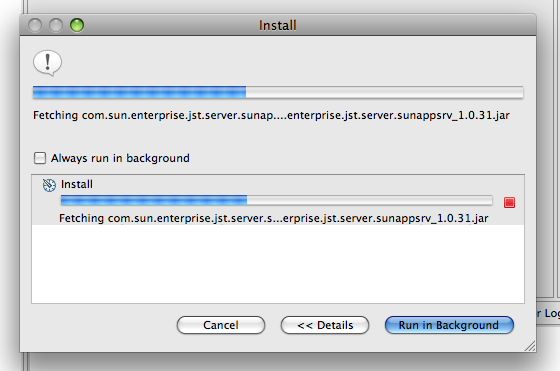
  6. Click on “Next”, accept the license by clicking on  “I accept …” and click on “Finish” to start the installation.

    The IDE restarts after the installation is complete.

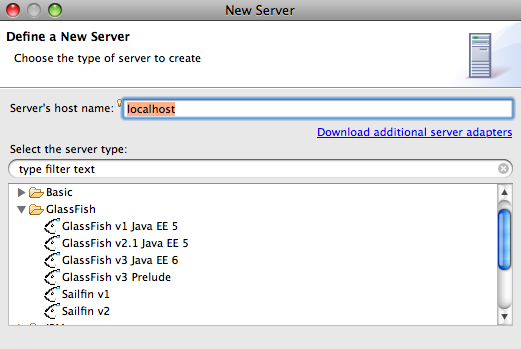
  7. Now a new server can be added using “Servers” tab and it shows GlassFish as an option as shown below:

The screencast #28 shows how to create a simple web application using GlassFish v3. Future blogs will show how to leverage the new functionality of JAX-WS Web services plugin and JPA Dali Tooling with GlassFish.

Please leave suggestions on other TOTD that you’d like to see. A complete archive of all the tips is available here.

Technorati: totd glassfish eclipse galileo

Share and Enjoy:
  • Print this article!
  • Digg
  • Sphinn
  • del.icio.us
  • Facebook
  • Google Bookmarks
  • DZone
  • E-mail this story to a friend!
  • StumbleUpon
  • Technorati
  • Twitter
  • Slashdot

August 19, 2009

TOTD #96: GlassFish v3 REST Interface to Monitoring and Management – JSON, XML, and HTML representations

GlassFish Monitoring allows you to monitor the state of various runtime components of the application server. This information is used to identify performance bottlenecks and tuning the system for optimal performance, to aid capacity planning, to predict failures, to do root cause analysis in case of failures and sometimes to just ensure that everything is functioning as expected.

GlassFish Management allows you to manage the running Application Server instance such as query/create/delete resources (JDBC, JMS, etc), stop/restart the instance, rotate the log and other similar functions.

GlassFish v3 exposes Monitoring and Management data using a REST Interface. This Tip Of The Day (TOTD) shows how to play with this new functionality. Rajeshwar’s blog has lot of useful information on this topic.

Most of the functionality available in web-based Admin Console and CLI (asadmin) is now available using the REST interface. Both of these are pre-built tools that ships with the GlassFish bundle. The REST interface is a lower level API that enables toolkit developers and IT administrators to write their custom scripts/clients using language of their choice such as Java, JavaScript, Ruby or Groovy.

The default URL for the REST interface of monitoring is “http://localhost:4848/monitoring/domain” and for the management is “http://localhost:4848/management/domain”. Each URL provides an XML, JSON and HTML representation of the resources. If a web browser is used then a HTML representation is returned and displayed nicely in the browser. Rajeshwar’s blog described a Java client written using Jersey Client APIs that can be used to make all the GET/PUT/POST/DELETE requests. This blog will use something more basic, and extremely popular, to make all the RESTful invocations – cURL.

At this time the monitoring resources are read-only (GET) and management can be done using GET/POST/DELETE methods. POST is used for creating and updating resources/objects and the updates can be partial.

Lets get started.

  1. Download the latest continuous build from the trunk and unzip. This functionality is also available in the Web profile bundle. This blog is using build #2023.
  2. Start the application server as:
    ~/tools/glassfish/v3/2023/glassfishv3 >./bin/asadmin start-domain –verbose

    Aug 19, 2009 9:52:45 AM com.sun.enterprise.admin.launcher.GFLauncherLogger info
    INFO: JVM invocation command line:
    /System/Library/Frameworks/JavaVM.framework/Versions/1.6/Home/bin/java
    -cp

    . . .

    INFO: felix.fileinstall.dir            /Users/arungupta/tools/glassfish/v3/2023/glassfishv3/glassfish/domains/domain1/autodeploy-bundles
    Aug 19, 2009 9:53:05 AM
    INFO: felix.fileinstall.debug          1
    Aug 19, 2009 9:53:05 AM
    INFO: felix.fileinstall.bundles.new.start          true

  3. Monitoring information – Lets monitor this GlassFish instance using the REST interface.
    1. Retrieve JSON information – As mentioned above, the monitoring resources are read-only and so the information can be accessed as:
      ~/tools/glassfish/v3/2023/glassfishv3 >curl -H “Accept: application/json” http://localhost:4848/monitoring/domain -v
      * About to connect() to localhost port 4848 (#0)
      *   Trying ::1… connected
      * Connected to localhost (::1) port 4848 (#0)
      > GET /monitoring/domain HTTP/1.1
      > User-Agent: curl/7.16.3 (powerpc-apple-darwin9.0) libcurl/7.16.3 OpenSSL/0.9.7l zlib/1.2.3
      > Host: localhost:4848
      > Accept: application/json
      >
      < HTTP/1.1 200 OK
      < Content-Type: application/json
      < Transfer-Encoding: chunked
      < Date: Wed, 19 Aug 2009 17:40:29 GMT
      <
      {Domain:{},”child-resources”:["http://localhost:4848/monitoring/domain/server"]}
      * Connection #0 to host localhost left intact
      * Closing connection #0

      The command explicitly asks for JSON representation of the resources. The outbound headers are prepended with “>” and inbound headers with “<”. And the JSON representation is shown in the last line as:

      {Domain:{},”child-resources”:["http://localhost:4848/monitoring/domain/server"]}

      The key element to remember here is “http://localhost:4848/monitoring/domain/server” which can be used to retrieve more monitoring information.

    2. XML represetation: Lets change the command to ask for XML representation as:
      ~/tools/glassfish/v3/2023/glassfishv3 >curl -H “Accept: application/xml” http://localhost:4848/monitoring/domain -v
      * About to connect() to localhost port 4848 (#0)
      *   Trying ::1… connected
      * Connected to localhost (::1) port 4848 (#0)
      > GET /monitoring/domain HTTP/1.1
      > User-Agent: curl/7.16.3 (powerpc-apple-darwin9.0) libcurl/7.16.3 OpenSSL/0.9.7l zlib/1.2.3
      > Host: localhost:4848
      > Accept: application/xml
      >
      < HTTP/1.1 200 OK
      < Content-Type: application/xml
      < Transfer-Encoding: chunked
      < Date: Wed, 19 Aug 2009 17:43:51 GMT
      <
      <Domain>
      <child-resource>http://localhost:4848/monitoring/domain/server</child-resource>
      </Domain>
      * Connection #0 to host localhost left intact
      * Closing connection #0

      The command changes the “Accept” header to “application/xml” and now the XML representation of the monitoring resources is returned as:

      <Domain>
      <child-resource>http://localhost:4848/monitoring/domain/server</child-resource>
      </Domain>
    3. HTML representation: The command can be altered to get the HTML representation as “curl -H “Accept: text/html” http://localhost
      :4848/monitoring/domain -v
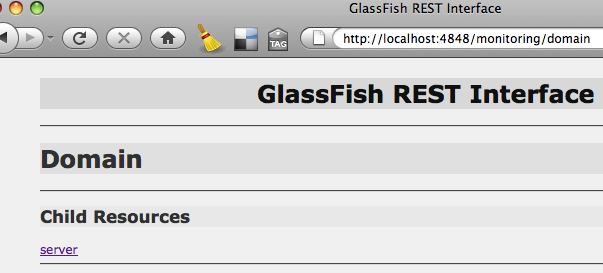
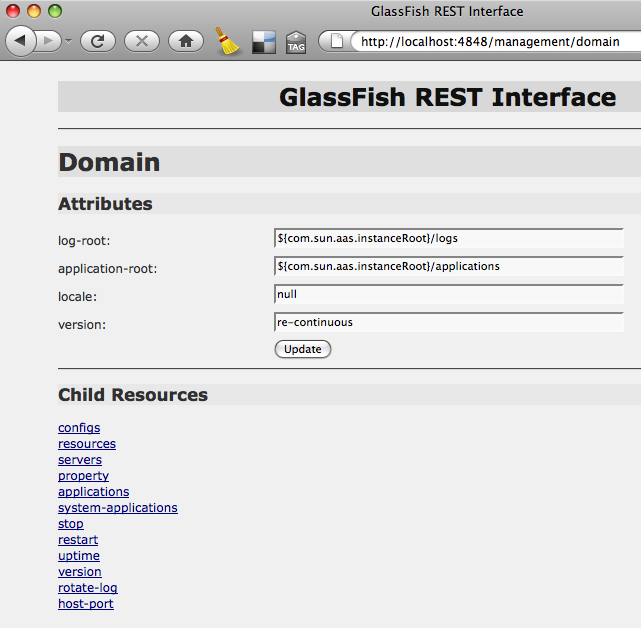
      “. But HTML is more pleasant when rendered by a browser and so viewing the page “http://localhost:4848/monitoring/domain” in the browser is shown as:

    4. Get more information: As mentioned above, more information about this GlassFish instance can be accessed by GETing from “http://localhost:4848/monitoring/domain/server” and here is the result:
      </tools/glassfish/v3/2023/glassfishv3 >curl -H “Accept: application/json” http://localhost:4848/monitoring/domain/server -v
      * About to connect() to localhost port 4848 (#0)
      *   Trying ::1… connected
      * Connected to localhost (::1) port 4848 (#0)
      > GET /monitoring/domain/server HTTP/1.1
      > User-Agent: curl/7.16.3 (powerpc-apple-darwin9.0) libcurl/7.16.3 OpenSSL/0.9.7l zlib/1.2.3
      > Host: localhost:4848
      > Accept: application/json
      >
      < HTTP/1.1 200 OK
      < Content-Type: application/json
      < Transfer-Encoding: chunked
      < Date: Wed, 19 Aug 2009 17:56:41 GMT
      <
      {Server:{},”child-resources”:["http://localhost:4848/monitoring/domain/server/webintegration",
      "http://localhost:4848/monitoring/domain/server/transaction-service",
      "http://localhost:4848/monitoring/domain/server/network",
      "http://localhost:4848/monitoring/domain/server/jvm",
      "http://localhost:4848/monitoring/domain/server/web",
      "http://localhost:4848/monitoring/domain/server/realm",
      "http://localhost:4848/monitoring/domain/server/http-service"]}
      * Connection #0 to host localhost left intact
      * Closing connection #0

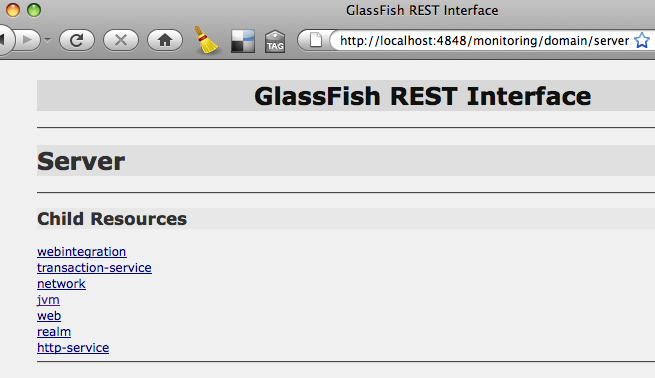
      An HTML rendering of this representation looks like:

      You can keep clicking on the links and more detailed information about that resource is displayed. This is just one HTML representation and is purposely kept light-weight. You can certainly grab the XML representation and apply an XSLT to generate your own HTML rendering.

      The monitoring levels for different modules can be easily changed using the management REST interface as explained below.

  4. Management of the GlassFish instance
    1. Lets see all the options supported by management REST interface as:
      ~/tools/glassfish/v3/2023/glassfishv3 >curl -X OPTIONS http://localhost:4848/management/domain -v
      * About to connect() to localhost port 4848 (#0)
      *   Trying ::1… connected
      * Connected to localhost (::1) port 4848 (#0)
      > OPTIONS /management/domain HTTP/1.1
      > User-Agent: curl/7.16.3 (powerpc-apple-darwin9.0) libcurl/7.16.3 OpenSSL/0.9.7l zlib/1.2.3
      > Host: localhost:4848
      > Accept: */*
      >
      < HTTP/1.1 200 OK
      < Content-Type: application/json
      < Transfer-Encoding: chunked
      < Date: Wed, 19 Aug 2009 18:07:14 GMT
      <
      {
      “Method”:”GET”

      “Method”:”PUT”
      }
      * Connection #0 to host localhost left intact
      * Closing connection #0

      Specifying “-X OPTIONS” switch displays the various HTTP methods supported by the REST interface. Even though the results show GET and PUT, but it really means GET and POST (issue #9177). Lets try “GET” first.

    2. GET JSON information as:
      ~/tools/glassfish/v3/2023/glassfishv3 >curl -H “Accept: application/json” http://localhost:4848/management/domain -v
      * About to connect() to localhost port 4848 (#0)
      *   Trying ::1… connected
      * Connected to localhost (::1) port 4848 (#0)
      > GET /management/domain HTTP/1.1
      > User-Agent: curl/7.16.3 (powerpc-apple-darwin9.0) libcurl/7.16.3 OpenSSL/0.9.7l zlib/1.2.3
      > Host: localhost:4848
      > Accept: application/json
      >
      < HTTP/1.1 200 OK
      < Content-Type: application/json
      < Transfer-Encoding: chunked
      < Date: Wed, 19 Aug 2009 18:14:46 GMT
      <
      {Domain:{”log-root” : “${com.sun.aas.instanceRoot}/logs”,”application-root” : “${com.sun.aas.instanceRoot}/applications”,”locale” : “”,”version” : “re-continuous”},”child-resources”:["http://localhost:4848/management/domain/configs",
      "http://localhost:4848/management/domain/resources","http://localhost:4848/management/domain/servers",
      "http://localhost:4848/management/domain/property","http://localhost:4848/management/domain/applications",
      "http://localhost:4848/management/domain/system-applications","http://localhost:4848/management/domain/stop",
      "http://localhost:4848/management/domain/restart","http://localhost:4848/management/domain/uptime",
      "http://localhost:4848/management/domain/version","http://localhost:4848/management/domain/rotate-log",
      "http://localhost:4848/management/domain/host-port"]}
      * Connection #0 to host localhost left intact
      * Closing connection #0

      As the result shows, there are several RESTful URLs available (in “child-resources” element) to manage this GlassFish instance. For example:

      1. Show the host/port of GlassFish instance as:
        curl -H “Accept: application/json” http://localhost:4848/management/domain/host-port -v

        will show the result as:

        {”GetHostAndPort”:{”value” : “dhcp-usca14-132-79.SFBay.Sun.COM:8080″}}
      2. Show that web-based Admin Console is pre-installed as system application using:
        curl -H “Accept: application/json” http://localhost:4848/management/domain/system-applications/application/__admingui -v

        will show the result as:

        {__admingui:{”libraries” : “”,”availability-enabled” : “false”,”enabled” : “true”,”context-root” : “”,”location” : “${com.sun.aas.installRootURI}/lib/install/applications/__admingui”,”description” : “”,”name” : “__admingui”,”directory-deployed” : “true”,”object-type” : “system-admin”},”child-resources”:["http://localhost:4848/management/domain/system-applications/application/__admingui/module"]} td>
      3. Query the monitoring levels of different modules as:
        curl -H “Accept: application/json” http://localhost:4848/management/domain/configs/config/server-config/monitoring-service/module-monitoring-levels -v

        to see the result as:

        {ModuleMonitoringLevels:{”transaction-service” : “OFF”,”ejb-container” : “OFF”,”jdbc-connection-pool” : “OFF”,”orb” : “OFF”,”http-service” : “OFF”,”connector-connection-pool” : “OFF”,”jms-service” : “OFF”,”connector-service” : “OFF”,”jvm” : “OFF”,”thread-pool” : “OFF”,”web-container” : “OFF”},”child-resources”:[]}

        And then change the monitoring level of Web container as:

        ~/tools/glassfish/v3/2023/glassfishv3 >curl -X POST -d “web-container=ON” -H “Accept: application/json” http://localhost:4848/management/domain/configs/config/server-config/monitoring-service/module-monitoring-levels -v
        * About to connect() to localhost port 4848 (#0)
        *   Trying ::1… connected
        * Connected to localhost (::1) port 4848 (#0)
        > POST /management/domain/configs/config/server-config/monitoring-service/module-monitoring-levels HTTP/1.1
        > User-Agent: curl/7.16.3 (powerpc-apple-darwin9.0) libcurl/7.16.3 OpenSSL/0.9.7l zlib/1.2.3
        > Host: localhost:4848
        > Accept: application/json
        > Content-Length: 16
        > Content-Type: application/x-www-form-urlencoded
        >
        < HTTP/1.1 200 OK
        < Content-Type: application/json
        < Transfer-Encoding: chunked
        < Date: Wed, 19 Aug 2009 22:01:31 GMT
        <
        * Connection #0 to host localhost left intact
        * Closing connection #0
        “http://localhost:4848/management/domain/configs/config/server-config/monitoring-service/module-monitoring-levels” updated successfully

        The last line shows that the monitoring level is successfull updated and can be verified again as:

        ~/tools/glassfish/v3/2023/glassfishv3 >curl -H “Accept: application/json” http://localhost:4848/management/domain/configs/config/server-config/monitoring-service/module-monitoring-levels -v
        * About to connect() to localhost port 4848 (#0)
        *   Trying ::1… connected
        * Connected to localhost (::1) port 4848 (#0)
        > GET /management/domain/configs/config/server-config/monitoring-service/module-monitoring-levels HTTP/1.1
        > User-Agent: curl/7.16.3 (powerpc-apple-darwin9.0) libcurl/7.16.3 OpenSSL/0.9.7l zlib/1.2.3
        > Host: localhost:4848
        > Accept: application/json
        >
        < HTTP/1.1 200 OK
        < Content-Type: application/json
        < Transfer-Encoding: chunked
        < Date: Wed, 19 Aug 2009 22:36:47 GMT
        <
        * Connection #0 to host localhost left intact
        * Closing connection #0
        {ModuleMonitoringLevels:{”transaction-service” : “OFF”,”ejb-container” : “OFF”,”jdbc-connection-pool” : “OFF”,”orb” : “OFF”,”http-service” : “OFF”,”connector-connection-pool” : “OFF”,”jms-service” : “OFF”,”connector-service” : “OFF”,”jvm” : “OFF”,”thread-pool” : “OFF”,”web-container” : “ON”},”child-resources”:[]}
      4. Stop this GlassFish instance using:
        curl -H “Accept: application/json” http://localhost:4848/management/domain/stop -v

        Or restart the instance using:

        curl -H “Accept: application/json” http://localhost:4848/management/domain/restart -v
      5. Create a JDBC resource using an existing connection pool
        1. Lets see all the resources that are available:
          curl -H “Accept: application/json” http://localhost:4848/management/domain/resources -v

          and the results are shown as:

          {Resources:{},”child-resources”:["http://localhost:4848/management/domain/resources/jdbc-connection-pool",
          "http://localhost:4848/management/domain/resources/jdbc-resource"]}
        2. View all the JDBC connection pools as:
          curl -H “Accept: application/json” http://localhost:4848/management/domain/resources/jdbc/connection-pool -v

          and the results are shown as:

          {JdbcConnectionPool:{},”child-resources”:["http://localhost:4848/management/domain/resources/jdbc-connection-pool/__TimerPool",
          "http://localhost:4848/management/domain/resources/jdbc-connection-pool/DerbyPool"]}
        3. See all the JDBC resources available as:
          curl “Accept: application/json” http://localhost:4848/management/domain/resources/jdbc-resource -v

          and the results are shown as:

          {JdbcResource:{},”child-resources”:["http://localhost:4848/management/domain/resources/jdbc-resource/jdbc/__TimerPool",
          "http://localhost:4848/management/domain/resources/jdbc-resource/jdbc/__default"]}
        4. See all the OPTIONS accepted for JDBC resource creation as:
          curl -X OPTIONS -H “Accept: application/json” http://localhost:4848/management/domain/resources/jdbc-resource -v

          with the result as:

          {
          “Method”:”POST”,
          “Message Parameters”:{
          “id”:{”Acceptable Values”:”",”Default Value”:”",”Type”:”class java.lang.String”,”Optional”:”false”},
          “enabled”:{”Acceptable Values”:”",”Default Value”:”true”,”Type”:”class java.lang.Boolean”,”Optional”:”true”},
          “description”:{”Acceptable Values”:”",”Default Value”:”",”Type”:”class java.lang.String”,”Optional”:”true”},
          “target”:{”Acceptable Values”:”",”Default Value”:”",”Type”:”class java.lang.String”,”Optional”:”true”},
          “property”:{”Acceptable Values”:”",”Default Value”:”",”Type”:”class java.util.Properties”,”Optional”:”true”},
          “connectionpoolid”:{”Acceptable Values”:”",”Default Value”:”",”Type”:”class java.lang.String”,”Optional”:”false”}
          }

          “Method”:”GET”

        5. Finally, create the JDBC resource as:
          ~/tools/glassfish/v3/2023/glassfishv3 >curl -d “id=jdbc/sample&connectionpoolid=DerbyPool” http://localhost:4848/management/domain/resources/jdbc-resource -v
          * About to connect() to localhost port 4848 (#0)
          *   Trying ::1… connected
          * Connected to localhost (::1) port 4848 (#0)
          > POST /management/domain/resources/jdbc-resource HTTP/1.1
          > User-Agent: curl/7.16.3 (powerpc-apple-darwin9.0) libcurl/7.16.3 OpenSSL/0.9.7l zlib/1.2.3
          > Host: localhost:4848
          > Accept: */*
          > Content-Length: 42
          > Content-Type: application/x-www-form-urlencoded
          >
          < HTTP/1.1 201 Created
          < Content-Type: text/html
          < Transfer-Encoding: chunked
          < Date: Wed, 19 Aug 2009 20:45:51 GMT
          <
          * Connection #0 to host localhost left intact
          * Closing connection #0
          “http://localhost:4848/management/domain/resources/jdbc-resource/jdbc/sample” created successfully.

          Note, this is a POST request. The JDBC resource name and JDBC connection pool id are passed as CLI parameters using “-d” switch. The last line shows that the JDBC resource was created successfully.

        6. And finally query the JDBC Resources again as:
          curl -H “Accept: application/json” http://localhost:4848/management/domain/resources/jdbc-resource -v

          to see the updated result as:

          {JdbcResource:{},”child-resources”:["http://localhost:4848/management/domain/resources/jdbc-resource/jdbc/__TimerPool",
          "http://localhost:4848/management/domain/resources/jdbc-resource/jdbc/__default",
          "http://localhost:4848/management/domain/resources/jdbc-resource/jdbc/sample"]}

        Similarly JDBC connection pools can be created.

    3. POST can be used to update the top-level attributes such as “log-root” and “application-root”. The name of these attributes are shown in the result of GET.
    4. As earlier, XML representation of management resources can be obtained as:
      ~/tools/glassfish/v3/2023/glassfishv3 >curl -H “Accept: application/xml” http://localhost:4848/management/domain -v
      * About to connect() to localhost port 4848 (#0)
      *   Trying ::1… connected
      * Connected to localhost (::1) port 4848 (#0)
      > GET /management/domain HTTP/1.1
      > User-Agent: curl/7.16.3 (powerpc-apple-darwin9.0) libcurl/7.16.3 OpenSSL/0.9.7l zlib/1.2.3
      > Host: localhost:4848
      > Accept: application/xml
      >
      < HTTP/1.1 200 OK
      < Content-Type: application/xml
      < Transfer-Encoding: chunked
      < Date: Wed, 19 Aug 2009 18:17:07 GMT
      <
      <Domain log-root=”${com.sun.aas.instanceRoot}/logs” application-root=”${com.sun.aas.instanceRoot}/applications” locale=”" version=”re-continuous”>
      <child-resource>http://localhost:4848/management/domain/configs</child-resource>
      <child-resource>http://localhost:4848/management/domain/resources</child-resource>
      <child-resource>http://localhost:4848/management/domain/servers</child-resource>
      <child-resource>http://localhost:4848/management/domain/property</child-resource>
      <child-resource>http://localhost:4848/management/domain/applications</child-resource>
      <child-resource>http://localhost:4848/management/domain/system-applications</child-resource>
      <child-resource>http://localhost:4848/management/domain/stop</child-resource>
      <child-resource>http://localhost:4848/management/domain/restart</child-resource>
      <child-resource>http://localhost:4848/management/domain/uptime</child-resource>
      <child-resource>http://localhost:4848/management/domain/version</child-resource>
      <child-resource>http://localhost:4848/management/domain/rotate-log</child-resource>
      <child-resource>http://localhost:4848/management/domain/host-port</child-resource>
      * Connection #0 to host localhost left intact
      * Closing connection #0

      Just changing the “Accept” header to “application/xml” did the trick.

    5. And an HTML representation can be obtained by viewing the URL “http://localhost:4848/management/domain” in the browser with result as:

Just like GlassFish v3, the REST interface is extensible as well. So if a new container is plugged in that generates data (possibly through probes) captured in the runtime tree, that is automatically exposed in the RESTful interface.

Now for the Mac users, Safari prefers XML over HTML. Basically a resource, that can be served using both XML and HTML representation (as our Management and Monitoring interface), is served as XML by Safari and HTML by Firefox. So use Firefox on Mac if you want HTML rendering.

How will you use GlassFish RE
ST interface ?

Do your application server provide that level of administration capability ?

Please leave suggestions on other TOTD that you’d like to see. A complete archive of all the tips is available here.

Technorati: totd glassfish v3 rest management monitoring jersey

Share and Enjoy:
  • Print this article!
  • Digg
  • Sphinn
  • del.icio.us
  • Facebook
  • Google Bookmarks
  • DZone
  • E-mail this story to a friend!
  • StumbleUpon
  • Technorati
  • Twitter
  • Slashdot

August 17, 2009

TOTD #95: EJB 3.1 + Java Server Faces 2.0 + JPA 2.0 web application – Getting Started with Java EE 6 using NetBeans 6.8 M1 & GlassFish v3

Categories: javaserverfaces, netbeans, totd

TOTD #93 showed how to get started with Java EE 6 using NetBeans 6.8 M1 and GlassFish v3 by building a simple Servlet 3.0 + JPA 2.0 web application. TOTD #94 built upon it by using Java Server Faces 2 instead of Servlet 3.0 for displaying the results. However we are still using a POJO for all the database interactions. This works fine if we are only reading values from the database but that’s not how a typical web application behaves. The web application would typically perform all CRUD operations. More typically they like to perform one or more CRUD operations within the context of a transaction. And how do you do transactions in the context of a web application ? Java EE 6 comes to your rescue.

The EJB 3.1 specification (another new specification in Java EE 6) allow POJO classes to be annotated with @EJB and bundled within WEB-INF/classes of a WAR file. And so you get all transactional capabilities in your web application very easily.

This Tip Of The Day (TOTD) shows how to enhance the application created in TOTD #94 and use EJB 3.1 instead of the JSF managed bean for performing the business logic. There are two ways to achieve this pattern as described below.

Lets call this TOTD #95.1

  1. The easiest way to back a JSF page with an EJB is to convert the managed bean into an EJB by adding @javax.ejb.Stateless annotation. So change the  “StateList” class from TOTD #94 as shown below:
    @javax.ejb.Stateless
    @ManagedBean
    public class StateList {
    @PersistenceUnit
    EntityManagerFactory emf;

    public List<States> getStates() {
    return emf.createEntityManager().createNamedQuery(”States.findAll”).getResultList();
    }
    }

    The change is highlighted in bold, and that’s it!

Because of “Deploy-on-save” feature in NetBeans and GlassFish v3, the application is autodeployed. Otherwise right-click on the project and select Run (default shortcut “F6″). As earlier, the results can be seen at “http://localhost:8080/HelloEclipseLink/forwardToJSF.jsp” or “http://localhost:8080/HelloEclipseLink/faces/template-client.xhtml” and looks like:

The big difference this time is that the business logic is executed by an EJB in a fully transactional manner. Even though the logic in this case is a single read-only operation to the database, but you get the idea :)

Alternatively, you can use the delegate pattern in the managed bean as described below. Lets call this #95.2.

  1. Right-click on the project, select “New”, “Session Bean …” and create a stateless session bean by selecting the options as shown below:

    This creates a stateless session with the name “StateBeanBean” (bug #170392 for redundant “Bean” in the name).

  2. Simplify your managed bean by refactoring all the business logic to the EJB as shown below:
    @Stateless
    public class StateBeanBean {
    @PersistenceUnit
    EntityManagerFactory emf;

    public List<States> getStates() {
    return emf.createEntityManager().createNamedQuery(”States.findAll”).getResultList();
    }
    }

    and

    @ManagedBean
    public class StateList {
    @EJB StateBeanBean bean;

    public List<States> getStates() {
    return bean.getStates();
    }
    }

    In fact the EJB code can be further simplified to:

    @Stateless
    public class StateBeanBean {
    @PersistenceContext
    EntityManager em;

    public List<States> getStates() {
    return em.createNamedQuery(”States.findAll”).getResultList();
    }
    }

    The changes are highlighted in bold.

If the application is already running then Deploy-on-Save would have automatically deployed the entire application. Otherwise right-click on the project and select Run (default shortcut “F6″). Again, the results can be seen at “http://localhost:8080/HelloEclipseLink/forwardToJSF.jsp” or “http://localhost:8080/HelloEclipseLink/faces/template-client.xhtml” and are displayed as shown in the screenshot above.

The updated directory structure looks like:

The important point to note is that our EJB is bundled in the WAR file and no additional deployment descriptors were added or existing ones modified to achieve that. Now, that’s really clean :)

The next blog in this series will show how managed beans can be replaced with WebBeans, err JCDI.

Also refer to other Java EE 6 blog entries.

Please leave suggestions on other TOTD that you’d like to see. A complete archive of all the tips is available here.

Technorati: totd glassfish v3 mysql javaee6 javaserverfaces jpa2 ejb netbeans

Share and Enjoy:
  • Print this article!
  • Digg
  • Sphinn
  • del.icio.us
  • Facebook
  • Google Bookmarks
  • DZone
  • E-mail this story to a friend!
  • StumbleUpon
  • Technorati
  • Twitter
  • Slashdot

August 14, 2009

TOTD #94: A simple Java Server Faces 2.0 + JPA 2.0 application – Getting Started with Java EE 6 using NetBeans 6.8 M1 & GlassFish v3

Categories: javaserverfaces, netbeans, totd

TOTD #93 showed how to get started with Java EE 6 using NetBeans 6.8 M1 and GlassFish v3 by building a simple Servlet 3.0 + JPA 2.0 web application. JPA 2.0 + Eclipselink was used for the database connectivity and Servlet 3.0 was used for displaying the results to the user. The sample demonstrated how the two technologies can be mixed to create a simple web application. But Servlets are meant for server-side processing rather than displaying the results to end user. JavaServer Faces 2 (another new specification in Java EE 6) is designed to fulfill that purpose.

This Tip Of The Day (TOTD) shows how to enhance the application created in TOTD #93 and use JSF 2 for displaying the results.

  1. Right-click on the project, select “Properties”, select “Frameworks”, click on “Add …” as shown below:

    Select “JavaServer Faces” and click on “OK”. The following configuration screen is shown:

    Click on “OK” to complete the dialog. This generates a whole bunch of files (7 to be accurate) in your project. Most of these files are leftover from previous version of NetBeans and will be cleaned up. For example, “faces-config.xml” is now optional and “forwardToJSF.jsp” is redundant.

  2. Anyway, lets add a POJO class that will be our managed bean. Right-click on “server” package and select “New”, “Java Class …”, give the name as “StateList”. Change the class such that it looks like:
    package server;

    import java.util.List;
    import javax.faces.bean.ManagedBean;
    import javax.persistence.EntityManagerFactory;
    import javax.persistence.PersistenceUnit;
    import states.States;

    /**
    * @author arungupta
    */
    @ManagedBean
    public class StateList {
    @PersistenceUnit
    EntityManagerFactory emf;

    public List<States> getStates() {
    return emf.createEntityManager().createNamedQuery(”States.findAll”).getResultList();
    }
    }

    Here are the main characterisitcs of this class:

    1. This is a POJO class with @ManagedBean annotation. This annotation makes this class a managed bean that can be used in the JSF pages. As no other annotations or parameters are specified, this is a request-scoped managed bean with the name “stateList” and lazily initialized. More details about this annotation are available in the javadocs.
    2. The persistence unit created in TOTD #93 is injected using @PersistenceUnit annotation.
    3. The POJO has one getter method that queries the database and return the list of all the states.
  3. In the generated file “template-client.xhtml”, change the “head” template to:
    Show States

    and “body” template to:

    <h:dataTable var=”state” value=”#{stateList.states}” border=”1″>
    <h:column><h:outputText value=”#{state.abbrev}”/></h:column>
    <h:column><h:outputText value=”#{state.name}”/></h:column>
    </h:dataTable>

    This uses the standard JSF “dataTable”, “column”, and “outputText” tags and uses the value expression to fetch the values from the managed bean.

If the application is already running from TOTD #93, then Deploy-on-Save would have automatically deployed the entire application. Otherwise right-click on the project and select Run (default shortcut “F6″). The results can be seen at “http://localhost:8080/HelloEclipseLink/forwardToJSF.jsp” or “http://localhost:8080/HelloEclipseLink/faces/template-client.xhtml” and looks like:

The updated directory structure looks like:

There were multiple files added by the JSF framework support in NetBeans. But as I said earlier, they will be cleaned up before the final release.

Also refer to other Java EE 6 blog entries.

Please leave suggestions on other TOTD that you’d like to see. A complete archive of all the tips is available here.

Technorati: totd glassfish v3 mysql javaee6 javaserverfaces jpa2 netbeans

Share and Enjoy:
  • Print this article!
  • Digg
  • Sphinn
  • del.icio.us
  • Facebook
  • Google Bookmarks
  • DZone
  • E-mail this story to a friend!
  • StumbleUpon
  • Technorati
  • Twitter
  • Slashdot

August 13, 2009

TOTD #93: Getting Started with Java EE 6 using NetBeans 6.8 M1 & GlassFish v3 – A simple Servlet 3.0 + JPA 2.0 app

Categories: javaserverfaces, netbeans, totd

NetBeans 6.8 M1 introduces support for creating Java EE 6 applications … cool!

This Tip Of The Day (TOTD) shows how to create a simple web application using JPA 2.0 and Servlet 3.0 and deploy on GlassFish v3 latest promoted build (58 as of this writing). If you can work with the one week older build then NetBeans 6.8 M1 comes pre-bundled with 57. The example below should work fine on that as well.

  1. Create the database, table, and populate some data into it as shown below:
    ~/tools/glassfish/v3/58/glassfishv3/bin >sudo mysql –user root
    Password:
    Welcome to the MySQL monitor.  Commands end with ; or \g.
    Your MySQL connection id is 1592
    Server version: 5.1.30 MySQL Community Server (GPL)

    Type ‘help;’ or ‘\h’ for help. Type ‘\c’ to clear the buffer.

    mysql> create database states;
    Query OK, 1 row affected (0.02 sec)

    mysql> CREATE USER duke IDENTIFIED by ‘glassfish’;
    Query OK, 0 rows affected (0.00 sec)

    mysql> GRANT ALL on states.* TO duke;
    Query OK, 0 rows affected (0.24 sec)

    mysql> use states;
    Database changed

    mysql> CREATE TABLE STATES (
    ->       id INT,
    ->       abbrev VARCHAR(2),
    ->       name VARCHAR(50),
    ->       PRIMARY KEY (id)
    -> );
    Query OK, 0 rows affected (0.16 sec)

    mysql> INSERT INTO STATES VALUES (1, “AL”, “Alabama”);
    INSERT INTO STATES VALUES (2, “AK”, “Alaska”);

    . . .

    mysql> INSERT INTO STATES VALUES (49, “WI”, “Wisconsin”);
    Query OK, 1 row affected (0.00 sec)

    mysql> INSERT INTO STATES VALUES (50, “WY”, “Wyoming”);
    Query OK, 1 row affected (0.00 sec)

    The complete INSERT statement is available in TOTD #38. Most of this step can be executed from within the IDE as well as explained in TOTD #38.

  2. Download and unzip GlassFish v3 build 58. Copy the latest MySQL Connector/J jar in “domains/domain1/lib” directory of GlassFish and start the application server as:
    ~/tools/glassfish/v3/58/glassfishv3/bin >asadmin start-domain
  3. Create JDBC connection pool and JNDI resource as shown below:
    ~/tools/glassfish/v3/58/glassfishv3/bin >./asadmin create-jdbc-connection-pool –datasourceclassname com.mysql.jdbc.jdbc2.optional.MysqlConnectionPoolDataSource –restype javax.sql.DataSource –property “User=duke:Password=glassfish:URL=jdbc\:mysql\://localhost/states” jdbc/states

    Command create-jdbc-connection-pool executed successfully.
    ~/tools/glassfish/v3/58/glassfishv3/bin >./asadmin ping-connection-pool jdbc/states

    Command ping-connection-pool executed successfully.
    ~/tools/glassfish/v3/58/glassfishv3/bin >./asadmin create-jdbc-resource –connectionpoolid jdbc/states jdbc/jndi_states

    Command create-jdbc-resource executed successfully.

  4. Download NetBeans 6.8 M1 and install “All” version. Expand “Servers” node and add the recently installed GlassFish server.
  5. Create a new Web project and name it “HelloEclipseLink”. Make sure to choose “GlassFish v3″ as the server and “Java EE 6 Web” as the Java EE version as shown below:

    Take defaults elsewhere.

  6. Create the Persistence Unit
    1. Right-click on the newly created project and select “New”, “Entity Classes from Database …”. Choose the earlier created data source “jdbc/jndi_states” as shown below:

    2. Select “STATES” table in “Available Tables:” and click on “Add >” and then “Next >”.
    3. Click on “Create Persistence Unit …”, take all the defaults and click on “Create”. “EclipseLink” is the Reference Implementation for JPA 2.0 is the default choosen Persistence Provider as shown below:
    4. Enter the package name as “server” and click on “Finish”.
  7. Create a Servlet to retrieve and display all the information from the database
    1. Right click on the project, “New”, “Servlet …”.
    2. Give the Servlet name “ShowStates” and package “server”.
    3. Even though you can take all the defaults and click on “Finish” but instead click on “Next >” and the following screen is shown:

      Notice “Add information to deployment descriptor (web.xml)” checkbox. Servlet 3.0 makes “web.xml” optional in most of the common cases by providing corresponding annotations and NetBeans 6.8 leverages that functionality. As a result, no “web.xml” will be bundled in our WAR file. Click on “Finish” now.

      The generated servlet code looks like:

      Notice @WebServlet annotation, this makes “web.xml” optional. TOTD #82 provide another example on how to use Servlet 3.0 with EJB 3.1.

    4. Inject the Persistence Unit as:
      @PersistenceUnit
      EntityManagerFactory emf;

      right above “processRequest” method.

    5. Change the “try” block of “processRequest” method to:
      List<States> list = emf.createEntityManager().createNamedQuery(”States.findAll”).getResultList();
      out.println(”<table border=\”1\”>”);
      for (States state : list) {
      out.println(”<tr><td>” + state.getAbbrev() +
      “</td><td>” + state.getName() +
      “</td></tr>”);
      }
      out.println(”</table>”);

      This uses a predefined query to retrieve all rows from the table and then display them in a simple formatted HTML table.

  8. Run the project
      1. Right click on the project, select “Properties” and change the “Relative URL” to “/ShowStates”. This is the exact URL that you specified earlier.

      2. Right-click on the project and select “Run” to see the following output:

    So we created a simple web application that uses Servlet 3.0, JPA 2.0, EclipseLink and deployed on GlassFish v3 using NetBeans 6.8 M1. NetBeans provides reasonable defaults making you a lazy programmer. Believe this is more evident when you start playing with Java EE support in other IDEs ;-)

    Finally, lets look at the structure of the generated WAR file:

    It’s very clean – no “web.xml”, only the relevant classes and “persistence.xml”.

    Also refer to other Java EE 6 blog entries. A future blog entry will show how to use JSF 2.0 instead of Servlet for displaying the results.

    Please leave suggestions on other TOTD that you’d like to see. A complete archive of all the tips is available here.

    Technorati: totd glassfish v3 mysql javaee6 servlet3 jpa2 netbeans

    Share and Enjoy:
    • Print this article!
    • Digg
    • Sphinn
    • del.icio.us
    • Facebook
    • Google Bookmarks
    • DZone
    • E-mail this story to a friend!
    • StumbleUpon
    • Technorati
    • Twitter
    • Slashdot

    August 12, 2009

    TOTD #92: Session Failover for Rails applications running on GlassFish

    The GlassFish High Availability allows to setup a cluster of GlassFish instances and achieve highly scalable architecture using in-memory session state replication. This cluster can be very easily created and tested using the “clusterjsp” sample bundled with GlassFish. Here are some clustering related entries published on this blog so far:

    • TOTD #84 shows how to setup Apache + mod_proxy balancer for Ruby-on-Rails load balancing
    • TOTD #81 shows how to use nginx to front end a cluster of GlassFish Gems
    • TOTD #69 explains how a GlassFish cluster can be front-ended using Sun Web Server and Load Balancer Plugin
    • TOTD #67 shows the same thing using Apache httpd + mod_jk

    #67 & #69 uses a web application “clusterjsp” (bundled with GlassFish) that uses JSP to demonstrate in-memory session replication state replication. This blog creates a similar application “clusterrails” – this time using Ruby-on-Rails and deploy it on GlassFish v2.1.1. The idea is to demonstrate how Rails applications can leverage the in-memory session replication feature of GlassFish.

    Rails applications can be easily deployed as a WAR file on GlassFish v2 as explained in TOTD #73. This blog will guide through the steps of creating the Controller and View to mimic “clusterjsp” and configuring the Rails application for session replication.

    1. Create a template Rails application and create/migrate the database. Add a Controller/View as:
      ~/samples/jruby/session >~/tools/jruby/bin/jruby script/generate controller home index
      JRuby limited openssl loaded. gem install jruby-openssl for full support.
      http://wiki.jruby.org/wiki/JRuby_Builtin_OpenSSL
      exists  app/controllers/
      exists  app/helpers/
      create  app/views/home
      exists  test/functional/
      create  test/unit/helpers/
      create  app/controllers/home_controller.rb
      create  test/functional/home_controller_test.rb
      create  app/helpers/home_helper.rb
      create  test/unit/helpers/home_helper_test.rb
      create  app/views/home/index.html.erb
    2. Edit the controller in “app/controllers/home_controller.rb” and change the code to (explained below):
      class HomeController < ApplicationController
      include Java

      def index
      @server_served = servlet_request.get_server_name
      @port = servlet_request.get_server_port
      @instance = java.lang.System.get_property “com.sun.aas.instanceName”
      @server_executed = java.net.InetAddress.get_local_host().get_host_name()
      @ip = java.net.InetAddress.get_local_host().get_host_address
      @session_id = servlet_request.session.get_id
      @session_created = servlet_request.session.get_creation_time
      @session_last_accessed = servlet_request.session.get_last_accessed_time
      @session_inactive = servlet_request.session.get_max_inactive_interval

      if (params[:name] != nil)
      servlet_request.session[params[:name]] = params[:value]
      end

      @session_values = “”
      value_names = servlet_request.session.get_attribute_names
      unless (value_names.has_more_elements)
      @session_values = “<br>No parameter entered for this request”
      else
      @session_values << “<UL>”
      while (value_names.has_more_elements)
      param = value_names.next_element
      unless (param.starts_with?(”__”))
      value = servlet_request.session.get_attribute(param)
      @session_values << “<LI>” + param + ” = ” + value + “</LI>”
      end
      end
      @session_values << “</UL>”
      end

      end

      def adddata
      servlet_request.session.set_attribute(params[:name], params[:value])
      render :action => “index”
      end

      def cleardata
      servlet_request.session.invalidate
      render :action => “index”
      end
      end

      The “index” action initializes some instance variables using the “servlet_request” variable mapped from “javax.servlet.http.ServletRequest” class. The “servlet_request” provides access to different properties of the request received such as server name/port, host name/address and others. It also uses an application server specific property ”com.sun.aas.instanceName” to fetch the name of particular instance serving the request. In this blog we’ll create a cluster with 2 instances. The action then prints the servlet session attributes name/value pairs entered so far.

      The “adddata” action takes the name/value pair entered on the page and stores them in the servlet request. The “cleardata” action clears any data that is storied in the session.

    3. Edit the view in “app/views/home/index.html.erb” and change to (explained below):
      <h1>Home#index</h1>
      <p>Find me in app/views/home/index.html.erb</p>
      <B>HttpSession Information:</B>
      <UL>
      <LI>Served From Server:   <b><%= @server_served %></b></LI>
      <LI>Server Port Number:   <b><%= @port %></b></LI>
      <LI>Executed From Server: <b><%= @server_executed %></b></LI>
      <LI>Served From Server instance: <b><%= @instance %></b></LI>
      <LI>Executed Server IP Address: <b><%= @ip %></b></LI>
      <LI>Session ID:    <b><%=
      @session_id %></b></LI>
      <LI>Session Created:  <%= @session_created %></LI>
      <LI>Last Accessed:    <%= @session_last_accessed %></LI>
      <LI>Session will go inactive in  <b><%= @session_inactive %> seconds</b></LI>
      </UL>
      <BR>
      <% form_tag “/session/home/index” do %>
      <label for=”name”>Name of Session Attribute:</label>
      <%= text_field_tag :name, params[:name] %><br>

      <label for=”value”>Value of Session Attribute:</label>
      <%= text_field_tag :value, params[:value] %><br>

      <%= submit_tag “Add Session Data” %>
      <% end  %>
      <% form_tag “/session/home/cleardata” do %>
      <%= submit_tag “Clear Session Data” %>
      <% end %>
      <% form_tag “/session/home/index” do %>
      <%= submit_tag “Reload Page” %>
      <% end %>
      <BR>
      <B>Data retrieved from the HttpSession: </B>
      <%= @session_values %>

      The view dumps the property value retrieved from the servlet context in the action. Then it consists of some forms to enter the session name/value pairs, clear the session and reload the page. The application is now ready, lets configure it for WAR packaging.

    4. Generate a template “web.xml” and copy it to “config” directory as:
      ~/samples/jruby/session >~/tools/jruby/bin/jruby -S warble war:webxml
      mkdir -p tmp/war/WEB-INF
      ~/samples/jruby/session >cp tmp/war/WEB-INF/web.xml config/
      1. Edit “tmp/war/WEB-INF/web.xml” and change the first few lines from:
        <!DOCTYPE web-app PUBLIC
        “-//Sun Microsystems, Inc.//DTD Web Application 2.3//EN”
        “http://java.sun.com/dtd/web-app_2_3.dtd”>
        <web-app>

        to

        <web-app version=”2.4″ xmlns=”http://java.sun.com/xml/ns/j2ee” xmlns:xsi=”http://www.w3.org/2001/XMLSchema-instance” xsi:schemaLocation=”http://java.sun.com/xml/ns/j2ee http://java.sun.com/xml/ns/j2ee/web-app_2_4.xsd”>

        This is required because the element to be added next is introduced in the Servlet 2.4 specification.

      2. Add the following element:
        <distributable/>

        as the first element, right after “<web-app>”. This element marks the web application to be distributable across multiple JVMs in a cluster.

    5. Generate and configure “warble/config.rb” as described in TOTD #87. This configuration is an important step otherwise you’ll encounter JRUBY-3789. Create a WAR file as:
      ~/samples/jruby/session >~/tools/jruby/bin/jruby -S warble
      mkdir -p tmp/war/WEB-INF/gems/specifications
      cp /Users/arungupta/tools/jruby-1.3.0/lib/ruby/gems/1.8/specifications/rails-2.3.2.gemspec tmp/war/WEB-INF/gems/specifications/rails-2.3.2.gemspec

      . . .

      mkdir -p tmp/war/WEB-INF
      cp config/web.xml tmp/war/WEB-INF
      jar cf session.war  -C tmp/war .

    6. Download latest GlassFish v2.1.1, install/configure GlassFish and create/configure/start a cluster using the script described here. Make sure to change the download location and filename in the script. This script creates a cluster “wines” with two instances – “cabernet” runing on the port 58080 and “merlot” running on the port 58081.
    7. Deploy the application using the command:
      ~/samples/jruby/session >asadmin deploy –target wines –port 5048 –availabilityenabled=true session.war

    Now, the screenshots from the two instances are shown and explained below. The two (or more) instances are front-ended by a load balancer so none of this is typically visible to the user but it helps to understand.
    Here is a snapshot of this application deployed on “cabernet”:

    The instance name and the session id is highlighted in the red box. It also shows the time when the session was created in “Session Created” field.

    And now the same application form “merlot”:

    Notice, the session id exactly matches the one from the “cabernet” instance. Similarly “Session Created” matches but “Last Accessed” does not because the same session session is accessed from a different instance.

    Lets enter some session data in the “cabernet” instance and click on “Add Session Data” button as shown below:

    The session attribute is “aaa” and value is “111″. Also the “Last Accessed” time is updated. In the “merlot” page, click on the “Reload Page” button and the same session name/value pairs are retrieved as shown below:

    Notice, the “Last Accessed” time is after the time showed in “cabernet” instance. The session information added in “cabernet” is automatically replicated to the “merlot” instance.

    Now, lets add a new session name/value pair in “merlot” instance as shown below:

    The “Last Accessed” is updated and the session name/value pair (”bbb”/”222″) is shown in the page. Click on “Reload page” in “cabernet” instance as shown below:

    This time the session information added to “merl
    ot” is replicated to “cabernet”.

    So any session information added in “cabernet” is replicated to “merlot” and vice versa.

    Now, lets stop “cabernet” instance as shown below:

    and click on “Reload Page” in “merlot” instance to see the following:

    Even though one instance from which the session data was added is stopped, the replicating instance continues to serve both the session values.

    As explained earlier, these two instances are front-ended by a load-balancer typically running at port 80. So the user makes a request to port 80 and the correct session values are served even if one of the instance goes down and there by providing in-memory session replication.

    Please leave suggestions on other TOTD that you’d like to see. A complete archive of all the tips is available here.

    Technorati: totd glassfish clustering rubyonrails jruby highavailability loadbalancer
    Share and Enjoy:
    • Print this article!
    • Digg
    • Sphinn
    • del.icio.us
    • Facebook
    • Google Bookmarks
    • DZone
    • E-mail this story to a friend!
    • StumbleUpon
    • Technorati
    • Twitter
    • Slashdot

    August 11, 2009

    TOTD #91: Applying Java EE 6 “web-fragment.xml” to Apache Wicket – Deploy on GlassFish v3

    Categories: javaee, totd, wicket

    “Extensibility” is a major theme of Java EE 6. This theme enables seamless pluggability of other popular Web frameworks with Java EE 6.

    Before Java EE 6, these frameworks have to rely upon registering servlet listeners/filters in “web.xml” or some other similar mechanism to register the framework with the Web container. Thus your application and framework deployment descriptors are mixed together. As an application developer you need to figure out the magical descriptors of the framework that will make this registration.

    What if you are using multiple frameworks ? Then “web.xml” need to have multiple of those listeners/servlets. So your deployment descriptor becomes daunting and maintenance nightmare even before any application deployment artifacts are added.

    Instead you should focus on your application descriptors and let the framework developer provide the descriptors along with their jar file so that the registration is indeed magical.

    For that, the Servlet 3.0 specification introduces “web module deployment descriptor fragment” (aka “web-fragment.xml”). The spec defines it as:

    A web fragment is a logical partitioning of the web app in such a way that the frameworks being used within the web app can define all the artifacts without asking devlopers to edit or add information in the web.xml.

    Basically, the framework configuration deployment descriptor can now be defined in “META-INF/web-fragment.xml” in the JAR file of the framework. The Web container picks up and use the configuration for registering the framework. The spec clearly defines the rules around ordering, duplicates and other complexities.

    TOTD #86 explained how to get started with Apache Wicket on GlassFish. This Tip Of The Day (TOTD) explains how to leverage ”web-fragment.xml” to deploy a Wicket application on GlassFish v3. The basic concepts are also discussed here.

    For the “Hello World” app discussed in TOTD #86, the generated “web.xml” looks like:

    <?xml version=”1.0″ encoding=”ISO-8859-1″?>
    <web-app xmlns=”http://java.sun.com/xml/ns/j2ee”
             xmlns:xsi=”http://www.w3.org/2001/XMLSchema-instance”
             xsi:schemaLocation=”http://java.sun.com/xml/ns/j2ee http://java.sun.com/xml/ns/j2ee/web-app_2_4.xsd”
             version=”2.4″>

            <display-name>helloworld</display-name>

             <!– 
                  There are three means to configure Wickets configuration mode and they are
                  tested in the order given.
                  1) A system property: -Dwicket.configuration
                  2) servlet specific <init-param>
                  3) context specific <context-param>
                  The value might be either “development” (reloading when templates change)
                  or “deployment”. If no configuration is found, “development” is the default.
            –>

            <filter>
                    <filter-name>wicket.helloworld</filter-name>
                    <filter-class>org.apache.wicket.protocol.http.WicketFilter</filter-class>
                    <init-param>
                            <param-name>applicationClassName</param-name>
                            <param-value>org.glassfish.samples.WicketApplication</param-value>
                    </init-param>
            </filter>

     <filter-mapping>
      <filter-name>wicket.helloworld</filter-name>
            <url-pattern>/*</url-pattern>
     </filter-mapping>

    </web-app>

    This deployment descriptor defines a Servlet Filter (wicket.helloworld) that registers the Wicket framework with the Web container. The filter specifies an initialization parameter that specifies the class name of the Wicket application to be loaded. And it also contains some other information that is also relevant to the framework. None of this application is either required or specified by the application. And so that makes this fragment a suitable candidate for “web-fragment.xml”.

    Here are the simple steps to make this change:

    1. Remove “src/main/webapp/WEB-INF/web.xml” because no application specific deployment descriptors are required.
    2. Include “wicket-quickstart-web-fragment.jar” in the “WEB-INF/lib” directory of your application by adding the following fragment in your “pom.xml”:
          <dependencies>

              . . .
              <!– web-fragment –>
              <dependency>
                  <groupId>org.glassfish.extras</groupId>
                  <artifactId>wicket-quickstart-web-fragment</artifactId>
                  <version>1.0</version>
                  <scope>runtime</scope>
              </dependency>
          </dependencies>

         . . .

          <repositories>
              <repository>
                  <id>maven2-repository.dev.java.net</id>
                  <name>Java.net Repository for Maven</name>
               &nbsp
      ;  <url>http://download.java.net/maven/2/</url>
              </repository>
          </repositories>

      This file contains only “META-INF/web-fragment.xml” with the following content:

      <web-fragment>
              <filter>
                      <filter-name>wicket.helloworld</filter-name>
                      <filter-class>org.apache.wicket.protocol.http.WicketFilter</filter-class>
                      <init-param>
                              <param-name>applicationClassName</param-name>
                              <param-value>org.glassfish.samples.WicketApplication</param-value>
                      </init-param>
              </filter>

              <filter-mapping>
                      <filter-name>wicket.helloworld</filter-name>
                      <url-pattern>/*</url-pattern>
              </filter-mapping>
      </web-fragment>

    3. Create the WAR file without “web.xml” by editing “pom.xml” and adding the following fragment:
            <plugins>
                  . . .
                  <plugin>
                      <groupId>org.apache.maven.plugins</groupId>
                      <artifactId>maven-war-plugin</artifactId>
                      <version>2.1-beta-1</version>
                      <configuration>
                          <failOnMissingWebXml>false</failOnMissingWebXml>
                      </configuration>
                  </plugin>
                  . . .
            </plugins>

    That’s it, now you can create a WAR file using “mvn package” and deploy this web application on GlassFish v3 latest promoted build (58 as of today) as explained in TOTD #86.

    The updated WAR file structure looks like:

    helloworld-1.0-SNAPSHOT
    helloworld-1.0-SNAPSHOT/META-INF
    helloworld-1.0-SNAPSHOT/WEB-INF
    helloworld-1.0-SNAPSHOT/WEB-INF/classes
    helloworld-1.0-SNAPSHOT/WEB-INF/classes/log4j.properties
    helloworld-1.0-SNAPSHOT/WEB-INF/classes/org
    helloworld-1.0-SNAPSHOT/WEB-INF/classes/org/glassfish
    helloworld-1.0-SNAPSHOT/WEB-INF/classes/org/glassfish/samples
    helloworld-1.0-SNAPSHOT/WEB-INF/classes/org/glassfish/samples/HomePage.class
    helloworld-1.0-SNAPSHOT/WEB-INF/classes/org/glassfish/samples/HomePage.html
    helloworld-1.0-SNAPSHOT/WEB-INF/classes/org/glassfish/samples/WicketApplication.class
    helloworld-1.0-SNAPSHOT/WEB-INF/lib
    helloworld-1.0-SNAPSHOT/WEB-INF/lib/log4j-1.2.14.jar
    helloworld-1.0-SNAPSHOT/WEB-INF/lib/slf4j-api-1.4.2.jar
    helloworld-1.0-SNAPSHOT/WEB-INF/lib/slf4j-log4j12-1.4.2.jar
    helloworld-1.0-SNAPSHOT/WEB-INF/lib/wicket-1.4.0.jar
    helloworld-1.0-SNAPSHOT/WEB-INF/lib/wicket-quickstart-web-fragment-1.0.jar

    Notice, there is no “web.xml” and the additional “wicket-quickstart-web-fragment-1.0.jar” and everything works as is!

    It would be nice if the next version of wicket-*.jar can include “META-INF/web-fragment.xml” then everything will work out-of-the-box :)

    Here is a snapshot of the deployed application:

    Are you deploying your Wicket applications on GlassFish ?

    Technorati: totd glassfish v3 wicket javaee6 servlet web-fragment

    Share and Enjoy:
    • Print this article!
    • Digg
    • Sphinn
    • del.icio.us
    • Facebook
    • Google Bookmarks
    • DZone
    • E-mail this story to a friend!
    • StumbleUpon
    • Technorati
    • Twitter
    • Slashdot

    August 7, 2009

    TOTD #91: Retrieve JSON libraries using Maven dependency: json-lib

    Categories: totd

    So you need to include JSON libraries in your Maven project. The only option that seems to be currently available is using json-lib with the following dependencies:

            <dependency>
                <groupId>net.sf.json-lib</groupId>
                <artifactId>json-lib</artifactId>
                <version>2.3</version>
                <classifier>jdk15</classifier>
            </dependency>

    The APIs are based upon the original work done at json.org/java.

    If you are using NetBeans for adding the Maven dependency then it nicely shows the different versions for the artifact as shown below:

    The usage guide and samples at json-lib have lots of documentation to get you started. Don’t forget the package names are changed so “org.json.JSONObject” is ”net.sf.json.JSONObject” and similarly other classes.

    Please leave suggestions on other TOTD (Tip Of The Day) that you’d like to see. A complete archive of all the tips is available here.

    Technorati: json maven json-lib netbeans

    Share and Enjoy:
    • Print this article!
    • Digg
    • Sphinn
    • del.icio.us
    • Facebook
    • Google Bookmarks
    • DZone
    • E-mail this story to a friend!
    • StumbleUpon
    • Technorati
    • Twitter
    • Slashdot

    August 6, 2009

    TOTD #90: Migrating from Wicket 1.3.x to 1.4 – “Couldn’t load DiskPageStore index from file” error

    Categories: totd, wicket

    Now that Apache Wicket 1.4 is available, migrating from previous versions is pretty straight forward.

    Change the version in your POM file as:

    <wicket.version>1.4.0</wicket.version>

    And that’s it!

    The complete dependency may look like:

    <dependency>
      <groupId>org.apache.wicket</groupId>
      <artifactId>wicket</artifactId>
      <version>1.4.0</version>
    </dependency>

    or

    <dependency>
      <groupId>org.apache.wicket</groupId>
      <artifactId>wicket</artifactId>
      <version>${wicket.version}</version>
    </dependency>

    You may encounter the following error:

    2009-08-05 05:58:49.387::INFO:  No Transaction manager found – if your webapp requires one, please configure one.
    ERROR – DiskPageStore              – Couldn’t load DiskPageStore index from file /Users/arungupta/workspaces/runner~subversion/wicket/runner/target/work/wicket.runner-filestore/DiskPageStoreIndex.
    java.lang.ClassNotFoundException: org.apache.wicket.util.concurrent.ConcurrentHashMap
            at java.net.URLClassLoader$1.run(URLClassLoader.java:200)
            at java.security.AccessController.doPrivileged(Native Method)
            at java.net.URLClassLoader.findClass(URLClassLoader.java:188)
            at java.lang.ClassLoader.loadClass(ClassLoader.java:319)

    At least I did :)

    Fortunately the fix is simple and intuitive. Instead of running “mvn jetty:run”, invoke the command:

    mvn clean jetty:run

    Basically, “clean” will clean out references to older version of Wicket jars in your project and voila!

    If you are deploying as WAR file, then bundle Wicket jars in WEB-INF/lib instead of copying them to the shared folder of your application server.

    Other Wicket tips on this blog are available here. Specifically TOTD #86 shows how to get started with Apache Wicket on GlassFish.

    Please leave suggestions on other TOTD (Tip Of The Day) that you’d like to see. A complete archive of all the tips is available here.

    Technorati: wicket glassfish migration

    Share and Enjoy:
    • Print this article!
    • Digg
    • Sphinn
    • del.icio.us
    • Facebook
    • Google Bookmarks
    • DZone
    • E-mail this story to a friend!
    • StumbleUpon
    • Technorati
    • Twitter
    • Slashdot
    Older Posts »
    Blog Information Profile for arungupta

    Powered by WordPress