Tag Archives: clustering

Labels and Constraints with Docker Daemon and Service

Metadata, such as labels, can be attached to Docker daemon. A label is a key/value pair and allows the Docker host to be a target of containers. The semantics of labels is completely defined by the application. A new constraint can be specified during service creation targeting the tasks on a particular host.

Let’s see how we can use labels and constraints in Docker for a real-world application.

Couchbase using Multidimensional Scaling (or MDS) allows to split Index, Data, Query and Full-text search service on multiple nodes. The needs for each service is different. For example, Query is CPU heavy, Index is disk intensive and Data is a mix of memory and fast read/write, such as SSD.

MDS allows the hardware resources to be independently assigned and optimized on a per node basis, as application requirements change.

couchbase-mds

Read more about Multidimensional Scaling.

Let’s see how this can be easily accomplished in a three-node cluster using Docker swarm mode.


Start Ubuntu Instances

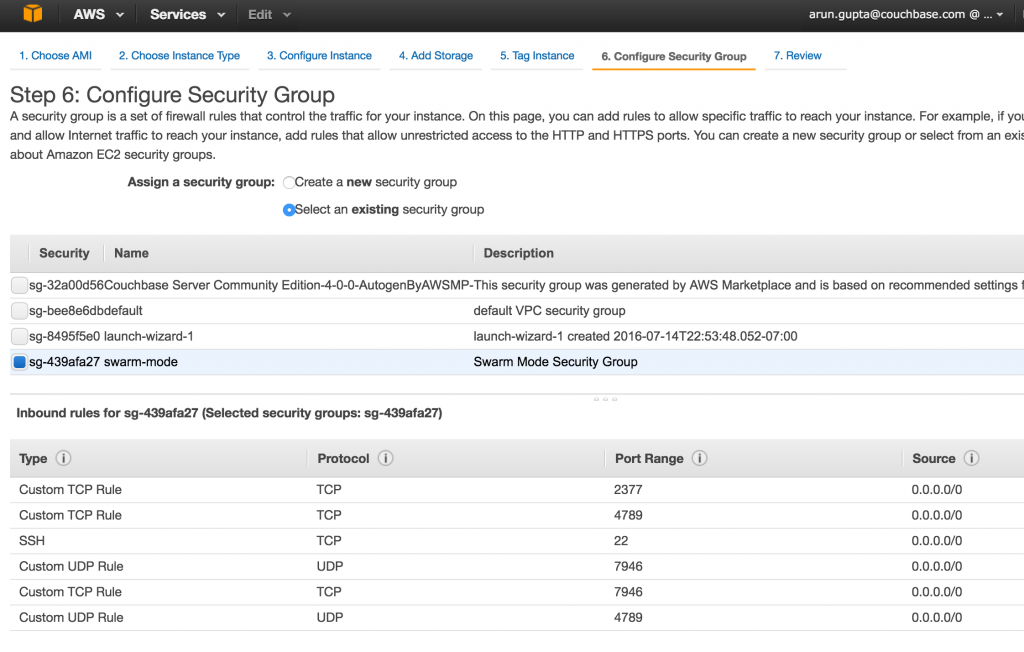
Start three instances on EC2 of Ubuntu Server 14.04 LTS (HVM) (AMI ID: ami-06116566). Take defaults in all cases except for the security group. Swarm mode requires the following three ports open between hosts:

  • TCP port 2377 for cluster management communications
  • TCP and UDP port 7946 for communication among nodes
  • TCP and UDP port 4789 for overlay network traffic

Make sure to create a new security group with these rules:

ec2-swarmmode-security-group

Wait for a few minutes for the instances to be provisioned.

Set up Docker on Ubuntu

Swarm mode is introduced in Docker 1.12. At the time of this writing, 1.12 RC4 is the latest candidate. Use the following script to install the RC4 release with experimental features:

This script assumes that AWS CLI is already setup and performs the following configuration for all running instances in your configured EC2 account:

  • Get public IP address of each instance
  • For each instance
    • Install latest Docker release with experimental features
    • Adds ubuntu user to the docker group. This allows Docker to be used as a non-root user.
    • Prints the Docker version

This simple script will setup Docker host on all three instances.

Assign Labels to Docker Daemon

Labels can be defined using DOCKER_OPTS. For Ubuntu, this is defined in the /etc/default/docker file.

Distinct labels need to be assigned to each node. For example, use couchbase.mds key and index value.

You also need to restart Docker daemon. Finally, docker info displays system-wide information:

As you can see, labels are visible in this information.

For the second node, assign a different label:

Make sure to use the IP address of the second EC2 instance. The updated information about the Docker daemon in this case will be:

And finally, the last node:

The updated information about the Docker daemon for this host will show:

In our case, a homogenous cluster is created where machines are exactly alike, including their operating system, CPU, disk and memory capacity. In real world, you’ll typically have the same operating system but the instance capacity, such as disk, CPU and memory, would differ based upon what Couchbase services you want to run on them. These labels would make perfect sense in that case but they do show the point here.

Enable Swarm Mode and Create Cluster

Let’s enable Swarm Mode and create a cluster of 1 Manager and 2 Worker nodes. By default, manager are worker nodes as well.

Initialize Swarm on the first node:

This will show the output:

Add other two nodes as worker:

The exact commands, and output, in this case are:

Complete details about the cluster can now be obtained:

And this shows the output:

This shows that we’ve created a 3-node cluster with one manager.

Run Docker Service with Constraints

Now, we are going to run three Couchbase services with different constraints. Each service specifies constraint using --constraint engine.labels.<label> format where <label> matches the labels defined earlier for the nodes.

Each service is given a unique name as it allows to scale them individually. All commands are directed towards the Swarm manager:

The exact commands in our case are:

The list of services can be verified as:

This shows the output as:

And the list of tasks (essentially containers within that service) for each service can then be verified as:

And the output in our case:

This shows the services are nicely distributed across different nodes. Feel free to check out if the task is indeed scheduled on the node with the right label.

All Couchbase instances can be configured in a cluster to provide a complete database solution for your web, mobile and IoT applications.

Want to learn more?

  • Docker Swarm Mode
  • Couchbase on Containers
  • Follow us on @couchbasedev or @couchbase
  • Ask questions on Couchbase Forums

Source: blog.couchbase.com/2016/july/labels-constraints-docker-daemon-service

Scaling Kubernetes Cluster

kubernetes-logo

Automatic Restarting of Pods inside Replication Controller of Kubernetes Cluster shows how Kubernetes reschedule pods in the cluster if one or more of existing Pods disappear for some reason. This is a common usage pattern and one of the key features of Kubernetes.

Another common usage pattern of Replication Controller is scaling:

The replication controller makes it easy to scale the number of replicas up or down, either manually or by an auto-scaling control agent, by simply updating the replicas field.

Replication Controller#Scaling

This blog will show how a Kubernetes cluster can be easily scaled up and down.

All the code used in this blog is available at kubernetes-java-sample.

Start Replication Controller and Verify

  1. Start a Replication Controller as:
  2. Get status of the Pods:
    Make sure to wait for the status to change to Running.

    Note down name of the Pods as wildfly-rc-bgtkg” and wildfly-rc-bgtkg”.

  3. Get status of the Replication Controller:

    If multiple Replication Controllers are running then you can query for this specific one using the label:

Scaling Kubernetes Cluster Up

Replication Controller allows dynamic scaling up and down of Pods.

  1. Scale up the number of Pods:
  2. Status of the Pods can be seen in another shell:
    Notice a new Pod with the name wildfly-rc-aqaqn is created.

Scale Kubernetes Cluster Down

  1. Scale down the number of Pods:
  2. Status of the Pods using -w is not correctly updated (#11338). But status of the Pods can be seen correctly as:
    Notice only one Pod is now running.

Kubernetes dynamically scales the Pods up and down using the scale --replicas command.

All code used in this blog is available at kubernetes-java-sample.

Enjoy!

Automatic Restarting of Pods inside Replication Controller of Kubernetes Cluster

kubernetes-logo

A key feature of Kubernetes is its ability to maintain the “desired state” using declared primitives. Replication Controllers is a key concept that helps achieve this state.

A replication controller ensures that a specified number of pod “replicas” are running at any one time. If there are too many, it will kill some. If there are too few, it will start more.

Replication Controller

Lets take a look on how to spin up a Replication Controller with two replicas of a Pod. Then we’ll kill one pod and see how Kubernetes will start another Pod automatically.

Start Kubernetes Cluster

  1. Easiest way to start a Kubernetes cluster on a Mac OS is using Vagrant:
  2. Alternatively, Kubernetes can be downloaded from github.com/GoogleCloudPlatform/kubernetes/releases/download/v1.0.0/kubernetes.tar.gz, and cluster can be started as:

Start and Verify Replication Controller and Pods

  1. All configuration files required by Kubernetes to start Replication Controller are in kubernetes-java-sample project.  Clone the workspace:
  2. Start a Replication Controller that has two replicas of a pod, each with a WildFly container:
    The configuration file used is shown:
    Default WildFly Docker image is used here.
  3. Get status of the Pods:
    Notice -w refreshes the status whenever there is a change. The status changes from Pending to Running and then Ready to receive requests.
  4. Get status of the Replication Controller:
    If multiple Replication Controllers are running then you can query for this specific one using the label:
  5. Get name of the running Pods:
  6. Find IP address of each Pod (using the name):
    And of the other Pod as well:
  7. Pod’s IP address is accessible only inside the cluster. Login to the minion to access WildFly’s main page hosted by the containers:

Automatic Restart of Pods

Lets delete a Pod and see how a new Pod is automatically created.

Notice how the Pod with name wildfly-rc-15xg5 was deleted and a new Pod with the name wildfly-rc-0xoms was created.

Finally, delete the Replication Controller:

The latest configuration files and detailed instructions are at kubernetes-java-sample.

In real world, you’ll typically wrap this Replication Controller in a Service and front-end with a Load Balancer. But that’s a topic for another blog!

Enjoy!

Multi-container Applications using Docker Compose and Swarm

Docker Compose to Orchestrate Containers shows how to run two linked Docker containers using Docker Compose. Clustering Using Docker Swarm shows how to configure a Docker Swarm cluster.

This blog will show how to run a multi-container application created using Docker Compose in a Docker Swarm cluster.

Updated version of Docker Compose and Docker Swarm are released with Docker 1.7.0.

Docker 1.7.0 CLI

Get the latest Docker CLI:

and check the version as:

Docker Machine 0.3.0

Get the latest Docker Machine as:

and check the version as:

Docker Compose 1.3.0

Get the latest Docker Compose as:

and verify the version as:

Docker Swarm 0.3.0

Swarm is run as a Docker container and can be downloaded as:

You can learn about Docker Swarm at docs.docker.com/swarm or Clustering using Docker Swarm.

Create Docker Swarm Cluster

The key components of Docker Swarm are shown below:

and explained in Clustering Using Docker Swarm.

  1. The easiest way of getting started with Swarm is by using the official Docker image:
    This command returns a discovery token, referred as <TOKEN> in this document, and is the unique cluster id. It will be used when creating master and nodes later. This cluster id is returned by the hosted discovery service on Docker Hub.

    It shows the output as:

    The last line is the <TOKEN>.

    Make sure to note this cluster id now as there is no means to list it later. This should be fixed with#661.

  2. Swarm is fully integrated with Docker Machine, and so is the easiest way to get started. Let’s create a Swarm Master next:

    Replace <TOKEN> with the cluster id obtained in the previous step.

    --swarm configures the machine with Swarm, --swarm-master configures the created machine to be Swarm master. Swarm master creation talks to the hosted service on Docker Hub and informs that a master is created in the cluster.

  3. Connect to this newly created master and find some more information about it:

    This will show the output as:

  4. Create a Swarm node

    Replace <TOKEN> with the cluster id obtained in an earlier step.

    Node creation talks to the hosted service at Docker Hub and joins the previously created cluster. This is specified by --swarm-discovery token://... and specifying the cluster id obtained earlier.

  5. To make it a real cluster, let’s create a second node:

    Replace <TOKEN> with the cluster id obtained in the previous step.

  6. List all the nodes created so far:

    This shows the output similar to the one below:

    The machines that are part of the cluster have the cluster’s name in the SWARM column, blank otherwise. For example, “lab” and “summit2015” are standalone machines where as all other machines are part of the “swarm-master” cluster. The Swarm master is also identified by (master) in the SWARM column.

  7. Connect to the Swarm cluster and find some information about it:

    This shows the output as:

    There are 3 nodes – one Swarm master and 2 Swarm nodes. There is a total of 4 containers running in this cluster – one Swarm agent on master and each node, and there is an additional swarm-agent-master running on the master.

  8. List nodes in the cluster with the following command:

    This shows the output as:

Deploy Java EE Application to Docker Swarm Cluster using Docker Compose

Docker Compose to Orchestrate Containers explains how multi container applications can be easily started using Docker Compose.

  1. Use the docker-compose.yml file explained in that blog to start the containers as:
    The docker-compose.yml file looks like:
  2. Check the containers running in the cluster as:
    to see the output as:
  3. “swarm-node-02” is running three containers and so lets look at the list of containers running there:
    and see the list of running containers as:
  4. Application can then be accessed again using:
    and shows the output as:

Latest instructions for this setup are always available at: github.com/javaee-samples/docker-java/blob/master/chapters/docker-swarm.adoc.

Enjoy!

Docker 1.7.0, Docker Machine 0.3.0, Docker Compose 1.3.0, Docker Swarm 0.3.0

Docker 1.7.0 is released (change log) and so time to update Docker Hosts, CLI, and other tools.

Docker 1.7.0

Docker Host is running inside a Docker Machine and so the machine needs to be upgraded. The machine must be stopped otherwise you get an error as:

So start the machine as:

And then upgrade the machine as:

The machine is anyway stopped to perform an upgrade, and so the need to start the machine seems superfluous (#1399).

Upgrading the host updates .docker/machine/cache/boot2docker.iso. Any previously created machines cache the boot2docker.iso in .docker/machine/machines/<MACHINE-NAME> and so they’ll continue to boot using the same version.

Docker CLI

Update the Docker CLI as:

Now docker version shows the following output:

Note, the client API version (1.7.0) and the server API version (1.7.0) are both shown here.

If you update only the CLI and not the Docker Host, then the following error message is shown:

This error messages shows a version mismatch between the client CLI and the Docker Host running in the machine. The will typically happen if the active machine was created a few days ago using an older boot2docker.iso. There seems to be no way straight forward way to find out the exact version currently being used (#1398).

There seems to be no way for a new client to talk to the old server (#14077), and thus the host needs to be upgraded. There is a proposal to override the API version of client (#11486), but at this time there is no ETA for the fix. So the only option is to upgrade the docker machine, which will then then upgrade to the latest version of Docker.

So upgrading the CLI requires to upgrade the machine as well.

Here are the options supported by Docker CLI :

Docker Machine 0.3.0

This was rather straight forward:

There are a lots of new features, including an experimental provisioner for Red Hat Enterprise Linux 7.0.

The version is shown as:

Complete list of commands are:

Docker Compose 1.3.0

Docker Compose can be updated to 1.3.0 as:

The version is shown as:

Two important points to note:

  • At least Docker 1.6.0 is required
  • There are breaking changes from Compose 1.2 and so you either need to remove and recreate your containers, or migrate them.Fortunately docker-compose migrate-to-labels can be used to migrate pre-Compose 1.3.0 containers to the latest format. This will recreate the containers with labels added.

Learn more in Docker Compose to Orchestrate Containers.

Docker Swarm 0.3.0

As of this blog, Docker Swarm 0.3.0 RC3 is available. Clustering Using Docker Swarm provide a good introduction to Docker Swarm and can be used to get started with the latest Docker Swarm release.

34 issues have been fixed since 0.2.0 but the commit notifications since 0.2.0 for Release Candidates seem to show no significant changes.

More detailed blogs on each Docker component will be shared in subsequent blogs.

Enjoy!

Deploying Java EE Application to Docker Swarm Cluster (Tech Tip #88)

What is Docker Swarm?

Docker Swarm provides native clustering to Docker. Clustering using Docker Swarm 0.2.0 provide a basic introduction to Docker Swarm, and how to create a simple three node cluster. As a refresher, the key components of Docker Swarm are shown below:

In short, Swarm Manager is a pre-defined Docker Host, and is a single point for all administration. Additional Docker hosts are identified as Nodes and communicate with the Manager using TCP. By default, Swarm uses hosted Discovery Service, based on Docker Hub, using tokens to discover nodes that are part of a cluster. Each node runs a Node Agent that registers the referenced Docker daemon, monitors it, and updates the Discovery Service with the node’s status. The containers run on a node.

That blog provide complete details, but a quick summary to create the cluster is shown below:

Listing the cluster shows:

It has one master and two nodes.

Deploy a Java EE application to Docker Swarm

All hosts in the cluster are accessible using a single, virtual host. Swarm serves the standard Docker API, so any tool that communicates with a single Docker host communicate can scale to multiple Docker hosts by communicating to this virtual host.

Docker Container Linking Across Multiple Hosts explains how to link containers across multiple Docker hosts. It deploys a Java EE 7 application to WildFly on one Docker host, and connects it with a MySQL container running on a different Docker host. We can deploy both of these containers using the virtual host, and they will then be deployed to the Docker Swarm cluster.

Lets get started!

MySQL on Docker Swarm

  1. Start the MySQL container
  2. Status of the container can be seen as:
    It shows the container is running on swarm-node-01.

    Make sure you are connected to the Docker Swarm cluster using eval $(docker-machine env --swarm swarm-master).

  3. Find IP address of the host where this container is started:

    Note IP address of the node where MySQL server is running. This will be used when starting WildFly application server later.

    ps: Filtering by name seem to not return accurate results (#10897).

WildFly on Docker Swarm

  1. Start WildFly application server by passing the IP address of the host and the port on which MySQL server is running:

  2. Status of the container can be seen as:

    It shows the container is running on swarm-node-02. IP address of the host is also shown in the PORTS column.

    As explained in Tech Tip #69, JDBC URL of the data source uses the specified IP address and port for connecting with the MySQL server. However passing IP address is very brittle as the MySQL server may restart on a different Docker host. This is filed as #773.

  3. Access the application at:

    This is using the IP address of the host where the container is started.

Enjoy!


Clustering Using Docker Swarm 0.2.0 (Tech Tip #85)

One of the key updates as part of Docker 1.6 is Docker Swarm 0.2.0. Docker Swarm solves one of the fundamental limitations of Docker where the containers could only run on a single Docker host. Docker Swarm is native clustering for Docker. It turns a pool of Docker hosts into a single, virtual host.

This Tech Tip will show how to create a cluster across multiple hosts with Docker Swarm.

Docker Swarm

A good introduction to Docker Swarm is by @aluzzardi and @vieux from Container Camp:

Key Components of Docker Swarm

Docker Swarm Cluster

Swarm Manager: Docker Swarm has a Master or Manager, that is a pre-defined Docker Host, and is a single point for all administration. Currently only a single instance of manager is allowed in the cluster. This is a SPOF for high availability architectures and additional managers will be allowed in a future version of Swarm with #598.

Swarm Nodes: The containers are deployed on Nodes that are additional Docker Hosts. Each Swarm Node  must be accessible by the manager, each node must listen to the same network interface (TCP port). Each node runs a node agent that registers the referenced Docker daemon, monitors it, and updates the discovery backend with the node’s status. The containers run on a node.

Scheduler Strategy: Different scheduler strategies (binpack, spread, and random) can be applied to pick the best node to run your container. The default strategy is spread which optimizes the node for least number of running containers. There are multiple kinds of filters, such as constraints and affinity.  This should allow for a decent scheduling algorithm.

Node Discovery Service: By default, Swarm uses hosted discovery service, based on Docker Hub, using tokens to discover nodes that are part of a cluster. However etcd, consul, and zookeeper can be also be used for service discovery as well. This is particularly useful if there is no access to Internet, or you are running the setup in a closed network. A new discovery backend can be created as explained here. It would be useful to have the hosted Discovery Service inside the firewall and #660 will discuss this.

Standard Docker API: Docker Swarm serves the standard Docker API and thus any tool that talks to a single Docker host will seamlessly scale to multiple hosts now. That means if you were using shell scripts using Docker CLI to configure multiple Docker hosts, the same CLI would can now talk to Swarm cluster and Docker Swarm will then act as proxy and run it on the cluster.

There are lots of other concepts but these are the main ones.

TL;DR Here is a simple script that will create a boilerplate cluster with a master and two nodes:

Lets dig into the details now!

Create Swarm Cluster

Create a Swarm cluster as:

This command returns a token and is the unique cluster id. It will be used when creating master and nodes later. As mentioned earlier, this cluster id is returned by the hosted discovery service on Docker Hub.

Make sure to note this cluster id now as there is no means to list it later. #661 should fix this.

Create Swarm Master

Swarm is fully integrated with Docker Machine, and so is the easiest way to get started on OSX.

  1. Create Swarm master as:
    --swarm configures the machine with Swarm, --swarm-master configures the created machine to be Swarm master. Make sure to replace cluster id after token:// with that obtained in the previous step. Swarm master creation talks to the hosted service on Docker Hub and informs that a master is created in the cluster.

    There should be an option to make an existing machine as Swarm master. This is reported as #1017.

  2. List all the running machines as:

    Notice, how swarm-master is marked as master.

    Seems like the cluster name is derived from the master’s name. There should be an option to specify the cluster name, likely during cluster creation. This is reported as #1018.

  3. Connect to this newly created master and find some more information about it:

Create Swarm Nodes

  1. Create a swarm node as:

    Once again, node creation talks to the hosted service at Docker Hub and joins the previously created cluster. This is specified by --swarm-discovery token://... and specifying the cluster id obtained earlier.

  2.  Create another Swarm node as:

  3. List all the existing Docker machines:

    The machines that are part of the cluster have the cluster’s name in the SWARM column, blank otherwise. For example, mydocker is a standalone machine where as all other machines are part of swarm-master cluster. The Swarm master is also identified by (master) in the SWARM column.

  4. Connect to the Swarm cluster and find some information about it:

    There are 3 nodes – one Swarm master and 2 Swarm nodes. There is a total of 4 containers running in this cluster – one Swarm agent on master and each node, and there is an additional swarm-agent-master running on the master. This can be verified by connecting to the master and listing all the containers:

  5. Configure the Docker client to connect to Swarm cluster and check the list of running containers:

    No application containers are running in the cluster, as expected.

  6. List the nodes in the cluster as:

A subsequent blog will show how to run multiple containers across hosts on this cluster, and also look into different scheduling strategies.

Scaling Docker with Swarm has good details.

Swarm is not fully integrated with Docker Compose yet. But what would be really cool is when I can specify all the Docker Machine descriptions in docker-compose.yml, in addition to the containers. Then docker-compose up -d would setup the cluster and run the containers in that cluster.