Tech Tip #25 showed how to configure WildFly on Raspberry Pi. This tech tip will show how to setup a WildFly managed domain over two hosts running on Raspberry Pi.
Lets understand some basic concepts first.
WildFly can run in two modes:
- Managed Domain allows you to run and manage a multi-server domain topology
- Standalone allows to run a single instance of server
Multiple standalone instances can be configured to form a highly available cluster. It is up to the user to coordinate management across multiple servers though.
Servers running in managed domain mode are referred to as the members of a “domain”. A single Domain Controller acts as the central management control point for the domain. A domain can span multiple physical or virtual hosts, with all WildFly instances on a given host under the control of a Host Controller process. One Host Controller instance is configured to act as the Domain Controller. The Host Controller on each host interacts with the Domain Controller to control the lifecycle of the application server instances running on its host and to assist the Domain Controller in managing them.
It is important to understand that administration of servers (standalone or managed domain) is orthogonal to clustering and high availability. In the managed domain mode, a server instance always belong to a Server Group. A domain can have multiple Server Groups. Each group can be configured with different profiles and deployments.
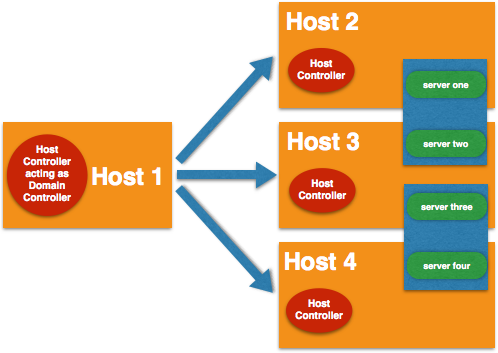
For example, default WildFly installation comes with “main-server-group” and “other-server-group” as shown:
|
1
2
3
4
5
6
7
8
9
10
11
|
<servers>
<server name="server-one" group="main-server-group" auto-start="false"/>
<server name="server-two" group="main-server-group" auto-start="false">
<socket-bindings port-offset="150"/>
</server>
<server name="server-three" group="other-server-group" auto-start="true">
<socket-bindings port-offset="250"/>
</server>
</servers>
|
“main-server-group” has two servers: “server-one” and “server-two”. “other-server-group” has one server: “server-three”.

By default, these are all configured on a single machine (localhost) with Host Controller and Domain Controller co-located. This is defined in “domain/configuration/host.xml”.
Each Server Group is configured with a profile. These profiles are defined, and associated with a Server Group, in “domain/configuration/domain.xml”. Default WildFly installation comes with two profiles: “full” and “full-ha”.
|
1
2
3
4
5
6
7
8
9
10
|
<server-groups>
<server-group name="main-server-group" profile="full">
. . .
</server-group>
<server-group name="other-server-group" profile="full-ha">
. . .
</server-group>
</server-groups>
|
“main-server-group” is configured with “full” profile and “other-server-group” is configured with “full-ha” profile.

Profile is a named set of subsystem configurations that adds capabilities like Servlet, EJB, JPA, JTA, etc. The “full-ha” profile also enable all subsystems needed to establish cluster (infinispan, jcluster, and mod_cluster).
OK, enough explanation, lets get into action!
Make sure to install WildFly on each of the Raspberry Pi following Tech Tip #25.
docs.jboss.org/author/display/WFLY8/WildFly+8+Cluster+Howto explain in detail on how to setup Domain Controller and Host Controller on two hosts and enable clustering. This tech tip follows these instructions and adapt them for WildFly. This tech tip will show how to configure WildFly managed domain over two Raspberry Pis.

A subsequent blog will show how to configure cluster over this managed domain.
Here is what we’ll do:
- Call one host as “master” and another as “slave”.
- Both will run WildFly 8.1 CR2, master will run as Domain Controller and slave will run under the domain management of master
- Deploy a project into domain, and verify that the application is deployed on both master and slave hosts.
Each WildFly was connected to a display to obtain the IP address and enable SSH access. It can be enabled by invoking
|
1
2
3
|
sudo raspi-config
|
Scroll down to the SSH option and enable it. Then the two Raspberry Pis were configured to run in headless mode (no keyboard, mouse, or monitor).

- Domain Configuration – Configure master and slave “host.xml”
- Master configuration
- Login to the master Raspberry pi:
The default password is “raspberry”.123456789101112~> <strong>ssh 10.0.0.27 -l pi</strong>pi@10.0.0.27's password: <strong>raspberry</strong>Linux raspberrypi 3.10.25+ #622 PREEMPT Fri Jan 3 18:41:00 GMT 2014 armv6lThe programs included with the Debian GNU/Linux system are free software; the exact distribution terms for each program are described in the individual files in /usr/share/doc/*/copyright.Debian GNU/Linux comes with ABSOLUTELY NO WARRANTY, to the extent permitted by applicable law.Last login: Wed May 28 19:03:19 2014pi@raspberrypi ~ $ - By default, WildFly is configured to run in server VM. As mentioned in Tech Tip #25, this is not support on JDK bundled on Raspbian. This needs to be updated at two places. Edit “bin/domain.sh”:
and remove the lines marked 80 through 110.12345678910111213141516171819202122232425262728293031323380 # If -server not set in JAVA_OPTS, set it, if supported81 SERVER_SET=`echo $JAVA_OPTS | $GREP "\-server"`82 if [ "x$SERVER_SET" = "x" ]; then8384 # Check for SUN(tm) JVM w/ HotSpot support85 if [ "x$HAS_HOTSPOT" = "x" ]; then86 HAS_HOTSPOT=`"$JAVA" $JVM_OPTVERSION -version 2>&1 | $GREP -i HotSpot`87 fi8889 # Check for OpenJDK JVM w/server support90 if [ "x$HAS_OPENJDK" = "x" ]; then91 HAS_OPENJDK=`"$JAVA" $JVM_OPTVERSION 2>&1 | $GREP -i OpenJDK`92 fi9394 # Check for IBM JVM w/server support95 if [ "x$HAS_IBM" = "x" ]; then96 HAS_IBM=`"$JAVA" $JVM_OPTVERSION 2>&1 | $GREP -i "IBM J9"`97 fi9899 # Enable -server if we have Hotspot or OpenJDK, unless we can't100 if [ "x$HAS_HOTSPOT" != "x" -o "x$HAS_OPENJDK" != "x" -o "x$HAS_IBM" != "x" ]; then101 # MacOS does not support -server flag102 if [ "$darwin" != "true" ]; then103 PROCESS_CONTROLLER_JAVA_OPTS="-server $PROCESS_CONTROLLER_JAVA_OPTS"104 HOST_CONTROLLER_JAVA_OPTS="-server $HOST_CONTROLLER_JAVA_OPTS"105 JVM_OPTVERSION="-server $JVM_OPTVERSION"106 fi107 fi108 else109 JVM_OPTVERSION="-server $JVM_OPTVERSION"110 fi - Edit host.xml
Remove “-server” option by removing lines 75 through 77 as shown below:123vi domain/configuration/host.xml
123456789101171 <jvms>72 <jvm name="default">73 <heap size="64m" max-size="256m"/>74 <permgen size="256m" max-size="256m"/><strong>75 <jvm-options></strong><strong>76 <option value="-server"/></strong><strong>77 </jvm-options></strong>78 </jvm>79 </jvms> - The default setting for <interfaces> in this file looks like:
Change this to:12345678910111213<interfaces><interface name="management"><inet-address value="${jboss.bind.address.management:127.0.0.1}"/></interface><interface name="public"><inet-address value="${jboss.bind.address:127.0.0.1}"/></interface><interface name="unsecure"><inet-address value="${jboss.bind.address.unsecure:127.0.0.1}"/></interface></interfaces>
10.0.0.27 is master’s IP address.12345678910111213<interfaces><interface name="management"><inet-address value="${jboss.bind.address.management:<strong>10.0.0.27</strong>}"/></interface><interface name="public"><inet-address value="${jboss.bind.address:<strong>10.0.0.27</strong>}"/></interface><interface name="unsecure"><inet-address value="${jboss.bind.address.unsecure:<strong>10.0.0.27</strong>}"/></interface></interfaces>
- Login to the master Raspberry pi:
- Slave configuration
- Login to the slave Raspberry pi:
The default password is “raspberry”.123456789101112~> <strong>ssh 10.0.0.28 -l pi</strong>pi@10.0.0.28's password: <strong>raspberry</strong>Linux raspberrypi 3.10.25+ #622 PREEMPT Fri Jan 3 18:41:00 GMT 2014 armv6lThe programs included with the Debian GNU/Linux system are free software; the exact distribution terms for each program are described in the individual files in /usr/share/doc/*/copyright.Debian GNU/Linux comes with ABSOLUTELY NO WARRANTY, to the extent permitted by applicable law.Last login: Tue May 27 21:28:02 2014 from 10.0.0.8pi@raspberrypi ~ $ - Edit “domain.sh” and remove the lines as done for server. This will ensure that non-server, or client, JVM is used for running the domain.
- Edit “host.xml”
123vi domain/configuration/host.xml - Set the host name by changing
to123<host name="master" xmlns="urn:jboss:domain:2.1">
123<host name="<strong>slave</strong>" xmlns="urn:jboss:domain:2.1"> - Remove “-server” option by removing lines 75 through 77 as explained above.
- Modify <domain-controller> such that slave can connect to master’s management port. Change
to1234567<domain-controller><local/><!-- Alternative remote domain controller configuration with a host and port --><!-- <remote host="${jboss.domain.master.address}" port="${jboss.domain.master.port:9999}" security-realm="ManagementRealm"/> --></domain-controller>
10.0.0.27 is master’s IP address.1234567<domain-controller><local/><!-- Alternative remote domain controller configuration with a host and port --><strong><remote host="10.0.0.27" port="9999" security-realm="ManagementRealm"/></strong></domain-controller> - Change the default <interfaces> from:
to:12345678910111213<interfaces><interface name="management"><inet-address value="${jboss.bind.address.management:127.0.0.1}"/></interface><interface name="public"><inet-address value="${jboss.bind.address:127.0.0.1}"/></interface><interface name="unsecure"><inet-address value="${jboss.bind.address.unsecure:127.0.0.1}"/></interface></interfaces>
10.0.0.28 is slave’s IP address.12345678910111213<interfaces><interface name="management"><inet-address value="${jboss.bind.address.management:<strong>10.0.0.28</strong>}"/></interface><interface name="public"><inet-address value="${jboss.bind.address:<strong>10.0.0.28</strong>}"/></interface><interface name="unsecure"><inet-address value="${jboss.bind.address.unsecure:<strong>10.0.0.28</strong>}"/></interface></interfaces>
- Login to the slave Raspberry pi:
- Master configuration
- Security Configuration
- Master
- Using “add-user.sh” script, create a user in Management Realm for master.
12345678910111213141516171819202122232425262728pi@raspberrypi ~/wildfly-8.1.0.CR2 $ <strong>./bin/add-user.sh</strong>What type of user do you wish to add?a) Management User (mgmt-users.properties)b) Application User (application-users.properties)(a): <strong><ENTER></strong>Enter the details of the new user to add.Using realm 'ManagementRealm' as discovered from the existing property files.Username : <strong>master</strong>Password recommendations are listed below. To modify these restrictions edit the add-user.properties configuration file.- The password should not be one of the following restricted values {root, admin, administrator}- The password should contain at least 8 characters, 1 alphabetic character(s), 1 digit(s), 1 non-alphanumeric symbol(s)- The password should be different from the usernamePassword : <strong>master</strong>JBAS015269: Password must have at least 8 characters!Are you sure you want to use the password entered yes/no? <strong>yes</strong>Re-enter Password : <strong>master</strong>What groups do you want this user to belong to? (Please enter a comma separated list, or leave blank for none)[ ]:About to add user 'master' for realm 'ManagementRealm'Is this correct yes/no? <strong>yes</strong>Added user 'master' to file '/home/pi/wildfly-8.1.0.CR2/standalone/configuration/mgmt-users.properties'Added user 'master' to file '/home/pi/wildfly-8.1.0.CR2/domain/configuration/mgmt-users.properties'Added user 'master' with groups to file '/home/pi/wildfly-8.1.0.CR2/standalone/configuration/mgmt-groups.properties'Added user 'master' with groups to file '/home/pi/wildfly-8.1.0.CR2/domain/configuration/mgmt-groups.properties'Is this new user going to be used for one AS process to connect to another AS process? e.g. for a slave host controller connecting to the master or for a Remoting connection for server to server EJB calls. yes/no? <strong>no</strong> - Using “add-user.sh” script, create a user in Management Realm for slave. The username must be equal to the name given in the slave’s <host> element in “host.xml”.
The answer to the last question is “yes” as this slave will be connecting to master.1234567891011121314151617181920212223242526272829pi@raspberrypi ~/wildfly-8.1.0.CR2 $ <strong>./bin/add-user.sh</strong>What type of user do you wish to add?a) Management User (mgmt-users.properties)b) Application User (application-users.properties)(a): <strong><ENTER></strong>Enter the details of the new user to add.Using realm 'ManagementRealm' as discovered from the existing property files.Username : <strong>slave</strong>Password recommendations are listed below. To modify these restrictions edit the add-user.properties configuration file.- The password should not be one of the following restricted values {root, admin, administrator}- The password should contain at least 8 characters, 1 alphabetic character(s), 1 digit(s), 1 non-alphanumeric symbol(s)- The password should be different from the usernamePassword : <strong>slave</strong>JBAS015269: Password must have at least 8 characters!Are you sure you want to use the password entered yes/no? <strong>yes</strong>Re-enter Password : <strong>slave</strong>What groups do you want this user to belong to? (Please enter a comma separated list, or leave blank for none)[ ]:About to add user 'master' for realm 'ManagementRealm'Is this correct yes/no? <strong>yes</strong>Added user 'master' to file '/home/pi/wildfly-8.1.0.CR2/standalone/configuration/mgmt-users.properties'Added user 'master' to file '/home/pi/wildfly-8.1.0.CR2/domain/configuration/mgmt-users.properties'Added user 'master' with groups to file '/home/pi/wildfly-8.1.0.CR2/standalone/configuration/mgmt-groups.properties'Added user 'master' with groups to file '/home/pi/wildfly-8.1.0.CR2/domain/configuration/mgmt-groups.properties'Is this new user going to be used for one AS process to connect to another AS process? e.g. for a slave host controller connecting to the master or for a Remoting connection for server to server EJB calls. yes/no? <strong>yes</strong>To represent the user add the following to the server-identities definition <secret value="c2xhdmU=" />Note that output’s last line contains a <secret …> element. Copy this string as this will need to be used in slave’s “host.xml”.
- Using “add-user.sh” script, create a user in Management Realm for master.
- Slave
- Configure “domain/configuration/host.xml” for authentication by changing the security-realms element from:
123456789<management><security-realms><security-realm name="ManagementRealm"><authentication><local default-user="$local" skip-group-loading="true" /><properties path="mgmt-users.properties" relative-to="jboss.domain.config.dir"/></authentication>
to
123456789101112<management><security-realms><security-realm name="ManagementRealm"><strong> <server-identities></strong><strong> <secret value="c2xhdmU=" /></strong><strong> </server-identities></strong><authentication><local default-user="$local" skip-group-loading="true" /><properties path="mgmt-users.properties" relative-to="jboss.domain.config.dir"/></authentication>The <secret …> element added here is obtained when “add-user.sh” is invoked for slave in the previous step. Slave’s host name is “slave”, master has a username by “slave”, and adding <secret …> element (base64 code for the password) allows the slave to connect to master.
- Configure “domain/configuration/host.xml” for authentication by changing the security-realms element from:
- Master
- Change the default username/password for HornetQ otherwise it will throw a pesky warning in the server log as:
12345678910111213141516[Server:server-three] 19:56:54,746 ERROR [org.hornetq.core.server](Thread-1 (HornetQ-client-netty-threads-<wbr />6928453)) HQ224058: StoppingClusterManager. As it failed to authenticate with the cluster:HQ119099: Unable to authenticate cluster user:HORNETQ.CLUSTER.ADMIN.USER[Server:server-three] 19:56:54,982 INFO [org.hornetq.core.server](Thread-6 (HornetQ-server-<wbr />HornetQServerImpl::serverUUID=<wbr />2b53cedf-e6a2-11e3-9d57-<wbr />71d44db5d6ff-27664265))HQ221029: stopped bridgesf.my-cluster.5e79c85f-e69d-<wbr />11e3-a06c-37b4b1e261b8[Server:server-three] 19:56:55,833 ERROR [org.hornetq.core.server](default I/O-1) HQ224018: Failed to create session:HornetQClusterSecurityExceptio<wbr />n[errorType=CLUSTER_SECURITY_<wbr />EXCEPTIONmessage=HQ119099: Unable to authenticate cluster user:HORNETQ.CLUSTER.ADMIN.USER]
Edit “domain/configuration/domain.xml” in master and change:
12345<subsystem xmlns="urn:jboss:domain:messaging:2.0"><hornetq-server><cluster-password>${jboss.messaging.cluster.password:CHANGE ME!!}</cluster-password>to
12345<subsystem xmlns="urn:jboss:domain:messaging:2.0"><hornetq-server><cluster-password><strong>newClusterPassword</strong></cluster-password>Make this change in “domain/configuration/domain.xml” for slave as well.
- Disable the firewall on master and slave by giving the following command on each host.
123sudo iptables --flush
- Start the master first as:
123./wildfly-8.1.0.CR2/bin/domain.sh
The last message in the log will look like:
123[Server:server-three] 17:32:01,641 INFO [org.jboss.as] (Controller Boot Thread) JBAS015874: WildFly 8.1.0.CR2 "Kenny" started in 137565ms - Started 321 of 430 services (186 services are lazy, passive or on-demand)After the master has completely started, start the slave as:
123./wildfly-8.1.0.CR2/bin/domain.shThe last message in the log will look like:
123[Server:server-three] 17:35:43,947 INFO [org.jboss.as] (Controller Boot Thread) JBAS015874: WildFly 8.1.0.CR2 "Kenny" started in 127576ms - Started 322 of 431 services (187 services are lazy, passive or on-demand)The server log for master will also show a message indicating that the slave is now a registered host with master:
123[Host Controller] 17:33:31,545 INFO [org.jboss.as.domain] (Host Controller Service Threads - 56) JBAS010918: Registered remote slave host "slave", WildFly 8.1.0.CR2 "Kenny" - Deploy the application
- Check out a simple application that puts/gets some HTTP session data.
123git clone https://github.com/arun-gupta/wildfly-samples.git
This workspace has other samples related to WildFly. But the one that we care about it is in “clustering/http” directory. Change to that directory and build the sample as:
1234cd clustering/httpmvn packageThis will generate a WAR file in the “target” directory.
- “jboss-cli” is a Command Line management tool for standalone and managed domains. It is bundled as a script in the “bin” directory. It can connect to remote servers as well. Now that we’ve Domain Controller running on master and Host Controller running on slave, lets connect it from your local machine as:
1234567<strong>~/tools/wildfly-8.1.0.CR2/bin/jboss-cli.sh -c --controller=10.0.0.27:9990</strong>Authenticating against security realm: ManagementRealmUsername: <strong>master</strong>Password: <strong>master</strong>[domain@10.0.0.27:9990 /]
10.0.0.27 is IP address of the master. The generated WAR file can now be deployed as:
123[domain@10.0.0.27:9990 /] deploy http-1.0-SNAPSHOT.war --server-groups=other-server-groupThis shows the following output in master’s log:
1234567891011[Host Controller] 20:20:27,058 INFO [org.jboss.as.repository] (management-handler-thread - 6) JBAS014900: Content added at location /home/pi/wildfly-8.1.0.CR2/domain/data/content/c4/f73f651f03c68d3a7b29686519e6142bccdfa4/content[Server:server-three] 20:20:31,497 INFO [org.jboss.as.server.deployment] (MSC service thread 1-1) JBAS015876: Starting deployment of "http-1.0-SNAPSHOT.war" (runtime-name: "http-1.0-SNAPSHOT.war"). . .[Server:server-three] 20:20:38,351 INFO [org.jboss.as.clustering.infinispan] (ServerService Thread Pool -- 71) JBAS010281: Started dist cache from web container[Server:server-three] 20:20:38,361 INFO [org.jboss.as.clustering.infinispan] (ServerService Thread Pool -- 70) JBAS010281: Started default-host/http-1.0-SNAPSHOT cache from web container[Server:server-three] 20:20:38,599 INFO [org.wildfly.extension.undertow] (MSC service thread 1-1) JBAS017534: Registered web context: /http-1.0-SNAPSHOT[Server:server-three] 20:20:42,474 INFO [org.jboss.as.server] (ServerService Thread Pool -- 68) JBAS018559: Deployed "http-1.0-SNAPSHOT.war" (runtime-name : "http-1.0-SNAPSHOT.war")And slave’s log shows:
12345678910[Server:server-three] 20:20:31,475 INFO [org.jboss.as.server.deployment] (MSC service thread 1-2) JBAS015876: Starting deployment of "http-1.0-SNAPSHOT.war" (runtime-name: "http-1.0-SNAPSHOT.war")[Server:server-three] 20:20:35,690 INFO [org.infinispan.configuration.cache.EvictionConfigurationBuilder] (ServerService Thread Pool -- 70) ISPN000152: Passivation configured without an eviction policy being selected. Only manually evicted entities will be passivated.. . .[Server:server-three] 20:20:41,028 INFO [org.jboss.as.clustering.infinispan] (ServerService Thread Pool -- 71) JBAS010281: Started default-host/http-1.0-SNAPSHOT cache from web container[Server:server-three] 20:20:41,214 INFO [org.wildfly.extension.undertow] (MSC service thread 1-1) JBAS017534: Registered web context: /http-1.0-SNAPSHOT[Server:server-three] 20:20:42,472 INFO [org.jboss.as.server] (ServerService Thread Pool -- 69) JBAS018559: Deployed "http-1.0-SNAPSHOT.war" (runtime-name : "http-1.0-SNAPSHOT.war"
- Check out a simple application that puts/gets some HTTP session data.
Accessing the application on master (http://10.0.0.27:8330/http-1.0-SNAPSHOT/index.jsp) shows:

Accessing the application on slave (http://10.0.0.28:8330/http-1.0-SNAPSHOT/index.jsp) shows:

So we could easily deploy a Java EE application to multiple WildFly instances, running on RaspberryPi, in managed domain mode, with a single command. How cool ?
Next blog will explain how to setup cluster on these multiple instances.


Hey there! This is kind of off topic but I need some help from an established
blog. Is it very hard to set up your own blog? I’m not very
techincal but I can figure things out pretty fast.
I’m thinking about setting up my own but I’m not sure where to
start. Do you have any ideas or suggestions?
Many thanks
my site; quotes
hello.
it seems that the layout is broken on this page…. Is see lot of tags from the markup language –> < ….. and the whole page turned unreadable.
Anything you browse at your desktop through any web browser can delete.Only you need ideas and steps to do that with perfect process.I am here for sharing this online tutorial delete internet history where you guys become to know how to remove permanently search records from bing,mozilla,chrome,explorer,yahoo.This is most amazing Junction of information and you have to learn through this for free of cost also.