One of the attendees from Kubernetes for Java Developers training suggested to try minikube for simplified Kubernetes dev and testing. This blog will show how to get started with minikube using a simple Java application.
![]()
Minikube starts a single node Kubernetes cluster on your local machine for rapid development and testing. Requirements lists the exact set of requirements for different operating systems.
This blog will show:
- Start one node Kubernetes cluster
- Run Couchbase service
- Run Java application
- View Kubernetes Dashboard
All Kubernetes resource description files used in this blog are at github.com/arun-gupta/kubernetes-java-sample/tree/master/maven.
Start Kubernetes Cluster using Minikube
Create a new directory with the name minikube.
In that directory, download kubectl CLI:
|
1
2
3
|
curl -Lo kubectl http://storage.googleapis.com/kubernetes-release/release/v1.4.0/bin/darwin/amd64/kubectl && chmod +x kubectl
|
Download minikube CLI:
|
1
2
3
|
curl -Lo minikube https://storage.googleapis.com/minikube/releases/v0.10.0/minikube-darwin-amd64 && chmod +x minikube
|
Start the cluster:
|
1
2
3
4
5
|
minikube start
Starting local Kubernetes cluster...
Kubectl is now configured to use the cluster.
|
The list of nodes can be seen:
|
1
2
3
4
5
|
kubectl get nodes
NAME STATUS AGE
minikube Ready 2h
|
More details about the cluster can be obtained using the kubectl cluster-info command:
|
1
2
3
4
5
6
7
|
kubectl cluster-info
Kubernetes master is running at https://192.168.99.100:8443
kubernetes-dashboard is running at https://192.168.99.100:8443/api/v1/proxy/namespaces/kube-system/services/kubernetes-dashboard
To further debug and diagnose cluster problems, use 'kubectl cluster-info dump'.
|
Behind the scenes, a Virtual Box VM is started.
Complete set of commands supported can be seen by using --help:
|
1
2
3
4
5
6
7
8
9
10
11
12
13
14
15
16
17
18
19
20
21
22
23
24
25
26
27
28
29
30
31
32
33
34
35
|
minikube --help
Minikube is a CLI tool that provisions and manages single-node Kubernetes clusters optimized for development workflows.
Usage:
minikube [command]
Available Commands:
dashboard Opens/displays the kubernetes dashboard URL for your local cluster
delete Deletes a local kubernetes cluster.
docker-env sets up docker env variables; similar to '$(docker-machine env)'
get-k8s-versions Gets the list of available kubernetes versions available for minikube.
ip Retrieve the IP address of the running cluster.
logs Gets the logs of the running localkube instance, used for debugging minikube, not user code.
config Modify minikube config
service Gets the kubernetes URL for the specified service in your local cluster
ssh Log into or run a command on a machine with SSH; similar to 'docker-machine ssh'
start Starts a local kubernetes cluster.
status Gets the status of a local kubernetes cluster.
stop Stops a running local kubernetes cluster.
version Print the version of minikube.
Flags:
--alsologtostderr[=false]: log to standard error as well as files
--log-flush-frequency=5s: Maximum number of seconds between log flushes
--log_backtrace_at=:0: when logging hits line file:N, emit a stack trace
--log_dir="": If non-empty, write log files in this directory
--logtostderr[=false]: log to standard error instead of files
--show-libmachine-logs[=false]: Whether or not to show logs from libmachine.
--stderrthreshold=2: logs at or above this threshold go to stderr
--v=0: log level for V logs
--vmodule=: comma-separated list of pattern=N settings for file-filtered logging
Use "minikube [command] --help" for more information about a command.
|
Run Couchbase Service
Create a Couchbase service:
|
1
2
3
4
5
|
kubectl create -f couchbase-service.yml
service "couchbase-service" created
replicationcontroller "couchbase-rc" created
|
This will start a Couchbase service. The service is using the pods created by the replication controller. The replication controller creates a single node Couchbase server.
The configuration file is at github.com/arun-gupta/kubernetes-java-sample/blob/master/maven/couchbase-service.yml and looks like:
|
1
2
3
4
5
6
7
8
9
10
11
12
13
14
15
16
17
18
19
20
21
22
23
24
25
26
27
28
29
30
31
32
33
34
35
36
37
38
|
apiVersion: v1
kind: Service
metadata:
name: couchbase-service
spec:
selector:
app: couchbase-rc-pod
ports:
- name: admin
port: 8091
- name: views
port: 8092
- name: query
port: 8093
- name: memcached
port: 11210
---
apiVersion: v1
kind: ReplicationController
metadata:
name: couchbase-rc
spec:
replicas: 1
template:
metadata:
labels:
app: couchbase-rc-pod
spec:
containers:
- name: couchbase
image: arungupta/oreilly-couchbase
ports:
- containerPort: 8091
- containerPort: 8092
- containerPort: 8093
- containerPort: 11210
|
Run Java Application
Run the application:
|
1
2
3
4
|
kubectl create -f bootiful-couchbase.yml
job "bootiful-couchbase" created
|
The configuration file is at github.com/arun-gupta/kubernetes-java-sample/blob/master/maven/bootiful-couchbase.yml and looks like:
|
1
2
3
4
5
6
7
8
9
10
11
12
13
14
15
16
17
18
19
20
|
apiVersion: batch/v1
kind: Job
metadata:
name: bootiful-couchbase
labels:
name: bootiful-couchbase-pod
spec:
template:
metadata:
name: bootiful-couchbase-pod
spec:
containers:
- name: bootiful-couchbase
image: arungupta/bootiful-couchbase
env:
- name: COUCHBASE_URI
value: couchbase-service
restartPolicy: Never
|
This is run-once job which runs a Java (Spring Boot) application and upserts (insert or update) a JSON document in Couchbase.
In this job, COUCHBASE_URI environment variable value is set to couchbase-service. This is the service name created earlier. Docker image used for this service is arungupta/bootiful-couchbase and is created using fabric8-maven-plugin as shown at github.com/arun-gupta/kubernetes-java-sample/blob/master/maven/webapp/pom.xml#L57-L68. Specifically, the command for the Docker image is:
|
1
2
3
|
java -Dspring.couchbase.bootstrap-hosts=$COUCHBASE_URI -jar /maven/${project.artifactId}.jar
|
This ensures that COUCHBASE_URI environment variable is overriding spring.couchbase.bootstrap-hosts property as defined in application.properties of the Spring Boot application.
Kubernetes Dashboard
Kubernetes 1.4 included an updated dashboard. For minikube, this can be opened using the following command:
|
1
2
3
4
|
minikube dashboard
Waiting, endpoint for service is not ready yet...Opening kubernetes dashboard in default browser...
|
The default view is shown below:

But in our case, a few resources have already been created and so this will look like as shown:

Notice, our Jobs, Replication Controllers and Pods are shown here.
Shutdown Kubernetes Cluster
The cluster can be easily shutdown:
|
1
2
3
4
5
|
minikube stop
Stopping local Kubernetes cluster...
Machine stopped.
|
couchbase.com/containers provide more details about running Couchbase using different orchestration frameworks. Further references:
- Couchbase Forums or StackOverflow
- Follow us at @couchbasedev or @couchbase
- Read more about Couchbase Server
Source: blog.couchbase.com/2016/september/minikube-rapid-dev–testing-kubernetes


 Click on

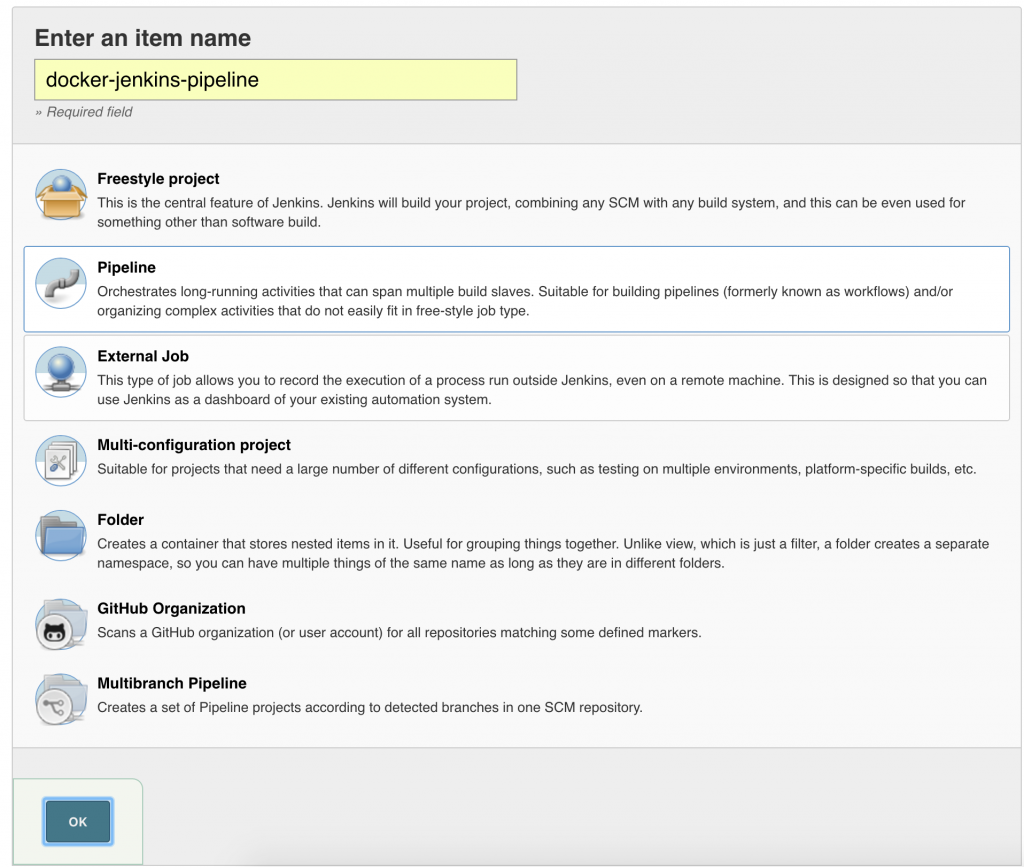 Click on OK.
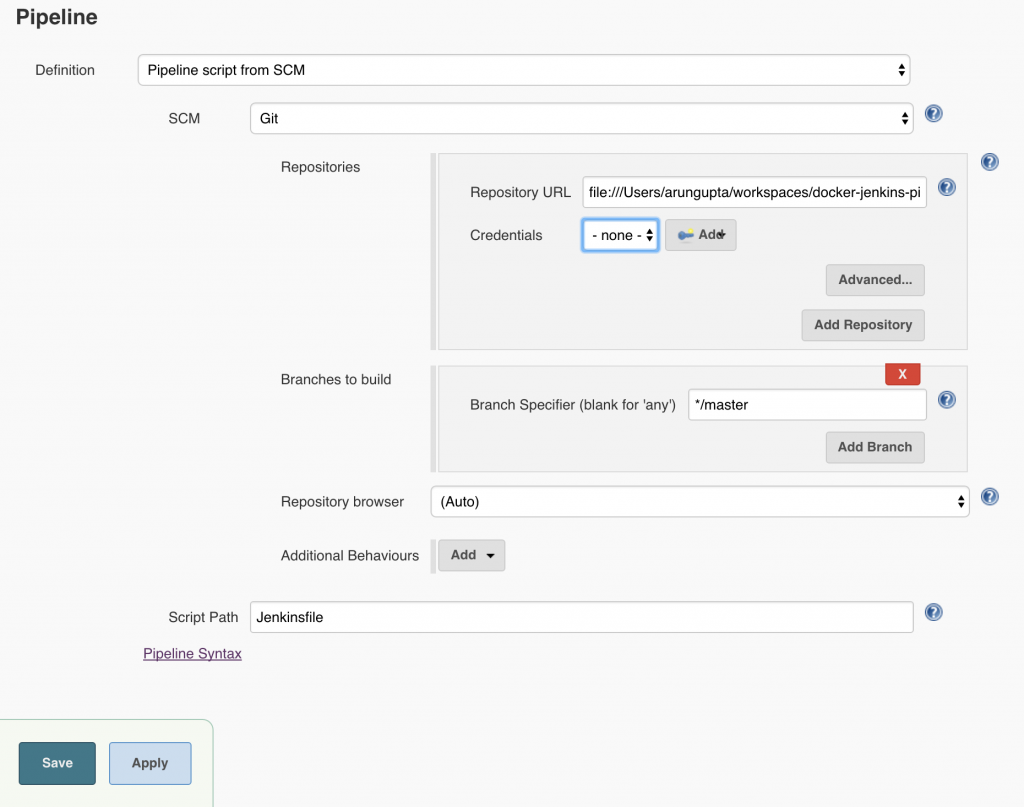 Local git repo is used in this case. You can certainly choose a repo hosted on github. Further, this repo can be configured with a git hook or poll at a constant interval to trigger the pipeline.Click on


