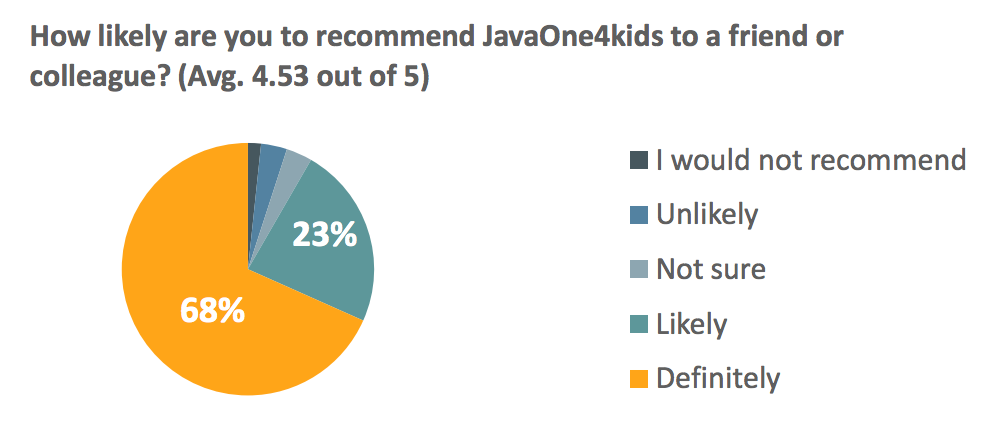
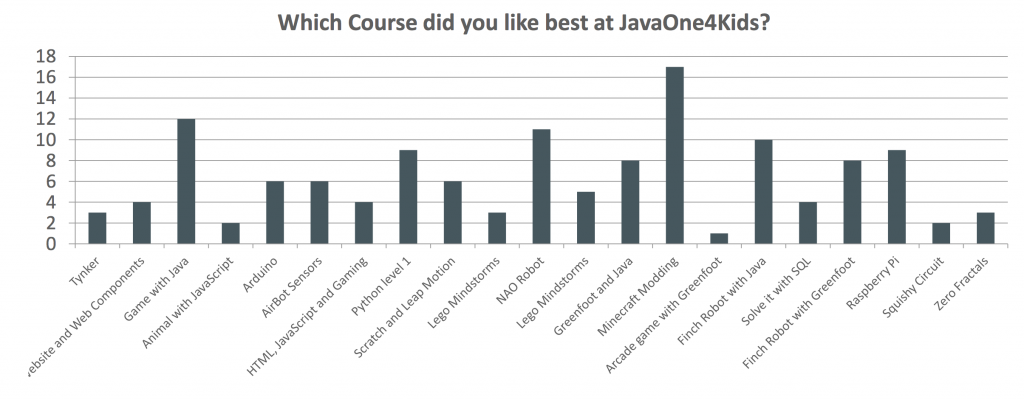
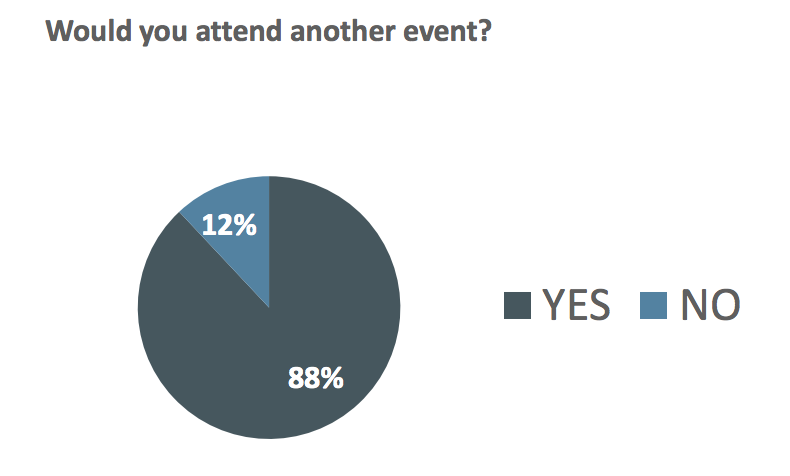
Two of the announcements at DockerCon 2017 directly relevant to Java developers are:
- Docker Multi-stage build
- Oracle JRE in Docker Store
This blog explains the purpose of Docker multi-stage build and provide examples of how they help us generate smaller and more efficient Java Docker images.

Just show me the code: github.com/arun-gupta/docker-java-multistage.
What is the issue?
Building a Docker image for a Java application typically involves building the application and package the generated artifact into an image. A Java developer would likely use Maven or Gradle to build a JAR or WAR file. If you are using the Maven base image to build the application then it will download the required dependencies from the configured repositories and keep them in the image. The number of JARs in the local repository could be significant depending upon the number of dependencies in the pom.xml. This could leave a lot of cruft in the image.
Let’s take a look at a sample Dockerfile:
|
1
2
3
4
5
6
7
8
9
10
11
12
13
14
15
16
17
18
|
FROM maven:3.5-jdk-8
COPY src /usr/src/myapp/src
COPY pom.xml /usr/src/myapp
RUN mvn -f /usr/src/myapp/pom.xml clean package
ENV WILDFLY_VERSION 10.1.0.Final
ENV WILDFLY_HOME /usr
RUN cd $WILDFLY_HOME && curl http://download.jboss.org/wildfly/$WILDFLY_VERSION/wildfly-$WILDFLY_VERSION.tar.gz | tar zx && mv $WILDFLY_HOME/wildfly-$WILDFLY_VERSION $WILDFLY_HOME/wildfly
RUN cp /usr/src/myapp/target/people-1.0-SNAPSHOT.war $WILDFLY_HOME/wildfly/standalone/deployments/people.war
EXPOSE 8080
CMD ["/usr/wildfly/bin/standalone.sh", "-b", "0.0.0.0"]
|
In this Dockerfile:
maven:3.5-jdk-8is used as the base image- Application source code is copied to the image
- Maven is used to build the application artifact
- WildFly is downloaded and installed
- Generated artifact is copied to the
deploymentsdirectory of WildFly - Finally, WildFly is started
There are several issues with this kind of flow:
- Using
mavenas the base image restricts on what functionality is available in the image. This requires WildFly to be downloaded and configured explicitly. - Building the artifact downloads all Maven dependencies. These stay in the image and are not needed at runtime. This causes an unnecessary bloat in the image size at runtime.
- Change in WildFly version will require to update the Dockerfile. This would’ve been much easier if we could use the
jboss/wildflybase image by itself. - In addition, unit tests may run before packaging the artifact and integration tests after the image is created. The test dependencies and results is again not needed to live in the production image.
There are other ways to build the Docker image. For example, splitting the Dockerfile into two files. The first file will then build the artifact and copy the artifact to a common location using volume mapping. The second file will then pick up the generated artifact and then use the lean base image. This approach has also has issues where multiple Dockerfiles need to be maintained separately. Additional, there is an out-of-band hand-off between the two Dockerfiles.
Let’s see how these issues are resolved with multi-stage build.
What are Docker multi-stage build?
Multi-stage build allows multiple FROM statements in a Dockerfile. The instructions following each FROM statement and until the next one, creates an intermediate image. The final FROM statement is the final base image. Artifacts from intermediate stages can be copied using COPY --from=<image-number>, starting from 0 for the first base image. The artifacts not copied over are discarded. This allows to keep the final image lean and only include the relevant artifacts.
FROM syntax is updated to specify stage name using as <stage-name>. For example:
|
1
2
3
|
FROM maven:3.5-jdk-8 as BUILD
|
This allows to use the stage name instead of the number with --from option.
Let’s take a look at a sample Dockerfile:
|
1
2
3
4
5
6
7
8
9
10
11
|
FROM maven:3.5-jdk-8 as BUILD
COPY src /usr/src/myapp/src
COPY pom.xml /usr/src/myapp
RUN mvn -f /usr/src/myapp/pom.xml clean package
FROM jboss/wildfly:10.1.0.Final
COPY --from=BUILD /usr/src/myapp/target/people-1.0-SNAPSHOT.war /opt/jboss/wildfly/standalone/deployments/people.war
|
In this Dockerfile:
- There are two
FROMinstructions. This means this is a two-stage build. maven:3.5-jdk-8is the base image for the first build. This is used to build the WAR file for the application. The first stage is named asBUILD.jboss/wildfly:10.1.0.Finalis the second and the final base image for the build. WAR file generated in the first stage is copied over to this stage usingCOPY --fromsyntax. The file is directly copied in the WildFly deployments directory.
Let’s take a look at what are some of the advantages of this approach.
Advantages of Docker multi-stage build
- One Dockerfile has the entire build process defined. There is no need to have separate Dockerfiles and then coordinate transfer of artifact between “build” Dockerfile and “run” Dockerfile using volume mapping.
- Base image for the final image can be chosen appropriately to meet the runtime needs. This helps with reduction of the overall size of the runtime image. Additionally, the cruft from build time is discarded during intermediate stage.
- Standard WildFly base image is used instead of downloading and configuring the distribution manually. This makes it a lot easier to update the image if a newer tag is released.
Size of the image built using a single Dockerfile is 816MB. In contrast, the size of the image built using multi-stage build is 584MB.

So, using a multi-stage helps create a much smaller image.
Is this a typical way of building Docker image? Are there other ways by which the image size can be reduced?
Sure, you can use docker-maven-plugin as shown at github.com/arun-gupta/docker-java-sample to build/test the image locally and then push to repo. But this mechanism allows you to generate and package artifact without any other dependency, including Java.
Sure, maven:jdk-8-alpine image can be used to create a smaller image. But then you’ll have to create or find a WildFly image built using jdk-8-alpine, or something similar, as well. But the cruft, such as maven repository, two Dockerfiles, sharing of artifact using volume mapping or some other similar technique would still be there.
There are other ways to craft your build cycle. But if you are using Dockerfile to build your artifact then you should seriously consider multi-stage builds.
Read more discussion in PR #31257.
As mentioned earlier, the complete code for this is available at github.com/arun-gupta/docker-java-multistage.
Sign up for Docker Online Meetup to get a DockerCon 2017 recap.


 Click on

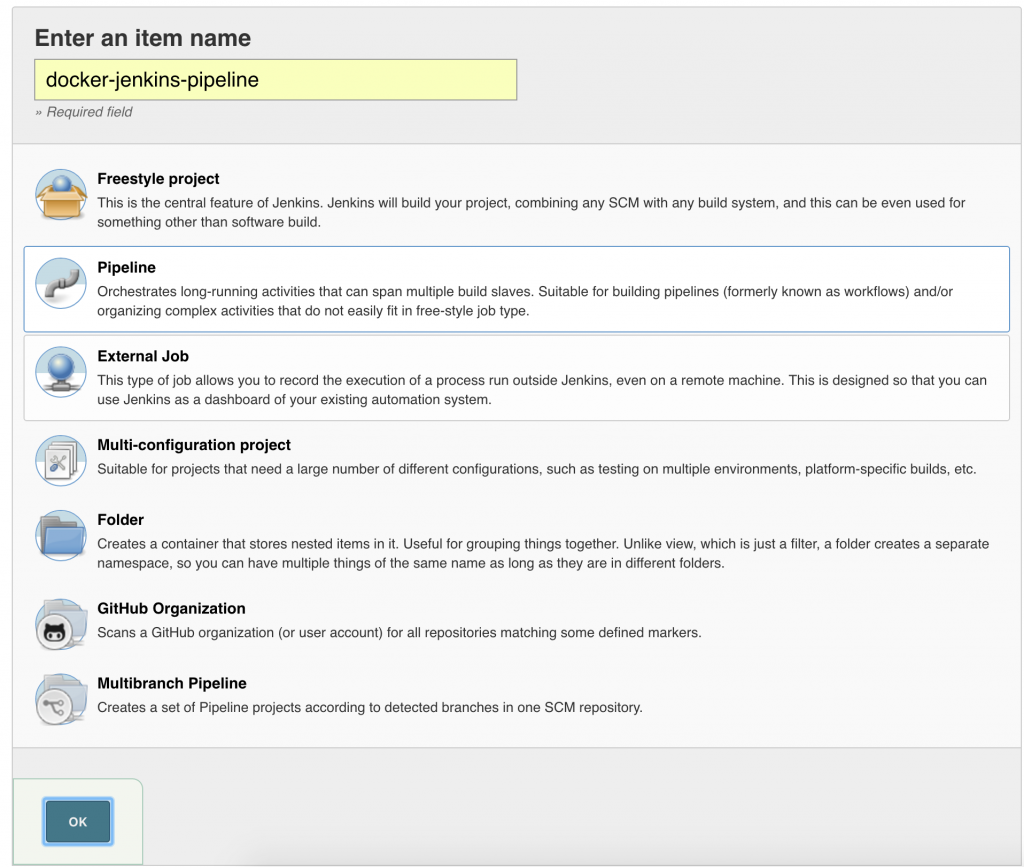 Click on OK.
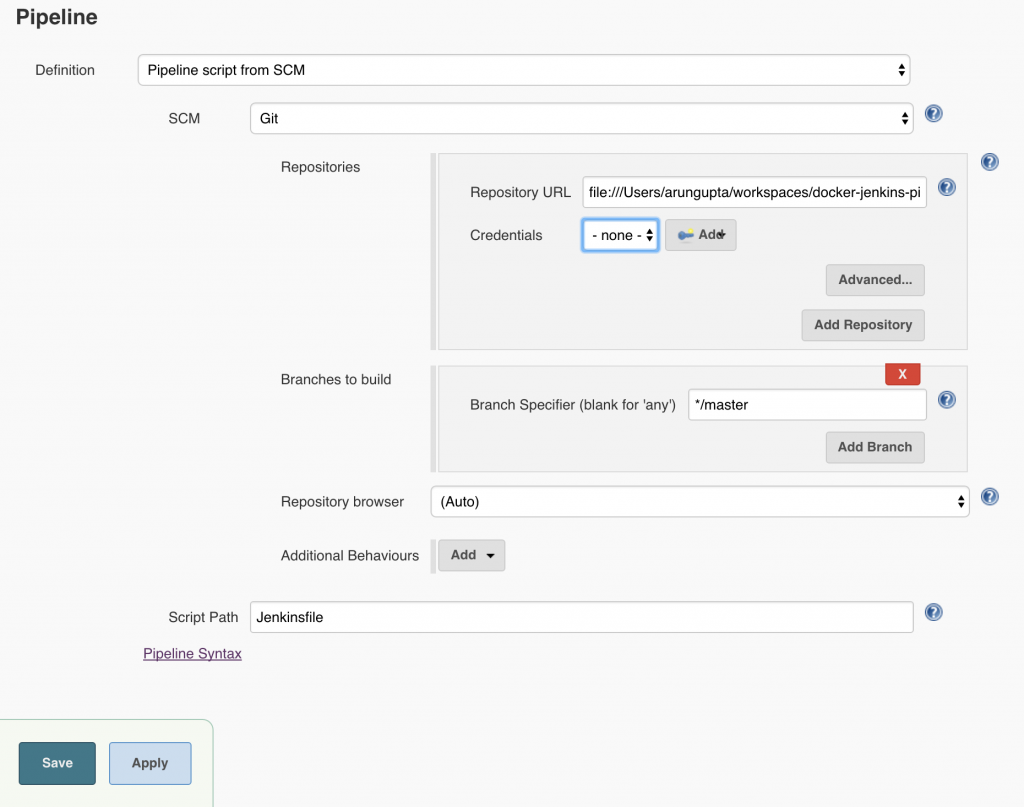 Local git repo is used in this case. You can certainly choose a repo hosted on github. Further, this repo can be configured with a git hook or poll at a constant interval to trigger the pipeline.Click on


 (tentative)