Tag Archives: cloud

Getting Started with Oracle Container Cloud Service

Oracle Cloud Container Logo

Oracle Container Cloud Service is Oracle’s entry into the the world of managed container service. There are plenty of existing options:

  • Docker for AWS or Azure
  • Amazon Elastic Container Service
  • Google Container Engine
  • Azure Container Service
  • DC/OS by Mesosphere
  • OpenShift by Red Hat

This blog will explain how to get started with Oracle Container Cloud Service. A comparison of different managed services is started at Managed Container Service.

Before we jump into all the details, let’s try to clarify a couple of things about this offering from Oracle.

First, a bit about the name. “Oracle Cloud Container Service” seems more natural and intuitive since its a Container Service in Oracle Cloud. Wonder why is it called “Oracle Container Cloud Service”? Is it because “Oracle Container” is Oracle’s container orchestration framework and its a Cloud Service? Could that mean other orchestration frameworks be offered as a service as well?

Second, don’t confuse it with Oracle Application Container Cloud Service that allows to build cloud-native 12-factor applications using polyglot platform. Now, that confuses me further. Can the Container Service not be used to build 12-factor apps? Are cloud-native and containers mutually exclusive?

Anyway, this is causing more confusion than clarification :) Let’s move on!

One last thing before we dig in. Many thanks to Bruno Borges (@brunoborges) for pushing the buttons for cloud service activation. I don’t know the normal time for the free trial to be activated otherwise. And a much bigger thank to Mike Raab (@mikeraab) for helping me understand the details of Container Service.

Let’s get started!

  1. Get a Free Trial for Oracle Cloud. It takes a few days for the trial to be activated. The trial time bombs after 30 days so make sure you’ve time planned for evaluation. Each free trial comes with 6 OC3 nodes. OC3 is one of the compute node types available on Oracle Cloud. OC3 particularly is 1 OCPU (think vCPU on Amazon Web Services) and 7.5 GB RAM.
  2. Once the account is activated, you get an email as shown:oracle-cloud-welcome-emailThe important piece of information is username, temporary password, identity domain and My Services URL. The My Account URL link is only for account administration.
  3. Click on My Service URL, login using the values from email:oracle-cloud-services-login
    You get an opportunity to change your password afterwards
  4. Oracle Cloud dashboard shows up after logging in:oracle-cloud-services-dashboardA default set of services and their status is shown. The dashboard can also be customized by clicking on Customize Dashboard button on the top right.
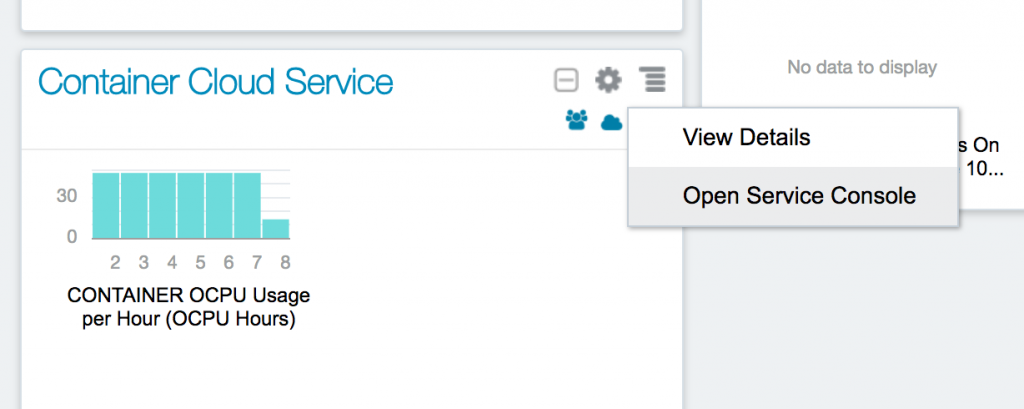
  5. Getting to Oracle Container Cloud Service Console is a bit non-intuitive but you get it once you know it. Select Container Cloud Service tab, click on top-right corner and select Open Service Console:oracle-cloud-container-service-console-accessOr you can directly click on the link for Oracle Container Cloud Service Console in the welcome email. Service console looks like:oracle-cloud-container-service-console
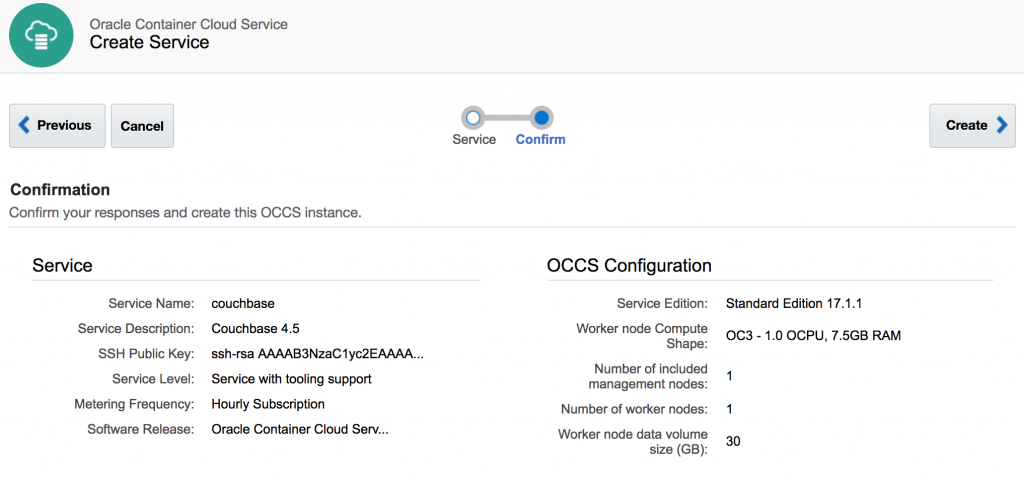
  6. Click on Create Service:oracle-cloud-container-service-definitionOracle Container Container Service Instance Details provide more details about each of the field.What is a worker node? We’ll talk about it a bit later. But essentially this is where the container runs. We are asking for only one worker node.

    Its worth noting different capacities for the worker node:
    Oracle Cloud CPUs

    Confirm all the settings:

    oracle-cloud-container-service-definition-confirmation

    and click on Create> to start the service creation.

  7. Wait for about 30 minutes for the service to be created. After that the Service Console looks like:
    oracle-cloud-container-service-console-with-serviceWait, we asked for  one worker node and how come two OCPUs are being consumed.Each Oracle Container Cloud Service has at least two nodes – a manager node and one or more worker nodes. Manager node is responsible for administration of all the workers and and orchestrate containers on different worker nodes. Worker nodes can be organized in different resource pools to meet different workflow needs.

    And, so ~30 minutes are spent provisioning two nodes and installing container service components on each node. This is also evident in the service logs shown in Service Create and Delete History shown in the main Console page:

    No timestamp in the activity feels a bit too clean.

  8. One main question that I kept wondering all along is “when am I ready to deploy the containers?“. Apparently, not yet!A couple of more steps so hang in there …

    In your service, click on the top-right icon to select another menu:
    oracle-cloud-container-console-open

    Select Container Console.  So, now you are transitioning from Oracle Container Cloud Service Console to Container Console. Make sure to use the right terminology otherwise it gets confusing fast.

  9. This attempts to open Container Console but prompts the usual warningoracle-cloud-container-console-open-warning

    Just click on Proceed link. In a typical production setup, this will setup correctly using certificates and so this warning would not happen.

  10. This brings up a login screen:oracle-cloud-container-console-login
  11. Use the username and password specified during service creation earlier. Click on Login to see Container Console:oracle-cloud-container-console-default

Are we there yet?

Yes, now is the time to deploy containers. But we’ll cover that in a subsequent blog!

Just to recap on what is needed to get started with Oracle Container Cloud Service …

  1. Register for Oracle Cloud trial
  2. Login to main Oracle Cloud Dashboard
  3. Create a Oracle Container Cloud Service Instance
  4. Oracle Container Cloud Service Instance Console
  5. Container Console

All the steps need to be done once but a console inside a console inside a dashboard feels like Inception. The good thing is that the IP address of Container Console is a public IP address served by Oracle Cloud and can be used from anywhere.

Oracle Container Cloud Service Docs have lot more details about building and deploying applications using this Console.

In the next blog, we’ll see what it takes to run a Couchbase container using this console? Possibly a cluster of Couchbase across multiple hosts?

Want to learn more about running Couchbase in containers?

  • Couchbase on Containers
  • Couchbase Forums
  • Couchbase Developer Portal
  • @couchhasedev and @couchbase

Source: https://blog.couchbase.com/2017/february/getting-started-oracle-container-cloud-service
Getting Started with Docker Cloud

Deploying Docker to Amazon using Tutum explained how to deploy a Docker image to Docker Tutum. Tutum is now Docker Cloud.

Read Announcing Docker Cloud for more details.

Docker Cloud Logo

The key features of Docker Cloud are:

  • Authentication using Docker ID
  • Integration with Docker Hub
  • Support for Docker official repositories
  • Commercially supported Docker Engine
  • Ability to deploy and scale your applications using GUI, API and CLI

This blog will show:

  • Key concepts of Docker Cloud
  • How to create a new Docker Cloud Node
  • How to install Docker Cloud CLI
  • How to create a new Docker Cloud Service
  • Access Couchbase Server in Docker Cloud
  • How to terminate the Docker Cloud Service and Node

And finally it’ll leave with some references for Docker Cloud docs.

The blog will use Couchbase Server – an open source, highly scalable,  JSON document database for the Docker image.

Docker Cloud TL;DR

Here are the quick commands to run a Docker image using Docker Cloud in Amazon:

More details below.

Key Concepts of Docker Cloud

Let’s understand the core concepts of Docker Cloud:

  • Nodes are individual Linux hosts/VMs used to deploy and run your applications. New nodes can be provisioned to increase the capacity. Docker Cloud does not provide hosting services. Nodes are provisioned using physical servers, virtual machine or cloud providers.
  • Node Clusters are logical groups of nodes of the same type. Node Clusters allow to scale the infrastructure easily by provisioning more nodes.
  • Services are logical groups of containers from the same image. Services make it simple to scale your application across different nodes.

Docker Cloud can be managed with Web, CLI or REST API. This blog will use the Docker Cloud CLI to perform all the commands.

Install Docker Cloud CLI

Install Docker Cloud CLI:

Complete installation instructions are at Installing CLI.

Check version:

Complete set of commands are:

Save the login credentials:

Create new Docker Cloud Node

Register your cloud provider credentials with Docker Cloud Web UI as explained in Link to a Cloud Service Provider. Amazon, Digital Ocean, Azure, and other cloud providers are supported.

Create a new node cluster with a single node:

This node cluster has a single node (-t 1) and uses the tag “couchbase” (--tag couchbase). Last four parameters are nodecluster name (couchbase-node, provider (aws, region (us-west-1 and nodetype (m3.large).

Each node in this node cluster will be given the assigned tag. This will be used later to assign services to a specific node or node cluster.

Status of this node cluster can be checked:

The dashboard at cloud.docker.com is updated to show:

Docker Cloud Node Created Dashboard

More information about each node can be seen as well:

Docker Cloud Created Node

Create a new Docker Cloud Service

Create a Docker Cloud Service:

If multiple node clusters exists, then --tag is used to assign a service to a node cluster.

docker-cli#10 is filed to ensure multiple ports can be exposed using -p 8091-8093:8091-8093 format. This will be aligned with the docker CLI.

Docker image used here is arungupta/couchbase. This image is based on the official couchbase image at Docker Hub and pre-configures it for different services.

Start the Docker Cloud Service:

The updated dashboard looks like:

Docker Cloud Service StartedGet the Docker Cloud Service logs:

The log shows output from the Couchbase REST API invoked to configure the Couchbase server.

Access Couchbase Server in Docker Cloud

Inspect the Docker Cloud service for the exposed container ports:

To be more specific, exact URI for the Couchbase Web Console can be obtained as:

Access the Couchbase Web Console at http://couchbase-b9132b42.936dbe58.svc.dockerapp.io:8091/ to see the Couchbase Web Console login screen. Enter the password credentials of Administrator and password.

Docker Cloud Couchbase Login Page

And the Couchbase Web Console looks like:

Docker Cloud Couchbase Web Console

Terminate the Docker Cloud Service and Node

Check the list of Docker Cloud services running:

Terminate the service:

Check the list of nodes:

Terminate the node as:

Docker Cloud References

  • Getting Started with Docker Cloud
  • Docker Cloud Tutorials
  • Docker Cloud API
  • Questions on Docker Forums

In this blog, you learned:

  • Key concepts of Docker Cloud
  • How to create a new Docker Cloud Node
  • How to install Docker Cloud CLI
  • How to create a new Docker Cloud Service
  • Access Couchbase Server in Docker Cloud
  • How to terminate the Docker Cloud Service and Node

Enjoy!

Source: http://blog.couchbase.com/2016/march/getting-started-docker-cloud


Deploy Docker to Amazon Cloud using Tutum

Have you felt the need to run Docker containers on Amazon?

Amazon Container Service requires extensive setup and manual work. This is meant for programmers who have plenty of time and willing to debug through multiple steps. For mundane programmers, like me, who like simple and easy to use steps, there is Docker Tutum!

What is Docker Tutum?

Docker Tutum is a SaaS that allows you to build, deploy and manage Docker containers in a variety of clouds.

Docker Hosting Tutum

There are three main features:

  • Build and run your code using Tutum’s free private registry
  • Deploy applications using Tutum to manage Clusters that are fault tolerant and scalable. Tutum handles the orchestration of your infrastructure and application containers.
  • Manage your applications through Tutum’s intuitive Dashboard, simple API, or CLI tool. With built-in logs and data monitoring, all the info you need is at your fingertips.

The main party line is:

Experience the simplicity of PaaS with none of its constraints. Enjoy the flexibility of IaaS with none of its complexity.

How Docker Tutum Works?

Key Concepts of Docker Tutum

The main concepts of Docker Tutum are explained below:

Docker Tutum Architecture

  • (A) Node clusters are logical groups of nodes of the same type. Tutum pools your nodes resources, so your apps can run together thereby reducing complexity and waste. Node Clusters can be easily scaled with a drag of the slider.
  • (B) Nodes are individual Linux hosts/VMs used to deploy and run your applications. New nodes can be provisioned right from within Tutum to increase the capacity of your Node Clusters.
  • (C) Containers, (D) Links and (E) Volumes are Docker concepts.
  • (F) Services are logical groups of Docker containers from the same image. Services make it simple to scale your application across different nodes. Simply drag a slider to increase or decrease the availability, performance, and redundancy of your application.

Deploy Couchbase Docker Container on Amazon using Tutum

Docker Tutum Getting Started provides detailed steps on how to get started. Here is what I did to run Couchbase Docker container in Amazon using Docker Tutum:

  • Get started for free (at least while its in beta) by logging in using Docker Hub account.
  • Link Amazon Web Services credentials with Tutum. I just had to specify Access Key Id and Secret Access Key.If you create a new account for this then you may have to attach a policy to enable privileges such that new instances can be provisioned on your behalf.
  • Create a new node cluster at dashboard.tutum.co/node/launch/Docker Tutum New Node Cluster
    The three values that need to be specified/changed:

    • Node cluster name
    • Deploy tags (optional)
    • Type/size to t2.medium
    • Disk size reduce from 60 to 20 GB

    Takes a few minutes to provision the AMI. Updated status could be seen on AWS Console:

    Docker Tutum AWS Console

    Tutum dashboard shows the following status after the node is created:

    Docker Tutum Node Created

  • Create your first service at dashboard.tutum.co/container/launch/. Select “Public Repositories” and search for “arungupta/couchbase-node”.
    Docker Tutum New ServiceThis image is created from github.com/arun-gupta/docker-images/tree/master/couchbase-node. This image performs the following:

    • Starts Couchbase server
    • Configures the server using Couchbase REST API
  • Click on “Select” and configure. You only need to override the ports and take all other defaults:
    Docker Tutum Couchbase ConfigurationClick on “Create and Deploy”.
  • Dashboard is updated after the service is deployed:
    Docker Tutum Couchbase Service
  • Click on “Logs” to see logs from the Couchbase Docker container:
    Docker Tutum Couchbase Logs
  • Find IP address from the AWS Console:
    Docker Tutum AWS Console IP Address
  • Access Couchbase Console at <IP-ADDRESS>:8091, in our case 54.67.111.235:8091. This will show the login screen:
    Docker Tutum Couchbase Console Login
    Enter the username “Administrator” and password “password”.
  • This shows the Couchbase Console:
    Docker Tutum Couchbase Console

Create/Access Sample Bucket on Couchbase

  • Click on “Settings”, “Sample Buckets”. This shows the list of sample buckets that can be installed.
  • Select “travel-sample” and click on “Create”. The updated console looks like:
    Docker Tutum Couchbase Travel Sample
  • If you’ve downloaded Couchbase server locally, then you can use Couchbase Query CLI Tool (cbq) to connect and query:
    Couchbase allows to query document database using SQL-like syntax, aka N1QL.

So this blog showed:

  • What is Docker Tutum?
  • How to get started with Docker Tutum?
  • Deploy Couchbase Docker container on Amazon using Tutum
  • Create/Access sample bucket on Couchbase

More details:

  • Docker Tutum Getting Started
  • Docker Tutum Support
  • Docker Tutum Web Dashboard
  • Docker Tutum API
  • Docker Tutum CLI
  • Docker Tutum Python SDK
  • Docker Tutum Go SDK

Enjoy!

Originally posted at: http://blog.couchbase.com/2016/deploy-docker-amazon-cloud-tutum

JavaOne Cloud, DevOps, Containers, Microservices etc. Track

javaone-logo

Every year, for the past 19 years, JavaOne is the biggest and most awesome gathering of Java enthusiasts from around the world. JavaOne 2015 is the 20th edition of this wonderful conference. How many conferences can claim this? :)

Would you like to be part of JavaOne 2015? Sure, you can get notified when the registration opens and attend the conference. Why not take it a notch higher on this milestone anniversary?

Submit a session and become a speaker? Tips for Effective Sessions Submissions at Technology Conferences provide detailed tips on how to make the session title/abstract compelling for the program committee.

Have you been speaking at JavaOne for past several years? Don’t wait, and just submit your session today. The sooner you submit, higher the chances of program committee members voting on it. You know the drill!

Important Dates

  • Call for Papers closes April 29, 2015
  • Notifications for accepted and declined sessions: mid-June
  • Conference date: Oct 25 – 29

JavaOne Tracks

JavaOne conference is organized by tracks, and the tracks for this year are:

  • Core Java Platform
  • Java and Security
  • JVM and Emerging Languages
  • Java, DevOps, and the Cloud
  • Java and the Internet of Things
  • Java and Server-Side Development
  • Java, Clients, and User Interfaces
  • Java Development Tools and Agile Techniques

I’m excited and honored to co-lead the Java, DevOps, and the Cloud track with Bruno Borges (@brunoborges). The track abstract is:

The evolution of service-related enterprise Java standards has been underway for more than a decade, and in many ways the emergence of cloud computing was almost inevitable. Whether you call your current service-oriented development “cloud” or not, Java offers developers unique value in cloud-related environments such as software as a service (SaaS) and platform as a service (PaaS). The Java Virtual Machine is an ideal deployment environment for new microservice and container application architectures that deploy to cloud infrastructures. And as Java development in the cloud becomes more pervasive, enabling application portability can lead to greater cloud productivity. This track covers the important role Java plays in cloud development, as well as orchestration techniques used to effectively address the service lifecycle of cloud-based applications. Track sessions will cover topics such as SaaS, PaaS, DevOps, continuous delivery, containers, microservices, and other related concepts.

So what exactly are we looking for in this track?

  • How have you been using PaaS effectively for solving customer issues?
  • Why is SaaS critical to your business? Are you using IaaS, PaaS, SaaS all together for different parts of your business?
  • Have you used microservices in a JVM-based application? Lessons from the trenches?
  • Have you transformed your monolith to a microservice-based architecture?
  • How are containers helping you reduce impedance mismatch between dev, test, and prod environments?
  • Building a deployment pipeline using containers, or otherwise
  • Are PaaS and DevOps complimentary? Success stories?
  • Docker machine, compose, swarm recipes
  • Mesosphere, Kubernetes, Rocket, Juju, and other clustering frameworks
  • Have you evaluated different containers and adopted one? Pros and Cons?
  • Any successful practices around containers, microservices, and DevOps together?
  • Tools, methodologies, case studies, lessons learned in any of these, and other related areas
  • How are you moving legacy applications to the Cloud?
  • Are you using private clouds? Hybrid clouds? What are the pros/cons? Successful case studies, lessons learned.

These are only some of the suggested topics and are looking forward to your creative imagination. Remember, there are a variety of formats for submission:

  • 60 mins session or panel
  • Two-hour tutorial or hands-on lab
  • 45 mins BoFs
  • 5 mins Ignite talk

We think this is going to be the coolest track of the conference, with speakers eager to share everything about all the bleeding edge technologies and attendees equally eager to listen and learn from them. We’d like to challenge all of you to submit your best session, and make our job extremely hard!

Once again, make sure to read Tips for Effective Sessions Submissions at Technology Conferences for a powerful session submission. One key point to remember: NO vendor or product pitches. This is a technology conference!

Dilbert Technology Show

Links to Remember

  • Call for Papers: oracle.com/javaone/call-for-proposals.html
  • Tracks: oracle.com/javaone/tracks.html
  • Submit your Proposal: oracleus.activeevents.com/2015/portal/cfp/cfpLogin.ww

JavaOne is where you have geekgasm multiple times during the day. This is going to be my 17th attendance in a row, and so looking forward to see you there!

Minecraft Server on Google Cloud – Tech Tip #82

Minecraft Logo

Bukkit Logo

If you’ve not followed the Minecraft/Bukkit saga over the past few months, Bukkit and CraftBukkit downloads were taken down by DMCA because a developer (@wolvereness) wanted Mojang to open up. Mojang (@vubui) posted an official statement in their forums. The general feeling is that @wolvereness left the Bukkit community hanging, and Mojang is not responsible for this debacle.

One of my friends (@ryanmichela), and a contributor to Bukkit, prepared a slide deck explaining the unfortunate debacle:

Anyway, leaving all the gory details behind, this blog will show how to get started with Bukkit 1.8.3.

What?

You just said, Bukkit was shutdown by DMCA.

SpigotMC LogoHail Spigot for reviving Bukkit, and updating to 1.8.3!
Its still not clear how did Spigot get around DMCA shutdown but the binaries seem to be available again, at least for now.

As a refresher, Bukkit is the API used by developers to make plugins. CraftBukkit is the modified Minecraft server that can understand plugins made by the Bukkit API.

Minecraft Server Hosting on OpenShift already explained how to setup a Minecraft server on OpenShift. This Tech Tip will show how to get a Minecraft server running on Google Cloud.

Lets get started!

Get Started with Google Cloud

Google Cloud Platform logo

  1. Sign up for a free trial at cloud.google.com. This gives you credit of $300, which should be pretty decent to begin with.

Create and Configure Google Compute Engine

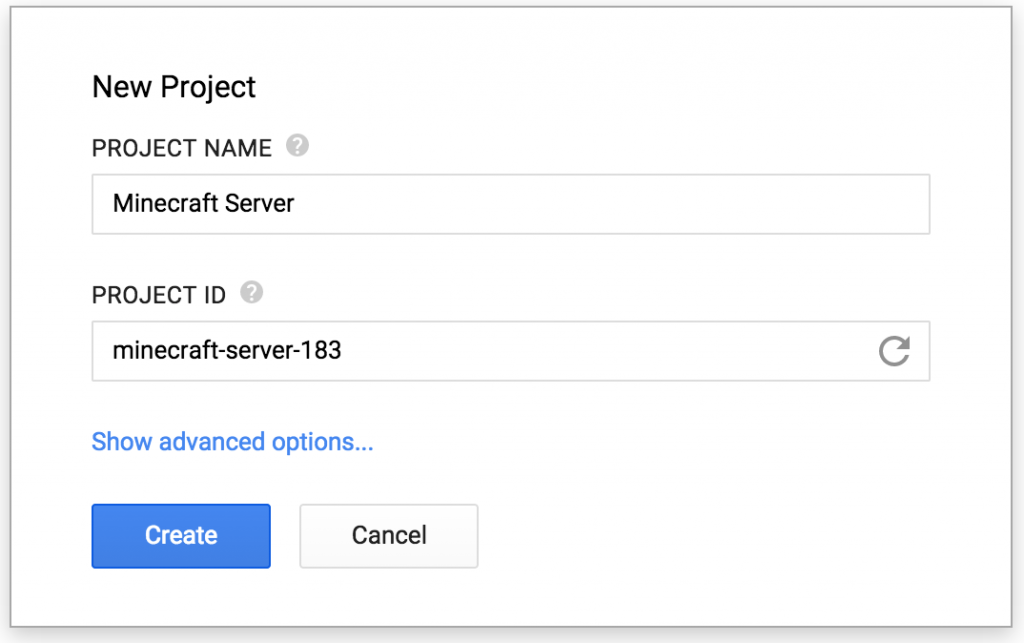
  1. Go to console.developers.google.com and create a new project by specifying the values as shown:Create Project on Google Cloud
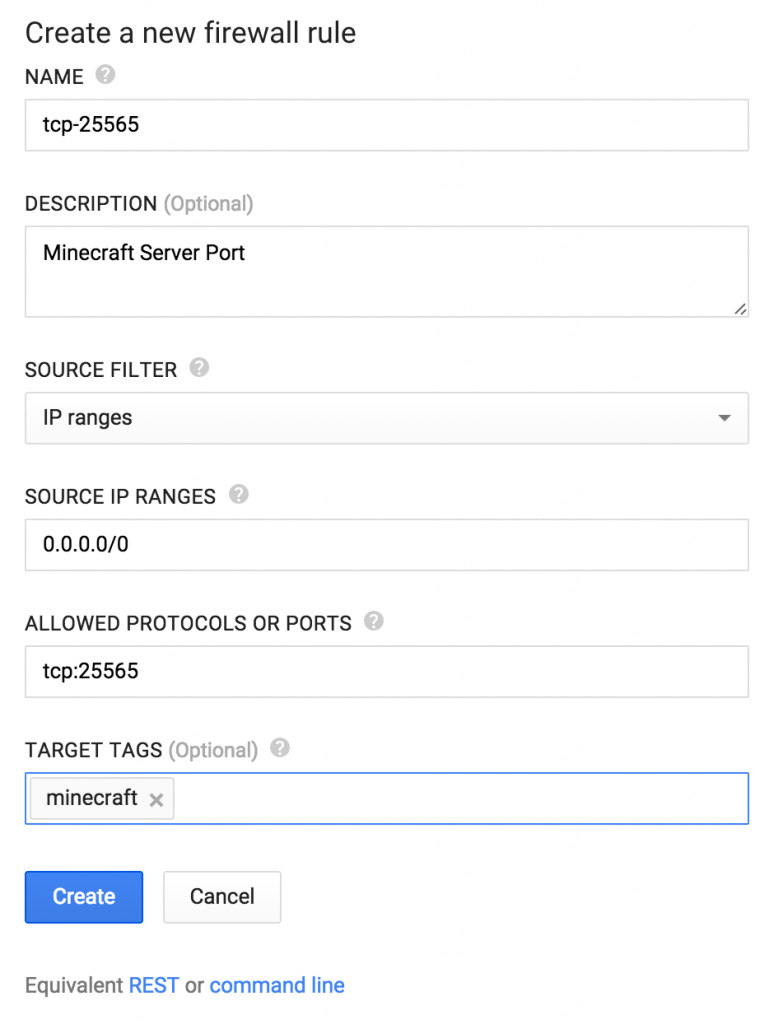
  2. In console.developers.google.com, go to “Compute”, “Compute Engine”, “Networks”, “default”, “New firewall rule” and enter the values as shown and click on “Create”.Google Cloud Firewall Rule
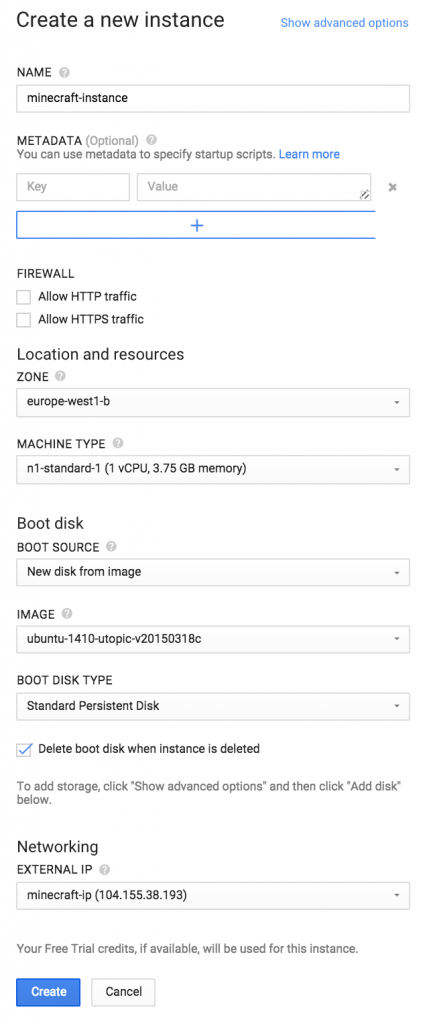
  3. In the left menu bar, click on “VM Instances” under “Compute Engine”, “Create instance”. Take everything default except:
    1. Provide a name as “minecraft-instance”
    2. Change Image to Ubuntu 14.10.
    3. Change External IP to “New static IP address” and fill in the details. IP address is automatically assigned.

    Exact values are shown here:

    Google Cloud Create Instance

    And click on “Create”.

    Note down the IP address, this will be used later to connect from Minecraft launcher.

  4. Click on the newly created instance, “Add tags”, and specify “minecraft” tag. Exact same tag on the VM instance and Firewall rule ensures that the rule is applied to the appropriate instance.

Install JDK, Git, and Spigot

In console.developers.google.com, select the recently created instance, click on “SSH”, “Open in browser window”. The software is installed in the shell window.

Install JDK

Make sure to answer questions and accept license during the install. Using OpenJDK 8 to install Spigot gives the following exception:

Install Git

This is required for installing Spigot.

Install Spigot

Download and Install Spigot

A successful completion of this task shows the following message:

Start Minecraft Server on Google Cloud

Run the server as:

This will generate “eula.txt”. Accept license agreement by giving the following command:

Run server as:

This will start the CraftBukkit 1.8 server in background.

Connect to Minecraft Server from the Client

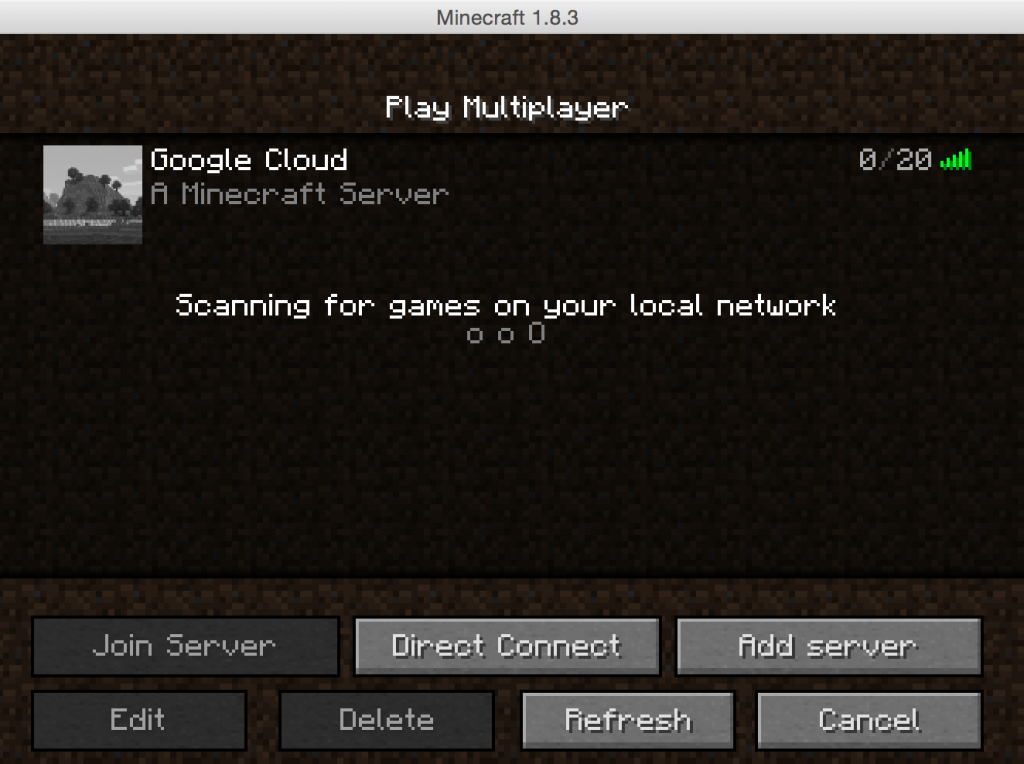
Launch Minecraft client and create a new Minecraft server as:

Google Cloud Minecraft Multiplayer

Clicking on Done shows:

Google Cloud Multiplayer Minecraft Server

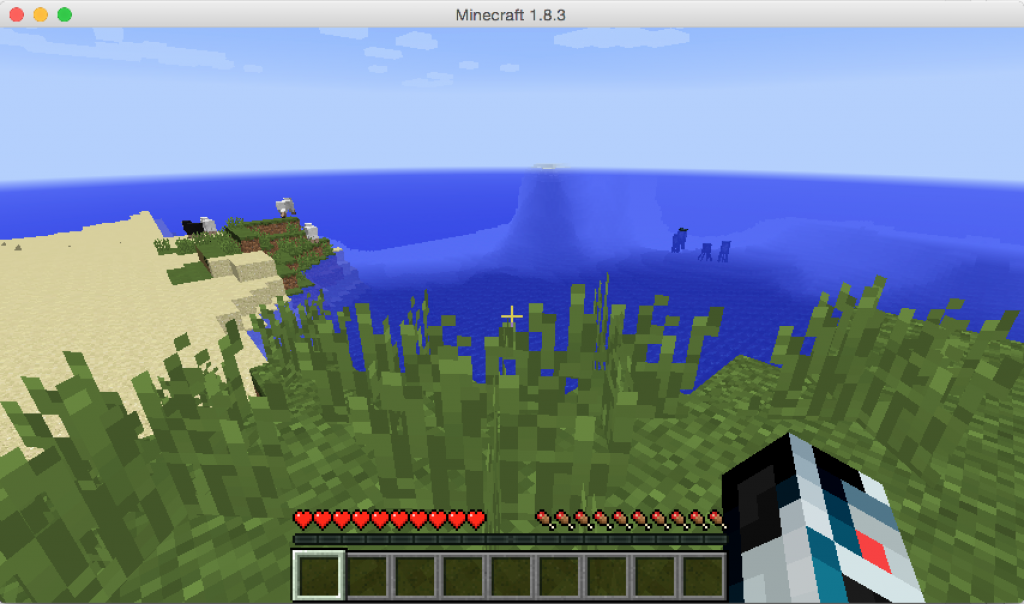
Now your client can connect to the Minecraft server running on Google Cloud.
Google Cloud Minecraft Client

The server is now live. Add 104.155.38.193  to your Minecraft launcher and put some Google resources to test :)

I was hoping to provide a script that can be run using Google Cloud SDK but the bundled CLI seems to have some issues creating the project. CLI equivalent for other commands can be easily seen from the console itself.

Enjoy and happy Minecrafting!