Tag Archives: devops

Cloud, Devops, Microservices Track Program Committee at JavaOne 2015

javaone-logo

JavaOne 2015 Program Committee wheels are churning to make sure we provide the best content for you this year. There are a total of 9 tracks covering the entire Java landscape and all the track leads and program committee members are reviewing and voting upon the submissions. This is not an easy task especially when there are a lot of submission and the quality of submissions is top notch.

Here is the list of program committee members for Cloud and DevOps track:


@danielbryanuk

@myfear

@frankgreco

@mikekeith
 
@jbaruch
 
@wakaleo
   stijn
@stieno
 James Turnbull
@kartar

And I am (@arungupta) leading the track along with @brunoborges!


Complete list of all the program committee members across all the tracks is published here.

Many thanks for all the wonderful submissions, and to all the program committee members for reviewing the proposals!

Just to give you an idea, here is the tag cloud generated from the titles of all submissions for Cloud and DevOps track:


JavaOne 2015 Title Tag Cloud for Cloud/DevOps Track


And a tag cloud from all the abstracts of the same track:

JavaOne 2015 Abstract Tag Cloud for Cloud/DevOps Track


And in case you are wondering, here is the tag cloud of titles from submissions across all the tracks:

JavaOne 2015 Tag Cloud Title


And the same for submissions across all the tracks:

JavaOne 2015 Tag Cloud Abstract


Stay tuned, we are working hard to make sure to provide an excellent content at JavaOne!

Here are a couple of additional links:

  • Register for JavaOne
  • Justify to your boss

And, you can always find all the details at oracle.com/javaone.

JavaOne Cloud, DevOps, Containers, Microservices etc. Track

javaone-logo

Every year, for the past 19 years, JavaOne is the biggest and most awesome gathering of Java enthusiasts from around the world. JavaOne 2015 is the 20th edition of this wonderful conference. How many conferences can claim this? :)

Would you like to be part of JavaOne 2015? Sure, you can get notified when the registration opens and attend the conference. Why not take it a notch higher on this milestone anniversary?

Submit a session and become a speaker? Tips for Effective Sessions Submissions at Technology Conferences provide detailed tips on how to make the session title/abstract compelling for the program committee.

Have you been speaking at JavaOne for past several years? Don’t wait, and just submit your session today. The sooner you submit, higher the chances of program committee members voting on it. You know the drill!

Important Dates

  • Call for Papers closes April 29, 2015
  • Notifications for accepted and declined sessions: mid-June
  • Conference date: Oct 25 – 29

JavaOne Tracks

JavaOne conference is organized by tracks, and the tracks for this year are:

  • Core Java Platform
  • Java and Security
  • JVM and Emerging Languages
  • Java, DevOps, and the Cloud
  • Java and the Internet of Things
  • Java and Server-Side Development
  • Java, Clients, and User Interfaces
  • Java Development Tools and Agile Techniques

I’m excited and honored to co-lead the Java, DevOps, and the Cloud track with Bruno Borges (@brunoborges). The track abstract is:

The evolution of service-related enterprise Java standards has been underway for more than a decade, and in many ways the emergence of cloud computing was almost inevitable. Whether you call your current service-oriented development “cloud” or not, Java offers developers unique value in cloud-related environments such as software as a service (SaaS) and platform as a service (PaaS). The Java Virtual Machine is an ideal deployment environment for new microservice and container application architectures that deploy to cloud infrastructures. And as Java development in the cloud becomes more pervasive, enabling application portability can lead to greater cloud productivity. This track covers the important role Java plays in cloud development, as well as orchestration techniques used to effectively address the service lifecycle of cloud-based applications. Track sessions will cover topics such as SaaS, PaaS, DevOps, continuous delivery, containers, microservices, and other related concepts.

So what exactly are we looking for in this track?

  • How have you been using PaaS effectively for solving customer issues?
  • Why is SaaS critical to your business? Are you using IaaS, PaaS, SaaS all together for different parts of your business?
  • Have you used microservices in a JVM-based application? Lessons from the trenches?
  • Have you transformed your monolith to a microservice-based architecture?
  • How are containers helping you reduce impedance mismatch between dev, test, and prod environments?
  • Building a deployment pipeline using containers, or otherwise
  • Are PaaS and DevOps complimentary? Success stories?
  • Docker machine, compose, swarm recipes
  • Mesosphere, Kubernetes, Rocket, Juju, and other clustering frameworks
  • Have you evaluated different containers and adopted one? Pros and Cons?
  • Any successful practices around containers, microservices, and DevOps together?
  • Tools, methodologies, case studies, lessons learned in any of these, and other related areas
  • How are you moving legacy applications to the Cloud?
  • Are you using private clouds? Hybrid clouds? What are the pros/cons? Successful case studies, lessons learned.

These are only some of the suggested topics and are looking forward to your creative imagination. Remember, there are a variety of formats for submission:

  • 60 mins session or panel
  • Two-hour tutorial or hands-on lab
  • 45 mins BoFs
  • 5 mins Ignite talk

We think this is going to be the coolest track of the conference, with speakers eager to share everything about all the bleeding edge technologies and attendees equally eager to listen and learn from them. We’d like to challenge all of you to submit your best session, and make our job extremely hard!

Once again, make sure to read Tips for Effective Sessions Submissions at Technology Conferences for a powerful session submission. One key point to remember: NO vendor or product pitches. This is a technology conference!

Dilbert Technology Show

Links to Remember

  • Call for Papers: oracle.com/javaone/call-for-proposals.html
  • Tracks: oracle.com/javaone/tracks.html
  • Submit your Proposal: oracleus.activeevents.com/2015/portal/cfp/cfpLogin.ww

JavaOne is where you have geekgasm multiple times during the day. This is going to be my 17th attendance in a row, and so looking forward to see you there!

Build Binaries Only Once for Continuous Deployment

What is Build Binaries Only Once?

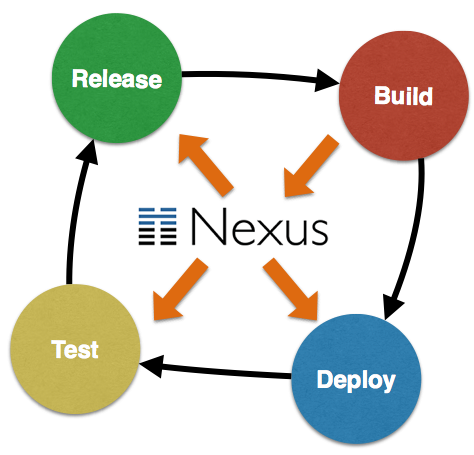
One of the fundamental principle of Continuous Delivery is Build Binaries Only Once, or in short BBOO. This means that the binary artifacts should be build once, and only once. These artifacts should then be stored in a repository manager, such as a Nexus Repository. Subsequent deploy, test, and release cycles should never attempt to build this binary again and instead reuse this binary. This ensures that the exact same binary has gone through all different test cycles and delivered to the customer.

Several times binaries are rebuilt during each testing phase using a specific tag of the workspace, and considered the same. But that is still different! This might turn out to be the same but that’s more incidental. Its more likely not same because of different environment configurations. For example, development team might be using JDK 8 on their machine and the test/staging might be using JDK 7. There are a multitude reasons because of which the binary artifacts could differ. So it’s very essential to build binaries only once, store them in a repository, and make them go through different test, staging, and production cycle. This increases the overall confidence level of delivery to the customer.

Build Binaries Only Once

This image shows how the binaries are built once during Build stage and stored on Nexus repository. There after, Deploy, Test, and Release stages are only reading the binary from Nexus.

The fact that dev, test, and staging environments differ is a different issue. And we’ll deal with that in a subsequent blog.

How do you setup Build Binaries Only Once?

For now, lets look at the setup:

  1. A Java EE 7 application WAR file is built once
  2. Store in a Nexus repository, or .m2 local repository
  3. Same binary is used for smoke testing
  4. Same binary is used for running full test suite

The smoke test in our case will be just a single test and full suite has four tests. Hopefully this is not your typical setup in terms of the number of tests, but at least you get to see how to setup everything.

Also only two stages of testing, smoke and full but the concept can be easily extended to add other stages. A subsequent blog will show a full blown deployment pipeline.

Lets get started!

  1. Check out a trivial Java EE 7 sample application from github.com/javaee-samples/javaee7-simple-sample. This is a typical Java EE application with REST endpoints, CDI beans, JPA entities.
  2. Setup a local Nexus Repository and deploy a SNAPSHOT of the application to it as:

    By default, Nexus repository is configured on localhost:8081/nexus. Note down the host/port if you are using a different combination. Also note down the exact version number that is deployed to Nexus. By default, it will be 1.0-SNAPSHOT.

    You can also deploy a RELEASE to this Nexus repository as:

    Note down whether you deployed SNAPSHOT or RELEASE.

    In either case, you can also specify -P release Maven profile and sources and javadocs will be attached with the deployment. So if RELEASE is deployed as:

    Then sources and javadocs are also attached.

  3. Check out the test workspace from github.com/javaee-samples/javaee7-simple-sample-test. Make the following changes in this project:
    1. Change nexus-repo property to match the host/port of the Nexus repository. If you used the default installation of Nexus and deployed a RELEASE, then nothing needs to be changed.By default, Nexus has one repository for SNAPSHOTs and another for RELEASEs. The workspace is configured to use RELEASE repository. If you deployed a SNAPSHOT, then “releases” in nexus-repo needs to be changed to “snapshots”to point to the appopriate repository.
    2. Change javaee7-sample-app-version property to match the version of the application deployed to Nexus.
  4. Start WildFly and run smoke tests as:

    This will run all files ending in “SmokeTest”. ShrinkWrap and Arquillian perform the heavy lifting of resolving the WAR file from Nexus and using it for running the tests:

    Running the smoke tests will show the results as:

  5. Run the full tests as:

    This will run all files included in your test suite and will show the results as:

    In both cases, smoke tests and full tests are using the binary that is deployed to Nexus.

Learn more about your toolset for creating this simple yet powerful setup:

arquillian-logo nexus-logowildfly-logo


Here are some other blogs coming in this series:

  • Use a CI server to deploy to Nexus
  • Run tests on WildFly running in a PaaS
  • Add static code coverage and code metrics in testing
  • Build a deployment pipeline

Enjoy!

OpenShift v3: Getting Started with Java EE 7 using WildFly and MySQL (Tech Tip #73)

OpenShift OriginOpenShift is Red Hat’s open source PaaS platform. OpenShift v3 (due to be released this year) will provide a holistic experience on running your microservices using Docker and Kubernetes. In a classic Red Hat way, all the work is done in the open source at OpenShift Origin. This will also drive the next major release of OpenShift Online and OpenShift Enterprise.

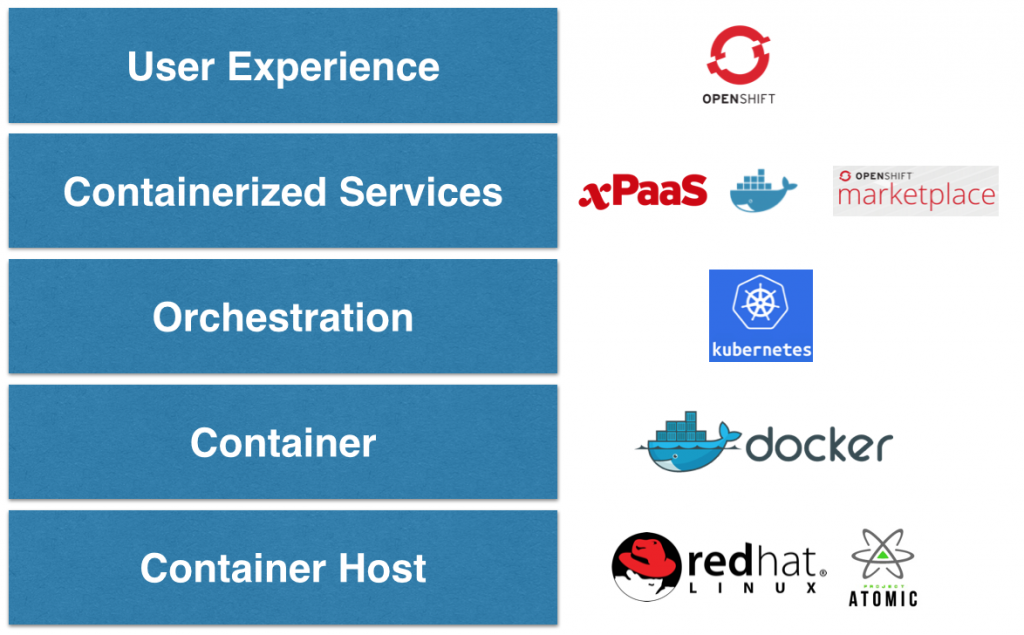
OpenShift v3 uses a new platform stack that is using plenty of community projects where Red Hat contributes such as Fedora, Centos, Docker, Project Atomic, Kubernetes, and OpenStack. OpenShift v3 Platform Combines Docker, Kubernetes, Atomic and More explain this platform stack in detail.

OpenShift v3 Stack

This tech tip will explain how to get started with OpenShift v3, lets get started!

Getting Started with OpenShift v3

Pre-built binaries for OpenShift v3 can be downloaded from Origin at GitHub. However the simplest way to get started is to run OpenShift Origin as a Docker container.

OpenShift Application Lifecycle provide complete details on what it takes to run a sample application from scratch. This blog will use those steps and adapt them to run using boot2docker VM on Mac. And in the process we’ll also deploy a Java EE 7 application on WildFly which will be accessing database on a separate MySQL container.

Here is our deployment diagram:

OpenShift v3 WildFly MySQL Deployment Strategy

  • WildFly and MySQL are running on separate pods.
  • Each of them is wrapped in a Replication Controller to enable simplified scaling.
  • Each Replication Controller is published as a Service.
  • WildFly talks to the MySQL service, as opposed to directly to the pod. This is important as Pods, and IP addresses assigned to them, are ephemeral.

Lets get started!

Configure Docker Daemon

  1. Configure the docker daemon on your host to trust the docker registry service you’ll be starting. This registry will be used to push images for build/test/deploy cycle.
    • Log into boot2docker VM as:
    • Edit the file

      This will be an empty file.
    • Add the following name/value pair:

      Save the file, and quit the editor.

    This will instruct the docker daemon to trust any docker registry on the 172.30.17.0/24 subnet.

Check out OpenShift v3 and Java EE 7 Sample

  1. Download and Install Go and setup GOPATH and PATH environment variable. Check out OpenShift origin directory:

    Note the directory where its checked out. In this case, its ~/workspaces/openshift.

    Build the workspace:

  2. Check out javaee7-hol workspace that has been converted to a Kubernetes application:

    This is also done in ~/workspaces/openshift directory.

Start OpenShift v3 Container

  1. Start OpenShift Origin as Docker container:

    Note ~/workspaces/openshift directory is mounted as /workspaces/openshift volume in the container. Some additional volumes are mounted as well.

    Check that the container is running:

  2. Log into the container as:

  3. Install Docker registry in the container by giving the following command:

  4. Confirm that the registry is running by getting the list of pods:

    osc is OpenShift Client CLI and allows to create and manage OpenShift projects. Some of the kubectl commands can also be using this script.

  5. Confirm the registry service is running. Note the actual IP address may vary:

  6. Confirm that the registry service is accessible:

    And look for the output:

Access OpenShift v3 Web Console

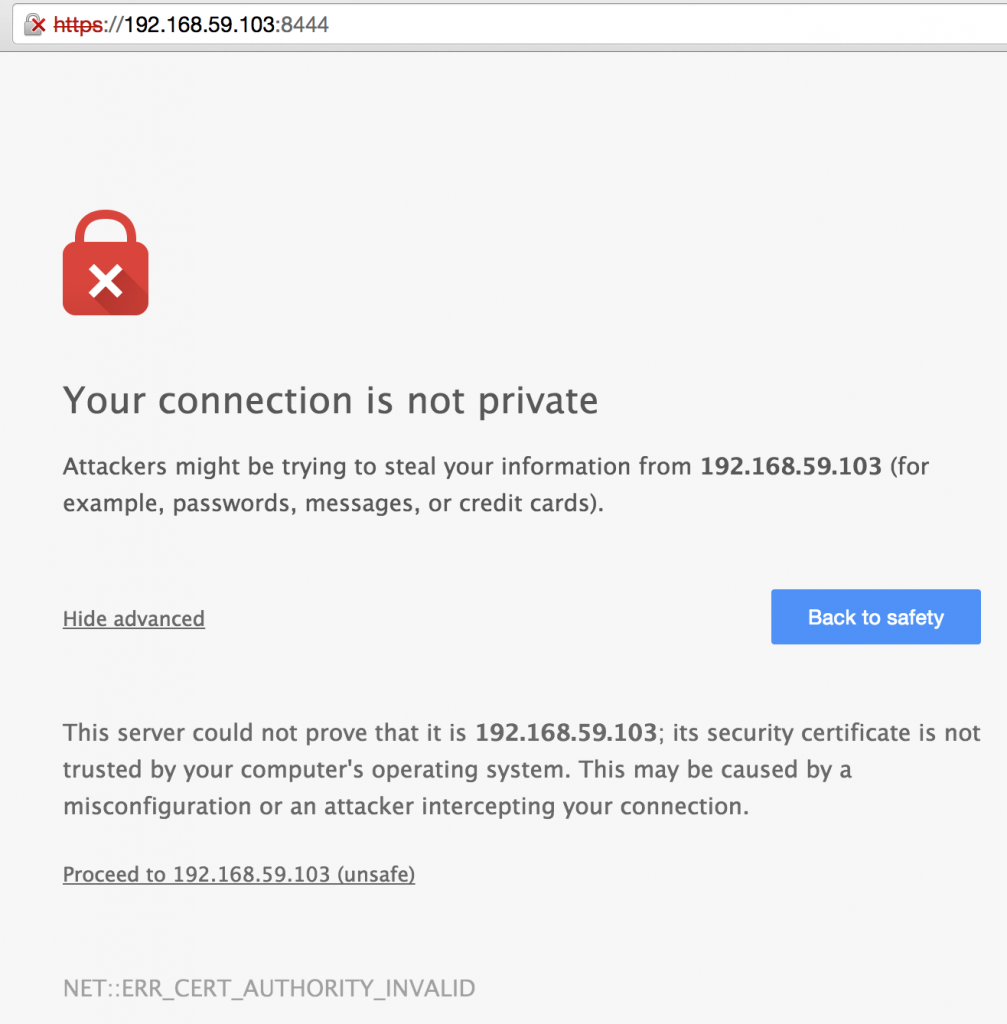
  1. OpenShift Origin server is now up and running. Find out the host’s IP address using boot2docker ip and open http://<IP addresss of boot2docker host>:8444 to view OpenShift Web  Console in your browser.For example, the console is accessible at https://192.168.59.103:8444/ on this machine.
    OpenShift Origin Browser Certificate

    You will need to have the browser accept the certificate at https://<host>:8444 before the console can consult the OpenShift API. Of course this would not be necessary with a legitimate certificate.

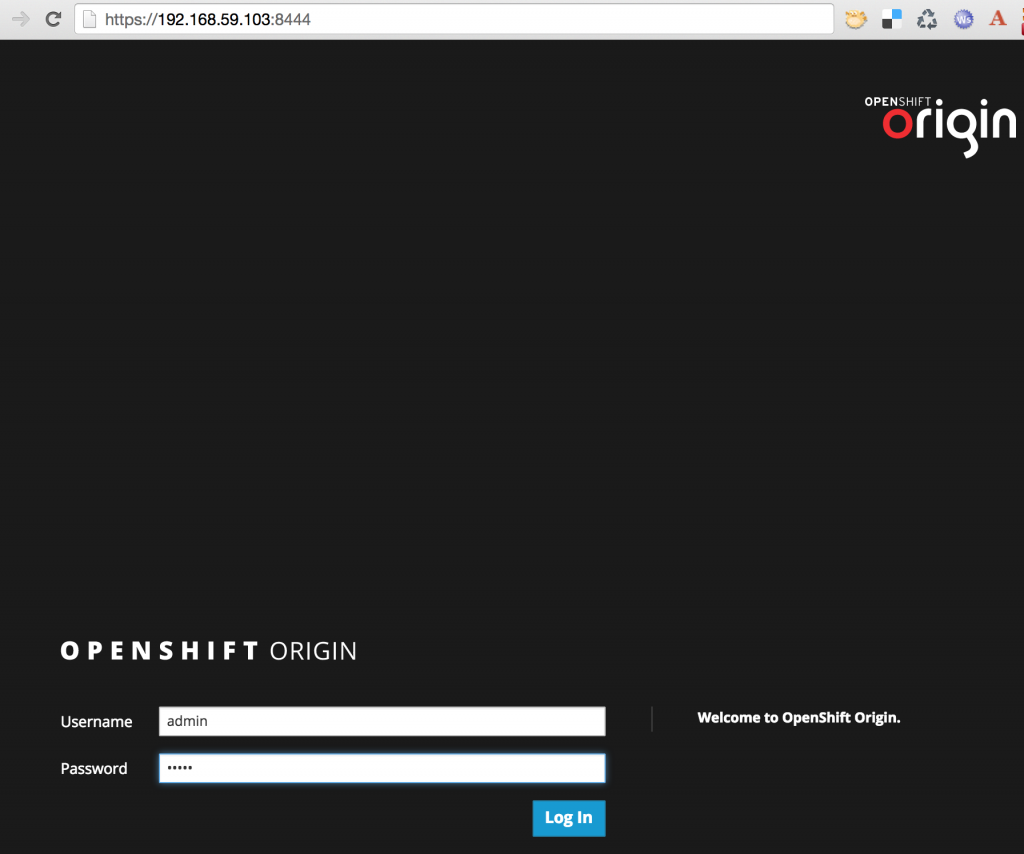
  2. OpenShift Origin login screen shows up. Enter the username/password as admin/admin:
    OpenShift Origin Login Screen

    and click on the “Log In” button. The default web console looks like:

    OpenShift v3 Web Console Default

Create OpenShift v3 Project

  1. Use project.json from github.com/openshift/origin/blob/master/examples/sample-app/project.json in the OpenShift v3 container and create a test project as:

    Refreshing the web console now shows:

    OpenShift Origin Test Project

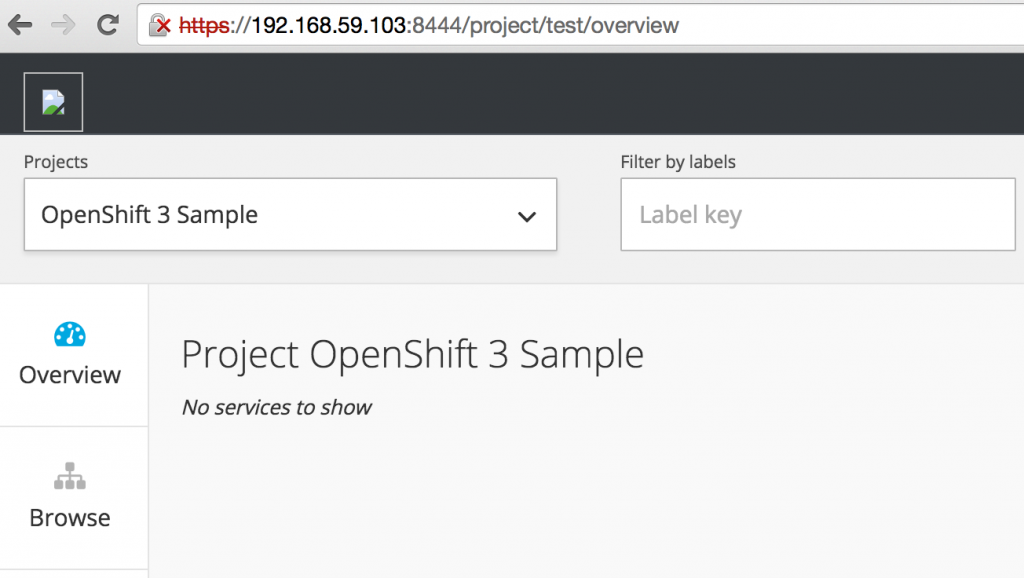
    Clicking on “OpenShift 3 Sample” shows an empty project description:

    OpenShift v3 Empty Project

  2. Request creation of the application template:

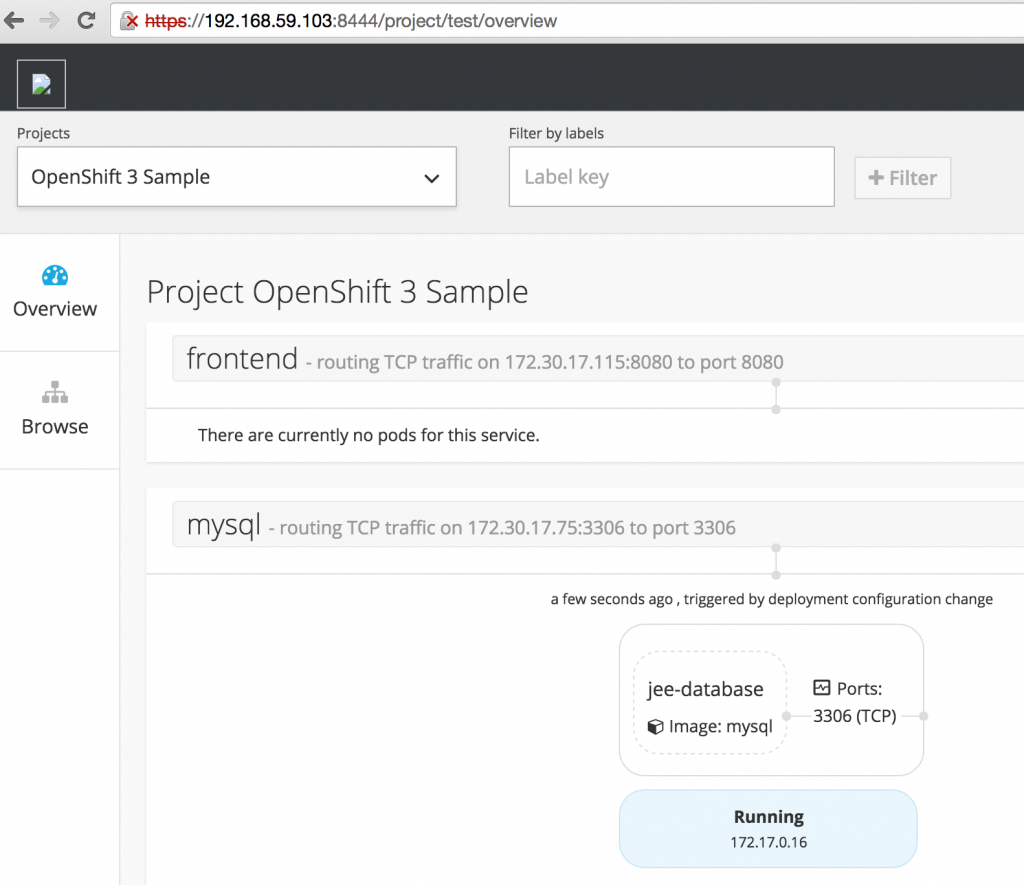
  3. Web Console automatically refreshes and shows:

    OpenShift v3 Java EE 7 Default Project

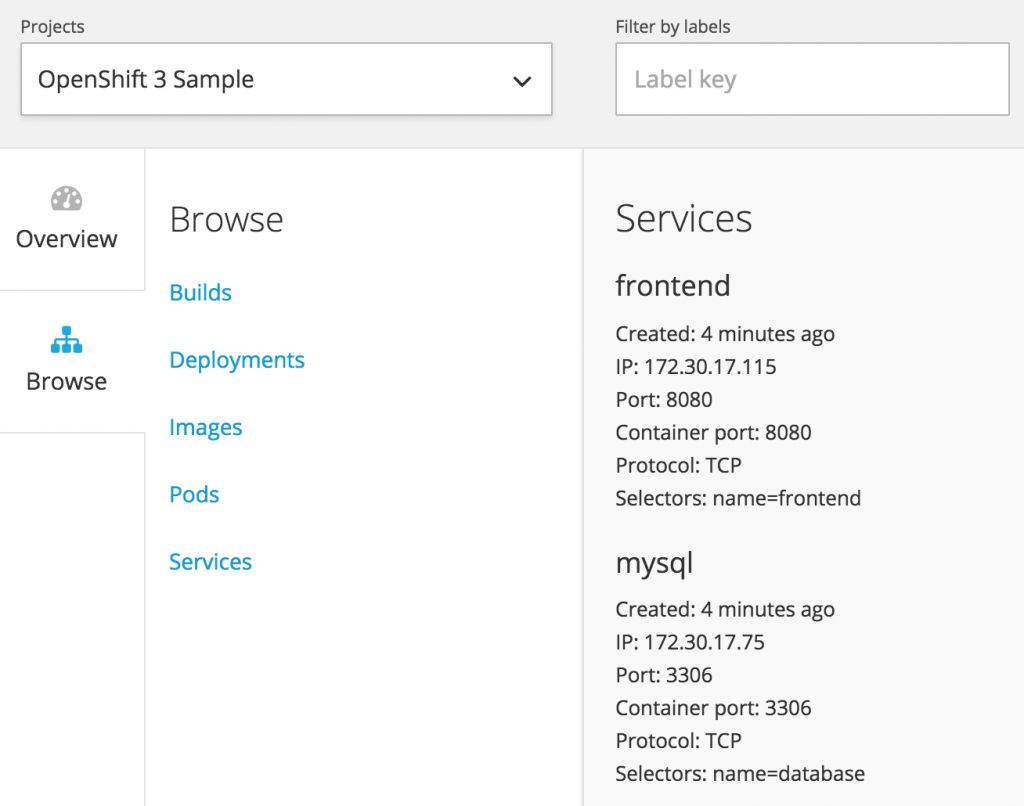
    The list of services running can be seen as:

    OpenShift v3 Java EE 7 Project Services

Build the Project

  1. Trigger an initial build of your project:

  2. Monitor the builds and wait for the status to go to “complete” (this can take a few minutes):

    You can add the –watch flag to wait for updates until the build completes:

    Wait for the STATUS column to show Complete. It will take a few minutes as all the components (WIldFly, MySQL, Java EE 7 application) are provisioned.  Effectively, their new Docker images are created and pushed to the local registry that was started earlier.

    Hit Ctrl+C to stop watching builds after the status changes to Complete.

  3. Complete log of the build can be seen as:

  4. Check for the application pods to start:

    Note, that the “frontend” and “database” pods are now running.

  5. Determine IP of the “frontend” service:

  6. Access the application at http://<IP address of “frontend”>:8080/movieplex7-1.0-SNAPSHOT should work. Note the IP address may (most likely will) vary. In this case, it would be http://172.30.17.115:8080/moviexplex7-1.0-SNAPSHOT.The app would not be accessible yet, as some further debugging is required to configure firewall on Mac when OpenShift v3 is used as Docker container. Until we figure that out, you can do docker ps in your boot2docker VM to see the list of all the containers:

    And then login to the container associated with frontend as:

    This will log in to the Docker container where you can check that the application is deployed successfully by giving the following command:

    This will print the index.html page from the application which has license at the top and rest of the page after that.

    Now once the firewall issue is resolved, this page will then be accessible on host Mac as well.

Lets summarize:

  • Cloned the OpenShift Origin and Java EE 7 sample repo
  • Started OpenShift v3 as Docker container
  • Loaded the OpenShift v3 Web Console
  • Create an OpenShift v3 project
  • Loaded Java EE 7 application template
  • Triggered a build, which deployed the application

Here are some troubleshooting tips if you get stuck.

Enjoy!

Continuous Integration, Delivery, Deployment and Maturity Model

Continuous Integration, Continuous Deployment, and Continuous Delivery are all related to each other, and feed into each other. Several articles have been written on these terms. This blog will attempt to explain these terms in an easy-to-understand manner.

What is Continuous Integration?

Continuous Integration (CI) is a software practice that require developers to commit their code to the main workspace, at least once, possibly several times a day. Its expected that the developers have run unit tests in their local environment before committing the source code. All developers in the team are following this methodology. The main workspace is checked out, typically after each commit, or possibly at a regular intervals, and then verified for any thing from build issues, integration testing, functional testing, performance, longevity, or any other sort of testing.

Continuous Integration

The level of testing that is performed in CI can completely vary but the key fundamentals are that multiple integrations from different developers are done through out the day. The biggest advantage of following this approach is that if there are any errors then they are identified early in the cycle, typically soon after the commit. Finding the bugs closer to commit does make them much more easier to fix. This is explained well by Martin Fowler:

Continuous Integrations doesn’t get rid of bugs, but it does make them dramatically easier to find and remove.

There are lots of tools that provide CI capabilities. Most common ones are Jenkins from CloudBees, Travis CI, Go from ThoughtWorks, and Bamboo from Atlassian.

What is Continuous Delivery?

Continuous Delivery is the next logical step of Continuous Integration. It means that every change to the system, i.e. every commit, can be released for production at the push of a button. This means that every commit made to the workspace is a release candidate for production. This release however is still a manual process and require an explicit push of a button. This manual step may be essential because of business concerns such as slowing the rate of software deployment.

Continuous Delivery

At certain times, you may even push the software to production-like environment to obtain feedback. This allows to get a fast and automated feedback on production-readiness of your software with each commit. A very high degree of automated testing is an essential part to enable Continuous Delivery.

Continuous Delivery is achieved by building Deployment Pipelines. This is best described in Continuous Delivery book by Jez Humble (@jezhumble).

A deployment pipeline is an automated implementation of your application’s build, deploy, test, and release process.

The actual implementation of the pipeline, tools used, and processes may differ but the fundamental concept of 100% automation is the key.

What is Continuous Deployment?

Continuous Deployment is often confused with Continuous Delivery. However it is the logical conclusion of Continuous Delivery where the release to production is completely automated. This means that every commit to the workspace is automatically released to production, and thus leading to several deployments of your software during a day.

Continuous Deployment

Continuous Delivery is a basic pre-requisite for Continuous Deployment.

Continuous Delivery Maturity Model

Maturity Models allow a team or organization to assess its methods and process against a clearly defined benchmark. As defined in Capability Maturity Model – The term “maturity” relates to the degree of formality and optimization of processes, from ad hoc practices, to formally defined steps, to managed result metrics, to active optimization of the processes.

The model explains different stages and helps teams to improve by moving from a lower stage to a higher one. Several Continuous Delivery Maturity Models are available, such as InfoQ, UrbanCode, ThoughtWorks, Bekk, and others.

Capability Maturity Model Integration (CMMI) is defined by Software Engineering Institute at Carnegie Mellon University.  CMMI-Dev particularly defines model that provides guidance for applying CMMI best practices in a development organization. It defines five maturity levels:

  • Initial
  • Managed
  • Defined
  • Quantitatively Managed
  • Optimizing

Each of these Continuous Delivery maturity models mentioned define their own maturity levels. For example, Base, Beginner, Intermediate, Advanced, Expert are used by InfoQ. Expert is changed to Extreme for UrbanCode. ThoughtWorks uses CMMI-Dev maturity levels but does not segregate them into different areas.

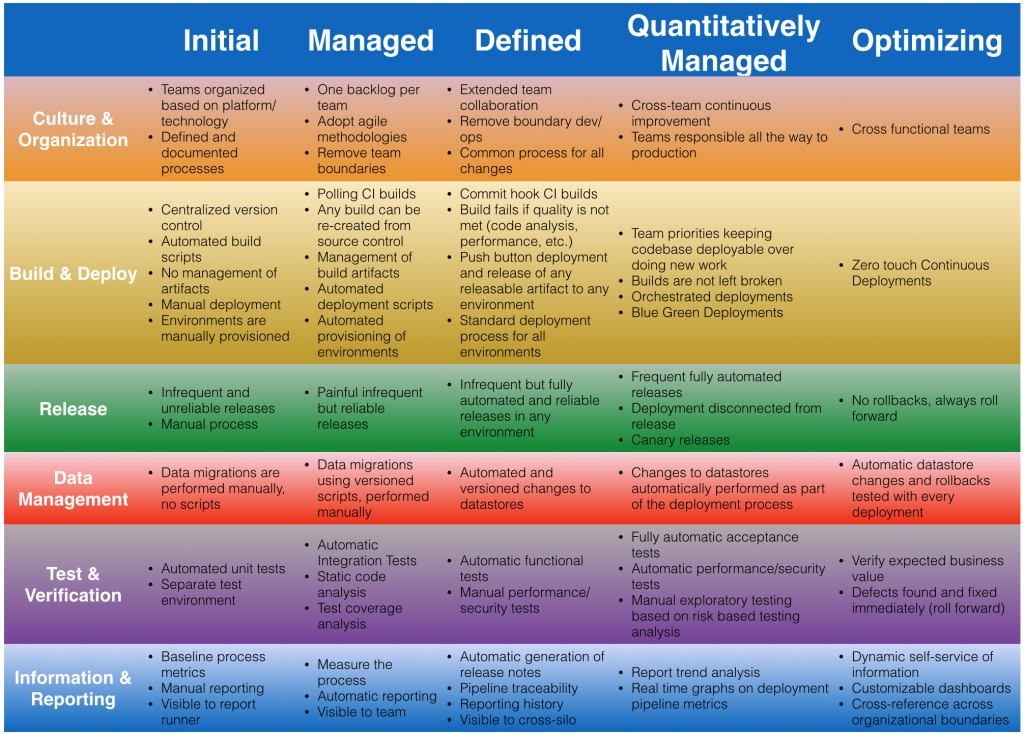
Here is another attempt to the maturity model that picks the best pieces from each of those.

Continuous Delivery Maturity Model v1.0

As a team/organization, you need to look at where do you fit in this maturity model. And once you’ve identified that, more importantly, figure how do you get to the next level. For example, if your team does not have any data management or migration strategy then you are at “Initial” level in “Data Migration”. Your goal would be to move from Initial -> Managed -> Defined -> Quantitatively Managed -> Optimizing. The progression from one level to the next is not necessarily sequential. But any changes in the organization is typically met with an inertia and so these incremental changes serve as guideline to improve.

Leave a comment on this blog to share your thoughts on the maturity model.

Create your own Docker image (Tech Tip #57)

Docker simplifies software delivery by making it easy to build and share images that contain your application’s entire environment, i.e. operating system, JDK, database, WAR file, specific tuning required for your application, etc.

There are three main components of Docker:

  • Docker images are “build component” – a read-only template of application operating system.
  • Containers are “run component” – a runtime representation created from images.
  • Registry are “distribution component” – a place to store and distribute images.

Several JBoss projects are available as Docker images at www.jboss.org/docker. Tech Tip #39 explained how to get started with Docker on Mac. It also explained how to start the official WildFly Docker image.

Docker image is made up of multiple layers where each layer provides some functionality, and a higher layer can add functionality on top of it. For example, Docker mounts the root filesystem as read-only layer and then adds a read-write layer on top of it. All these layers are combined together using Union Mount to provide application operating environment.

The complete history of how the WildFly image was built can be seen as:

The exact command issued at each layer is listed in this output. If you scroll to the far right then you can see the total space consumed by each layer as well. For example, Fedora is used as the base image and consumes ~574 MB of the total image, Open JDK 7 is taking 217.5 MB and WildFly is 135 MB.

Docker images are built by reading the instructions from Dockerfile. This is a text file that contains all the commands, in order, needed to build a given image. It adheres to a specific format and use a specific set of instructions. The vocabulary of commands is rather limited but serves the purpose well. The image can be built by giving the command docker build. Docker Tutorial provides complete instructions on how to create your own custom image.

The official WildFly Docker image is built using Fedora 20 as the base operating system. The Dockerfile can be seen at github.com/jboss-dockerfiles/wildfly/blob/master/Dockerfile. It uses  jboss/base-jdk:7 as the base image, which uses jboss/base as the base image. Dockerfile of jboss/base shows Fedora 20 is used as the base image.

An alternative is to build this image using CentOS or Ubuntu as a base image. Dockerfiles for these images are available at github.com/arun-gupta/docker-images/.

Starting boot2docker shows the output as:

And then you can build the CentOS-based WildFly Docker image as shown below. Note this command is given from the “wildfly-centos” directory of github.com/arun-gupta/docker-images/. And so the Dockerfile is at github.com/arun-gupta/docker-images/blob/master/wildfly-centos/Dockerfile.

The list of Docker images can now be seen as:

The total image size is 619.6 MB. The official WildFly Docker image can be installed as shown:

And the complete list of Docker images can again be seen as:

The image size in this case is 948.7 MB. A detailed understanding of this image is created was explained earlier in this blog.

Ubuntu-based WildFly image can be built and installed as shown below. Note this command is given from the “wildfly-ubuntu” directory of github.com/arun-gupta/docker-images/. And so the Dockerfile is at github.com/arun-gupta/docker-images/blob/master/wildfly-ubuntu/Dockerfile.

The list of Docker images can once again be seen as:

Docker image can run with docker run command. Some other related commands are:

  • docker ps: Lists containers
  • docker stop <id>: Stops the container with the given <id>

Run CentOS image as shown below. Specifying -i option will make it interactive and -t option allocates a pseudo-TTY. And port 8080 from the container is made accessible on port 80 of the container.

In a different shell, get the container’s IP address as:

And then access WildFly at http://192.168.59.103.

Similarly, running the WildFly Ubuntu image shows:

You can login to the host VM as shown:

Different layers of the image are stored in /var/lib/docker directory as shown:

VM image on Mac OSX is stored in ~/VirtualBox VMs/boot2docker-vm directory. This directory can grow up rather quickly if the intermediate containers are not removed. boot2docker-vm.vmdk on my machine is ~5GB for these different images.

You can reset it by running the following commands (WARNING: This will destroy all images you’ve downloaded and built so far):

Containers, as you can imagine, have a memory foot print.

More Docker goodness is coming in subsequent blogs!

Deployment Pipeline for Java EE 7 with WildFly, Arquillian, Jenkins, and OpenShift (Tech Tip #56)

Tech Tip #54 showed how to Arquillianate (Arquillianize ?) an existing Java EE project and run those tests in remote mode where WildFly is running on a known host and port. Tech Tip #55 showed how to run those tests when WildFly is running in OpenShift. Both of these tips used Maven profiles to separate the appropriate Arquillian dependencies in “pom.xml” and <container> configuration in “arquillian.xml” to define where WildFy is running and how to connect to it.

This tip will show how to configure Jenkins in OpenShift and invoke these tests from Jenkins. This will create deployment pipeline for Java EE.

Lets see it in action first!

Configuration required to connect from Jenkins on OpenShift to a WildFly instance on OpenShift is similar to that required for  connecting from local machine to WildFly on OpenShift. This configuration is specified in “arquillian.xml” and we can specify some parameters which can then be defined in Jenkins.

On a high level, here is what we’ll do:

  • Use the code created in Tech Tip #54 and #55 and add configuration for Arquillian/Jenkins/OpenShift
  • Enable Jenkins
  • Create a new WildFly Test instance
  • Configure Jenkins to run tests on the Test instance
  • Push the application to Production only if tests pass on Test instance

Lets get started!

  1. Remove the existing boilerplate source code, only the src directory, from the WildFly git repo created in Tech Tip #55.
  2. Set a new remote to javaee7-continuous-delivery repository: