Tag Archives: compose

Deploy Docker Compose Services to Swarm

Docker 1.13 introduced a new version of Docker Compose. The main feature of this release is that it allow services defined using Docker Compose files to be directly deployed to Docker Engine enabled with Swarm mode. This enables simplified deployment of multi-container application on multi-host.

Docker 1.13

This blog will show use a simple Docker Compose file to show how services are created and deployed in Docker 1.13.

Here is a Docker Compose v2 definition for starting a Couchbase database node:

This definition can be started on a Docker Engine without Swarm mode as:

This will start a single replica of the service define in the Compose file. This service can be scaled as:

If the ports are not exposed then this would work fine on a single host. If swarm mode is enabled on on Docker Engine, then it shows the message:

Docker Compose gives us multi-container applications but the applications are still restricted to a single host. And that is a single point of failure.

Swarm mode allows to create a cluster of Docker Engines. With 1.13, docker stack deploy command can be used to deploy a Compose file to Swarm mode.

Here is a Docker Compose v3 definition:

As you can see, the only change is the value of version attribute. There are other changes in Docker Compose v3. Also, read about different Docker Compose versions and how to upgrade from v2 to v3.

Enable swarm mode:

Other nodes can join this swarm cluster and this would easily allow to deploy the multi-container application to a multi-host as well.

Deploy the services defined in Compose file as:

A default value of Compose file here would make the command a bit shorter. #30352 should take care of that.

List of services running can be verified using docker service ls command:

The list of containers running within the service can be seen using docker service ps command:

In this case, a single container is running as part of the service. The node is listed as moby which is the default name of Docker Engine running using Docker for Mac.

The service can now be scaled as:

The list of container can then be seen again as:

Note that the containers are given the name using the format <service-name>_n. Both the containers are running on the same host.

Also note, the two containers are independent Couchbase nodes and are not configured in a cluster yet. This has already been explained at Couchbase Cluster using Docker and a refresh of the steps is coming soon.

A service will typically have multiple containers running spread across multiple hosts. Docker 1.13 introduces a new command docker service logs <service-name> to stream the log of service across all the containers on all hosts to your console. In our case, this can be seen using the command docker service logs couchbase_db and looks like:

The preamble of the log statement uses the format <container-name>.<container-id>@<host>. And then actual log message from your container shows up.

At first instance, attaching container id may seem redundant. But Docker services are self-healing. This means that if a container dies then the Docker Engine will start another container to ensure the specified number of replicas at a given time. This new container will have a new id. And thus it allows  to attach the log message from the right container.

So a quick comparison of commands:

 Docker Compose v2  Docker compose v3
 Start services docker-compose up -d docker stack deploy --compose-file=docker-compose.yml <stack-name> 
 Scale service docker-compose scale <service>=<replicas> docker service scale <service>=<replicas>
 Shutdown docker-compose down docker stack rm <stack-name>
 Multi-host No Yes

Want to get started with Couchbase? Look at Couchbase Starter Kits.

Want to learn more about running Couchbase in containers?

  • Couchbase on Containers
  • Couchbase Forums
  • Couchbase Developer Portal
  • @couchhasedev and @couchbase

Source: https://blog.couchbase.com/2017/deploy-docker-compose-services-swarm
Couchbase Cluster using Docker Compose

Couchbase 4.0 provides lots of features that allows you to develop with agility and operate at any scale. Some of the features that allow you to operate at any scale are:

  • Elastic Scalability
  • Consistent High Performance
  • Always-On Availability
  • Multi-Data Center Deployment
  • Simple and Powerful Administration
  • Enterprise-grade Security

Learn more about these enterprise features at couchbase.com/operate-at-any-scale.

A complete overview is available in Couchbase Server 4.0 datasheet.

This blog will explain how you can easily setup a 3-node Couchbase Cluster using Docker Compose.

Docker Couchbase Cluster

The source code and latest instructions are available at github.com/arun-gupta/docker-images/tree/master/couchbase-cluster.

Create Couchbase Nodes

Couchbase cluster can be easily created using the following Docker Compose file:

This file has service definition for three Couchbase nodes. Admin ports are exposed for only one node as other nodes will talk to each other use Docker-internally assigned IP addresses.

  1. Create three directories ~couchbase/node1, ~couchbase/node2, ~couchbase/node3 – one for each node.
  2. Start three Couchbase nodes as using the docker-compose.yml shown earlier:
    This command is given on a Docker Machine.
  3. Check status of the nodes:
    Docker Compose can also show the status:
  4. Check logs of the nodes:

Configure Couchbase Cluster

Lets configure these nodes to be part of a cluster now.

  1. Find IP address of the Docker Machine:
  2. Access Couchbase Admin Console at http://<DOCKER_MACHINE_IP:8091. This is http://192.168.99.104:8091 in our case. It will show the output as:

    Docker Couchbase Cluster Setup

    Click on “Setup”.

  3. Each container is given an internal IP address by Docker, and each of these IPs is visible to all other containers running on the same host. We need to use these internal IP address when adding a new node to the cluster.Find IP address of the first container:

    Use this IP address to change the Hostname field:

    Docker Couchbase Cluster Node 1

  4. Click on “Next”. Adjust the RAM if necessary. Read more about Couchbase Cluster Settings.
  5. Pick a sample bucket that you’d like to get installed, and click on Next.
  6. Change Per Node RAM Quota from 400 to 100. This is required as we’ll add other nodes later.Docker Couchbase Cluster Per Node RAM Quota
  7. Click on Next, accept T&C, and click on Next.
  8. Enter a password that you can remember as we’ll need this later to add more nodes.

Default view of the cluster looks like as shown:

Docker Couchbase Cluster Default View

Add More Couchbase Nodes

Now, lets add the other two nodes that were created earlier by Docker Compose.

  1. Click on “Server Nodes” to see the default view as:

    Docker Couchbase Cluster Server Nodes Default View

  2. Find IP address of one of the remaining nodes:

  3. Click on “Add Server”, specify the IP address:

    Docker Couchbase Cluster Add Server Node1
    and click on “Add Server”.

  4. Repeat the previous two steps with the server name couchbasecluster_couchbase2_1.

Couchbase Cluster Rebalance

A cluster needs to be rebalanced to ensured that the data is well distributed amongst the newly added or removed nodes. Read more about Couchbase Cluster Rebalance.

Clicking on “Pending Rebalance” tab shows the nodes that have been added to the cluster but are not rebalanced yet:

Docker Couchbase Cluster Pending Rebalance

Click on “Rebalance” and this will automatically rebalance the cluster:

Docker Couchbase Cluster Rebalanced

You just deployed a Couchbase cluster using Docker Compose, enjoy!

Some more references:

  • Couchbase 4 Administration Guide
  • Couchbase 4 Server Architecture
  • Couchbase 4 Cluster Setup

Docker 1.7.0, Docker Machine 0.3.0, Docker Compose 1.3.0, Docker Swarm 0.3.0

Docker 1.7.0 is released (change log) and so time to update Docker Hosts, CLI, and other tools.

Docker 1.7.0

Docker Host is running inside a Docker Machine and so the machine needs to be upgraded. The machine must be stopped otherwise you get an error as:

So start the machine as:

And then upgrade the machine as:

The machine is anyway stopped to perform an upgrade, and so the need to start the machine seems superfluous (#1399).

Upgrading the host updates .docker/machine/cache/boot2docker.iso. Any previously created machines cache the boot2docker.iso in .docker/machine/machines/<MACHINE-NAME> and so they’ll continue to boot using the same version.

Docker CLI

Update the Docker CLI as:

Now docker version shows the following output:

Note, the client API version (1.7.0) and the server API version (1.7.0) are both shown here.

If you update only the CLI and not the Docker Host, then the following error message is shown:

This error messages shows a version mismatch between the client CLI and the Docker Host running in the machine. The will typically happen if the active machine was created a few days ago using an older boot2docker.iso. There seems to be no way straight forward way to find out the exact version currently being used (#1398).

There seems to be no way for a new client to talk to the old server (#14077), and thus the host needs to be upgraded. There is a proposal to override the API version of client (#11486), but at this time there is no ETA for the fix. So the only option is to upgrade the docker machine, which will then then upgrade to the latest version of Docker.

So upgrading the CLI requires to upgrade the machine as well.

Here are the options supported by Docker CLI :

Docker Machine 0.3.0

This was rather straight forward:

There are a lots of new features, including an experimental provisioner for Red Hat Enterprise Linux 7.0.

The version is shown as:

Complete list of commands are:

Docker Compose 1.3.0

Docker Compose can be updated to 1.3.0 as:

The version is shown as:

Two important points to note:

  • At least Docker 1.6.0 is required
  • There are breaking changes from Compose 1.2 and so you either need to remove and recreate your containers, or migrate them.Fortunately docker-compose migrate-to-labels can be used to migrate pre-Compose 1.3.0 containers to the latest format. This will recreate the containers with labels added.

Learn more in Docker Compose to Orchestrate Containers.

Docker Swarm 0.3.0

As of this blog, Docker Swarm 0.3.0 RC3 is available. Clustering Using Docker Swarm provide a good introduction to Docker Swarm and can be used to get started with the latest Docker Swarm release.

34 issues have been fixed since 0.2.0 but the commit notifications since 0.2.0 for Release Candidates seem to show no significant changes.

More detailed blogs on each Docker component will be shared in subsequent blogs.

Enjoy!

9 Docker recipes for Java EE Applications – Tech Tip #80

Cross-posted from www.voxxed.com/blog/2015/03/9-docker-recipes-for-java-ee-applications/

So, you’d like to start using Docker for Java EE applications?

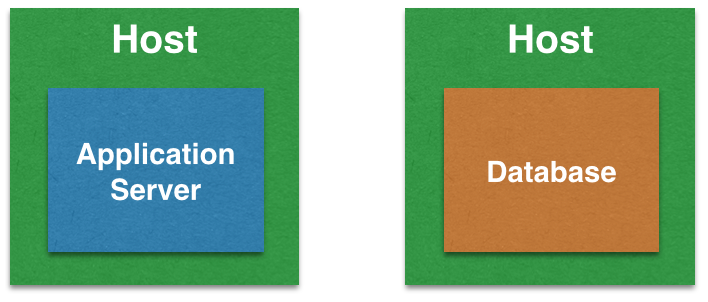
A typical Java EE application consists of an application server, such as WildFly, and a database, such as MySQL. In addition, you might have a separate front-end tier, say Apache, for load balancing a number of application server. A caching layer, such as Infinispan, may be used to improve overall application performance. Messaging system, such as ActiveMQ, may be used for processing queues. Both the caching and messaging components could be setup as a cluster for further scalability.

This Tech Tip will show some simple Docker recipes to configure your containers that use application server and database. Subsequent blog will cover more advanced recipes that will include front-end, caching, messaging, and clustering.

Lets get started!

Docker Recipe #1: Setup Docker using Docker Machine

If Docker is not already setup on your machine, then as a first step, you need to set it up. If you are on a recent version of Linux then you already have Docker. Or optionally can be installed as:

On Mac and Windows, this means installing boot2docker which is a Tinycore Linux VM and comes with Docker host. Then you need to configure ssh keys and certificates.

Fortunately, this is extremely simplified using Docker Machine. It takes you from zero-to-Docker on a host with a single command. This host could be your laptop, in the cloud, or in your data center. It creates servers, installs Docker on them, then configures the Docker client to talk to them.

This recipe is explained in detail in Docker Machine to Setup Docker Host.

Docker Recipe #2: Application Server + In-memory Database

One of the cool features of Java EE 7 is the default database resource. This allows you to not worry about creating a JDBC resource in an application server-specific before your application is accessible. Any Java EE 7 compliant application server will map the default JDBC resource name (java:comp/DefaultDataSource) to the application server-specific resource in the bundled database server.

For example, WildFly comes bundled with H2 in-memory database. This database is ready to be used as soon as WildFly is ready to accept your requests. This simplifies your development efforts and allows you to do a rapid prototyping. The default JDBC resource is mapped to
java:jboss/datasources/ExampleDS which is then mapped to the JDBC URL of jdbc:h2:mem:test;DB_CLOSE_DELAY=-1;DB_CLOSE_ON_EXIT=FALSE.

In such a case, the Database server is another application running inside the Application server.

Docker Recipe for Java EE Application #1

Here is the command that runs Java EE 7 application in WildFly:

If you want to run a typical Java EE 7 application using WildFly and H2 in-memory database, then this Docker recipe is explained in detail in Java EE 7 Hands-on Lab on WildFly and Docker.

Docker Recipe #3: Two Containers on Same Host Using Linking

The previous recipe gets you started rather quickly but becomes a bottleneck soon as the database is only in-memory. This means that any changes made to your schema and data are lost after the application server shuts down. In this case, you need to use a database server that resides outside the application server. For example, MySQL as the database server and WildFly as the application server.

To keep things simple, both the database server and application server can run on the same host.

Docker Recipe for Java EE Application #2

Docker Container Links are used to link the two containers. Creating a link between two containers creates a conduit between a source container and a target container and securely transfer information about source container to target container. In our case, target container (WildFly) can see information about source container (MySQL). The important part to understand here is that none of this information needs to be publicly exposed by the source container, and is only made available to the target container.

Here are the commands that start the MySQL and WildFly containers and link them:

WildFly and MySQL linked on two Docker containers explains how to set up this recipe.

Docker Recipe #4: Two Containers on Same Host Using Fig

The previous recipe require you to run the containers in a specific order. Running multi-container applications can quickly become challenging if each tier of your application is sitting in a container. Fig (deprecated in favor of Docker Compose) is a Docker Orchestration Tool that:

  • Define multiple containers in a single configuration file
  • Create dependencies between two containers by creating links between them
  • Start containers in the right sequence

Docker Recipe for Java EE Application #3

The entry point for Fig is a configuration file as shown:

and all the containers can be started as:

Docker orchestration using Fig explains this recipe in detail.

Fig is only receiving updates. Its code base is used as basis for Docker Compose. This is explained in the next recipe.

Docker Recipe #5: Two Containers on Same Host Using Compose

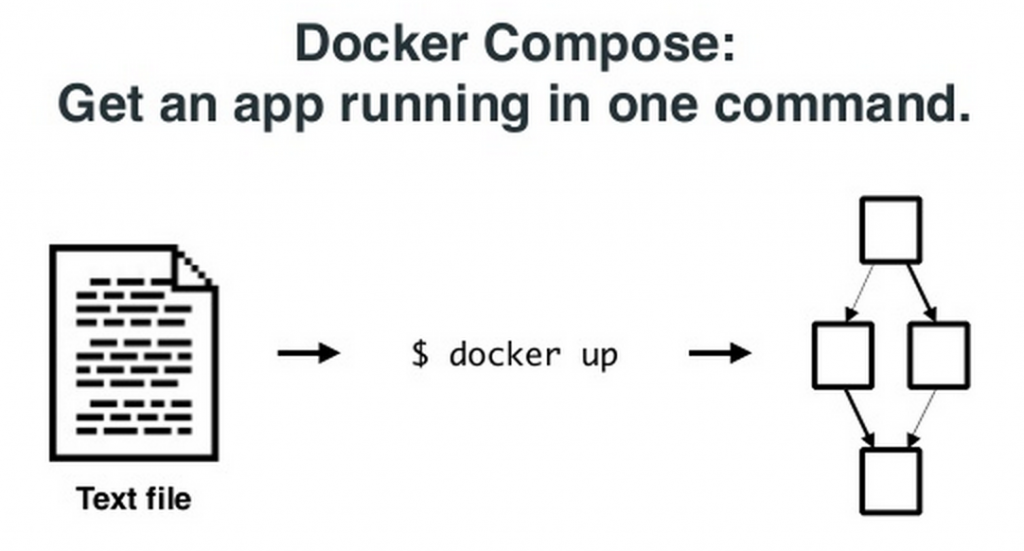
Docker Compose is a tool for defining and running complex applications with Docker. With Compose, you define a multi-container application in a single file, then spin your application up in a single command which does everything that needs to be done to get it running.

The application configuration file is the same format as from Fig. The containers can be started as:

This recipe is explained in detail in Docker Compose to Orchestrate Containers.

Docker Recipe #6: Two Containers on Different Hosts using IP Address

In the previous recipe, the two containers are running on the same host. These two could easily communicate using Docker linking. But simple container linking does not allow cross-host communication.

Running containers on the same host means you cannot scale each tier, database or application server, independently. This is where you need to run each container on a separate host.

Docker Recipe for Java EE Application #4

MySQL container can start as:

JDBC resource can be created as:

And WildFly container can start as:

Complete details for this recipe is explained in Docker container linking across multiple hosts.

Docker Recipe #7: Two Containers on Different Hosts using Docker Swarm

Docker Machine

Docker Swarm is native clustering for Docker. It turns a pool of Docker hosts into a single, virtual host. It picks-up where Docker Machine leaves off by optimizing host resource utilization and providing failover services.  Specifically, Docker Swarm allows users to create resource pools of hosts running Docker daemons and then schedule Docker containers to run on top, automatically managing workload placement and maintaining cluster state.

More details about this recipe are coming in a subsequent blog.

Docker Recipe #8: Deploy Java EE Application from Eclipse

Last recipe will deal with how to deploy your existing applications to a Docker container.

Lets say you are using JBoss Tools as your development environment and WildFly as your application server.

eclipse-logo JBoss Tools Logo

There are a couple of ways by which these applications can be deployed:

  • Use Docker volumes + Local deployment:  Here a directory on your local machine is mounted as a Docker Volume. WildFly Docker container is started by mapping that directory to the deployment directory as:
    Configure JBoss Tools to deploy WAR files to this directory.
  • Use WildFly management API + Remote deployment: Start WildFly Docker container, and additionally expose the management port 9990 as:
    Configure JBoss Tools to use a remote WildFly server and deploy using management APIs.

This recipe is explained in detail at Deploy to WildFly and Docker from Eclipse.

Docker Recipe #9: Test Java EE Applications using Arquillian Cube

Arquillian Cube allows you to control the lifecycle of Docker images as part of the test lifecyle, either automatically or manually. Cube uses Docker REST API to talk to the container. It uses the remote adapter API, for example WildFly in this case, to talk to the application server. Docker configuration is specified as part of the maven-surefire-plugin as:

Complete details about this recipe are available on Run Java EE Tests on Docker using Arquillian Cube.

What other recipes are you using to deploy your Java EE applications using Docker?

Enjoy!

Docker Compose to Orchestrate Containers – Tech Tip #77

Docker Orchestration using Fig showed how to defining and control a multi-container service using Fig. Since then, Fig has been renamed to Docker Compose, or Compose for short.

First release of Compose was announced recently

From github.com/docker/compose

Compose is a tool for defining and running complex applications with Docker. With Compose, you define a multi-container application in a single file, then spin your application up in a single command which does everything that needs to be done to get it running.

Docker Compose uses the same API used by other Docker commands and tools.

Docker Compose

This Tech Tip will rewrite Docker Orchestration using Fig blog to use Docker Compose. In other words, it will show how to run a Java EE 7 application that is deployed using MySQL and WildFly.

Lets get started!

Install Docker Compose

Install Compose as:

Docker Compose Configuration File

Entry point to Compose is docker-compose.yml. To begin with, docker-compose tool also recognizes fig.yml file name but shows the following message:

And if both fig.yml and docker-compose.yml are available in the directory then the following message is shown:

Use the same configuration file from the previous blog and rename to docker-compose.yml:

This YML-based configuration file has:

  1. Two containers defined by the name “mysqldb” and “mywildfly”
  2. Image names are defined using “image”
  3. Environment variables for the MySQL container are defined in “environment”
  4. MySQL container is linked with WildFly container using “links”
  5. Port forwarding is achieved using “ports”

Start, Verify, Stop Docker Containers

  1. All the containers can be started, in detached mode, by giving the command:
    And that shows the output as:
  2. Verify the containers as:
  3. Logs for the containers can be seen as:
    And shows the output as:
  4. Find the IP address of the host as:
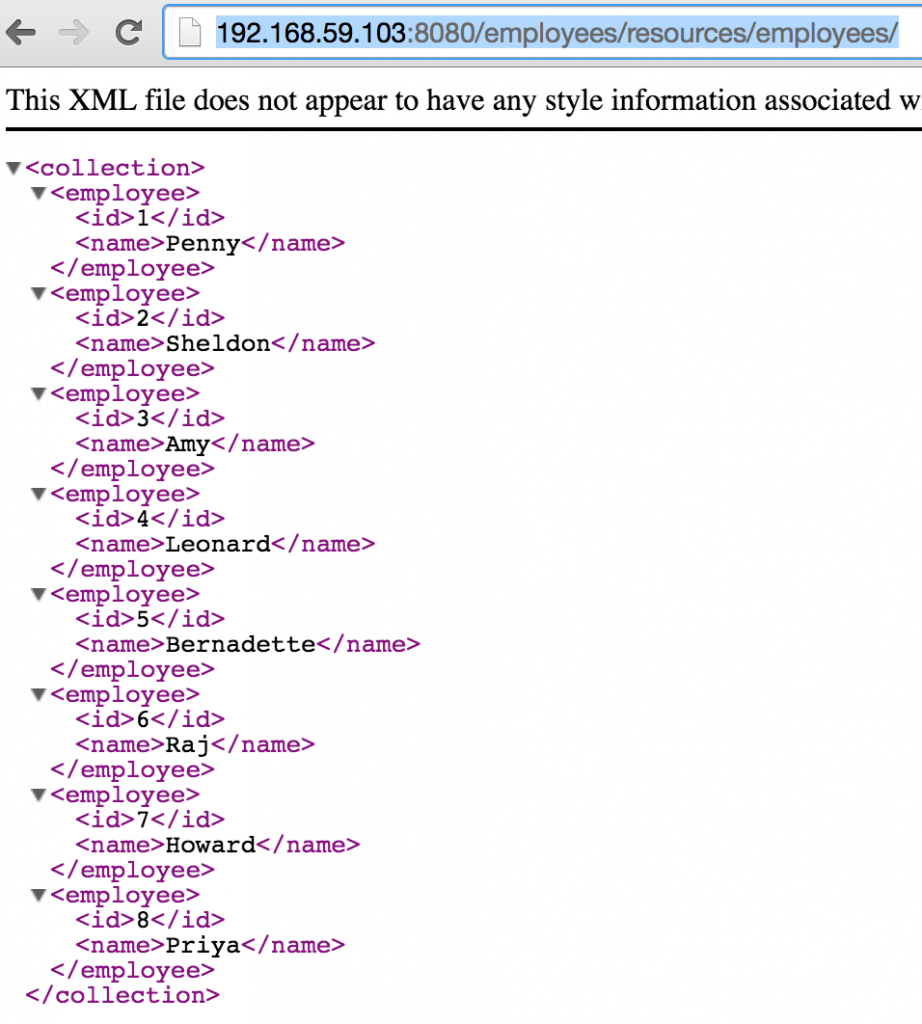
    And access the application as:
    To see the output as:
    Or in the browser as:

    Docker Compose Output

  5. Stop the containers as:

    to see the output as:

Docker Compose Commands

Complete list of Docker Compose commands can be seen by typing docker-compose and shows the output as:

A subsequent blog will likely play with scale command.

Help for each command is shown by typing -h after the command name. For example, help for run command is shown as:

Enjoy!