Miles to go …

November 18, 2010

TOTD #150: Collection of GlassFish, NetBeans, JPA, JSF, JAX-WS, EJB, Jersey, MySQL, Rails, Eclipse, and OSGi tips

This is the 150th tip published on this blog so decided to make it a collection of all the previous ones. Here is a tag cloud (created from wordle.net/create) from title of all the tips:

As expected GlassFish is the most prominent topic. And then there are several entries on NetBeans, JRuby/Rails, several Java EE 6 technologies like JPA, JAX-WS, JAX-RS, EJB, and JSF, and more entries on Eclipse, OSGi and some other tecnhologies too. Here is a complete collection of all the tips published so far:

  • #149: How to clean IntelliJ cache, preferences, etc on Mac OS X ?
  • #148: JPA2 Metamodel Classes in NetBeans 7.0 – Writing type-safe Criteria API
  • #147: Java Server Faces 2.0 Composite Components using NetBeans – DRY your code
  • #146: Understanding the EJB 3.1 Timer service in Java EE 6 – Programmatic, Deployment Descriptor, @Schedule
  • #145: CDI Events – a light-weight producer/consumer in Java EE 6
  • #144: CDI @Produces for container-managed @Resource
  • #143: Retrieve Twitter user timeline using using Jersey and OAuth
  • #142: GlassFish 3.1 – SSH Provisioning and Start/Stop instance/cluster on local/remote machines
  • #141: Running GlassFish 3.1 on Ubuntu 10.04 AMI on Amazon EC2
  • #140: Moving GlassFish Installation – Referenced file does not exist "osgi-main.jar"
  • #139: Asynchronous Request Processing using Servlets 3.0 and Java EE 6
  • #138: GlassFish 3.1 Milestone 1 – Clustering and Application Versioning Demos
  • #137: Asynchronous EJB, a light-weight JMS solution – Feature-rich Java EE 6
  • #136: Default Error Page using Servlets 3.0 – Improved productivity using Java EE 6
  • #135: JSF2 Composite Components using NetBeans IDE – lightweight Java EE 6
  • #134: Interceptors 1.1 in Java EE 6 – What and How ?
  • #133: JPA2 (JPQL & Criteria), JavaDB, and embedded GlassFish – perfect recipe for testing
  • #132: Servlets 3.0 in Embedded GlassFish Reloaded – lightweight Java EE 6
  • #131: Dynamic OSGi services in GlassFish – Using ServiceTracker
  • #130: Invoking a OSGi service from a JAX-WS Endpoint – OSGi and Enterprise Java
  • #129: Managed Beans 1.0 in Java EE 6 – What and How ?
  • #128: EJBContainer.createEJBContainer: Embedded EJB using GlassFish v3
  • #127: Embedding GlassFish in an existing OSGi runtime – Eclipse Equinox
  • #126: Creating an OSGi bundles using Eclipse and deploying in GlassFish
  • #125: Creating an OSGi bundles using NetBeans and deploying in GlassFish
  • #124: OSGi Declarative Services in GlassFish – Accessed from a Java EE client
  • #124: Using CDI + JPA with JAX-RS and JAX-WS
  • #123: f:ajax, Bean Validation for JSF, CDI for JSF and JPA 2.0 Criteria API – all in one Java EE 6 sample application
  • #122: Creating a JPA Persistence Unit using NetBeans 6.8
  • #121: JDBC resource for MySQL and Oracle sample database in GlassFish v3
  • #120: Deployment Descriptor-free Java EE 6 application using JSF 2.0 + EJB 3.1 + Servlets 3.0
  • #119: Telnet to GlassFish v3 with NetBeans 6.8 – "Could not open connection to the host"
  • #118: Managing OSGi bundles in GlassFish v3 – asadmin, filesystem, telnet console, web browser, REST, osgish
  • #117: Invoke a JAX-WS Web service from a Rails app deployed in GlassFish
  • #116: GlassFish v3 Administration using JavaFX front-end – JNLP available
  • #115: GlassFish in Eclipse – Integrated Bundle, Install Stand-alone or Update Existing plugin
  • #114: How to enable Java Console in Mac OS X, Windows, … ?
  • #113: JavaFX front-end for GlassFish v3 Administration – Using REST interface
  • #112: Exposing Oracle database tables as RESTful entities using JAX-RS, GlassFish, and NetBeans
  • #111: Rails Scaffold for a pre-existing table using Oracle and GlassFish
  • #110: JRuby on Rails application using Oracle on GlassFish
  • #109: How to convert a JSF managed bean to JSR 299 bean (Web Beans) ?
  • #108: Java EE 6 web application (JSF 2.0 + JPA 2.0 + EJB 3.1) using Oracle, NetBeans, and GlassFish
  • #107: Connect to Oracle database using NetBeans
  • #106: How to install Oracle Database 10g on Mac OS X (Intel) ?
  • TOTD #105: GlassFish v3 Monitoring – How to monitor a Rails app using asadmin, JavaScript, jConsole, REST ?
  • #104: Popular Ruby-on-Rails applications on GlassFish v3 – Redmine, Typo, Substruct
  • #103: GlassFish v3 with different OSGi runtimes – Felix, Equinox, and Knoplerfish
  • #102: Java EE 6 (Servlet 3.0 and EJB 3.1) wizards in Eclipse
  • #101: Applying Servlet 3.0/Java EE 6 “web-fragment.xml” to Lift – Deploy on GlassFish v3
  • #100: Getting Started with Scala Lift on GlassFish v3
  • #99: Creating a Java EE 6 application using MySQL, JPA 2.0 and Servlet 3.0 with GlassFish Tools Bundle for Eclipse
  • #98: Create a Metro JAX-WS Web service using GlassFish Tools Bundle for Eclipse
  • #97: GlassFish Plugin with Eclipse 3.5
  • #96: GlassFish v3 REST Interface to Monitoring and Management – JSON, XML, and HTML representations
  • #95: EJB 3.1 + Java Server Faces 2.0 + JPA 2.0 web application – Getting Started with Java EE 6 using NetBeans 6.8 M1 & GlassFish v3
  • #94: A simple Java Server Faces 2.0 + JPA 2.0 application – Getting Started with Java EE 6 using NetBeans 6.8 M1 & GlassFish v3
  • #93: Getting Started with Java EE 6 using NetBeans 6.8 M1 & GlassFish v3 – A simple Servlet 3.0 + JPA 2.0 app
  • #92: Session Failover for Rails applications running on GlassFish
  • #91: Applying Java EE 6 "web-fragment.xml" to Apache Wicket – Deploy on GlassFish v3
  • #90: Migrating from Wicket 1.3.x to 1.4 – "Couldn’t load DiskPageStore index from file" error
  • #89: How to add pagination to an Apache Wicket application
  • #88: How add pagination to Rails – will_paginate
  • #87: How to fix the error undefined method `new’ for "Rack::Lock":String caused by Warbler/JRuby-Rack ?
  • #86: Getting Started with Apache Wicket on GlassFish
  • #85: Getting Started with Django Applications on GlassFish v3
  • #84: Using Apache + mod_proxy_balancer to load balance Ruby-on-Rails running on GlassFish
  • #83: Eclipse Tools Bundle for GlassFish 1.0 – Now Available!
  • #82: Getting Started with Servlet 3.0 and EJB 3.1 in Java EE 6 using NetBeans 6.7
  • #81: How to use nginx to load balance a cluster of GlassFish Gem ?
  • #80: Sinatra CRUD application using Haml templates with JRuby and GlassFish Gem
  • #79: Getting Started with Sinatra applications on JRuby and GlassFish Gem
  • #78: GlassFish, EclipseLink, and MySQL efficient pagination using LIMIT
  • #77: Running Seam examples with GlassFish
  • #76: JRuby 1.2, Rails 2.3, GlassFish Gem 0.9.3, ActiveRecord JDBC Adapter 0.9.1 – can they work together ?
  • #75: Getting Started with Grails using GlassFish v3 Embedded
  • #74: JRuby and GlassFish Integration Test #5: JRuby 1.2.0 RC2 + Rails 2.x.x + GlassFish + Redmine
  • #73: JRuby and GlassFish Integration Test #4: JRuby 1.2.0 RC2 + Rails 2.2.x + GlassFish v2 + Warbler
  • #72: JRuby and GlassFish Integration Test #3: JRuby 1.2.0 RC2 + Rails 2.2.x + GlassFish v3
  • #71: JRuby and GlassFish Integration Test #2: JRuby 1.2.0 RC1 + Rails 2.2.x + GlassFish v3 Prelude
  • #70: JRuby and GlassFish Integration Test# 1: JRuby 1.2.0 RC1 + Rails 2.2.x + GlassFish Gem
  • #69: GlassFish High Availability/Clustering using Sun Web Server + Load Balancer Plugin on Windows Vista
  • #68: Installing Zones in Open Solaris 2008/11 on Virtual Box
  • #67: How to front-end a GlassFish Cluster with Apache + mod_jk on Mac OSX Leopard ?
  • #66: GlassFish Eclipse Plugin 1.0.16 – Install v3 Prelude from the IDE
  • #65: Windows 7 Beta 1 Build 7000 on Virtual Box: NetBeans + Rails + GlassFish + MySQL
  • #64: OpenSolaris 2008/11 using Virtual Box
  • #63: jmx4r gem – How to manage/monitor your Rails/Merb applications on JRuby/GlassFish ?
  • #62: How to remotely manage/monitor your Rails/Merb applications on JRuby/GlassFish using JMX API ?
  • #61: How to locally manage/monitor your Rails/Merb applications on JRuby/GlassFish using JMX ?
  • #60: Configure MySQL 6.0.x-alpha to NetBeans 6.5
  • #59: How to add Twitter feeds to blogs.sun.com ? + Other Twitter Tools
  • #58: Jersey and GlassFish – how to process POST requests ?
  • #57: Jersey Client API – simple and easy to use
  • #56: Simple RESTful Web service using Jersey and Embeddable GlassFish – Text and JSON output
  • #55: How to build GlassFish v3 Gem ?
  • #54: Java Server Faces with Eclipse IDE
  • #53: Scaffold in Merb using JRuby/GlassFish
  • #52: Getting Started with Merb using GlassFish Gem
  • #51: Embedding Google Maps in Java Server Faces using GMaps4JSF
  • #50: Mojarra 2.0 EDR2 is now available – Try them with GlassFish v3 and NetBeans 6.5
  • #49: Converting a JSF 1.2 application to JSF 2.0 – @ManagedBean
  • #48: Converting a JSF 1.2 application to JSF 2.0 – Facelets and Ajax
  • #47: Getting Started with Mojarra 2.0 nightly on GlassFish v2
  • #46: Facelets with Java Server Faces 1.2
  • #45: Ajaxifying Java Server Faces using JSF Extensions
  • #44: JDBC Connection Pooling for Rails on GlassFish v3
  • #43: GlassFish v3 Build Flavors
  • #42: Hello JavaServer Faces World with NetBeans and GlassFish
  • #41: How I created transparent logo of GlassFish using Gimp ?
  • #40: jQuery Autcomplete widget with MySQL, GlassFish, NetBeans
  • #39: Prototype/Script.aculo.us Autcomplete widget with MySQL, GlassFish, NetBeans
  • #38: Creating a MySQL Persistence Unit using NetBeans IDE
  • #37: SQLite3 with Ruby-on-Rails on GlassFish Gem
  • #36: Writing First Test for a Rails Application
  • #35: Rails Database Connection on Solaris
  • #34: Using Felix Shell with GlassFish
  • #33: Building GlassFish v3 Workspace
  • #32: Rails Deployment on GlassFish v3 from NetBeans IDE
  • #31: CRUD Application using Grails – Hosted on GlassFish and MySQL
  • #30: CRUD Application using Grails – Hosted on Jetty and HSQLDB
  • #29: Enabling "Available Plugins" tab in NetBeans IDE
  • #28: Getting Started with Rails 2.0 Scaffold
  • #27: Configurable Multiple Ruby Platforms in NetBeans 6.1 M1
  • #26: Overriding Database Defaults in Rails 2.0.2
  • #25: Rails application with PostgreSQL database using NetBeans
  • #24: Getting Started with Rails 2.0.x in JRuby 1.0.3 and JRuby 1.1RC1
  • #23: JavaFX Client invoking a Metro endpoint
  • #22: Java SE client for a Metro endpoint
  • #21: Metro 1.1 with GlassFish v2 UR1 and NetBeans 6
  • #20: How to create a new jMaki widget ?
  • #19: How to Add Metro Quality-of-Service to Contract-First Endpoint ?
  • #18: How to Build The GlassFish v3 Gem for JRuby ?
  • #17: Backing Up your Blog Posts on Roller
  • #16: Optimizing Metro Stubs by locally packaging the WSDL
  • #15: Delete/Update Row from Database using jMaki Data Table
  • #14: How to generate JRuby-on-Rails Controller on Windows (#9893)
  • #13: Setup Mongrel for JRuby-on-Rails applications on Windows
  • #12: Invoking a Java EE 5 Web service endpoint from JRuby
  • #11: Setup Mongrel cluster for JRuby-on-Rails applications on Unix
  • #10: Consuming JSON and XML representations generated by a Jersey endpoint in a jMaki Table widget
  • #9: Using JDBC connection pool/JNDI name from GlassFish in Rails Application
  • #8: Generating JSON using JAXB annotations in Jersey
  • #7: Switch between JRuby and CRuby interpreter in NetBeans 6
  • #6: Difference between Ruby Gem and Rails Plugin
  • #5: Loading data from beans in jMaki widgets
  • #4: How to convert a Session EJB to a Web service ?
  • #3: Using JavaDB with JRuby on Rails
  • #2: Change the endpoint address on a pre-generated Web services Stub
  • #1: SOAP Messaging Logging in Metro

Just for fun, here is another tag cloud:

You can access all the tips here. And keep those suggestions coming!

Technorati: totd glassfish netbeans jpa jsf jaxws jersey mysql rails osgi eclipse
Share and Enjoy:
  • Print
  • Digg
  • Sphinn
  • del.icio.us
  • Facebook
  • Google Bookmarks
  • DZone
  • StumbleUpon
  • Technorati
  • Twitter
  • Slashdot

October 28, 2010

TOTD #147: Java Server Faces 2.0 Composite Components using NetBeans – DRY your code

Filed under: frameworks, glassfish, javaee, javaserverfaces, netbeans — arungupta @ 12:03 pm

The Java Server Faces 2.0 uses Facelets instead of JSP as the view declaration language. This allows "view" part of MVC to be completely written using XHTML and CSS only and all the business logic resides in the backing bean. This enables a cleaner separation of views with model and controller and thus follows the MVC design pattern in a more intuitive way. JSF 2 also defines how resources can be packaged, located, and rendered by JSF runtime within a web application.

Using these two features of Facelets and Resource Handling, JSF2 defines a composite component as a component that consists of one or more JSF components defined in a Facelet markup file that resides inside of a resource library. The composite component is defined in the defining page and used in the using page. The "defining page" defines the metadata (or parameters) using <cc:interface> and implementation using <cc:implementation> where "cc" is the prefix for "http://java.sun.com/jsf/composite" namespace. Future versions of the JSF 2 specification may relax the requirement to specify metadata as it can be derived from the implementation itself.

A composite component can be defined using JSF 1.2 as well but it requires a much deeper understanding of JSF lifecycle and also authoring multiple files. JSF2 really simplifies the authoring of composite components using just an XHTML file.

Code is king! This Tip Of The Day (TOTD) will explain how to convert an existing code fragment into a JSF2 composite component using NetBeans IDE.

Lets say a Facelet (index.xhtml) has the following code fragment:

<h:form>
    <h:panelGrid columns="3">
    <h:outputText value="Name:" />
    <h:inputText value="#{user.name}" id="name"/>
    <h:message for="name" style="color: red" />
    <h:outputText value="Password:" />
    <h:inputText value="#{user.password}" id="password"/>
    <h:message for="password" style="color: red" />
  </h:panelGrid>

  <h:commandButton actionListener="#{userService.register}"
                   id="loginButton" action="status" value="submit"/>
</h:form>

This fragment displays an HTML form with two text input boxes and a "submit" button. The two input boxes are bound to "user" bean and clicking on the button invokes "register" method of the "userService" bean.

Instead of repeating this code in multiple pages, its beneficial to convert this into a composite component and use the resulting tag instead of the complete fragment again. Why ?

  • Follows the DRY principle and allows to keep the code, that can be potentially be repeated at multiple places, in a single file.
  • It allows developers to author new components without any Java code or XML configuration.

How do you convert an existing code fragment to a composite component ? NetBeans makes it really easy.

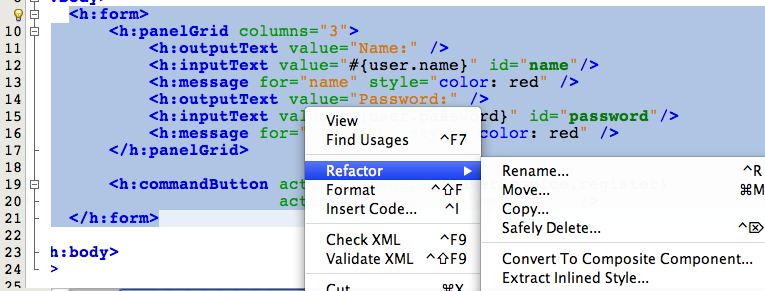
In NetBeans IDE select the code fragment, right-click, "Refactor", "Convert to Composite Component…" as shown below:

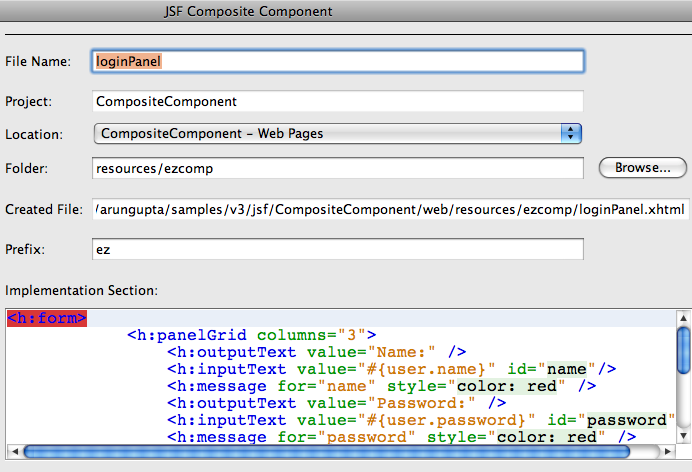
In the next screen, change the filename to "loginPanel" and take every thing else as default as shown below:

and click on "Finish".

This will generate "web/resources/ezcomp/loginPanel.xhtml" and move the component definition to this file, aka "defining page" and looks like:

<?xml version='1.0' encoding='UTF-8' ?>
<!DOCTYPE html PUBLIC "-//W3C//DTD XHTML 1.0 Transitional//EN"
   "http://www.w3.org/TR/xhtml1/DTD/xhtml1-transitional.dtd">
<html xmlns="http://www.w3.org/1999/xhtml"
      xmlns:cc="http://java.sun.com/jsf/composite"
      xmlns:h="http://java.sun.com/jsf/html">

 <!-- INTERFACE -->
 <cc:interface>
 </cc:interface>

 <!-- IMPLEMENTATION -->
 <cc:implementation>
   <h:form>
     <h:panelGrid columns="3">
       <h:outputText value="Name:" />
       <h:inputText value="#{user.name}" id="name"/>
       <h:message for="name" style="color: red" />
       <h:outputText value="Password:" />
       <h:inputText value="#{user.password}" id="password"/>
       <h:message for="password" style="color: red" />
     </h:panelGrid>

     <h:commandButton actionListener="#{userService.register}"
                      id="loginButton" action="status" value="submit"/>
   </h:form>
</cc:implementation>
</html>

<cc:interface> defines metadata that describe the characteristics of component, such as supported attributes, facets, and attach points for event listeners. <cc:implementation> contains the markup substituted for the composite component.

<cc:interface> is generated in the page but is empty and may be made optional in a subsequent release of the JSF specification.The "using page" will declare a new namespace as:

xmlns:ez="http://java.sun.com/jsf/composite/ezcomp"

and then replace the code fragment with:

<ez:loginPanel/>

The tag name for the new composite component is the same as the "defining page" file name. This enables "<ez:loginPanel/>" to be used instead of repeating that entire code fragment.

Now lets say that the code fragment need to pass different value expressions (instead of #{user.name}) and invoke a different method (instead of #{userService.register}) when submit button is clicked in different "using page"s. The "defining page" can then look like:

<!-- INTERFACE -->
<cc:interface>
  <cc:attribute name="name"/>
  <cc:attribute name="password"/>
  <cc:attribute name="actionListener"
      method-signature="void action(javax.faces.event.Event)"
      targets="ccForm:loginButton"/>
</cc:interface>

<!-- IMPLEMENTATION -->
<cc:implementation>
  <h:form id="ccForm">
  <h:panelGrid columns="3">
    <h:outputText value="Name:" />
    <h:inputText value="#{cc.attrs.name}" id="name"/>
    <h:message for="name" style="color: red" />
    <h:outputText value="Password:" />
    <h:inputText value="#{cc.attrs.password}" id="password"/>
    <h:message for="password" style="color: red" />
  </h:panelGrid>

  <h:commandButton id="loginButton"
                   action="status"
                   value="submit"/>
  </h:form>
</cc:implementation>

The changes are highlighted in bold and explained below:

  • All the parameters are explicitly specified in <cc:interface> for clarity. The third parameter has a "targets" attribute referrring to "ccForm:loginButton".
  • In <cc:implementation>

    • The <h:form> in has "id" attribute. This is required such that the button within the form can be explicitly referenced.
    • <h:inputText> is now using #{cc.attrs.xxx} instead of #{user.xxx}. #{cc.attrs} is a default EL expression that is available for composite component authors and provide access to attributes of the current composite component. In this case #{cc.attrs} has "name" and "password" defined as attributes.
    • "actionListener" is an attach point for event listener, defined as a "method-signature" and describes the signature of a method pointed to by the expression.
    • <h:commandButton> has "id" attribute so that it can be clearly identified within the <h:form>.

The "user", "password", and "actionListener" are then passed as required attributes in the "using page" as:

<ez:loginPanel
    name="#{user.name}"
    password="#{user.password}"
    actionListener="#{userService.register}"/>

Now the "using page" can pass different "backing beans" and business method to be invoked when "submit" button is invoked.

The complete source code for this TOTD can be downloaded here.

How are you using JSF 2 composite components ?

The entire source code used in this blog can be downloaded here.

JSF 2 implementation is bundled with GlassFish Server Open Source Edition, try it today!

I realized TOTD #135 already explains how to author composite components. Hey, but this TOTD provides new information on how to attach event listeners :-)

Technorati: totd javaee6 glassfish jsf2 composite component facelets

Share and Enjoy:
  • Print
  • Digg
  • Sphinn
  • del.icio.us
  • Facebook
  • Google Bookmarks
  • DZone
  • StumbleUpon
  • Technorati
  • Twitter
  • Slashdot

October 1, 2010

Java EE 6 & GlassFish @ JAX London & London JUG Trip Report

Filed under: glassfish, javaee, javaserverfaces — arungupta @ 1:18 pm

JAX London had its second conference of the year and the venue was shared with DevCon and OSGi DevCon. The tri-partite conference gave the attendees an option to attend a variety of sessions from a good quality of speakers. There were about approximately 250 attendees and I think the number is commendable considering this is only the second conference. The good news is that there is only room to grow :-)

I gave a presentation on "Running your Java EE applications in the Cloud" and the slides are available below:

Running your Java EE applications in the Cloud

The talk explained

  • Oracle’s definition of Cloud and talked about Exalogic Elastic Compute Cloud, a.k.a "Cloud in a box"
  • Light-weight ness, extensibility, and simplicity/ease-of-use of Java EE 6
  • How to run Java EE 6 on Amazon, RightScale, Elastra, and Joyent
  • What Java EE currently offers for the Cloud and what’s coming in Java EE 7

Because of a last minute speaker cancellation for the JAX Community Night I also got a chance to show a live demo of how NetBeans provides extensive and powerful tooling around Java EE 6 & GlassFish. Check out screencast #30 to view the complete set of Java EE 6 Netbeans tooling. Java EE 6 tooling is also available in Eclipse and can be seen in the screencast #31.

I had a good conversation with Sebastien Meyen who is the organizer of JAX conferences and hopefully you’ll see more presence of Java EE 6 & GlassFish in their upcoming events ;-) He recorded a video segment for JAX TV and the link will be shared when its live.

Barry Cranford, London JUG leader, graciously arranged for a talk at their local meeting. And of course I talked on the Java EE 6 & GlassFish 3: Light-weight, Extensible, and Powerful and the slides are available below:

Java EE 6 & GlassFish 3: Light-weight, Extensible, and Powerful

The talk explained how Java EE 6 is an extreme makeover from its previous versions and provides a light-weight, extensible, and powerful platform to build your enterprise and Web applications. The talk explained how several new key specifications like Contexts & Dependency Injection, Bean Validation, and Java API for RESTful Web Services 1.1 in the platform are making it really powerful and rich. It also explained how the existing specifications like  Java Server Faces, Servlets, Java Persistence API, and Enterprise Java Beans have gone over an extreme makeover to make the platform easier and intuitive to use. And its always fun to talk about the latest set of features coming in GlassFish 3.1 like Clustering, High Availability, Application Versioning, SSH-based Administration and Provisioning, and Application-scoped Resources. The Java EE 6 code sample built during the meeting can be downloaded here.

Here is some feedback posted on the event page:

Great speaker and great talk, with a perfect pace and content!

It was great. I particularly like that it was presented with examples, and you could really see how it works, and not only someone explaining how it would work

This was a very insightful and engaging session with a good mix of technical detail and completely live demo. The presenter was very skilled and knowledgeable and had a great way of expressing concepts and details easily.

Great presentation and demos. Had underestimated the tooling in Netbeans IDE so the demos were great. Good opportunity to meet Arun Gupta, whose blog I spend time reading

Very good presentation. The key point that Glassfish restores session information over multiple restarts was very helpfull for me. Also learnt quite a few titbits throughout the presentation , which I am sure will come very handy.

An excellent presentation which covered a good subset of a very wide topic to an adequate depth. A great overview of some of the compelling new features in JEE6.

Now this is London and pub culture is very prominent here, yes even on weekdays :) So we got together at a nearby pub – The Slaughtered Lamb – and it was good discussing with JUG attendees and fellow beer drinkers on why Oracle will do the right thing for Java.

Most of the major European conferences like Devoxx, JFall, and JFokus are organized by a local JUG. I seeded that thought with Sebastien and Barry and hopefully the energies will synthesize and the conference will grow. Overall, a short visit for me but gave me an opportunity to meet with several other speakers and create more community connections for GlassFish, and in general for Oracle :-)

Let us know how are you using GlassFish by posting a comment on this blog.

Technorati: conf jax london devcon osgi javaee6 glassfish 

Share and Enjoy:
  • Print
  • Digg
  • Sphinn
  • del.icio.us
  • Facebook
  • Google Bookmarks
  • DZone
  • StumbleUpon
  • Technorati
  • Twitter
  • Slashdot

September 1, 2010

2-day Java EE 6 & GlassFish workshops in Germany, Czech Republic, Hungary – Register now!

Filed under: glassfish, javaee, javaserverfaces — arungupta @ 10:46 am
  • Are you interested in learning the nuts and bolts of the Java EE 6 platform ?
  • Do you want to learn on how Servlet 3.0, Java Server Faces 2.0, Context & Dependency Injection 1.0, Enterprise JavaBeans 3.1, Bean Validation 1.0, Java Persistence API 2, RESTful Web services and other new technologies in Java EE 6 provide a complete stack for building your Web & Enterprise applications ?
  • GlassFish 3.1 adds clustering, high availability, application versioning and other interesting featuresm, above light-weight, OSGi-based modularity, and embeddability, making it the richest open source application server.
  • Did you know that NetBeans, Eclipse, and IntelliJ provide comprehensive tooling around Java EE 6 and would like to learn it ?

If you are interested in learning any of these details then I’ll be delivering 2-day workshops in 3 countries across Europe. The complete details about the venue and cost are available in the links below:

  • Oct 4/5: Munich, Germany
  • Nov 22/23: Czech Republic
  • Nov 25/26: Hungary

This is going to be a complete deep dive for 2 days and extensive hands-on experience.

Be ready to drink from the fire hose and learn how you can leverage Java EE 6 in your next project to boost the productivity and simplify the development and deployment of your applications.

Register now!

Technorati: conf javaee6 glassfish workshop germany czech hungary

Share and Enjoy:
  • Print
  • Digg
  • Sphinn
  • del.icio.us
  • Facebook
  • Google Bookmarks
  • DZone
  • StumbleUpon
  • Technorati
  • Twitter
  • Slashdot

May 11, 2010

TOTD #135: JSF2 Composite Components using NetBeans IDE – lightweight Java EE 6

Filed under: glassfish, javaee, javaserverfaces, netbeans, totd — arungupta @ 11:44 pm

NetBeans IDE provide comprehensive feature set to build applications using Java Server Faces 2 (JSR 314). This Tip Of The Day (TOTD) explains how to create JSF composite components using wizards provided by the NetBeans IDE.

The JSF2 specification, section 3.6 defines composite components as:

A tree of "UIComponent" instances, rooted at a top level component, that can be thought of and used as a single component in a view. The component hierarchy of this subtree is described in the composite component defining page.

This definition is good from the specification perspective but can help with some layman explanation. Essentially, a composite component is what it says – a composition of two or more components such that it behaves like a single component. For example, consider four components in a panel grid where 2 components are "h:outputText" to display prompts and other 2 are "h:inputText" to receive input from the user. The composite components allow all of these components (1 panel grid + 2 "h:inputText" + 2 "h:outputText") packaged as a single component.

Resource Handling and Facelets, both features newly introduced in the JSF2 specification, makes the creation of composite component much easier. The Resource Handling defines a standard location for bundling resources in a web application and Facelets defines a cleaner templating language that enables composition. In technical terms:

A composite component is any Facelet markup file that resides inside of a resource library.

Lets create a simple Web application using JSF 2 that accepts a username/password and displays it in a new page. The application is first created using the traditional "h:inputText" and "h:outputText" elements and is then converted to use a composite component.

Before we dig into composite component creation using JSF2, here are the steps listed to create one using JSF 1.2:

  1. Implement UIComponent subclass
  2. Markup rendering code in Renderer
  3. Register your component and renderer in faces-config.xml
  4. Implement your JSP tag
  5. And the TLD

There is Java code involved, sub-classing from JSF classes, deployment descriptor editing in "faces-config.xml", declaring TLDs and then implementing the JSP tag. Creating a composite component in JSF 1.2 was quite a chore and spread all over. There are lots of files

With that background, lets see what it takes us to create a composite component using JSF2.

The CDI backing bean for the application looks like:

package server;

import javax.enterprise.context.RequestScoped;
import javax.inject.Named;

@Named("simplebean")
@RequestScoped
public class SimpleBean {
    String name;
    String password;

    public String getPassword() {
        return password;
    }

    public void setPassword(String password) {
        this.password = password;
    }

    public String getName() {
        return name;
    }

    public void setName(String name) {
        this.name = name;
    }
}

The "index.xhtml" Facelet markup file looks like:

<?xml version='1.0' encoding='UTF-8' ?>
<!DOCTYPE html PUBLIC "-//W3C//DTD XHTML 1.0 Transitional//EN"
   "http://www.w3.org/TR/xhtml1/DTD/xhtml1-transitional.dtd">
<html xmlns="http://www.w3.org/1999/xhtml"
  xmlns:ui="http://java.sun.com/jsf/facelets"
  xmlns:h="http://java.sun.com/jsf/html">
  <h:head>
    <title>Enter Name &amp; Password</title>
  </h:head>
  <h:body>
    <h1>Enter Name &amp; Password</h1>
    <h:form>
      <h:panelGrid columns="2">
        <h:outputText value="Name:"/>
        <h:inputText value="#{simplebean.name}" title="name"
                     id="name" required="true"/>
        <h:outputText value="Password:"/>
        <h:inputText value="#{simplebean.password}" title="password"
                     id="password" required="true"/>
      </h:panelGrid>
      <h:commandButton action="show" value="submit"/>
    </h:form>
  </h:body>
</html>

And the "show.xhtml" Facelet markup looks like:

<?xml version='1.0' encoding='UTF-8' ?>
<!DOCTYPE html PUBLIC "-//W3C//DTD XHTML 1.0 Transitional//EN"
  "http://www.w3.org/TR/xhtml1/DTD/xhtml1-transitional.dtd">
<html xmlns="http://www.w3.org/1999/xhtml"
  xmlns:h="http://java.sun.com/jsf/html">
  <h:head>
    <title>Show Name &amp; Password</title>
  </h:head>
  <h:body>
    <h1>Show Name &amp; Password</h1>
    <h:panelGrid columns="2">
      <h:outputText value="Name:"/>
      <h:outputText value="#{simplebean.name}" />
      <h:outputText value="Password:"/>
      <h:outputText value="#{simplebean.password}" />
    </h:panelGrid>
  </h:body>
</html>

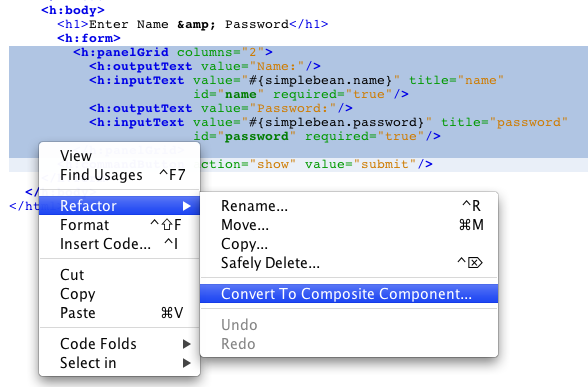
Now select the <panelGrid> fragment in "index.xhtml" as shown below:

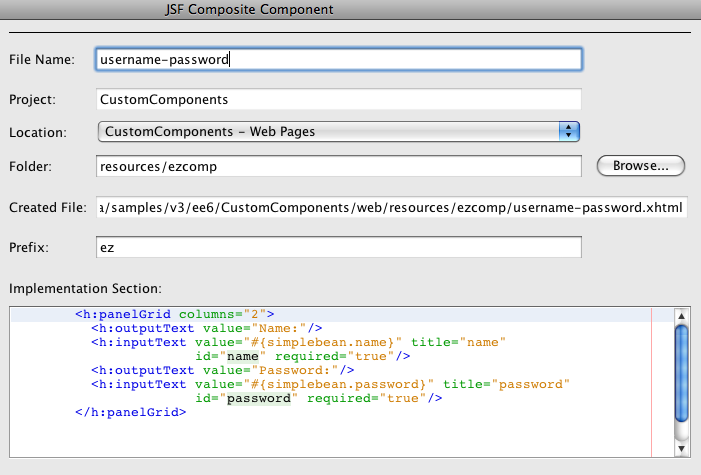
Right-click and select "Convert To Composite Component …" and specify the values as given in the wizard below:

Note, most of the values are default and only the "File Name:" is changed. After clicking on "Finish" in the wizard, the updated page looks like:

<?xml version='1.0' encoding='UTF-8' ?>
<!DOCTYPE html PUBLIC "-//W3C//DTD XHTML 1.0 Transitional//EN"
   "http://www.w3.org/TR/xhtml1/DTD/xhtml1-transitional.dtd">
<html xmlns="http://www.w3.org/1999/xhtml"
  xmlns:ui="http://java.sun.com/jsf/facelets"
  xmlns:h="http://java.sun.com/jsf/html"
  xmlns:ez="http://java.sun.com/jsf/composite/ezcomp">
  <h:head>
    <title>Enter Name &amp; Password</title>
  </h:head>
  <h:body>
    <h1>Enter Name &amp; Password</h1>
    <h:form>
      <ez:username-password/>
      <h:commandButton action="show" value="submit"/>
    </h:form>
  </h:body>
</html>

The namspace/prefix "http://java.sun.com/jsf/composite/ezcomp" is added to the markup page. <ez:username-password> is the composite component used instead of those multiple components. The namespace prefix, "ez", and the tag name, "username-password", are chosen based upon the values entered in the wizard.

The JSF 2 specification, section 3.6.1.4 defines that:

The occurrence of the string “http://java.sun.com/jsf/composite/” in a Facelet XML namespace declaration means that whatever follows that last “/” is taken to be the name of a resource library.

The resource library location is relative to the Facelet markup file that is using it. So in our case, all the code is rightly encapsulated in the "resources/ezcomp/username-password.xhtml" file as:

<?xml version='1.0' encoding='UTF-8' ?>
<!DOCTYPE html PUBLIC "-//W3C//DTD XHTML 1.0 Transitional//EN"
    "http://www.w3.org/TR/xhtml1/DTD/xhtml1-transitional.dtd">
  <html xmlns="http://www.w3.org/1999/xhtml"
     xmlns:cc="http://java.sun.com/jsf/composite"
     xmlns:h="http://java.sun.com/jsf/html">

    <!-- INTERFACE -->
    <cc:interface>
    </cc:interface>

    <!-- IMPLEMENTATION -->
    <cc:implementation>
      <h:panelGrid columns="2">
        <h:outputText value="Name:"/>
        <h:inputText value="#{simplebean.name}" title="name"
                   id="name" required="true"/>
        <h:outputText value="Password:"/>
        <h:inputText value="#{simplebean.password}" title="password"
                   id="password" required="true"/>
      </h:panelGrid>
 </cc:implementation>
</html>

Notice, the composite component name matches the Facelet markup file name. The markup file lives in "resources/ezcomp" directory as indicated by the namespace value.

<cc:interface> defines metadata that describe the characteristics of component, such as supported attributes, facets, and attach points for event listeners. <cc:implementation> contains the markup substituted for the composite component.

The "index.xhtml" page is using the composite component and is conveniently called the using page. Similarly the "username-password.xhtml" page is defining the composite component and is conveniently called the defining page. In short, creating composite components in JSF2 requires the following steps:

  1. Move the required tags to a separate Facelet markup file, "defining page", in the "resources" directory
  2. Declare the namespace/prefix derived from "http://java.sun.com/jsf/composite" and the directory name
  3. Refer the composite component in the "using page".

Much simpler and cleaner than JSF 1.2. Are you using JSF 2 composite components ?

The entire source code used in this blog can be downloaded here.

JSF 2 implementation is bundled with GlassFish Server Open Source Edition, try it today!

Technorati: totd glassfish v3 netbeans jsf2 javaee composite components ajax

Share and Enjoy:
  • Print
  • Digg
  • Sphinn
  • del.icio.us
  • Facebook
  • Google Bookmarks
  • DZone
  • StumbleUpon
  • Technorati
  • Twitter
  • Slashdot

October 2, 2009

TOTD #109: How to convert a JSF managed bean to JSR 299 bean (Web Beans) ?

Filed under: frameworks, glassfish, javaee, javaserverfaces, totd — Tags: , — arungupta @ 1:34 pm

This entry is a follow up to TOTD #95 and shows how to use the recent integrations of JSR 299 in GlassFish v3 to convert a JSF managed bean to a JSR 299 bean (aka Web Beans). The TOTD #95 describes a simple Java EE 6 web application that uses Java Server Faces 2.0 components for displaying the results of a database query conducted by EJB 3.1 and JPA 2.0 classes.

The EJB class, which also acts as the JSF managed bean, looks like:

@javax.ejb.Stateless
@ManagedBean
public class StateList {
  @PersistenceUnit
  EntityManagerFactory emf;

  public List getStates() {
    return    emf.createEntityManager().createNamedQuery(”States.findAll”).getResultList();
  }
}

Three changes are required to convert this class into a JSR 299 compliant bean (Web Bean) as listed below:

  1. Add an empty "beans.xml" to the WEB-INF directory.
  2. Replace "@ManagedBean" with "@javax.inject.Named annotation". "@javax.inject" annotations are defined by JSR 330.
  3. Resource injection does not work with JPA classes, yet, so populate EntityManager explicitly as explained below:

    1. Replace EntityManagerFactory resource injection:

      @PersistenceUnit
      EntityManagerFactory emf;
      

      with:

      EntityManager emf = Persistence.createEntityManagerFactory("HelloEclipseLinkPU");
      
    2. Add the required entity classes explicitly to "persistence.xml". If the persistence unit is injected then the container automatically scans the web application root for any entity classes.

      1. Expand "Configuration Files" and edit "persistence.xml".
      2. Uncheck "Include All Entity Classes in …" check box.
      3. Click on "Add Class…", select "state.States", and click on "OK".

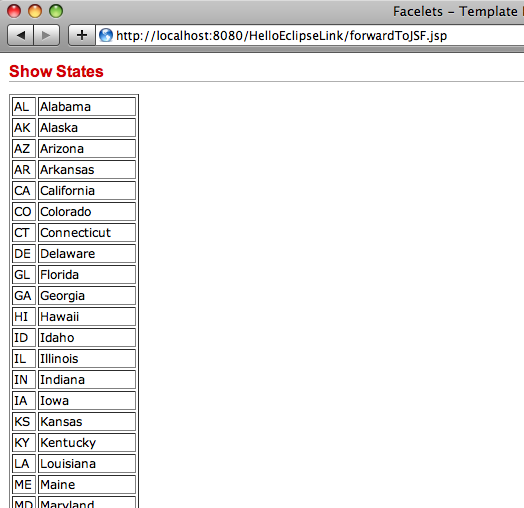
That’s it, re-deploy your application and now you are using the Web Beans integration in GlassFish v3 instead of JSF managed bean. The output is available at "http://localhost:8080/HelloEclipseLink/forwardToJSF.jsp" as shown:

This is the exact same output as shown in TOTD #95.

Now, one-by-one, JPA, EJB, Transactions and other components will start working. Read Roger’s blog for another example of Web Beans in GlassFish.

A complete archive of all the tips is available here.

Technorati: totd glassfish v3 mysql javaee6 javaserverfaces webbeans jsr299  netbeans

Share and Enjoy:
  • Print
  • Digg
  • Sphinn
  • del.icio.us
  • Facebook
  • Google Bookmarks
  • DZone
  • StumbleUpon
  • Technorati
  • Twitter
  • Slashdot

October 1, 2009

TOTD #108: Java EE 6 web application (JSF 2.0 + JPA 2.0 + EJB 3.1) using Oracle, NetBeans, and GlassFish

Filed under: frameworks, glassfish, javaee, javaserverfaces, netbeans, totd — Tags: , — arungupta @ 11:00 am

TOTD #106 explained how to install Oracle database 10g R2 on Mac OS X. TOTD #107 explained how to connect this Oracle database using NetBeans. This Tip Of The Day will explain how to use the sample HR database (that comes with Oracle database server) to write a simple Java EE 6 application.

This application will use Java Server Faces 2.0 for displaying the results, Enterprise Java Beans 3.1 + Java Persistence API 2.0 for middle tier, and Oracle database server + GlassFish v3 as the backend. The latest promoted build (65 of this writing) will not work because of the issue #9885 so this blog will use build 63 instead.

Several improvements have been made over NetBeans 6.8 M1 build and this blog is using the nightly build of 9/27. The environment used in this blog is:

  • NetBeans 9/27 nightly
  • GlassFish v3 build 63
  • Oracle database server 10.2.0.4.0 R2 on Mac OS X
  • Oracle JDBC Driver type 4 (ojdbc6.jar)

Lets get started!

  1. Configure GlassFish v3 with JDBC connection

    1. Download and unzip build 63.
    2. Download ojdbc6.jar and copy to "glassfishv3/glassfish/domains/domain1/lib/ext" directory.
    3. Start the Application Server as:

      ./bin/asadmin start-domain --verbose &
      
    4. Create a JDBC connection pool as:

      ./bin/asadmin create-jdbc-connection-pool --datasourceclassname oracle.jdbc.pool.OracleDataSource --restype javax.sql.DataSource --property "User=hr:Password=hr:URL=jdbc\:oracle\:thin\:@localhost\:1521\:orcl" jdbc/hr
      

      and verify the connection pool as:

      ./bin/asadmin ping-connection-pool jdbc/hr
      
    5. Create a JDBC resource as:

      ./bin/asadmin create-jdbc-resource --connectionpoolid jdbc/hr jdbc/hr
      
  2. Configure GlassFish v3 build 63 in NetBeans

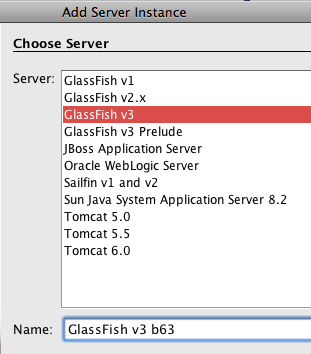
    1. In NetBeans IDE "Services" panel, right-click on "Servers" and click on "Add Server…". Choose "GlassFish v3" and provide a name as shown below:

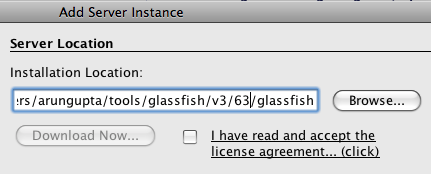
    2. Click on "Next >" and specify the unzipped GlassFish location as:

      and click on "Finish".

  3. Create the Java EE 6 application

    1. In "Projects" pane, right-click and select "New Project…".
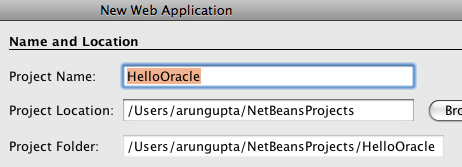
    2. Choose "Java Web" and "Web Application" and click on "Next". Choose the project name as "HelloOracle":

      and click on "Next >".

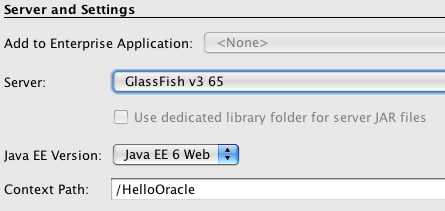
    3. Select the recently added GlassFish v3 server and choose "Java EE 6 Web" profile:

      and click on "Next >". Notice "Java EE 6 Web" profile is chosen as the Java EE version.

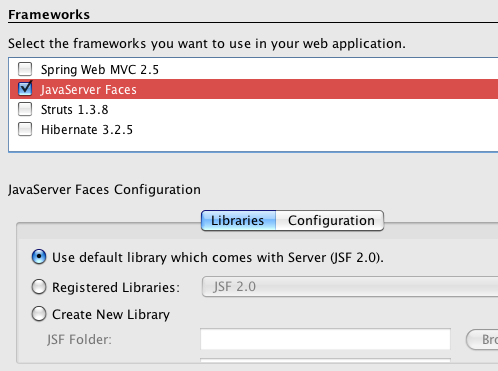
    4. Select "JavaServer Faces" on the frameworks page:

      and click on "Finish". Notice the JSF libraries bundled with the App Server are used.

  4. Create the Java Persistence Unit

    1. Right-click on the project, select "New", "Entity Classes from Database…":

    2. From the Data Source, select "jdbc/hr" as shown:

      This is the same JDBC resource created earlier. Select "EMPLOYEES" from the Available Table, click on "Add >" to see the output as:

      The related tables are automatically included. Click on "Next >".

    3. Click on "Create Persistence Unit …" and take all the defaults and click on "Create".
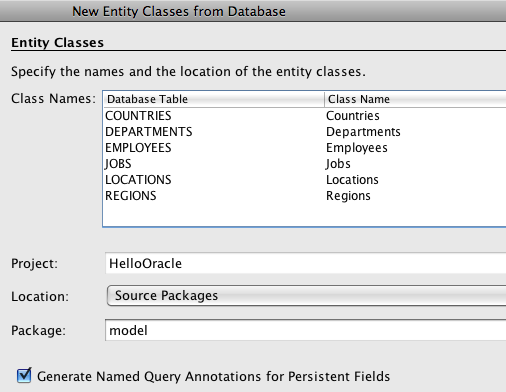
    4. Specify the package name as "model":

      and click on "Finish". This generates a JPA-compliant POJO class that provide access to tables in the underlying Oracle database. The class name corresponding to each table is shown in the wizard.

  5. Create Enterprise Java Beans

    1. Right-click on the project and select "New Class…".
    2. Specify the class name as "EmployeesBean" and package as "controller", click on "Finish".
    3. Annotate the class to make it an Enterprise Java Bean and a JSF Managed Bean as:

      @javax.ejb.Stateless
      @javax.faces.bean.ManagedBean
      

      Notice, the EJB is bundled in the WAR file and no special type of modules are required. Java EE 6 provides simplified packaging of EJB which makes it really ease to use.

      Also this application is currently using JSF managed bean but will use JSR 299 (aka Web Beans) in a future blog.

    4. Inject the Persistence Unit by adding the following variable:

      @PersistenceUnit
      EntityManagerFactory emf;
      
    5. Add a new method to retrieve the list of all employees as:

      public List getEmployees() {
       return em.createNamedQuery("Employees.findAll").getResultList();
      }
      

      "Employees.findAll" is a default NamedQuery generated by NetBeans and makes it easy to query the database. Several other queries are generated for each mapped JPA class, such as "Employees.findByEmployeeId" and "Employees.findByFirstName". Custom queries can also be created and specified on the POJO class.

      The completed class looks like:

      @Stateless
      @ManagedBean
      public class EmployeesBean {
      
       @PersistenceContext
       EntityManager em;
      
       public List getEmployees() {
       return em.createNamedQuery("Employees.findAll").getResultList();
       }
      }
      
  6. Use EJB in the generated JSF page

    1. JSF 2 uses Facelets as the templating mechanism and NetBeans generate a simple "index.xhtml" file to start with. Expand "Web Pages" and open "index.xhtml".
    2. Replace the body template with:

      <h1>First Java EE 6 app using Oracle database</>
      <h:dataTable var="emp" value="#{employeesBean.employees}" border="1">
       <h:column><h:outputText value="#{emp.lastName}"/>, <h:outputText value="#{emp.firstName}"/></h:column>
       <h:column><h:outputText value="#{emp.email}"/></h:column>
       <h:column><h:outputText value="#{emp.hireDate}"/></h:column>
       </h:dataTable>
      

      It uses JSF value expressions to bind the Enterprise Java Bean and dumps the HTML formatted name, email, and hire date of each employee in the database.

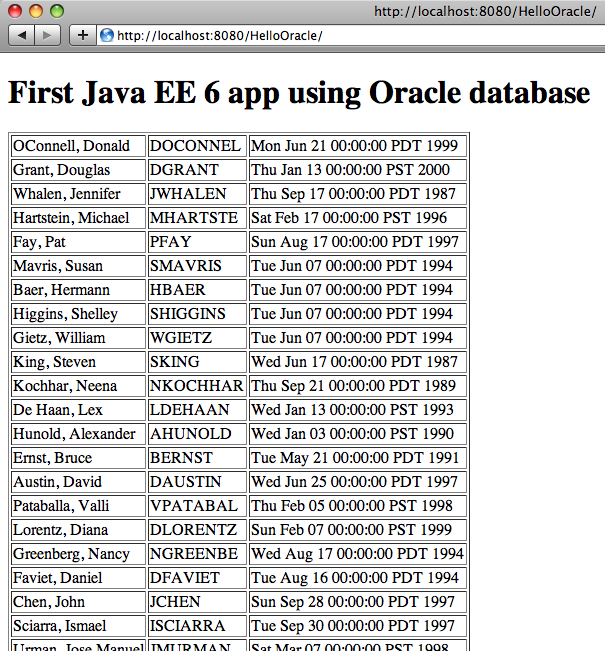
  7. Run the project: Right-click on the project and select "Run" to see the output at "http://localhost:8080/HelloOracle/" as:

So we can easily create a Java EE 6 application using NetBeans, Oracle, and GlassFish.

A complete archive of all the TOTDs is available here.

This and other similar applications will be demonstrated at the upcoming Oracle Open World.

Technorati: totd oracle database glassfish v3 javaee javaserverfaces ejb jpa netbeans oow

Share and Enjoy:
  • Print
  • Digg
  • Sphinn
  • del.icio.us
  • Facebook
  • Google Bookmarks
  • DZone
  • StumbleUpon
  • Technorati
  • Twitter
  • Slashdot

August 17, 2009

TOTD #95: EJB 3.1 + Java Server Faces 2.0 + JPA 2.0 web application – Getting Started with Java EE 6 using NetBeans 6.8 M1 & GlassFish v3

Filed under: glassfish, javaserverfaces, netbeans, totd — Tags: , , , , — arungupta @ 3:00 am

TOTD #93 showed how to get started with Java EE 6 using NetBeans 6.8 M1 and GlassFish v3 by building a simple Servlet 3.0 + JPA 2.0 web application. TOTD #94 built upon it by using Java Server Faces 2 instead of Servlet 3.0 for displaying the results. However we are still using a POJO for all the database interactions. This works fine if we are only reading values from the database but that’s not how a typical web application behaves. The web application would typically perform all CRUD operations. More typically they like to perform one or more CRUD operations within the context of a transaction. And how do you do transactions in the context of a web application ? Java EE 6 comes to your rescue.

The EJB 3.1 specification (another new specification in Java EE 6) allow POJO classes to be annotated with @EJB and bundled within WEB-INF/classes of a WAR file. And so you get all transactional capabilities in your web application very easily.

This Tip Of The Day (TOTD) shows how to enhance the application created in TOTD #94 and use EJB 3.1 instead of the JSF managed bean for performing the business logic. There are two ways to achieve this pattern as described below.

Lets call this TOTD #95.1

  1. The easiest way to back a JSF page with an EJB is to convert the managed bean into an EJB by adding @javax.ejb.Stateless annotation. So change the  “StateList” class from TOTD #94 as shown below:
    @javax.ejb.Stateless
    @ManagedBean
    public class StateList {
    @PersistenceUnit
    EntityManagerFactory emf;

    public List<States> getStates() {
    return emf.createEntityManager().createNamedQuery(“States.findAll”).getResultList();
    }
    }

    The change is highlighted in bold, and that’s it!

Because of “Deploy-on-save” feature in NetBeans and GlassFish v3, the application is autodeployed. Otherwise right-click on the project and select Run (default shortcut “F6″). As earlier, the results can be seen at “http://localhost:8080/HelloEclipseLink/forwardToJSF.jsp” or “http://localhost:8080/HelloEclipseLink/faces/template-client.xhtml” and looks like:

The big difference this time is that the business logic is executed by an EJB in a fully transactional manner. Even though the logic in this case is a single read-only operation to the database, but you get the idea :)

Alternatively, you can use the delegate pattern in the managed bean as described below. Lets call this #95.2.

  1. Right-click on the project, select “New”, “Session Bean …” and create a stateless session bean by selecting the options as shown below:

    This creates a stateless session with the name “StateBeanBean” (bug #170392 for redundant “Bean” in the name).

  2. Simplify your managed bean by refactoring all the business logic to the EJB as shown below:
    @Stateless
    public class StateBeanBean {
    @PersistenceUnit
    EntityManagerFactory emf;

    public List<States> getStates() {
    return emf.createEntityManager().createNamedQuery(“States.findAll”).getResultList();
    }
    }

    and

    @ManagedBean
    public class StateList {
    @EJB StateBeanBean bean;

    public List<States> getStates() {
    return bean.getStates();
    }
    }

    In fact the EJB code can be further simplified to:

    @Stateless
    public class StateBeanBean {
    @PersistenceContext
    EntityManager em;

    public List<States> getStates() {
    return em.createNamedQuery(“States.findAll”).getResultList();
    }
    }

    The changes are highlighted in bold.

If the application is already running then Deploy-on-Save would have automatically deployed the entire application. Otherwise right-click on the project and select Run (default shortcut “F6″). Again, the results can be seen at “http://localhost:8080/HelloEclipseLink/forwardToJSF.jsp” or “http://localhost:8080/HelloEclipseLink/faces/template-client.xhtml” and are displayed as shown in the screenshot above.

The updated directory structure looks like:

The important point to note is that our EJB is bundled in the WAR file and no additional deployment descriptors were added or existing ones modified to achieve that. Now, that’s really clean :)

The next blog in this series will show how managed beans can be replaced with WebBeans, err JCDI.

Also refer to other Java EE 6 blog entries.

Please leave suggestions on other TOTD that you’d like to see. A complete archive of all the tips is available here.

Technorati: totd glassfish v3 mysql javaee6 javaserverfaces jpa2 ejb netbeans

Share and Enjoy:
  • Print
  • Digg
  • Sphinn
  • del.icio.us
  • Facebook
  • Google Bookmarks
  • DZone
  • StumbleUpon
  • Technorati
  • Twitter
  • Slashdot

August 14, 2009

TOTD #94: A simple Java Server Faces 2.0 + JPA 2.0 application – Getting Started with Java EE 6 using NetBeans 6.8 M1 & GlassFish v3

Filed under: glassfish, javaserverfaces, netbeans, totd — Tags: , , , , — arungupta @ 3:00 am

TOTD #93 showed how to get started with Java EE 6 using NetBeans 6.8 M1 and GlassFish v3 by building a simple Servlet 3.0 + JPA 2.0 web application. JPA 2.0 + Eclipselink was used for the database connectivity and Servlet 3.0 was used for displaying the results to the user. The sample demonstrated how the two technologies can be mixed to create a simple web application. But Servlets are meant for server-side processing rather than displaying the results to end user. JavaServer Faces 2 (another new specification in Java EE 6) is designed to fulfill that purpose.

This Tip Of The Day (TOTD) shows how to enhance the application created in TOTD #93 and use JSF 2 for displaying the results.

  1. Right-click on the project, select “Properties”, select “Frameworks”, click on “Add …” as shown below:

    Select “JavaServer Faces” and click on “OK”. The following configuration screen is shown:

    Click on “OK” to complete the dialog. This generates a whole bunch of files (7 to be accurate) in your project. Most of these files are leftover from previous version of NetBeans and will be cleaned up. For example, “faces-config.xml” is now optional and “forwardToJSF.jsp” is redundant.

  2. Anyway, lets add a POJO class that will be our managed bean. Right-click on “server” package and select “New”, “Java Class …”, give the name as “StateList”. Change the class such that it looks like:
    package server;

    import java.util.List;
    import javax.faces.bean.ManagedBean;
    import javax.persistence.EntityManagerFactory;
    import javax.persistence.PersistenceUnit;
    import states.States;

    /**
    * @author arungupta
    */
    @ManagedBean
    public class StateList {
    @PersistenceUnit
    EntityManagerFactory emf;

    public List<States> getStates() {
    return emf.createEntityManager().createNamedQuery(“States.findAll”).getResultList();
    }
    }

    Here are the main characterisitcs of this class:

    1. This is a POJO class with @ManagedBean annotation. This annotation makes this class a managed bean that can be used in the JSF pages. As no other annotations or parameters are specified, this is a request-scoped managed bean with the name “stateList” and lazily initialized. More details about this annotation are available in the javadocs.
    2. The persistence unit created in TOTD #93 is injected using @PersistenceUnit annotation.
    3. The POJO has one getter method that queries the database and return the list of all the states.
  3. In the generated file “template-client.xhtml”, change the “head” template to:
    Show States

    and “body” template to:

    <h:dataTable var=”state” value=”#{stateList.states}” border=”1″>
    <h:column><h:outputText value=”#{state.abbrev}”/></h:column>
    <h:column><h:outputText value=”#{state.name}”/></h:column>
    </h:dataTable>

    This uses the standard JSF “dataTable”, “column”, and “outputText” tags and uses the value expression to fetch the values from the managed bean.

If the application is already running from TOTD #93, then Deploy-on-Save would have automatically deployed the entire application. Otherwise right-click on the project and select Run (default shortcut “F6″). The results can be seen at “http://localhost:8080/HelloEclipseLink/forwardToJSF.jsp” or “http://localhost:8080/HelloEclipseLink/faces/template-client.xhtml” and looks like:

The updated directory structure looks like:

There were multiple files added by the JSF framework support in NetBeans. But as I said earlier, they will be cleaned up before the final release.

Also refer to other Java EE 6 blog entries.

Please leave suggestions on other TOTD that you’d like to see. A complete archive of all the tips is available here.

Technorati: totd glassfish v3 mysql javaee6 javaserverfaces jpa2 netbeans

Share and Enjoy:
  • Print
  • Digg
  • Sphinn
  • del.icio.us
  • Facebook
  • Google Bookmarks
  • DZone
  • StumbleUpon
  • Technorati
  • Twitter
  • Slashdot

August 13, 2009

TOTD #93: Getting Started with Java EE 6 using NetBeans 6.8 M1 & GlassFish v3 – A simple Servlet 3.0 + JPA 2.0 app

Filed under: glassfish, javaserverfaces, netbeans, totd — Tags: , , , , — arungupta @ 3:00 am

NetBeans 6.8 M1 introduces support for creating Java EE 6 applications … cool!

This Tip Of The Day (TOTD) shows how to create a simple web application using JPA 2.0 and Servlet 3.0 and deploy on GlassFish v3 latest promoted build (58 as of this writing). If you can work with the one week older build then NetBeans 6.8 M1 comes pre-bundled with 57. The example below should work fine on that as well.

  1. Create the database, table, and populate some data into it as shown below:
    ~/tools/glassfish/v3/58/glassfishv3/bin >sudo mysql –user root
    Password:
    Welcome to the MySQL monitor.  Commands end with ; or \g.
    Your MySQL connection id is 1592
    Server version: 5.1.30 MySQL Community Server (GPL)

    Type ‘help;’ or ‘\h’ for help. Type ‘\c’ to clear the buffer.

    mysql> create database states;
    Query OK, 1 row affected (0.02 sec)

    mysql> CREATE USER duke IDENTIFIED by ‘glassfish’;
    Query OK, 0 rows affected (0.00 sec)

    mysql> GRANT ALL on states.* TO duke;
    Query OK, 0 rows affected (0.24 sec)

    mysql> use states;
    Database changed

    mysql> CREATE TABLE STATES (
    ->       id INT,
    ->       abbrev VARCHAR(2),
    ->       name VARCHAR(50),
    ->       PRIMARY KEY (id)
    -> );
    Query OK, 0 rows affected (0.16 sec)

    mysql> INSERT INTO STATES VALUES (1, “AL”, “Alabama”);
    INSERT INTO STATES VALUES (2, “AK”, “Alaska”);

    . . .

    mysql> INSERT INTO STATES VALUES (49, “WI”, “Wisconsin”);
    Query OK, 1 row affected (0.00 sec)

    mysql> INSERT INTO STATES VALUES (50, “WY”, “Wyoming”);
    Query OK, 1 row affected (0.00 sec)

    The complete INSERT statement is available in TOTD #38. Most of this step can be executed from within the IDE as well as explained in TOTD #38.

  2. Download and unzip GlassFish v3 build 58. Copy the latest MySQL Connector/J jar in “domains/domain1/lib” directory of GlassFish and start the application server as:
    ~/tools/glassfish/v3/58/glassfishv3/bin >asadmin start-domain
  3. Create JDBC connection pool and JNDI resource as shown below:
    ~/tools/glassfish/v3/58/glassfishv3/bin >./asadmin create-jdbc-connection-pool –datasourceclassname com.mysql.jdbc.jdbc2.optional.MysqlConnectionPoolDataSource –restype javax.sql.DataSource –property “User=duke:Password=glassfish:URL=jdbc\:mysql\://localhost/states” jdbc/states

    Command create-jdbc-connection-pool executed successfully.
    ~/tools/glassfish/v3/58/glassfishv3/bin >./asadmin ping-connection-pool jdbc/states

    Command ping-connection-pool executed successfully.
    ~/tools/glassfish/v3/58/glassfishv3/bin >./asadmin create-jdbc-resource –connectionpoolid jdbc/states jdbc/jndi_states

    Command create-jdbc-resource executed successfully.

  4. Download NetBeans 6.8 M1 and install “All” version. Expand “Servers” node and add the recently installed GlassFish server.
  5. Create a new Web project and name it “HelloEclipseLink”. Make sure to choose “GlassFish v3″ as the server and “Java EE 6 Web” as the Java EE version as shown below:

    Take defaults elsewhere.

  6. Create the Persistence Unit
    1. Right-click on the newly created project and select “New”, “Entity Classes from Database …”. Choose the earlier created data source “jdbc/jndi_states” as shown below:

    2. Select “STATES” table in “Available Tables:” and click on “Add >” and then “Next >”.
    3. Click on “Create Persistence Unit …”, take all the defaults and click on “Create”. “EclipseLink” is the Reference Implementation for JPA 2.0 is the default choosen Persistence Provider as shown below:
    4. Enter the package name as “server” and click on “Finish”.
  7. Create a Servlet to retrieve and display all the information from the database
    1. Right click on the project, “New”, “Servlet …”.
    2. Give the Servlet name “ShowStates” and package “server”.
    3. Even though you can take all the defaults and click on “Finish” but instead click on “Next >” and the following screen is shown:

      Notice “Add information to deployment descriptor (web.xml)” checkbox. Servlet 3.0 makes “web.xml” optional in most of the common cases by providing corresponding annotations and NetBeans 6.8 leverages that functionality. As a result, no “web.xml” will be bundled in our WAR file. Click on “Finish” now.

      The generated servlet code looks like:

      Notice @WebServlet annotation, this makes “web.xml” optional. TOTD #82 provide another example on how to use Servlet 3.0 with EJB 3.1.

    4. Inject the Persistence Unit as:
      @PersistenceUnit
      EntityManagerFactory emf;

      right above “processRequest” method.

    5. Change the “try” block of “processRequest” method to:
      List<States> list = emf.createEntityManager().createNamedQuery(“States.findAll”).getResultList();
      out.println(“<table border=\”1\”>”);
      for (States state : list) {
      out.println(“<tr><td>” + state.getAbbrev() +
      “</td><td>” + state.getName() +
      “</td></tr>”);
      }
      out.println(“</table>”);

      This uses a predefined query to retrieve all rows from the table and then display them in a simple formatted HTML table.

  8. Run the project
      1. Right click on the project, select “Properties” and change the “Relative URL” to “/ShowStates”. This is the exact URL that you specified earlier.

      2. Right-click on the project and select “Run” to see the following output:

    So we created a simple web application that uses Servlet 3.0, JPA 2.0, EclipseLink and deployed on GlassFish v3 using NetBeans 6.8 M1. NetBeans provides reasonable defaults making you a lazy programmer. Believe this is more evident when you start playing with Java EE support in other IDEs ;-)

    Finally, lets look at the structure of the generated WAR file:

    It’s very clean – no “web.xml”, only the relevant classes and “persistence.xml”.

    Also refer to other Java EE 6 blog entries. A future blog entry will show how to use JSF 2.0 instead of Servlet for displaying the results.

    Please leave suggestions on other TOTD that you’d like to see. A complete archive of all the tips is available here.

    Technorati: totd glassfish v3 mysql javaee6 servlet3 jpa2 netbeans

    Share and Enjoy:
    • Print
    • Digg
    • Sphinn
    • del.icio.us
    • Facebook
    • Google Bookmarks
    • DZone
    • StumbleUpon
    • Technorati
    • Twitter
    • Slashdot
    Older Posts »

    The views expressed on this blog are my own and do not necessarily reflect the views of Oracle.
    Powered by WordPress