Tag Archives: docker

Vagrant with Docker provider, using WildFly and Java EE 7 image

What is Vagrant?

vagrant-logoVagrant is a simplified and portable way to create virtual development environments. It works with multiple virtualization software such as VirtualBox, VMWare, AWS, and more. It also works with multiple configuration software such as Ansible, Chef, Puppet, or Salt.

No more “works on my machine”!

The usual providers are, well, usual. Starting with version 1.6, Docker containers can be used as one of the backend providers as well. This allows your development environment to be based on Docker containers as opposed to full Virtual Machines. Read more about this at docs.vagrantup.com/v2/docker/index.html.

The complete development environment definition such as the type of machine, software that needs to be installed, networking, and other configuration information is defined in a text file, typically called as Vagrantfile. Based upon the provider, it creates the virtual development environment.

Read more about what can be defined in the file, and how, at docs.vagrantup.com/v2/vagrantfile/index.html.

Getting Started with Vagrant

Getting Started Guide is really simple and easy to follow to get your feet wet with Vagrant. Once your basic definition is created, the environment can be started with a simple command:

The complete set of commands are defined at docs.vagrantup.com/v2/cli/index.html.

Default provider for Vagrant is VirtualBox. An alternate provider can be specified at the CLI as:

This will spin up the Docker container based upon the image specified in the Vagrantfile.

Packaging Format

Vagrant environments are packaged as Boxes. You can search from the publicly available list of boxes to find the box of your choice. Or even create your own box, and add them to the central repository using the following command:

Vagrant with WildFly Docker image

After learning the basic commands, lets see what does it take to start a WildFly Docker image using Vagrant.

The Vagrantfile is defined at github.com/arun-gupta/vagrant-images/blob/master/docker-wildfly/Vagrantfile and shown in line:

Clone the git repo and change to docker-wildfly directory. Vagrant image can be started using the following command:

and shows the output as:

This will not work until #5187 is fixed. But at least this blog explained the main concepts of Vagrant.

Build Kubernetes on Mac OS X (Tech Tip #70)

kubernetes on macKey Concepts of Kubernetes explained the basic fundamentals of Kubernetes. Binary distributions of Kubernetes on Linux can be downloaded from Continuous Integration builds. But it needs to manually built on other platforms, for example Mac. Building Kubernetes on Mac is straightforward as long as you know the steps.

This Tech Tip explains how to build Kubernetes on Mac.

Lets get started!

  1. Kubernetes is written using Go programming language. So you’ll need to download the tools/compilers to build Kubernetes.Install Go (golang.org/doc/install). For example Go 1.4 package for 64-bit Mac OS X can be downloaded from storage.googleapis.com/golang/go1.4.darwin-amd64-osx10.8.pkg.
  2. Configure Go. GOROOT is directory of Go installation is done and contains compiler/tools. GOPATH is directory for your Go projects / 3rd party libraries (downloaded with “go get”).Setup environment variables GOPATH and GOROOT. For example, on my environment they are:

    Make sure $GOROOT/bin is in $PATH.
  3. Install Gnutar:

    Without this, the following message will be shown:
  4. Tech Tip #39 shows how to get stared with Docker on Mac using boot2docker. Download boot2docker for Mac from github.com/boot2docker/osx-installer/releases and install.
  5. Git clone Kubernetes repo:
  6. Build it. This needs to be done from within the boot2docker VM.

Enjoy!

Subsequent blogs will show how to run a Kubernetes cluster of WildFly containers. WildFly will have a Java EE 7 application deployed and persist data to MySQL containers.

Key Concepts of Kubernetes

What is Kubernetes?

kubernetes-logo

Kubernetes is an open source orchestration system for Docker containers. It manages containerized applications across multiple hosts and provides basic mechanisms for deployment, maintenance, and scaling of applications.

It allows the user to provide declarative primitives for the desired state, for example “need 5 WildFly servers and 1 MySQL server running”. Kubernetes self-healing mechanisms, such as auto-restarting, re-scheduling, and replicating containers then ensure this state is met. The user just define the state and Kubernetes ensures that the state is met at all times on the cluster.

How is it related to Docker?

Docker provides the lifecycle management of containers. A Docker image defines a build time representation of the runtime containers. There are commands to start, stop, restart, link, and perform other lifecycle methods on these containers. Containers can be manually linked as shown in Tech Tip #66 or orchestrated using Fig as shown in Tech Tip #68. Containers can run on multiple hosts as well as shown in Tech Tip #69.

Kubernetes uses Docker to package, instantiate, and run containerized applications.

How does Kubernetes simplify containerized application deployment?

A typical application would have a cluster of containers across multiple hosts. For example, your web tier (Apache or Undertow) might run on a set of containers. Similarly, your application tier (WildFly) would run on a different set of containers. The web tier would need to delegate the request to application tier. In some cases, or at least to begin with, you may have your web and application server packaged together in the same set of containers. The database tier would generally run on a separate tier anyway. These containers would need to talk to each other. Using any of the solutions mentioned above would require scripting to start the containers, and monitoring/bouncing if something goes down. Kubernetes does all of that for the user after the application state has been defined.

Kubernetes is cloud-agnostic. This allows it run on public, private or hybrid clouds. Any cloud provider such as Google Cloud Engine. OpenShift v3 is going to be based upon Docker and Kubernetes. It can even run on a variety of hypervisors, such as VirtualBox.

Key concepts of Kubernetes

At a very high level, there are three key concepts:

  • Pods are the smallest deployable units that can be created, scheduled, and managed. Its a logical collection of containers that belong to an application.
  • Master is the central control point that provides a unified view of the cluster. There is a single master node that control multiple minions.
  • Minion is a worker node that run tasks as delegated by the master. Minions can run one or more pods. It provides an application-specific “virtual host” in a containerized environment.

A picture is always worth a thousand words and so this is a high-level logical block diagram for Kubernetes:

kubernetes-key-concepts

After the 50,000 feet view, lets fly a little lower at 30,000 feet and take a look at how Kubernetes make all of this happen. There are a few key components at Master and Minion that make this happen.

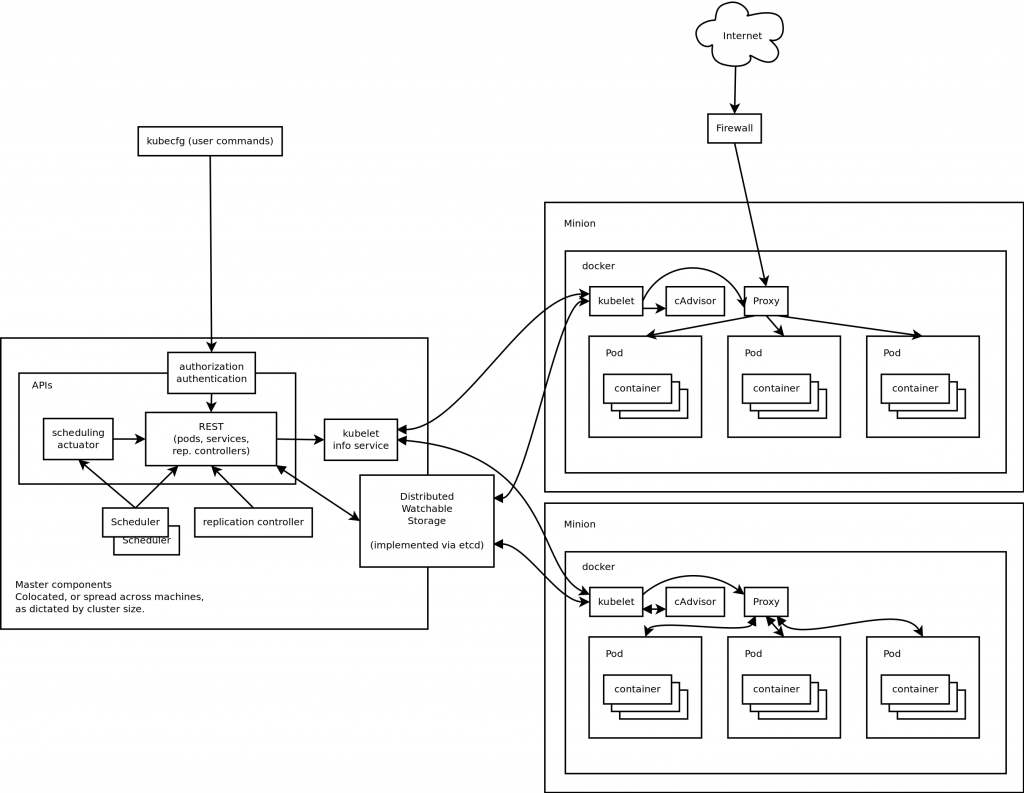
  • Replication Controller is a resource at Master that ensures that requested number of pods are running on minions at all times.
  • Service is an object on master that provides load balancing across a replicated group of pods.
  • Label is an arbitrary key/value pair in a distributed watchable storage that the Replication Controller uses for service discovery.
  • Kubelet: Each minion runs services to run containers and be managed from the master. In addition to Docker, Kubelet is another key service installed there. It reads container manifests as YAML files that describes a pod. Kubelet ensures that the containers defined in the pods are started and continue running.
  • Master serves RESTful Kubernetes API that validate and configure Pod, Service, and Replication Controller.

Kubernetes Design Overview provides great summary of all the key components as shown below.


kubernetes-architecture

Extensive docs are already available at github.com/GoogleCloudPlatform/kubernetes/tree/master/docs. A subsequent blog will explain a Kubernetes version of Tech Tip #66.

OpenShift v3 uses Kubernetes and Docker to provide the next level of PaaS platform.

As a fun fact, “Kubernetes” is actually a Greek word written as κυβερνήτης and means “helmsman of a ship”. In that sense, Kubernetes serves that role for your Docker containers.

Docker container linking across multiple hosts (Tech Tip #69)

Docker container linking is important concept to understand since any application in production will typically run on a cluster of containers across multiple hosts. But simple container linking does not allow cross-host communication.

Whats the issue with Docker container linking?

Docker containers can communicate with each other be manually linking as shown in Tech Tip #66 or orchestrated using Fig as shown in Tech Tip #68. Both of these using container linking but that has an inherent disadvantage that it is restricted to a single host. Linking does not work if containers are running across multiple hosts.

What is the solution?

This Tech Tip will evolve the sample built in Tech Tip #66 and #68 and show the containers can be connected if they are running across multiple hosts.

Docker container linking across multiple hosts can be easily done by explicitly publishing the host/port and using it from a container on a different host.

Lets get started!

  1. Start MySQL container as:

    The MySQL container is explicitly forwarding the port 3306 to port 5506.
  2. Git repo has customization/execute.sh that creates the MySQL data source. The command looks like:

    This command creates the JDBC resource for WildFly using jboss-cli. It is using $DB_PORT_3306_TCP_ADDR and $DB_PORT_3306_TCP_PORT variables which are defined per Container Linking Environment Variables. The scheme by which the environment variables for containers are created is rather weird. It exposes the port number in the variable name itself. I hope this improves in subsequent releases.

    This command needs to be updated such that an explicit host/port can be used instead.

    So update the command to:

    The only change in the command is to use $MYSQL_HOST and $MYSQL_PORT variables. This command already exists in the file but is commented. So just comment the previous one and uncomment this one.

  3. Build the image and run it as:

    Make sure to substitute <IP_ADDRESS> with the IP address of your host. For convenience, I ran it on the same host. The IP address in this case can be easily obtained using boot2docker ip.

  4. A quick verification of the deployment can be done by accessing the REST endpoint:

With this, your WildFly and MySQL can run on two separate hosts, no special configuration required.

Enjoy!

Docker allows cross-host container linking using Ambassador Containers but that adds a redundant hop for the service to be accessed. A cleaner solution would to use Kubernetes or Swarm, more on that later.

Marek also blogged about a more elaborate solution in Connecting Docker Containers on Multiple Hosts.


Docker orchestration using Fig (Tech Tip #68)

Tech Tip #66 showed how to run a Java EE 7 application using WildFly and MySQL in two separate containers. It required to explicitly start the two containers, and link them using --link. This defining and controlling a multi-container service is a common design pattern in order to get an application up and going.

Meet Fig – Docker Orchestration Tool.

Fig allows to:

  • Define multiple containers in a single configuration file
  • Create dependencies between two containers by creating links between them
  • Start containers in the right sequence

Let’s get started!

  1. Install Fig as:
  2. Entry point to Fig is a configuration file that defines the containers and their dependencies. The equivalent configuration file from Tech Tip #65 is:

    This YML-based configuration file has:

    1. Two containers defined by the name “mysqldb” and “mywildfly”
    2. Image names are defined using “image”
    3. Environment variables for the MySQL container are defined in “environment”
    4. MySQL container is linked with WildFly container using “links”
    5. Port forwarding is achieved using “ports”
  3. All the containers can be started, in detached mode, by giving the command:

    The output is shown as:

    Fig commands allow to monitor and update the status of the containers:

    1. Logs can be seen as:
    2. Container status can be seen by giving the command:

      to show the output as:
    3. Containers can be stopped as:
    4. Alternatively, containers can be started in foreground by giving the command:

      and the output is seen as:
  4. Find out the IP address using boot2docker ip and access the app as:

Complete list of Fig commands can be seen by typing fig:

Particularly interesting is scale command, and we’ll take a look at it in a subsequent blog.

File issues on github.

Enjoy!

WildFly Admin Console in a Docker image (Tech Tip #67)

WildFly Docker image binds application port (8080) to all network interfaces (using -b 0.0.0.0). If you want to view feature-rich lovely-looking web-based administration console, then management port (9990) needs to be bound to all network interfaces as well using the shown command:

This is overriding the default command in Docker file, explicitly starting WildFly, and binding application and management port to all network interfaces.

The -P flag map any network ports inside the image it to a random high port from the range 49153 to 65535 on Docker host. Exact port can be verified by giving docker ps command as shown:

In this case, port 8080 is mapped to 49161 and port 9990 is mapped to 49162. IP address of Docker containers can be verified using boot2docker ip command. The default web page and admin console can then be accessed on these ports.

Accessing WildFly Administration Console require a user in administration realm. This can be done by using an image which will create that user. And since a new image is created, the Dockerfile can also consume network interface binding to keep the actual command-line simple. The Dockerfile is pretty straight forward:

This image has already been pushed to Docker Hub and source file is at github.com/arun-gupta/docker-images/tree/master/wildfly-admin.
So to have a WildFly image with Administration Console, just run the image as shown:

Then checked the mapped ports as:

Application port is mapped to 49165 and management port is mapped to 49166. Access the admin console at http://192.168.59.103:49166/ which will then prompt for the username (“admin”) and the password (“Admin#007″).

techtip66-admin-console

If you don’t like random ports being assigned by Docker, then you can map them to specific ports as well using the following command:

In this case, application port 8080 is mapped to 8080 on Docker host and management port 9990 is mapped to 9990 on Docker host. So the admin console will then be accessible at http://192.168.59.103:9990/.

WildFly/JavaEE7 and MySQL linked on two Docker containers (Tech Tip #66)

Tech Tip #61 showed how to run Java EE 7 hands-on lab on WildFly Docker container. A couple of assumptions were made in that case:

  • WildFly bundles H2 in-memory database. The Java EE 7 application uses the default database resource, which in case of WildFly, gets resolved to a JDBC connection to that in-memory database. This is a good way to start building your application but pretty soon you want to start using a real database, like MySQL.
  • Typically, Application Server and Database may not be residing on the same host. This reduces the risk by avoiding a single point of failure. And so WildFly and MySQL would be on to separate host.

There is plethora of material available to show how to configure WildFly and MySQL on separate hosts. What are the design patterns, and anti-patterns, if you were to do that using Docker?

Lets take a look!

In simplified steps:

  1. Run the MySQL container as:
  2. Run the WildFly container, with MySQL JDBC resource pre-configured, as:
  3. Find the IP address of the WildFly container:

    If you are on a Mac, then use boot2docker ip to find the IP address.
  4. Access the application as:

    to see the output as:

    The application is a trivial Java EE 7 application that publishes a REST endpoint. Access it as:

    to see:

If you are interested in nitty gritty, read further details.

Linking Containers

The first concept we need to understand is how Docker allows linking containers. Creating a link between two containers creates a conduit between a source container and a target container and securely transfer information about source container to target container. In our case, target container (WildFly) can see information about source container (MySQL). The important part to understand here is that none of this information needs to be publicly exposed by the source container, and is only made available to the target container.

The magic switch to enable link is, intuitively, --link. So for example, if MySQL and WildFly containers are run as shown above, then --link mysqldb:db links the MySQL container named mysqldb with an alias db to the WildFly target container. This defines some environment variables, following the defined protocol, in the target container which can then be used to access information about the source container. For example, IP address, exposed ports, username, passwords, etc. The complete list of environment variables can be seen as:

So you can see there are DB_* environment variables providing plenty of information about source container.

Linking only works if all the containers are running on the same host. A better solution will be shown in the subsequent blog, stay tuned.

Override default Docker command

Dockerfile for this image inherits from jboss/wildfly:latest and starts the WildFly container. Docker containers can only run one command but we need to install JDBC driver, create JDBC resource using the correct IP address and port, and deploy the WAR file. So we will override the command by inheriting from jboss/wildfly:latest and use a custom command. This command will do everything that we want to do, and then start WildFly as well.

The custom command does the following:

  • Add MySQL module
  • Add MySQL JDBC driver
  • Add the JDBC data source using IP address and port of the linked MySQL container
  • Deploy the WAR file
  • Start WildFly container

Note, WildFly is starting with -b 0.0.0.0 that allows it to be bound to any IP address. Also, the command needs to run in foreground so that the container stays active.

Customizing security

Ideally, you’ll poke holes in the firewall to enable connection to specific host/ports. But these instructions were tried on Fedora 20 running in Virtual Box. So for convenience, the complete firewall was disabled as:

In addition, a Host-only adapter was added using Virtual Box settings and looks like:

techtip65-host-only-adapter

That’s it, that should get you going to to use WildFly and MySQL on two separate containers.

Also verified the steps on boot2docker, and it worked seamlessly there too:

Source code for the image is at github.com/arun-gupta/docker-images/tree/master/wildfly-mysql-javaee7.

Enjoy!

Resolve “dial unix /var/run/docker.sock” error with Docker (Tech Tip #65)

I’ve played around with Docker configuration on Mac using boot2docker (#62, #61, #60, #59, #58, #57) and starting to play with native support on Fedora 20. Boot2docker starts as a separate VM on Mac and everything is pre-configured. Booting a fresh Fedora VM and trying to run Docker commands there gives:

Debugging revealed that Docker daemon was not running on this VM. It can be easily started as:

And then enable it to start automatically with every restart of the VM as:

Simple, isn’t it?

Enjoy!

Run Java EE Tests on Docker using Arquillian Cube (Tech Tip #62)

Tech Tip #61 showed how to run Java EE 7 Hands-on Lab using Docker. The Dockerfile used there can be used to create a new image that can deploy any Java EE 7 WAR file to the WildFly instance running in the container.

For example github.com/arun-gupta/docker-images/blob/master/javaee7-test/Dockerfile can be copied to the root directory of javaee7-samples and be used to deploy jaxrs-client.war file to the container. Of course, you first need to build the sample as:

The exact Dockerfile is shown here:

If you want to deploy another Java EE 7 application, then you need to do the following steps:

  • Create the WAR file of the sample
  • Change the Dockerfile
  • Build the image
  • Stop the previous container
  • Start the new container

Now, if you want to run tests against this instance then mvn test alone will not do it because either you need to bind the IP address of the Docker container statically, or dynamically find out the address and then patch it at runtime. Anyway, the repeated cycle is little too cumbersome. How do you solve it?

Meet Arquillian Cube!

Arquillian Cube allows you to control the lifecycle of Docker images as part of the test lifecyle, either automatically or manually.

The blog entry provide more details about getting started with Arquillian Cube, and this functionality has now been enabled in “docker” branch of javaee7-samples. Arquillian Cube Extension Alpha2 was recently released and is used to provide integration. Here are the key concepts:

  • A new “wildfly-docker-arquillian” profile is being introduced
  • The profile adds a dependency on:
  • Uses Docker REST API to talk to the container. Complete API docs shows the sample payloads and explains the query parameters and status codes.
  • Uses WildFly remote adapter to talk to the application server running within the container
  • Configuration for Docker image is specified as part of maven-surefire-plugin.:

    Username and password are specified are for the WildFly in arungupta/javaee7-samples-wildfly image. All the configuration values can be overridden by arquillian.xml for each test case, as explained here.

How do you try out this functionality?

Here is a complete log of running simple-servlet test:

REST payload from the client to Docker server are shown here. This was verified on a Fedora 20 Virtual Box image. Here are some quick notes on setting it up there:

  1. Install the required packages
  2. Configure Docker
  3. Verify Docker TCP configuration

Boot2docker on Mac still has issue #49, this is Alpha2 after all :-)

Try some other Java EE 7 tests and file bugs here.

Enjoy!

Java EE 7 Hands-on Lab on WildFly and Docker (Tech Tip #61)

Java EE 7 Hands-on Lab has been delivered all around the world and is a pretty standard application that shows design patterns and anti-patterns for a typical Java EE 7 application. It shows how the following technologies can be used in a close-to-real-world application:

  • WebSocket 1.0
  • JSON Processing 1.0
  • Batch 1.0
  • Contexts & Dependency Injection 1.1
  • Java Message Service 2.0
  • Java API for RESTFul Services 2.0
  • Java Persistence API 2.0
  • Enterprise JavaBeans 3.1
  • JavaSever Faces 2.2

However the lab requires you to download NetBeans (Java EE 7 tooling) and WildFly or GlassFish (Java EE 7 runtime).

If you don’t want to follow the instructions and create the app, a pre-built solution zip file is available. But this still requires you to download Maven and build the app. You still have to download the runtime, which is pretty straight forward for WildFly, but still an extra task.

Maven step can be reduced using a pre-built WAR file, but runtime is still required.

Docker containers allows you to simplify application delivery by packaging all the key components together in an image. So how do you get the first feel of Java EE 7 hands-on lab with Docker ?

If you are new to Docker, Tech Tip #39 provide more background and details on how to get started. After initial setup, you can pull the Docker image that contains WildFly and pre-built Java EE 7 hands-on lab WAR file as shown:

And then you can run it as:

Find out the IP address where your container is hosted using boot2docker ip command. And now access your Java EE 7 application at http://<IP>/movieplex7. The app would look like:

techtip61-output

Here is the complete log shown by the Docker container:

Source code for this Dockerfile is pretty straight forward and at github.com/arun-gupta/docker-images/blob/master/javaee7-hol/Dockerfile.

Enjoy!


Remove Docker image and container with a criteria (Tech Tip #60)

You have installed multiple Docker images and would like to clean them up using rmi command. So, you list all the images as:

Then try to remove the “arungupta/wildfly-centos” image as shown below, but get an error:

So you follow the recommendation of using -f switch but get another error:

What do you do ?

This message indicates that the image is used by one of the containers and that’s why could not be removed. The error message is very ambiguous and a #9458 has been filed for the same.

In the meanwhile, an easy way to solve this is to list all the containers as shown:

There are lots of containers that are using “arungupta/wildfly-centos” image but none of them seem to be running. If there are any containers that are running then you need to stop them as:

Remove the containers that are using this image as:

The criteria here is specified as a grep pattern.

docker ps command has other options to specify criteria as well such as only the latest created containers or containers in a particular status. For example, containers that exited with status -1 can be seen as:

All running containers, as opposed to meeting a specific criteria, can be removed as:

And now the image can be easily removed as

Just like removing all containers, all images can be removed as:

Enjoy!

Docker Common Commands Cheatsheet (Tech Tip #59)

Docker CLI provides a comprehensive set of commands. Here is a quick cheat sheet of the commonly used commands:

Purpose Command
Build an image docker build –rm=true .
Install an image docker pull ${IMAGE}
List of installed images docker images
List of installed images (detailed listing) docker images –no-trunc
Remove an image docker rmi ${IMAGE_ID}
Remove all untagged images docker rmi $(docker images | grep “^” | awk “{print $3}”)
Remove all images docker rm $(docker ps -aq)
Run a container docker run
List containers docker ps
Stop a container docker stop ${CID}
Find IP address of the container docker inspect –format ‘{{ .NetworkSettings.IPAddress }}’ ${CID}
Attach to a container docker attach ${CID}
Remove a container docker rm ${CID}
Remove all containers docker rm $(docker ps -aq)

What other commands do you use commonly ?

Pushing Docker images to Registry (Tech Tip #58)

Tech Tip #57 explained how to create your own Docker images. That particular blog specifically showed how to build your own WildFly Docker images on CentOS and Ubuntu. Now you are ready to share your images with rest of the world. That’s where Docker Hub comes in handy.

Docker Hub is the “distribution component” of Docker, or a place to store and search images. From the Getting Started with Docker Hub docs …

The Docker Hub is a centralized resource for working with Docker and its components. Docker Hub helps you collaborate with colleagues and get the most out of Docker.

Starting and pushing images to with Docker Hub is pretty straight forward.

  • Pushing images to Docker Hub require an account. It can be created as explained here. Or rather easily by using docker login command.

    Searching on WildFly shows there are 72 images:

    Official images are tagged jboss/wildfly.
  • In order to push your own image, it needs to be built as a named image otherwise you’ll get an error as shown:

    This can be easily done as shown:

    docker build command builds the image, -t specifies the repository name to be applied to the resulting image.
  • Once the image is built, it can be verified as:

    Notice the first line shows the named image arungupta/wildfly-centos.
  • This image can then be pushed to Docker Hub as:
  • And you can verify this by pulling the image:

Enjoy!


Create your own Docker image (Tech Tip #57)

Docker simplifies software delivery by making it easy to build and share images that contain your application’s entire environment, i.e. operating system, JDK, database, WAR file, specific tuning required for your application, etc.

There are three main components of Docker:

  • Docker images are “build component” – a read-only template of application operating system.
  • Containers are “run component” – a runtime representation created from images.
  • Registry are “distribution component” – a place to store and distribute images.

Several JBoss projects are available as Docker images at www.jboss.org/docker. Tech Tip #39 explained how to get started with Docker on Mac. It also explained how to start the official WildFly Docker image.

Docker image is made up of multiple layers where each layer provides some functionality, and a higher layer can add functionality on top of it. For example, Docker mounts the root filesystem as read-only layer and then adds a read-write layer on top of it. All these layers are combined together using Union Mount to provide application operating environment.

The complete history of how the WildFly image was built can be seen as:

The exact command issued at each layer is listed in this output. If you scroll to the far right then you can see the total space consumed by each layer as well. For example, Fedora is used as the base image and consumes ~574 MB of the total image, Open JDK 7 is taking 217.5 MB and WildFly is 135 MB.

Docker images are built by reading the instructions from Dockerfile. This is a text file that contains all the commands, in order, needed to build a given image. It adheres to a specific format and use a specific set of instructions. The vocabulary of commands is rather limited but serves the purpose well. The image can be built by giving the command docker build. Docker Tutorial provides complete instructions on how to create your own custom image.

The official WildFly Docker image is built using Fedora 20 as the base operating system. The Dockerfile can be seen at github.com/jboss-dockerfiles/wildfly/blob/master/Dockerfile. It uses  jboss/base-jdk:7 as the base image, which uses jboss/base as the base image. Dockerfile of jboss/base shows Fedora 20 is used as the base image.

An alternative is to build this image using CentOS or Ubuntu as a base image. Dockerfiles for these images are available at github.com/arun-gupta/docker-images/.

Starting boot2docker shows the output as:

And then you can build the CentOS-based WildFly Docker image as shown below. Note this command is given from the “wildfly-centos” directory of github.com/arun-gupta/docker-images/. And so the Dockerfile is at github.com/arun-gupta/docker-images/blob/master/wildfly-centos/Dockerfile.

The list of Docker images can now be seen as:

The total image size is 619.6 MB. The official WildFly Docker image can be installed as shown:

And the complete list of Docker images can again be seen as:

The image size in this case is 948.7 MB. A detailed understanding of this image is created was explained earlier in this blog.

Ubuntu-based WildFly image can be built and installed as shown below. Note this command is given from the “wildfly-ubuntu” directory of github.com/arun-gupta/docker-images/. And so the Dockerfile is at github.com/arun-gupta/docker-images/blob/master/wildfly-ubuntu/Dockerfile.

The list of Docker images can once again be seen as:

Docker image can run with docker run command. Some other related commands are:

  • docker ps: Lists containers
  • docker stop <id>: Stops the container with the given <id>

Run CentOS image as shown below. Specifying -i option will make it interactive and -t option allocates a pseudo-TTY. And port 8080 from the container is made accessible on port 80 of the container.

In a different shell, get the container’s IP address as:

And then access WildFly at http://192.168.59.103.

Similarly, running the WildFly Ubuntu image shows:

You can login to the host VM as shown:

Different layers of the image are stored in /var/lib/docker directory as shown:

VM image on Mac OSX is stored in ~/VirtualBox VMs/boot2docker-vm directory. This directory can grow up rather quickly if the intermediate containers are not removed. boot2docker-vm.vmdk on my machine is ~5GB for these different images.

You can reset it by running the following commands (WARNING: This will destroy all images you’ve downloaded and built so far):

Containers, as you can imagine, have a memory foot print.

More Docker goodness is coming in subsequent blogs!

Continuous Deployment with Java EE 7, WildFly, and Docker – (Hanginar #1)

This blog is starting a new hanginar (G+ hangout + webinar) series that will highlight solutions, frameworks, application servers, tooling, deployment, and more content focused on Java EE. These are not the usual conference-style monologue presentations, but are interactive hackathons where real working stuff is shown, and is mostly code-driven. Think of this as a mix of, and inspired by, Nighthacking (@_nighthacking), Virtual JUG (@virtualjug), and virtual JBUG (@vjbug) but focussing purely on Java EE technology.

There are so many cool things happening in the Java EE platform and ecosystem around it, and they need to be shared with the broader community, more importantly at a location where people can go back again and again. Voxxed.com has graciously offered to host all the videos and be the central place for this content.

The first such webinar, with none other than Adam Bien (@adambien), in that series just went live. It discusses how to do Continuous Deployment with Java EE 7 and Docker. It will also show how to go from “git push” to production in less than a minute, including rebooting your Docker containers and restarting all your microservices.

A tentative list of speakers is identified at github.com/javaee-samples/webinars. Each speaker is assigned an issue which allows you to ask questions. Feel free to file an issue for any other speaker that should be on the list.

What would you like to see ? Spec leads ? App servers ? Why this over that ? Design patterns and anti-patterns ? Anonymous customer use cases ? What frequency would you like to see ? Use G+ hangout on air ?

As with any new effort, we’ll learn and evolve and see what makes best sense for the Java EE community.

So what’s the mantra ? Code is king, give some love to Java EE!