Tag Archives: eclipse

Docker Tooling in Eclipse Video

Eclipse Mars provides integrated tooling for Docker. What can you do?

  • Pull/Push/Build Docker images
  • Run/Start/Stop/Kill Docker containers
  • Customize views

The video below shows how to get started with and try out some of the features:

Couchbase Docker Container is used to showcase different features.

Here are some snapshots from Eclipse to give you a quick feel.

Docker Tooling PerspectiveDocker Eclipse Mars Docker Perspective

Docker Explorer, Images and ContainersDocker Eclipse Mars Docker Explorer Default View

Run, Start, Stop, Kill Containers

Docker Eclipse Mars Container Properties

Complete instructions are available at https://wiki.eclipse.org/Linux_Tools_Project/Docker_Tooling/User_Guide

If you have suggestions or find bugs, please open these in the Linux Tools project in Eclipse under Docker.

Source: http://blog.couchbase.com/2016/march/docker-tooling-eclipse-video

Docker Tools in Eclipse

Upcoming Docker Tooling for Eclipse gave a preview of Docker Tooling coming in Eclipse. This Tech Tip will show how to get started with it.

docker-logoeclipse-logo

NOTE: This is pretty bleeding edge and so some of the features may be half baked. But we are looking for all the feedback!

The Docker tooling is aimed at providing at minimum the same basic level features as the command-line interface, but also provide some advantages by having access to a full fledged UI.

Install Docker Tools Plugins

  • Download and Install JBoss Developer Studio 9.0 Nightly, take defaults through out the installation. Alternatively, download Eclipse Mars latest build and configure JBoss Tools plugin from the update site http://download.jboss.org/jbosstools/updates/nightly/mars/.
  • Open JBoss Developer Studio 9.0 Nightly or Eclipse Mars.
  • Add a new site using the menu items: Help > Install New Software… > Add…. Specify the Name: as “Docker Nightly” and Location: as http://download.eclipse.org/linuxtools/updates-docker-nightly/.Eclipse Docker Tooling
  • Expand Linux Tools, select Docker Client and Docker Tooling:Eclipse Docker Tooling
  • Click on Next >, Next >, accept the license agreement, and click on Finish. This will complete the installation of plugins.Restart the IDE for changes to take effect.

Docker Explorer

The Docker Explorer provides a wizard to establish a new connection to a Docker daemon. This wizard can detect default settings if the user’s machine runs Docker natively (such as in Linux) or in a VM using Boot2Docker (such as in Mac or Windows). Both Unix sockets on Linux machines and the REST API on other OSes are detected and supported. The wizard also allows remote connections using custom settings.

  • Use the menu Window, Show View, Other…. Type “docker” to see the output as:Docker Eclipse Tools
  • Select Docker Explorer to open the explorer.Docker Eclipse Tools
  • Click on the link in this window to create a connection to Docker Host. Specify the settings as shown:Docker Eclipse ToolsMake sure to get IP address of the Docker Host using docker-machine ip command.Also, make sure to specify the correct directory for .docker on your machine.
  • Click on Test Connection to check the connection. This should show the output as:Docker Eclipse ToolsClick on OK and Finish to exit out of the wizard.
  • Docker Explorer itself is a tree view that handles multiple connections and provides users with quick overview of the existing images and containers.Docker Eclipse Tools
  • Customize the view by clicking on the arrow in toolbar:Docker Eclipse Tools
  • Built-in filters can show/hide intermediate and dangling images, as well as stopped containers.Docker Eclipse Tools

Docker Images

The Docker Images view lists all images in the Docker host selected in the Docker Explorer view. This view allows user to manage images, including:

  • Pull/push images from/to the Docker Hub Registry (other registries will be supported as well, #469306)
  • Build images from a Dockerfile
  • Create a container from an image

Lets take a look at it.

  • Use the menu  Window, Show View, Other…, select Docker Images. It shows the list of images on Docker Host:Docker Eclipse Tools
  • Right-click on the image ending with wildfly:latest and click on the green arrow in the toolbar. This will show the following wizard:Docker Eclipse ToolsBy default, all exports ports from the image are mapped to random ports on the host interface. This setting can be changed by unselecting the first checkbox and specify exact port mapping.Click on Finish to start the container.
  • When the container is started, all logs are streamed into Eclipse Console:Docker Eclipse Tools

Docker Containers

Docker Containers view lets the user manage the containers. The view toolbar provides commands to start, stop, pause, unpause, display the logs and kill containers.

  • Use the menu Window, Show View, Other…, select Docker Containers. It shows the list of running containers on Docker Host:Docker Eclipse Tools
  • Pause the container by clicking on the pause button in the toolbar (#469310). Show the complete list of containers by clicking on the View Menu, Show all containers.

    Docker Eclipse Tools

  • Select the paused container, and click on the green arrow in the toolbar to restart the container.
  • Right-click on any running container and select Display Log to view the log for this container.

    Docker Eclipse Tools

Information and Inspect on Images and Containers

Eclipse Properties view is used to provide more information about the containers and images.

  • Just open the Properties View and click on a Connection, Container, or Image in any of the Docker Explorer View, Docker Containers View, or Docker Images View. This will fill in data in the Properties view.
  • Info view is shown as:

    Docker Eclipse Tools

  • Inspect view is shown as:

    Docker Eclipse Tools

The code is hosted in Linux Tools project.

File your bugs at: bugs.eclipse.org/bugs/enter_bug.cgi?product=Linux%20Tools and use “Docker” component. Talk to us on IRC.

Enjoy!

WildFly 9 on NetBeans, Eclipse, IntelliJ, OpenShift, and Maven (Tech Tip #86)

wildfly9-banner

WildFly 9 CR1 was recently released. Lots of cool features are included:

  • Intelligent load balancing
  • HTTP/2 and SPDY support
  • A new offline CLI mode
  • Graceful single node shutdown
  • A new Servlet-only distribution

And this is above the usual Java EE 7 compliance!

This blog is a quick check to verify that it works in all three major IDEs and OpenShift.

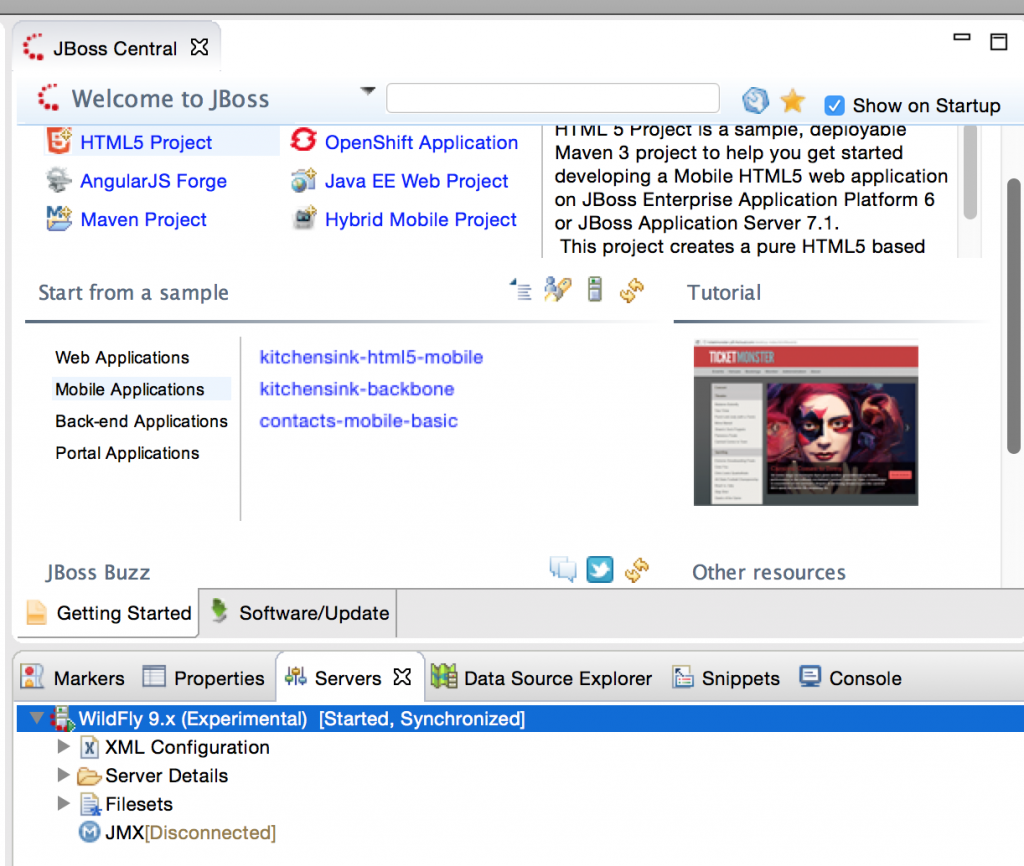
WildFly 9 and NetBeans

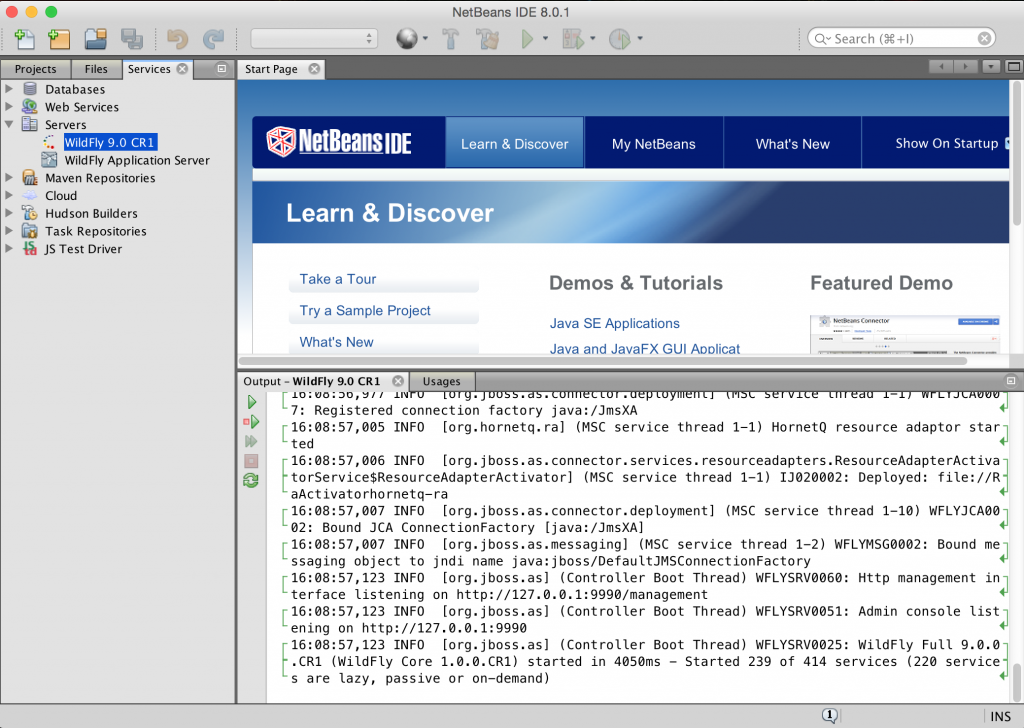
Lets start with NetBeans 8.0.x first. The screenshot shows WildFly 9 CR1 configured in NetBeans and started. The log is shown in the console.

WildFly 9 CR1 on NetBeans

Complete instructions to setup WildFly in NetBeans are in NetBeans 8 and WildFly 8.

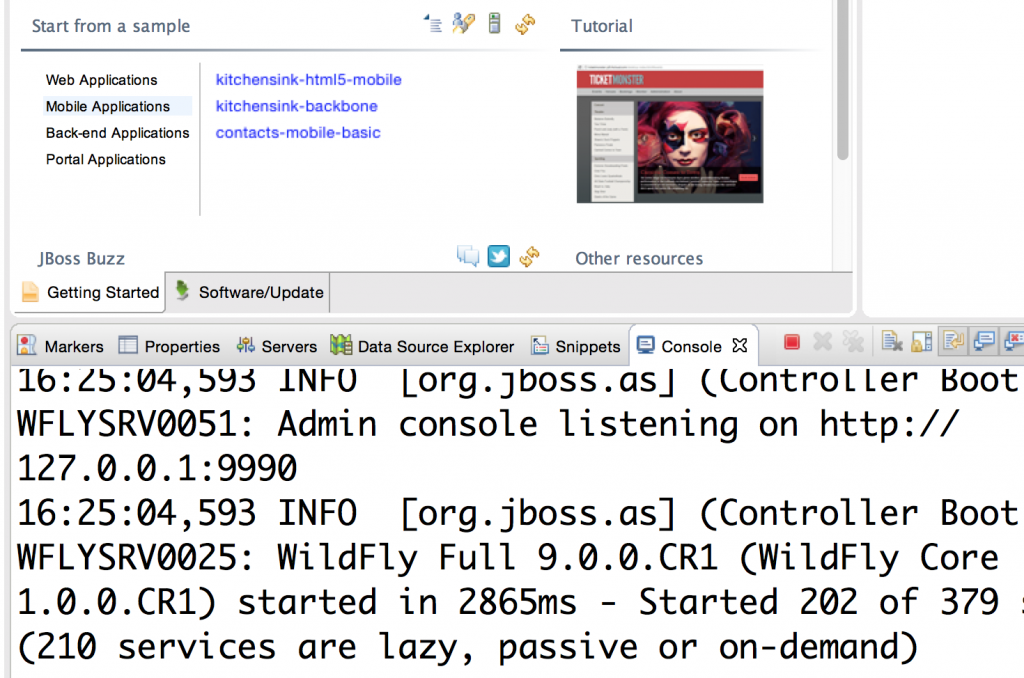
WildFly 9 and Eclipse

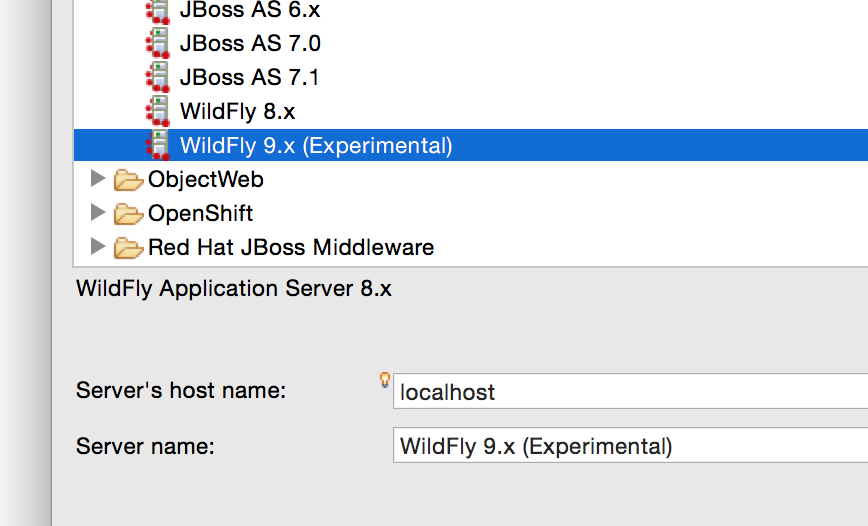
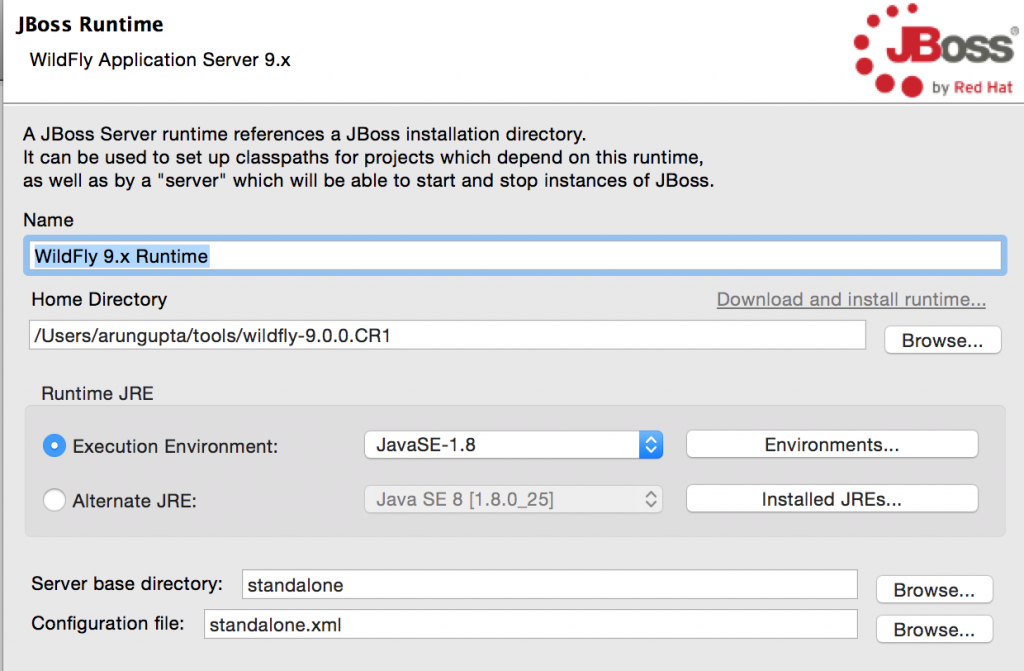
Getting Started with JBoss Tools and WildFly 8 shows how to configure WildFly with JBoss Tools. Here are the series of snapshots that shows configuring WildFly 9 in JBoss Tools with Eclipse Mars M6.

A new experimental runtime …

WildFly 9 CR1 Experimental

Specify the directory …

WildFly 9 CR1 Eclipse New Runtime

Now WildFly 9 is configured as a Server in Eclipse …

WildFly 9 CR1 Eclipse Servers

And finally the server is up and running …

WildFly 9 CR1 Eclipse Console

Complete details, including download and update center coordinates, are explained at JBoss Tools Alpha 2 for Eclipse Mars.

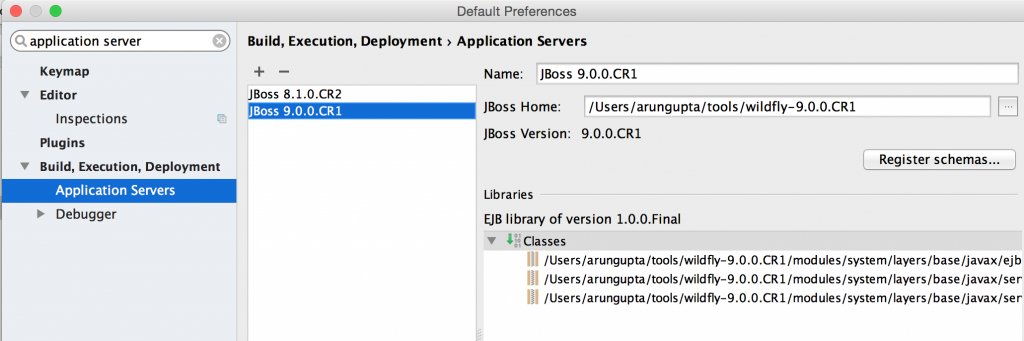
WildFly 9 and IntelliJ

WildFly 8 and IntelliJ IDEA Screencast provide complete details on how to setup IntelliJ with WildFly. The snapshot below shows WildFly 9 configured in IntelliJ 14.1.2.

WildFly 9 CR1 with IntelliJ 14

WildFly 9 and OpenShift

Creating an OpenShift application is pretty straightforward as well:

This creates a new application and uses WildFly 9 as the underlying application server. Complete details about the OpenShift cartridge are at github.com/openshift-cartridges/openshift-wildfly-cartridge/tree/wildfly-9. You can find about how to create an OpenShift application with an existing application, how to connect to this WildFly instance using JBoss CLI.

WildFly 8 CR1 on OpenShift also provide more details.

WildFly 9 and Maven

WildFly Maven Plugin  provide the latest information about how to get started with WildFly Maven plugin.

But you just need to fire up a WildFly server as:

And then deploy the Java EE 7 Movieplex application as:

And the plugin definition is very simple:

Enjoy!

Configure JRebel with Docker containers – Tech Tip #81

JRebel allows you to skip build and redeploy process by instantly deploying your application to the application server of your choice. It is supported in all the major IDEs such as NetBeans, Eclipse, and IntelliJ. It is also supported in a wide variety of application servers such as JBoss EAP, WildFly, WebLogic, WebsFear (err, WebSphere), Tomcat, and many others.

You can easily get started with JRebel in JBoss Developer Studio  or Integrate JRebel with JBoss on your local desktop. It can also be easily used with JBoss Developer Studio and Ticket Monster on OpenShift.

This Tech Tip will explain how do you set up JRebel with Docker containers. Specifically, we’ll use the sample application provided by Java EE 7 Hands-on Lab (jrebel branch), JBoss Tools with Eclipse Mars M5, and running the sample application in WildFly Docker container.

Many thanks to Adam Koblentz (@akoblentz) for helping me through the steps!

Lets get started!

Install JRebel in Eclipse

JRebel runs in three modes:

  • Local: App server is running from inside the IDE
  • External: App server is running from outside the IDE, such as using CLI, but on the same machine
  • Remote: App server is running on a different machine, VM, container, or cloud

Docker containers need to be configured using the “remote” mode.

  1. Install JBoss Tools  as explained at tools.jboss.org/downloads/. JRebel’s remote mode can only be enabled using the IDE. Install JRebel plugin from Eclipse Marketplace.

Package rebel.xml and rebel-remote.xml with the WAR

These files define the location of classes and resources in your archive.

  1. Clone the Java EE 7 HOL repo:
  2. Import the Maven project (from the solution directory) in the IDE, right-click on the project, select JRebel menu, and click on “Enable JRebel Nature”. This will generate rebel.xml in src/main/resources directory and would look something like:
  3. Right-click on the project again, and select “Enable Remoting”. This generates rebel-remote.xml, in src/main/resources directory again, and will look like:
    This needs to be done on the machine where JRebel will be used in the IDE. This will ensure that the public key is generated appropriately.
  4. Package your application as
    This will package rebel.xml and rebel-remote.xml in the WAR file.

Configure and Run the Application Server

Application server needs to know about JRebel agent and platform-specific library. Both of these files are available from Eclipse if JRebel was installed earlier. On Mac these files are available in eclipse/mars/m5/eclipse/plugins/org.zeroturnaround.eclipse.embedder_6.1.1.RELEASE-201503121801/jr6/jrebel/ directory. The exact name would very likely differ in your case.

  1. Build the image using the Dockerfile:
    The key parts in this image are:

    1. Using the official jboss/wildfly Docker image
    2. Copying the JRebel agent and platform-specific library to the image
    3. Configuring application server such that it knows about the “remote” mode and platform-specific library
    4. Start WildFly
    5. Downloads the pre-built WAR file from GitHub. This will not work for you, and you’ll need to replace it with something like:
      This WAR file is the same that was generated earlier.
  2. Actually build the image as:
  3. Run the container as:
    and this should show something like:
    JRebel license information is a good sign that everything is configured properly.

    If you used Docker Machine to Setup Docker Host then the application should now be accessible at 192.168.99.100:8080/movieplex7/.

Configure Eclipse

Last step is to configure Eclipse so that it knows where the application is deployed.

  1. In Eclipse, right-click on the project, select JRebel, Advanced Properties
  2. Click on “Edit” on next to “Deployment URLs”
  3. Click on Add and specify the URL of the application, 192.168.99.100:8080/movieplex7/ in our case.
  4. Click on Continue, Apply, OK.

Voila, the configuration is now complete.

Now changing any class, adding any method, updating any entity or HTML or JSF page will push the changes to the Docker container instantly. No need to redeploy the application.

Enjoy!

Deploy to WildFly and Docker from Eclipse – Tech Tip #79

Docker and WildFly Part 1 – Deployment via Volumes and Docker and WildFly Part 2 – Deployment over Management API shows two approaches of how JBoss Tools can be configured to run any application on WildFly server running as a Docker container.

The blogs provide detailed setup and the underlying background. This Tech Tip will provide a quick summary of how to deploy a Java EE 7 application to WildFly and Docker from Eclipse.

Lets get started!

Configure Docker

  1. Configure Docker on your machine using Docker Machine.
  2. Find the IP address as:
    and add an entry in /etc/hosts as:

Deployment to WildFly Container using Docker Volumes

  1. Create a folder that will be mounted as volume in the WildFly Docker container. In this case, the folder is /Users/arungupta/tmp/deployments.WildFly Docker container can be started as:
    rw ensures that the Docker container can write to it.
  2. Create a new server adapter:
    WildFly Docker Server Adapter
  3. Assign or create a WildFly 8.x runtime:

    Docker WildFly Server Adapter

    Changed properties are highlighted.

  4. Setup the server properties as:

    Docker WildFly Adapter Properties


    Changed properties are highlighted. The two properties on the left are automatically propagated from the previous dialog. Additional two properties on the right side are required to disable to keep deployment scanners in sync with the server.

  5. Specify a custom deployment folder on Deployment tab of Server Editor:

    Docker WildFly Server Adapter

  6. Right-click on the newly created server adapter and click “Start”.

    Docker WildFly Server Synchronized

    Status quickly changes to “Started, Synchronized” as shown.

  7. Open up any Java EE 7 project (for example javaee7-simple-sample), right-click, Run on Server, and chose this server. The project runs and displays the page:

    Docker Java EE 7 Output


Deployment to WildFly Container using Management API

  1. Run WildFly management image as:
    This is only a convenience image to reduce the number of steps required to get started. Dockerfile for this image has more details, including admin credentials.

    Volume mapping is not required in this case, instead additional management port is exposed.

  2. Configure a remote server controlled by management operations:Docker WildFly Remote Server Configuration

    Changed properties are highlighted.

  3. Take the defaults:

    Docker WildFly Remote System Integration

  4. Set up server properties by specifying the admin credentials (Admin#70365). Note, you need to delete the existing password and use this instead:

    Docker WildFly Admin Credentials

  5. Right-click on the newly created server adapter and click “Start”.Status quickly changes to “Started, Synchronized” as shown.

    Docker WildFly Server Synchronized

  6. Open up any Java EE 7 project (for example javaee7-simple-sample), right-click, Run on Server, and chose this server. The project runs and displays the page:

    Docker Java EE 7 Output

Enjoy!

This blog showed how how to deploy a Java EE 7 application to WildFly and Docker from Eclipse.

Is there any other way that you deploy to WildFly Docker container from Eclipse?

JBoss Tools Community Acceptance Testing (JBoss Tools CAT)

JBoss Tools is a set of plugins for Eclipse that complements, enhances and goes beyond the support that exists for JBoss and related technologies in the default Eclipse distribution.

Until now, early builds of JBoss Tools were released at a regular cadence leading up to the release of a particular version. Anybody could download, integrate the plugins in Eclipse, test, and provide feedback. JBoss Tools Community Acceptance Testing (CAT) seeks to obtain feedback from the community on early builds of JBoss Tools.

So what’s different ?

  • Allows JBoss Tools team to engage with individuals who can look at the release schedule and features coming in a particular release, test them, and provide feedback
  • JBoss Tools team will be paying close attention to the bugs filed by CAT members and ensuring they are responded/reacted to
  • Your name will be included in the JBoss Tools release notes
  • Help us decide if JBoss Tools is ready for release

Any feedback is relevant ? Stability, performance, usability, regression, RFE, anything literally.

Ready to get started ?

The simple process and other details are available at tools.jboss.org/cat/.

Learn more about the motivation behind all of this in a short interview with Max Andersen:

You might also wonder the name looks very familiar! Having actively participated in NetCAT and driven FishCAT, this was a very natural choice. All the more relevant because Red Hat truly believes in community powered innovation.

Max also blogged about it here.

And in case you are wondering, JBoss Developer Studio (JBDS) is a fully bundled Eclipse distribution which not only includes the majority of JBoss Tools but also all its needed dependencies and 3rd party plugins allowing for an easy one-click and no-fuss installation. JBDS is released along with the GA version of JBoss Tools. So if you are participating in JBoss Tools CAT, you are helping us test JBoss Developer Studio as well.

Tech Tip #5 shows how to get started with JBoss Tools and WildFly!

Getting Started with WildFly in OpenShift and JBoss Developer Studio (Tech Tip #21)

[Republishing from http://wildfly.org/news/2014/04/25/Getting-Started-WildFly-OpenShift/]

OpenShift provides an open source hybrid cloud application platform by Red Hat. It enables polyglot applications to be deployed on a public, private, and a hybrid cloud very easily. It provides an extensible cartridge-based architecture that allows a wide range of functionality such as frameworks, databases, monitoring services, or connectors to external backends to be easily added. WildFly cartridge allows you to start a WildFly instance in OpenShift Online.

JBoss Developer Studio provide comprehensive tooling around Java EE, HTML5, Mobile, and many other technologies needed for modern web application development. The latest 7.1.1 release provide support for Eclipse Kepler SR2, the latest Eclipse release.

This blog contains a video tutorial that explains how to get started with WildFly in OpenShift and JBoss Developer Studio. Specifically, it shows:

  • Create an OpenShift application using WildFly cartridge
  • Access the WildFly administration console using port forwarding
  • Import the created application in JBoss Developer Studio
  • Make changes to the application and view them in the deployed application
  • Add a simple Java EE 7 component to the application

Enjoy!

WildFly 8, Java EE 7, and Eclipse/JBoss Developer Studio Screencast (Tech Tip #20)

JBoss Developer Studio provide comprehensive tooling around Java EE, HTML5, Mobile, and many other technologies needed for modern web application development.

This short screencast shows you how to configure WildFly 8 in JBoss Developer Studio 7.1.1 and build/deploy a simple Java EE 7 application to it. Please note, that this would work if you installed Eclipse + JBoss Tools separately as well.

Enjoy!

Getting Started with JBoss Tools and WildFly (Tech Tip #5)

JBoss Tools 4.1.1 and JBoss Developer Studio 7.1 were released 2 days ago. This release is built on top of Eclipse Kepler 4.3.1, came in less than 6 months from the previous one, has 500+ bug fixes and some nice  features.

  • Improved hybrid mobile tooling with support for Apache Cordova using Aerogear
  • More support for OpenShift 2.0
  • Content assist on Angular.js attributes and resource content

What is the difference between JBoss Tools and JBoss Developer Studio ?

JBoss Tools is a set of plugins for Eclipse that complements, enhances and goes beyond the support that exists for JBoss and related technologies in the default Eclipse distribution.

JBoss Developer Studio is a fully bundled Eclipse distribution which not only includes the majority of JBoss Tools but also all its needed dependencies and 3rd party plugins allowing for an easy one-click and no-fuss installation.

If you are into doing your own bleeding edge Eclipse plugin assembly, JBoss Tools is for you; if you are more into having something that “Just Works” then JBoss Developer Studio is the way to go.

I took JBoss Tools for a ride and tried Java EE samples on WildFly. Here are the steps for the same:

  1. Downloaded Eclipse IDE for Java EE Developers. Ignore this step if you already have Eclipse Kepler 4.3.1 for Java EE.
  2. Drag and Drop the button in Eclipse to install the tools . There are other usual methods to install as well but I found this extremely convenient.Dropping the button shows the following screen:jboss-tools-install-techtip4

    Follow the instructions to complete the installation. Restarting the Eclipse shows the following screen:

    kepler-main-screen-techtip4

    And that shows a successful installation.

  3. Click on the “Servers” tab, click on “Click this link to create a new server…”jboss-servers-techtip4Select “WildFly” and click on “Next>”. Use Tech Tip #1 to install WildFly locally on your machine. Specify the WildFly location on next screen:

    wildfly-location-techtip4

    Click on the second “Browse…” button to select an appropriate profile. Click on “Finish” to complete WildFly installation.

  4. Right-click on the selected server and click on “Start” to start WildFly.wildfly-log-techtip4
  5. Check out Java EE samples and import them in Eclipse. Select any project, right-click on it and select “Run on Server”. Choose the WildFly server to see the output as:

jboss-tools-browser-techtip4

And now you’ve a Java EE 7 sample running on WildFly using JBoss Tools!

Here are some resources:

  • JBoss Developer Studio Getting Started Guide
  • New and Noteworthy features
  • Ask a question on forums, @jbosstools, or file an issue on JIRA

Have fun!