Category Archives: techtip

Create WildFly OpenShift application using Command Line Tools (Tech Tip #52)

A new instance of WildFly can be easily provisioned on OpenShift by using the quick start. Just a single click, and you are ready to go!

Generally power users of OpenShift use Command Line Tools. However you could not create WildFly cartridge using the CLI tools. But bug# 1134134 is now resolved.

And so now rhc cartridge-list shows:

The newly added cartridge of WildFly 8 is shown in bold.

And so now a new WildFly instance can be easily provisioned using the CLI as:

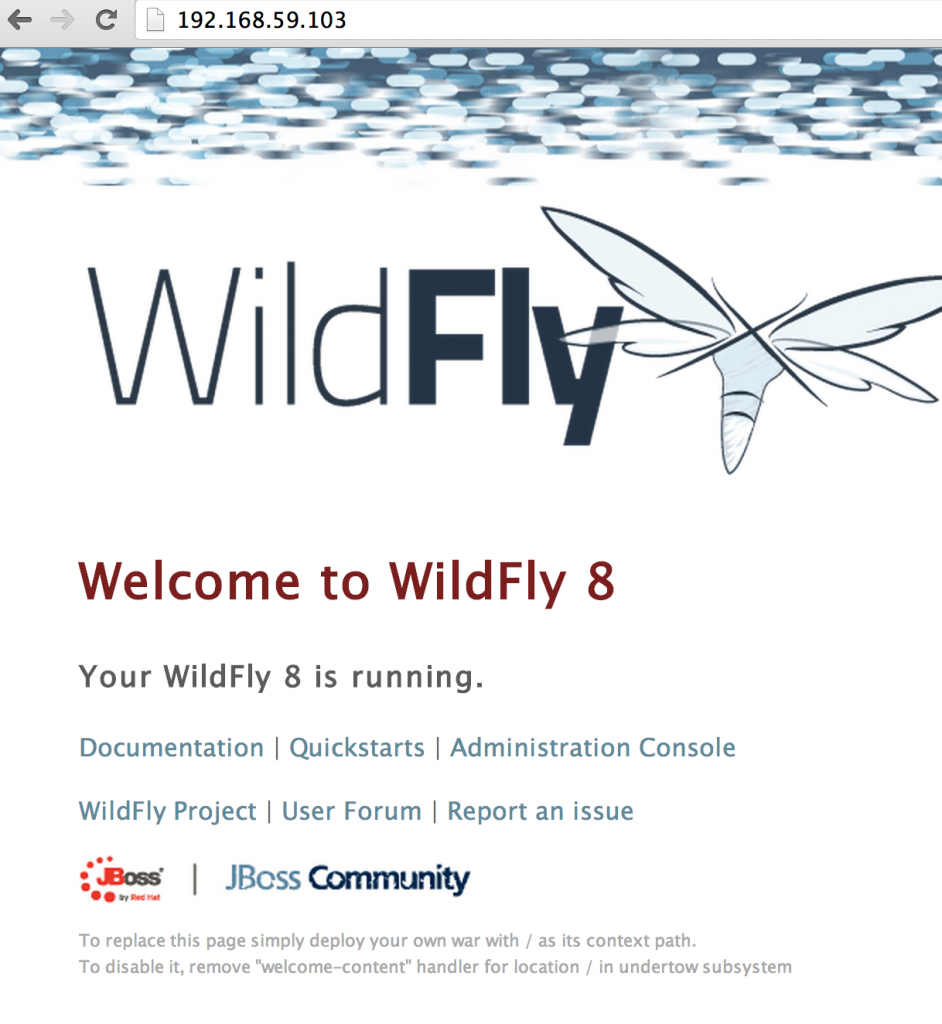
And then the application’s main page is accessible as shown:

techtip52-main-page

And the application can be deleted as:

Simple, isn’t it ?

See several other OpenShift getting-started related blog entries here.

WebSocket Chat on WildFly and OpenShift (Tech Tip #51)

Chat is one of the most canonical sample to explain WebSocket. Its a fairly commonly used interface and allows to explain the fundamental WebSocket concepts very easily. Of course, Java EE 7 WebSocket has one too, available here! You can easily run it on WildFly using the following steps:

And then access it at http://localhost:8080/chat/.

One of the biggest advantage of WebSocket is how it opens up a socket over the same port as HTTP, 8080 in this case. If you want to deploy this application to OpenShift, then WebSocket is available on port 8000 for regular access, and 8443 for secure access. This is explained in the figure below:

openshift-websocket-routing

 If you want to run this Chat application on OpenShift, then use the following steps:

  1. Click here to provision a WildFly instance in OpenShift. Change the name to “chatserver” and everything else as default. Click on “Create Application” to create the application.
  2. Clone the workspace:
  3. Edit the first line of “javaee7-samples/websocket/chat/src/main/webapp/websocket.js”from:

    to
  4. Create the WAR file:
  5. Copy the generated WAR file to the workspace cloned earlier:
  6. Remove existing files and add the WAR file to git repository:

    And this shows the output as:

And now your chat server is available at: http://chatserver-milestogo.rhcloud.com and looks like:

techtip51-websocket-chat-output

Enjoy!

Securing WebSocket using wss and HTTPS/TLS (Tech Tip #50)

50th tip on this blog, yaay!

Tech Tip #49 explained how to secure WebSockets using username/password and Servlet Security mechanisms. This Tech Tip will explain how to secure WebSockets using HTTPS/TLS on WildFly.

Lets get started!

  1. Create a new keystore:

    Used “websocket” as the convenience password.
  2. Download WildFly 8.1, unzip, and copy “websocket.keystore” file in standalone/configuration directory.
  3. Start WildFly as
  4. Connect to it using jboss-cli as:
  5. Add a new security realm as:

    And configure it:
  6. Add a new HTTPS listener as:
  7. A simple sample to show TLS-based security for WebSocket is available at github.com/javaee-samples/javaee7-samples/tree/master/websocket/endpoint-wss. Clone the workspace and change directory to “websocket/endpoint-wss”. The sample’s deployment descriptor has:

    This ensures that any request coming to this application will be auto-directed to an HTTPS URL.
  8. Deploy the sample by giving the command:

Now accessing http://localhost:8080/endpoint-wss redirects to https://localhost:8080/endpoint-wss. The browsers may complain about self-signed certificate. For example, Chrome shows the following warning:

techtip50-certificate-chrome

And Safari shows the following warning:

techtip50-certificate

In either case, click on “Proceed to localhost” or “Continue” to proceed further. And then a secure WebSocket connection is established.

Another relevant point to understand is that a non-secure WebSocket connection cannot be made from an https-protected page. For example the following code in our sample:

will throw the following exception in Chrome Developer Tools:

Enjoy!

Securing WebSockets using Username/Password and Servlet Security (Tech Tip #49)

RFC 6455 provide a complete list of security considerations for WebSockets. Some of them are baked in the protocol itself, and others need more explanation on how they can be achieved on a particular server. Lets talk about some of the security built into the protocol itself:

  • The Origin header in HTTP request includes only the information required to identify the principal (web page, JavaScript or any other client) that initiated the request (typically the scheme, host, and port of initiating origin). For WebSockets, this header field is included in the client’s opening handshake. This is used to inform server of the script origin generating the WebSocket connection request. The server may then decide to accept or reject the handshake request accordingly. This allows the server to protect against unauthorized cross-origin use of a WebSocket server by scripts using the WebSocket API in a browser.

    For example, if Java EE 7 WebSocket Chat sample is deployed to WildFly and accessed at localhost:8080/chat/ then the Origin header is “http://localhost:8080″. Non-browser clients may use the Origin header to specify the origin of the request. WebSocket servers should be careful about receiving such requests.
  • WebSocket opening handshake from client must include Sec-WebSocket-Key and Sec-WebSocket-Version HTTP header field. XMLHttpRequest can be used to make HTTP requests, and allows to set headers as part of that request as:

    If XMLHttpRequest tries to set any header fields starting with Sec- then they are ignored. So a malicious user cannot simulate a WebSocket connection to a server by using HTML and JavaScript APIs.

In addition to these two primary ways, WebSockets can be secured using client authentication mechanism available to any HTTP servers. This Tech Tip will show how to authenticate Java EE 7 WebSockets deployed on WildFly.

Lets get started!

  • Clone Java EE 7 Samples workspace:
  • The “websocket/endpoint-security” sample shows how client authentication can be done before the WebSocket handshake is initiated from the client. This is triggered by including the following deployment descriptor:

    Some key points to understand about this descriptor:

    • <url-pattern> indicates that any request made to this application will be prompted for authentication
    • <auth-constraint> defines the security role that can access this resource
    • <login-config> shows that file-based realm is used with basic authentication
    • <security-role> defines the security roles referenced by this application

    In our particular case, the page that creates the WebSocket connection is protected by basic authentication.

  • Download WildFly 8.1, unzip, and add a new user by invoking the following script:

    This will add user “u1″ with password “p1″ in group “g1″. The group specified here needs to match as defined in <role-name> in the deployment descriptor.

  • Deploy the sample by giving the command:

Now when the application is accessed at localhost:8080/endpoint-security then a security dialog box pops up as shown:

techtip49-browser-security-popup

Enter “u1″ as the username and “p1″ as the password to authenticate. These credentials are defined in the group “g1″ which is referenced in the deployment descriptor. Any other credentials will keep bringing the dialog back.

As soon as the request is successfully authenticated, the WebSocket connection is established and a message is shown on the browser.

If you are interested in securing only the WebSocket URL then change the URL pattern from

to

In websocket.js, change the URL to create WebSocket endpoint from:

to

Note, how credentials are passed in the URL itself. As of Google Chrome 38.0.2125.104, a browser popup does not appear if only WebSocket URL requires authentication.

Next Tech Tip will explain how to secure WebSocket using wss:// protocol.

Load Balance WebSockets using Apache HTTPD (Tech Tip #48)

JBoss EAP 6.3 provides a technology preview of WebSocket and WildFly have supported them as part of Java EE 7 compliance.

github.com/javaee-samples/javaee7-samples/tree/master/websocket provide tons of Java EE 7 samples that run on WildFly. If you are interested in similar functionality on JBoss EAP 6.3 then github.com/jboss-developer/jboss-eap-quickstarts/tree/6.4.x-develop/websocket-hello is a quickstart. In addition, there are a few more samples at github.com/arun-gupta/jboss-samples/tree/master/eap63.

One of the common questions asked related to WebSockets is how to how to load balance  them. This Tech Tip will explain that for WildFly and JBoss EAP 6.3.

First, what are the main components ?

  • At least Apache HTTPD 2.4.5 is required. Now HTTPD binaries are not available for Mac but fortunately compiling instructions are explained clearly in Tech Tip #45.
  • mod_proxy_wstunnel is an Apache module that provides support for tunneling of Web Socket connections to a backend Web Sockets server, such as WildFly or JBoss EAP. It is a support module to mod_proxy that provide support for a number of popular protocols as well as several different load balancing algorithms. The connection is automagically upgraded to a WebSocket connection.  And all the modules are already included in the modules directory.
  • mod_proxy_balancer module is required that provides load balancing for HTTP and other protocols.

Let’s go!

  1. Download and unzip WildFly 8.1.
  2. Start WildFly 8.1 in domain mode using ./bin/domain.sh.
  3. Download this chat sample, rename the file to “chat.war” and deploy to “main-server-group” as:

    The only difference from the original Java EE 7 WebSocket Chat sample is the addition of System.getProperty("jboss.node.name") to display the name of WildFly instance serving the application. The source code is available at github.com/arun-gupta/wildfly-samples/tree/master/websocket-loadbalance.
  4. Uncomment the following lines in /usr/local/apache2/conf/httpd.conf:

    This will enable all the required modules.
  5. Add the following code fragment at the end of “httpd.conf”:

    Proxy is a container for proxied resources and is creating a load balancing group in this case using balancer directive. BalancerMember adds a member to this load balancing group.  ProxyPass is a standard directive that maps remote servers running on different ports into the space of the local server. In this case, WildFly is started in domain mode and so starts two instances on port 8080 and 8230. Both of these instances are mapped to localhost:80, which is where Apache HTTPD is running by default.

The deployed chat sample is now accessible at localhost:8080/chat (first instance in the managed domain), localhost:8230/chat (second WildFly instance in the managed domain), and localhost/chat (via Apache HTTPD).

Now even if you kill one of the WildFly instances, the other instance will continue to serve the client. Note, this only gives application availability as there is no session failover in this.

This was also verified on JBoss EAP 6.3 and there are a few differences:

  1. Use the sample from github.com/arun-gupta/jboss-samples/tree/master/eap63/websocket-chat instead.
  2. The generated archive name is different and so the command would look slightly different too:
  3. Configure “httpd.conf” as:

And that’s it!

Watch this live in action:

An important point to understand is that there is no concept of “sticky sessions” in WebSocket as, unlike HTTP, there is a direct and “permanent” connection between the client and the server in this case.

Enjoy!

WildFly with a custom configuration in OpenShift (Tech Tip #47)

WildFly instances can be easily started in OpenShift. Tech Tip #7 shows how to spin up an instance of WildFly in OpenShift. Tech Tip #21 explained how to get started using JBoss Tools.

Now this WildFly instance is started with the stock configuration.xml. However some times you may want to configure the containers or specify additional configuration information in this file. This Tech Tip will show you how to do that.

Let’s go!

  1. Start a WildFly instance as explained in Tech Tip #7.
  2. On the application page, clone the workspace associated with this application. The command will look something like:
  3. This workspace has .openshift/standalone.xml file. Edit this file to meet your need. For example, if you want to use Infinispan as a persistency solution in standalone mode, then you’ll add the following code fragment:

    under <subsystem xmlns="urn:jboss:domain:infinispan:2.0"> section.
  4. Commit and push the change:

    This will automatically restart the cartridge and show the output as:

Now the WildFly instance in OpenShift will use the updated configuration file.

You can even verify this by logging into your application as:

And checking for the updated elements in wildfly/standalone/configuration/standalone.xml file.

Alternatively, you can ssh into your instance and use the JBoss CLI to make updates to your standalone.xml file.

Enjoy!

Compiling Apache HTTPD on Mac (Tech Tip #45)

One of my blogs needed Apache HTTPD 2.4.x on Mac but quickly realized that the binaries are available only for Netware and Win32. Even the build instructions were only for RPM-based systems. So I downloaded the source code and started building it.

Complete compile instructions are explained here. However there were some issues on Mavericks and so decided to document it.

Let’s go!

  1. Download the source bundle and unzip:
  2. Source code comes with INSTALL instructions and per that the following should’ve worked:

    So gave the command

    and got the first error:
  3. Moved past “checking whether the C compiler works… no” error by following instructions on stackoverflow #13587001.In short, do the following for Mavericks
  4. Issued the command to compile the server again and got the error as shown:

    This was resolved using stackoverflow #10663180. In short:

    1. Download PCRE as:
    2. Compile and install as:

    The compilation output is shown here.

  5. Compile HTTPD source again as:

    Complete output of this configuration is here.

  6. Now issue the command make:

    Complete output of the command is shown here.

  7. Finally install Apache2 as:

    Complete output of this command is shown here.

Version for HTTPD can be checked as:

Server can be started as:

Stopped as:

Restarted as:

Enjoy!

Java EE 6 Sample, with HTML5, jQuery, Hybrid mobile: aka Ticket Monster (Tech Tip #44)

Java EE 7 was released last year, Java EE 8 preparations have already started, so what tempts me to write a blog about Java EE 6 ?

A few reasons …

  • Even though Java EE 5 was the first version where some of the specs were updated to simplify the platform, Java EE 6 is where higher productivity became the primary focus and kicked into high gear.
  • All commercially available application servers are still Java EE 6 compliant.
  • Java EE 7 is pretty cool and provide an awesome bunch of new technologies like WebSocket, Batch, JSON, and Concurrency. But customers are still sticking around with older version of the platform because these applications, servers, and environments cannot change overnight.

So if you are looking for a real-world Java EE 6 sample application that:

  • Use Eclipse for building a Java EE 6 application
  • Build persistence layer with JPA2 and Bean Validation
  • Build business services with JAX-RS
  • Building the User Interface with HTML5
  • Building Administration UI with JBoss Forge
  • Building statistics dashboard using HTML5 and JavaScript
  • Hybrid mobile version of the app using Apache Cordova

In addition, it also shows:

  • Deploy your application on a local instance or a remote instance running in OpenShift
  • Run tests against your JBoss instance

Ticket Monster is your ultimate source. It not only shows how the key Java EE 6 technologies can be used together but also integrate jQuery, HTML5, and mobile version of the application as well.

The video below gives a quick preview of the application:

An instance of Ticket Monster can be previewed at ticketmonster-jdf.rhcloud.com or timo-milestogo.rhcloud.com.

So how do you get started ?

  1. Download Ticket Monster 2.6.0 (with tutorials). Corresponding source code is at github.com/jboss-developer/ticket-monster/tree/2.6.0.Final-with-tutorials.
  2. Set up Red Hat Maven repositories as explained here. If you don’t care reading through the instructions, overwrite .m2/settings.xml with this settings.xml.
  3. Build the WAR of your application
  4. To run on local JBoss instance:
    • Download JBoss EAP 6.3
    • Unzip and start as
    • Deploy the application as

      This will also build the application again.

      The application is now accessible at localhost:8080/ticket-monster.

  5. To run on JBoss instance in OpenShift
    • Create a JBoss EAP 6 application in OpenShift
    • Add PostgreSQL cartridge for this application
    • Create an archive as

      This will use the installed PostgreSQL cartridge for persistence.

    • Clone the git workspace from OpenShift

      The actual git url will be specific to your application.

    • Copy generated WAR file to git workspace and rename to ROOT.war

    • Remove existing source and pom.xml from git workspace, add WAR, and push

    • Access the application at htp://<appname-domainname>.rhcloud.com.The following video shows the steps for running TicketMonster on OpenShift:

Ask your questions about Ticket Monster at .
Enjoy!

WildFly 9: Features and Getting Started (Tech Tip #43)

WildFly 8.1 provides a Java EE 7 compliant application server, and is pretty awesome!

WildFly team has been actively working this summer on the next release. WildFly 9 features were announced a few weeks ago. Here is a quick summary and links to discussions on wildfly-dev:

  • Core/Servlet/Full Split
  • Graceful shutdown
  • Elytron (Security improvments)
  • Switching to the JDK ORB from JacORB
  • Undertow as a mod_cluster frontend
  • Subsystem Capabilities and Requirements
  • EAP 6.4 RFEs (TBA)

Links/details to rest of the features TBD.

So how do you get started with WildFly 9 ?

  • Building WildFly 9 requires at least have Maven 3.2.1, download the latest here.
  • Clone the workspace as:
  • Build the workspace as:

    Took 02:36 mins to build on my machine :)
  • Unzip dist/target/wildfly-9.0.0.Alpha1-SNAPSHOT.zip to a new directory
  • Run WildFly as:

Note that is still very early in the development stages and workspace is constantly evolving. So things may be broken but you know that Red Hat is working actively on your favorite application server :-)

Some useful references …

  • Feel free to subscribe to wildfly-dev alias and participate in the discussion
  • Ask your questions on WildFly forum
  • WildFly 9 docs (very early, mostly placeholder)
  • Follow us at @WildFlyAS

Java EE 7 Javadocs Download, Online, Tutorial, Samples (Tech Tip #42)

I was surprised when Google could not find Java EE 7 Javadocs download link clearly on the first page. StackOverflow was helpful here again, but even that was the last link on first page.

Now, I do know the location and can find my ways around. But this needs to be simplified and made more accessible for developers around the world.

So here are some usual Java EE 7 references:

  • Java EE 7 Javadocs Download Full Platform (bit.ly/ee7-javadocs), Web Profile
  • Java EE 7 Javadocs Online
  • Java EE 7 Tutorial
  • Java EE 7 Whitepaper
  • Java EE 7 Samples

Javadocs can also be installed on Dash as explained in Antonio’s blog.

And as usual, you can download WildFly or GlassFish to get started with Java EE 7!

Enjoy!

Adding Java EE 7 Batch Addon to JBoss Forge ? – Part 7 (Tech Tip #41)

This is the seventh part (part 1part 2, part 3, part 4, part 5) of a multi-part video series where Lincoln Baxter (@lincolnthree), George Gastaldi (@gegastaldi) and I are interactively building a Forge addon to add Java EE 7 Batch functionality. So far, here is what different parts have shown:

  • Part 1 showed how to get started with creating an addon, add relevant POM dependencies, build and install the addon using Forge shell, add a new command batch-new-jobxml, and add --reader--processor--writer parameters to the newly added command.
  • Part 2 showed how to identify classes for each CLI parameter that already honor the contract required by the Batch specification.
  • Part 3 showed how parameters can be made required, created templates for reader, processor, and writer, validated the specified parameters.
  • Part 4 added a new test for the command and showed how Forge can be used in debug mode.
  • Part 5 fixed a bug reported by a community member and started work to make processor validation optional.
  • Part 6 upgraded from 2.6.0 to 2.7.1 and started work on reader, processor, and writer template files.

This part shows:

  • Merged the request by George in the workspace
  • Reader, processor, and writer source files are created if they do not exist

Enjoy!

As always, the evolving source code is available at github.com/javaee-samples/forge-addons.

Next episode will add a new test for this functionality.

Adding Java EE 7 Batch Addon to JBoss Forge ? – Part 6 (Tech Tip #40)

This is the sixth part (part 1part 2, part 3, part 4, part 5) of a multi-part video series where Lincoln Baxter (@lincolnthree) and I are interactively building a Forge addon to add Java EE 7 Batch functionality.

Part 1 showed how to get started with creating an addon, add relevant POM dependencies, build and install the addon using Forge shell, add a new command batch-new-jobxml, and add --reader--processor--writer parameters to the newly added command.

Part 2 showed how to identify classes for each CLI parameter that already honor the contract required by the Batch specification.

Part 3 showed how parameters can be made required, created templates for reader, processor, and writer, validated the specified parameters.

Part 4 added a new test for the command and showed how Forge can be used in debug mode.

Part 5 fixed a bug reported by a community member and started work to make processor validation optional.

This part shows:

  • Upgrade from Forge 2.6.0 to 2.7.1
  • Fix the failing test
  • Reader, processor, and writer files are now templates instead of source files
  • Reader, processor, and writer are injected appropriately in test’s temp project

Enjoy!

As always, the evolving source code is available at github.com/javaee-samples/forge-addons. The debugging will continue in the next episode.

Getting Started with Docker (Tech Tip #39)

If the numbers of articles, meetups, talk submissions at different conferences, tweets, and other indicators are taken into consideration, then seems like Docker is going to solve world hunger. It would be nice if it would, but apparently not. But it does solve one problem really well!

Lets hear it from @solomonstre – creator of Docker project!

In short, Docker simplifies software delivery by making it easy to build and share images that contain your application’s entire environment, or application operating system.

What does it mean by application operating system ?

Your application typically require a specific version of operating system, application server, JDK, database server, may require to tune the configuration files, and similarly multiple other dependencies. The application may need binding to specific ports and certain amount of memory. The components and configuration together required to run your application is what is referred to as application operating system.

You can certainly provide an installation script that will download and install these components. Docker simplifies this process by allowing to create an image that contains your application and infrastructure together, managed as one component. These images are then used to create Docker containers which run on the container virtualization platform, provided by Docker.

What are the main components of Docker ?

Docker has two main components:

  • Docker: the open source container virtualization platform
  • Docker Hub: SaaS platform for sharing and managing Docker images

Docker uses Linux Containers to provide isolation, sandboxing, reproducibility, constraining resources, snapshotting and several other advantages. Read this excellent piece at InfoQ on Docker Containers for more details on this.

Images are “build component” of Docker and a read-only template of application operating system. Containers are runtime representation, and created from, images. They are “run component” of Docker. Containers can be run, started, stopped, moved, and deleted. Images are stored in a registry, the “distribution component” of Docker.

Docker in turn contains two components:

  • Daemon runs on a host machine and does the heavy lifting of building, running, and distributing Docker containers.
  • Client is a Docker binary that accepts commands from the user and communicates back and forth with daemon

How do these work together ?

Client communicates with Daemon, either co-located on the same host, or on a different host. It requests the Daemon to pull an image from the repository using pull command. The Daemon then downloads the image from Docker Hub, or whatever registry is configured. Multiple images can be downloaded from the registry and installed on Daemon host.

docker-architecture-techtip39

Client can then start the Container using run command. The complete list of client commands can be seen here.

Client communicates with Daemon using sockets or REST API.

Because Docker uses Linux Kernel features, does that mean I can use it only on Linux-based machines ?

Docker daemon and client for different operating systems can be installed from docs.docker.com/installation/. As you can see, it can be installed on a wide variety of platforms, including Mac and Windows.

For non-Linux machines, a lightweight Virtual Machine needs to be installed and Daemon is installed within that. A native client is then installed on the machine that communicates with the Daemon. Here is the log from booting Docker daemon on Mac:

For example, Docker Daemon and Client can be installed on Mac following the instructions at docs.docker.com/installation/mac.

The VM can be stopped from the CLI as:

And then restarted again as:

And logged in as:

The complete list of boot2docker commands are available in help:

Enough talk, show me an example ?

Some of the JBoss projects are available as Docker images at www.jboss.org/docker and can be installed following the commands explained on that page. For example, WildFly Docker image can be installed as:

The image can be verified using the command:

Once the image is downloaded, the container can be started as:

By default, Docker containers do not provide an interactive shell and input from STDIN. So if WildFly Docker container is started using the command above, it cannot be terminated using Ctrl + C.  Specifying -i option will make it interactive and -t option allocated a pseudo-TTY.

In addition, we’d also like to make the port 8080 accessible outside the container, i.e. on our localhost. This can be achieved by specifying -p 80:8080 where 80 is the host port and 8080 is the container port.

So we’ll run the container as:

Container’s IP address can be found as:

The started container can be verified using the command:

And now the WildFly server can now be accessed on your local machine as http://192.168.59.103 and looks like as shown:

Finally the container can be stopped by hitting Ctrl + C, or giving the command as:

The container id obtained from “docker ps” is passed to the command here.

More detailed instructions to use this image, such as booting in domain mode, deploying applications, etc. can be found at github.com/jboss/dockerfiles/blob/master/wildfly/README.md.

What else would you like to see in the WildFly Docker image ? File an issue at github.com/jboss/dockerfiles/issues.

Other images that are available at jboss.org/docker are:

  • KeyCloak
  • TorqueBox
  • Immutant
  • LiveOak
  • AeroGear


Did you know that Red Hat is amongst one of the top contributors to Docker, with 5 Red Hatters from Project Atomic working on it ?

Adding Java EE 7 Batch Addon to JBoss Forge ? – Part 5 (Tech Tip #38)

This is the fifth part (part 1part 2, part 3, part 4) of a multi-part video series where Lincoln Baxter (@lincolnthree) and I are interactively building a Forge addon to add Java EE 7 Batch functionality.

Part 1 showed how to get started with creating an addon, add relevant POM dependencies, build and install the addon using Forge shell, add a new command batch-new-jobxml, and add --reader--processor--writer parameters to the newly added command.

Part 2 showed how to identify classes for each CLI parameter that already honor the contract required by the Batch specification.

Part 3 showed how parameters can be made required, created templates for reader, processor, and writer, validated the specified parameters.

Part 4 added a new test for the command and showed how Forge can be used in debug mode.

This part shows:

  • Fix a bug reported by a community member
  • Started work another issue to make processor validation optional

Enjoy!

As always, the evolving source code is available at github.com/javaee-samples/forge-addons. The debugging will continue in the next episode.

Schedule Java EE 7 Batch Jobs (Tech Tip #36)

Java EE 7 added the capability to perform Batch jobs in a standard way using JSR 352.

This code fragment is the Job Specification Language defined as XML, a.k.a. Job XML. It defines a canonical job, with a single step, using item-oriented or chunk-oriented processing. A chunk can have a reader, optional processor, and a writer. Each of these elements are identified using the corresponding elements in the Job XML, and are CDI beans packaged in the archive.

This job can be easily started using:

A typical question asked in different forums and conferences is how to schedule these jobs in a Java EE runtime. Batch 1.0 API itself does not offer anything to be schedule these jobs. However Java EE platform offers three different ways to schedule these jobs:

  1. Use the @javax.ejb.Schedule annotation in an EJB.
    Here is a sample code that will trigger the execution of batch job at 11:59:59 PM every day.

    Of course, you can change the parameters of @Schedule to start the batch job at the desired time.
  2. Use ManagedScheduledExecutorService using javax.enterprise.concurrent.Trigger as shown:

    Call runJob to initiate job execution and cancelJob to terminate job execution. In this case, a new job is started a day later than the previous task. And its not started until previous one is terminated. You will need more error checks for proper execution.

    MyJob is very trivial:

    Of course, you can automatically schedule it by calling this code in @PostConstruct.

  3. A slight variation of second technique allows to run the job after a fixed delay as shown:

    The first task is executed 2 hours after the runJob2 method is called. And then with a 3 hours delay between subsequent execution.

This support is available to you within the Java EE platform. In addition, you can also invoke BatchRuntime.getJobOperator().start("myJob", new Properties()); from any of your Quartz-scheduled methods as well.

You can try all of this on WildFly.

And there are a ton of Java EE 7 samples at github.com/javaee-samples/javaee7-samples.

This particular sample is available at github.com/javaee-samples/javaee7-samples/tree/master/batch/scheduling.

How are you scheduling your Batch jobs ?