Tag Archives: wildfly

WildFly with a custom configuration in OpenShift (Tech Tip #47)

WildFly instances can be easily started in OpenShift. Tech Tip #7 shows how to spin up an instance of WildFly in OpenShift. Tech Tip #21 explained how to get started using JBoss Tools.

Now this WildFly instance is started with the stock configuration.xml. However some times you may want to configure the containers or specify additional configuration information in this file. This Tech Tip will show you how to do that.

Let’s go!

  1. Start a WildFly instance as explained in Tech Tip #7.
  2. On the application page, clone the workspace associated with this application. The command will look something like:
  3. This workspace has .openshift/standalone.xml file. Edit this file to meet your need. For example, if you want to use Infinispan as a persistency solution in standalone mode, then you’ll add the following code fragment:

    under <subsystem xmlns="urn:jboss:domain:infinispan:2.0"> section.
  4. Commit and push the change:

    This will automatically restart the cartridge and show the output as:

Now the WildFly instance in OpenShift will use the updated configuration file.

You can even verify this by logging into your application as:

And checking for the updated elements in wildfly/standalone/configuration/standalone.xml file.

Alternatively, you can ssh into your instance and use the JBoss CLI to make updates to your standalone.xml file.

Enjoy!

Java EE 7 Real World Experience: Campground Management with Tipi.camp

tipicamp-logo

Tipi.camp provides a simple campground management software and targets 25,000+ independent campgrounds all over Europe. It provides a customer-friendly booking-portal and a RESTful API for partners to integrate. The project was conceived in September 2013 when Christoph returned from vacation, disappointed because of the missed booking for their tent. And now he has created a new solution connecting campers and campgrounds with each other.

The website offers a SaaS where campgrounds can register their camp sites and campers can look at the availability of these campgrounds, check out their calendar, pick a site and make a reservation. It is also available for on-site installation if you prefer running it on your domain. Think of it as koa.com, but available to all the independent campgrounds and much more modern ;)

The landing page is certainly very fancy:

tipicamp-opening-page

Websites of smaller campgrounds are typically characterized by low data maintenance and absence of a booking possibility. tipi.camp has advantages:

  • Easy-to-use portal for campground owners and campers
  • Campground owner administrate and book his sites independently
  • Customer data management
  • External sales channels, for example booking.com, can be connected to sell the log cabins
  • RESTful API it is also possible to handle larger individual installations

Campgrounds get their own portal, reservations, channel management, email and much more for â‚¬1/day if they are located in Europe or $1/day if they are in US. Each campground with an Internet connection and browser (whether computer or iPad) can use the software.

In terms of the overall flow, campground owner register their campground with tipi.camp. Traveler checks out the calendar and books the campground using the responsive portal.

tipicamp-architecture


Check out the welcome page:

tipicamp-welcome

Campers can search through the available camps and then look at the calendar of a particular camp:

tipicamp-calendar

Pick a particular site on the campground:

tipicamp-maps

And then checkout to make the payment:

tipicamp-checkout

This website is built using Java EE 7:

tipicamp-technology


Here is a brief description of the technology stack:

  • Presentation
    • JavaServer Faces + Expression Language. Different templates are used for desktop and iPad apps. JSF Template Library might be used to provide a fully customized portal for the campground owners later.
    • Security: JAAS Principal + JDBC realm
    • Bean discovery mode=”all”
  • Middle Tier
    • EJB for business boundaries
    • Servlets with JSON for web hooks: response from Paypal and Sendgrid
    • JAX-RS for exposing API to partners
  • Backend
    • JPA + Bean Validation, use @Index for database generation during development. Flyway API for database migrations in production.
    • Concurrency: Calculation of statistics and sending messages, Sendgrid takes ~1-4 seconds to send messages
    • Using @Startup @Singleton @Schedule to run a job at pre-defined time

Technologies from outside the platform were:

  • Primefaces 5 for the GUI and Bootstrap for the responsive Enduser-Portal.
  • Sendgrid API for sending mails. This is required as opposed to JavaMail because specific meta information needs to be added to each email.
  • Misc apache commons (eq. FileUtils.writeByteArrayToFile or IOUtils.toByteArray) – there are only a few sections.
  • Flyway API for database migrations
  • Junit with Derby – for testing

Toolset

  • JDK 8
  • IntelliJ 13.1 with Maven
  • Wildfly 8.1.0.Final – Single instance of WildFly is used. The app was previously deployed on GlassFish.
  • Apache httpd is used to:
    • performance-tuning with KeepAlive, mod_expires for the images and the compression
    • easy SSL configuration
    • handle more WildFly under 1 hostname with the mod_proxy
    • mod_redirect for redirect all http requests to the app to https
  • Github
  • Jenkins
  • loader.io for Load-Testing
  • Currently the application is deployed on a self-hostet Linux-Server in the hetzner.de data center.

Wish list for Java EE 8

  • Most used Apache Commons Libs
  • @Temporal works with LocalDate and LocalDateTime
  • Batch processing API does support generics

And here are supporting quotes on Java EE 7

And on WildFly:

So, do you want to start on this terrific two combination of Java EE 7 + WildFly ?

Download WildFly 8.1 today, learn the technology by reading/trying Java EE 7 samples, browse through Java EE 7 resources.

Or if you want to be on the bleeding edge, check out WildFly 9.0.

Many thanks to Christoph Gapp () and Adam Bien (@adambien) for providing all the answers!

Are you using Java EE 7 and WildFly to deploy your projects ? Would love to feature you here! Send me an email or leave a comment on the blog.


WildFly 9: Features and Getting Started (Tech Tip #43)

WildFly 8.1 provides a Java EE 7 compliant application server, and is pretty awesome!

WildFly team has been actively working this summer on the next release. WildFly 9 features were announced a few weeks ago. Here is a quick summary and links to discussions on wildfly-dev:

  • Core/Servlet/Full Split
  • Graceful shutdown
  • Elytron (Security improvments)
  • Switching to the JDK ORB from JacORB
  • Undertow as a mod_cluster frontend
  • Subsystem Capabilities and Requirements
  • EAP 6.4 RFEs (TBA)

Links/details to rest of the features TBD.

So how do you get started with WildFly 9 ?

  • Building WildFly 9 requires at least have Maven 3.2.1, download the latest here.
  • Clone the workspace as:
  • Build the workspace as:

    Took 02:36 mins to build on my machine :)
  • Unzip dist/target/wildfly-9.0.0.Alpha1-SNAPSHOT.zip to a new directory
  • Run WildFly as:

Note that is still very early in the development stages and workspace is constantly evolving. So things may be broken but you know that Red Hat is working actively on your favorite application server :-)

Some useful references …

  • Feel free to subscribe to wildfly-dev alias and participate in the discussion
  • Ask your questions on WildFly forum
  • WildFly 9 docs (very early, mostly placeholder)
  • Follow us at @WildFlyAS

Shape the future of JBoss EAP and WildFly Web Console

Are you using WildFly ?

Any version of JBoss EAP ?

Would you like to help us define how the Web Console for future versions should look like ?

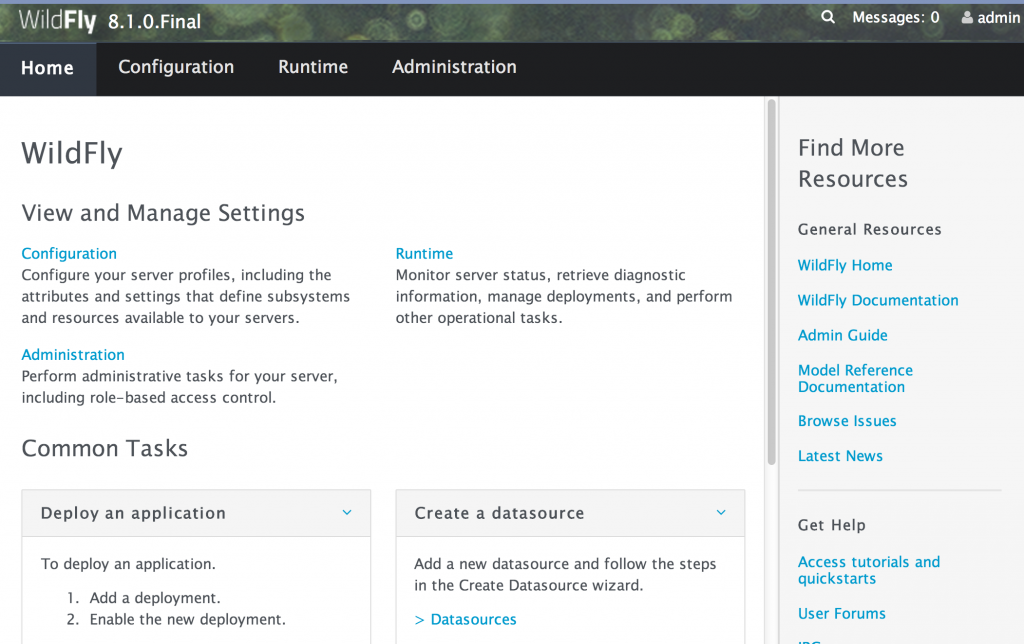
wildfly-8.1-admin-console

Help the Red Hat UX Design team shape the future of JBoss EAP and WildFly!

We are currently working to improve the usability and information architecture of the web-based admin console. By taking part in a short exercise you will help us better understand how users interpret the information and accomplish their goals.

You do not need to be an expert of the console to participate in this study. The activity shouldn’t take longer than 10 to 15 minutes to complete.

To start participating in the study, click on the link below and follow the instructions.

http://ows.io/tj/12t0qr48

I completed the study in about 12 mins and was happy that my clicking around helped shape the future of JBoss EAP and WildFly!

Just take a quick detour from your routine for 10-15 mins and take the study.

Thank you in advance for taking the time to complete the study.

Getting Started with Docker (Tech Tip #39)

If the numbers of articles, meetups, talk submissions at different conferences, tweets, and other indicators are taken into consideration, then seems like Docker is going to solve world hunger. It would be nice if it would, but apparently not. But it does solve one problem really well!

Lets hear it from @solomonstre – creator of Docker project!

In short, Docker simplifies software delivery by making it easy to build and share images that contain your application’s entire environment, or application operating system.

What does it mean by application operating system ?

Your application typically require a specific version of operating system, application server, JDK, database server, may require to tune the configuration files, and similarly multiple other dependencies. The application may need binding to specific ports and certain amount of memory. The components and configuration together required to run your application is what is referred to as application operating system.

You can certainly provide an installation script that will download and install these components. Docker simplifies this process by allowing to create an image that contains your application and infrastructure together, managed as one component. These images are then used to create Docker containers which run on the container virtualization platform, provided by Docker.

What are the main components of Docker ?

Docker has two main components:

  • Docker: the open source container virtualization platform
  • Docker Hub: SaaS platform for sharing and managing Docker images

Docker uses Linux Containers to provide isolation, sandboxing, reproducibility, constraining resources, snapshotting and several other advantages. Read this excellent piece at InfoQ on Docker Containers for more details on this.

Images are “build component” of Docker and a read-only template of application operating system. Containers are runtime representation, and created from, images. They are “run component” of Docker. Containers can be run, started, stopped, moved, and deleted. Images are stored in a registry, the “distribution component” of Docker.

Docker in turn contains two components:

  • Daemon runs on a host machine and does the heavy lifting of building, running, and distributing Docker containers.
  • Client is a Docker binary that accepts commands from the user and communicates back and forth with daemon

How do these work together ?

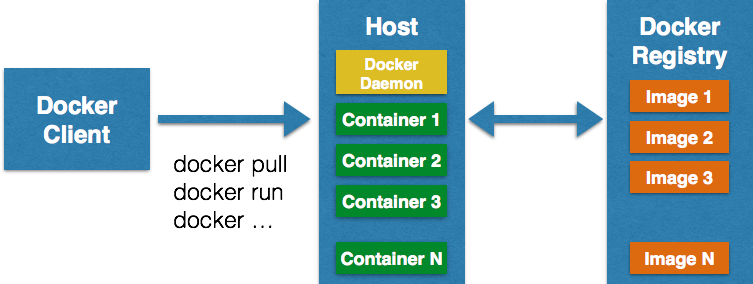
Client communicates with Daemon, either co-located on the same host, or on a different host. It requests the Daemon to pull an image from the repository using pull command. The Daemon then downloads the image from Docker Hub, or whatever registry is configured. Multiple images can be downloaded from the registry and installed on Daemon host.
docker-architecture-techtip39

Client can then start the Container using run command. The complete list of client commands can be seen here.

Client communicates with Daemon using sockets or REST API.

Because Docker uses Linux Kernel features, does that mean I can use it only on Linux-based machines ?

Docker daemon and client for different operating systems can be installed from docs.docker.com/installation/. As you can see, it can be installed on a wide variety of platforms, including Mac and Windows.

For non-Linux machines, a lightweight Virtual Machine needs to be installed and Daemon is installed within that. A native client is then installed on the machine that communicates with the Daemon. Here is the log from booting Docker daemon on Mac:

For example, Docker Daemon and Client can be installed on Mac following the instructions at docs.docker.com/installation/mac.

The VM can be stopped from the CLI as:

And then restarted again as:

And logged in as:

The complete list of boot2docker commands are available in help:

Enough talk, show me an example ?

Some of the JBoss projects are available as Docker images at www.jboss.org/docker and can be installed following the commands explained on that page. For example, WildFly Docker image can be installed as:

The image can be verified using the command:

Once the image is downloaded, the container can be started as:

By default, Docker containers do not provide an interactive shell and input from STDIN. So if WildFly Docker container is started using the command above, it cannot be terminated using Ctrl + C.  Specifying -i option will make it interactive and -t option allocated a pseudo-TTY.

In addition, we’d also like to make the port 8080 accessible outside the container, i.e. on our localhost. This can be achieved by specifying -p 80:8080 where 80 is the host port and 8080 is the container port.

So we’ll run the container as:

Container’s IP address can be found as:

The started container can be verified using the command:

And now the WildFly server can now be accessed on your local machine as http://192.168.59.103 and looks like as shown:
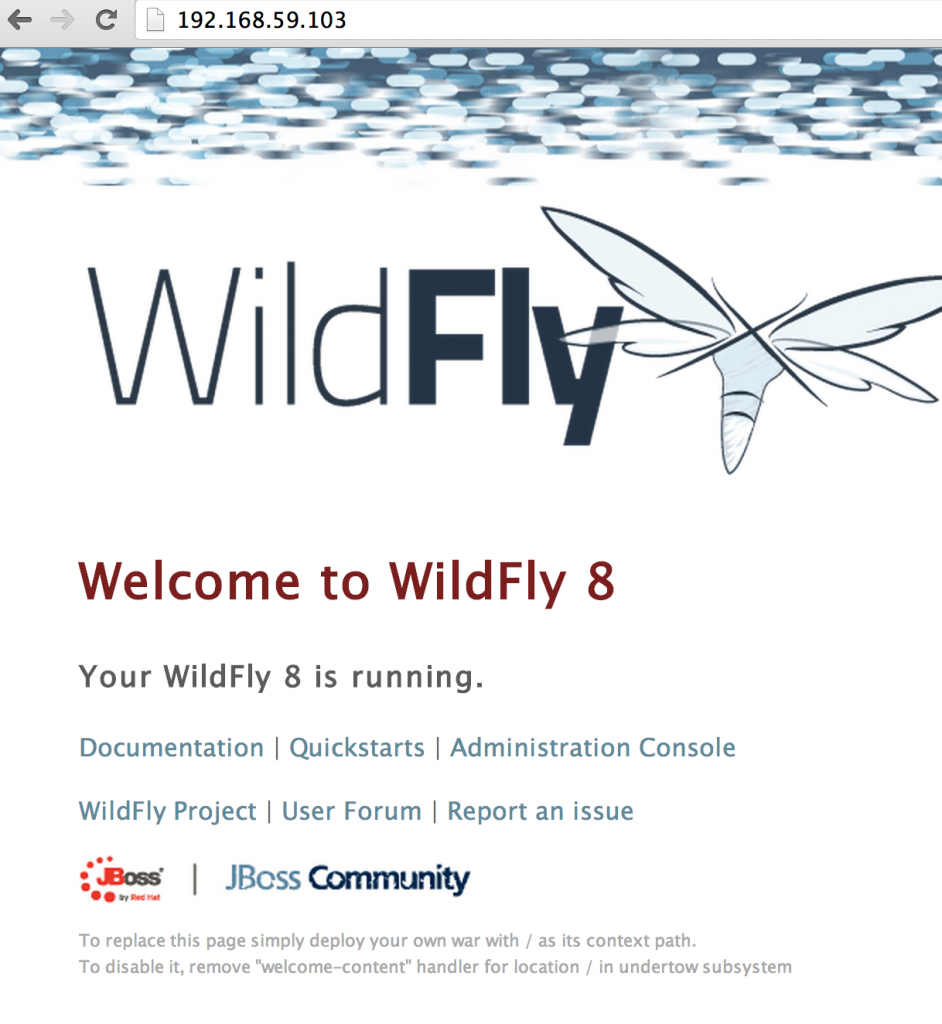
Finally the container can be stopped by hitting Ctrl + C, or giving the command as:

The container id obtained from “docker ps” is passed to the command here.

More detailed instructions to use this image, such as booting in domain mode, deploying applications, etc. can be found at github.com/jboss/dockerfiles/blob/master/wildfly/README.md.

What else would you like to see in the WildFly Docker image ? File an issue at github.com/jboss/dockerfiles/issues.

Other images that are available at jboss.org/docker are:

  • KeyCloak
  • TorqueBox
  • Immutant
  • LiveOak
  • AeroGear


Did you know that Red Hat is amongst one of the top contributors to Docker, with 5 Red Hatters from Project Atomic working on it ?

Defaults in Java EE 7 (Tech Tip #37)

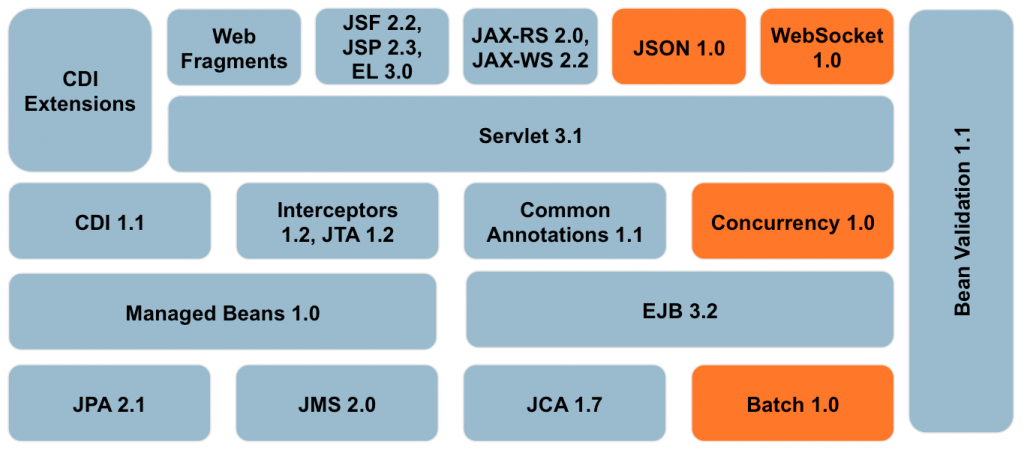
Java EE 7 platform added a few new specifications to the platform:

  • Java API for WebSocket 1.0
  • Batch Applications for Java 1.0
  • Java API for JSON Processing 1.0
  • Concurrency Utilities for Java EE 1.0

This is highlighted in the pancake diagram shown below:

javaee7-pancake

Several of the existing specifications were updated to fill the gaps and provide a more cohesive platform. Some small, but rather significant additions, were made to the platform to provide defaults for different features. These defaults would lower the bar for application developers to build Java EE applications.

Lets take a look at them.

  • Default CDI: Java EE 6 required “beans.xml” in an archive to enable CDI. This was mostly a marker file. So you could bundle a completely empty “beans.xml” in the archive and that would enable injection. Of course, you could specify a lot of other elements in this file such as interceptors, decorators, alternative but the basic dependency injection was enabled by just the mere inclusion of this file.This was one of the biggest source of confusion of why beans were not getting injected in a Java EE 7 archive, and was asked on several forums and other channels.

    Java EE 7 made that “beans.xml” optional and provided a default behavior. Now if this file is not bundled, all CDI-scoped beans are available for injection. So any bean with an explicitly specified scope is available for injection. Scopes defined by the CDI specification are listed at docs.oracle.com/javaee/7/api/javax/enterprise/context/package-summary.html. Specifically, here are the scopes defined by CDI:

    • @ApplicationScoped
    • @ConversationScoped
    • @Dependent
    • @NormalScope
    • @RequestScoped
    • @SessionScoped

    In addition, two new scopes are introduced in Java EE 7:

    • @FlowScoped
    • @TransactionScoped

    So, any bean with these scopes will be available for injection, in other beans only, without the presence of “beans.xml”.

    Check it out in action at github.com/javaee-samples/javaee7-samples/tree/master/cdi/nobeans-xml.

  • Default data source: A Java EE runtime, a.k.a application server, requires to package a database with it. If you are building a Java EE application, you likely will need some sort of data store or RBDMS to store the data. So this makes perfect sense.For example, WildFly bundles in-memory H2 database.Now, you can certainly use another JDBC-compliant database but bundling a database makes it convenient to start with. However, in order to get started, Java EE 6 still required to create JDBC resources in an application server-specific way. This would mean understanding app server-specific tools.

    Java EE 7 simplified it by providing a default data source with a pre-defined JNDI name.This mean you can inject a data source as:

    Also, your persistence.xml can look like:

    Note, no <jta-data-source>.

    In both of these circumstances, a default data source with JNDI name java:comp/DefaultDataSource is bound to your application-server specific JDBC resource.

    The exact data source in WildFly can be verified using jboss-cli script as:

    Check it out in action at github.com/javaee-samples/javaee7-samples/tree/master/jpa/default-datasource.

  • Create JMS connection factory, queues, and topics: An application using JMS topics and queues in Java EE 6 would require a deployment script to create Connection Factory and Queues/Topics. These would again be done in an application server-specific way.Java EE 7 provide annotations @JMSConnectionFactoryDefinition and @JMSConnectionFactoryDefinitions that are read by the Java EE 7 runtime and ensures that the ConnectionFactory specified by these annotations is provisioned in the operational environment.

    Similarly, @JMSDestinationDefinition and @JMSDestinationDefinitions can be used to create Topics/Queues as part of application deployment.So no more deployment scripts, just include annotation in your code ?

    Check it out in action at github.com/javaee-samples/javaee7-samples/tree/master/jms/send-receive.

  • Default JMS connection factory: Just like default data source, a default JMS resource allows you to avoid creating a JMSConnectionFactory in an appserver-specific way to deploy the application using JMS resources.Injection of a JMS Producer or Consumer in Java EE 6 required to get an instance of application-managed or container-managed JMSConnectionFactory. This factory had to be manually created in an application-server specific way.Providing a default JMSConnectionFactory simplifies this step further.

    JMS 2.0 also introduced JMSContext as entry point to the simplified API, and it can be injected simply as:

    Not specifying a ConnectionFactory means the default one will be used. And it has the JNDI name of jms/DefaultJMSConnectionFactory.

    The JNDI name may be mapped to the appserver-specific JMS provider. For example, in case of WildFly it is defined as:

    Check it out in action at github.com/javaee-samples/javaee7-samples/tree/master/jms/send-receive.

  • Default executors: Concurrency Utilities for Java EE introduced four different managed objects:
    • ManagedExecutorService
    • ScheduledManagedExecutorService
    • ContextService
    • ManagedThreadFactory

    These objects allow user to create application threads that are managed by the Java EE server runtime. Once again, a default and pre-configured managed object, with a well-defined JNDI name, is made available for each one of them.

    This allows a user to inject a ManagedExecutorService as:

    instead of:

    Default ManagedExecutorService in WildFly can be found as:

    Similarly other default managed objects can be found.

    Check out different executors in action at github.com/javaee-samples/javaee7-samples/tree/master/concurrency.

With so many simplifications, why would you not like to use Java EE 7 platform ?

And WildFly is a fantastic application server too :-)

Download WildFly now, and get started!

Testable Java EE 7 Maven Archetype, using Arquillian (Tech Tip #34)

There is a Maven archetype to create Java EE 7 application:

It generates a simple “pom.xml” with Java EE 7 API <dependency>. It does the job to get started with building the application. But how do you test this app ?

Of course, you write unit and integration tests. But how do you run these tests, especially in a container-independent manner ?

That’s where Arquillian comes in!

Arquillian guides explain how to write real tests, but you still need to figure out Maven dependencies, create profiles, figure out container dependencies, and more. That’s still too much work :)

Meet a new Maven archetype that generates a Java EE 7 app, with profiles pre-configured for WildFly and GlassFish.

The four profiles are:

  1. wildfly-remote-arquillian
  2. wildfly-managed-arquillian
  3. glassfish-remote-arquillian
  4. glassfish-embedded-arquillian

The first profile is the most natural to start with. It requires to download WildFly 8.1, unzip and start using ./bin/standalone.sh. Then you can run the test as:

to see the result as:

This is useful if tests need to be executed multiple times on the same WildFly instance.

The second profile is the easiest to start with, and does not require any manual downloading. Using the profile downloads WildFly (8.0.0 at this time) to Maven repository, installs it in the “target” directory, starts the server, deploys the WAR file, runs the test, and stops the server.

“glassfish-remote-arquillian” profile is like “wildfly-remote-arquillian” where an instance of GlassFish is started externally and tests are run in the usual manner. This profile does not work at this moment because of ARQ-1596.

“glassfish-embedded-arquillian” is like “wildfly-managed-arquillian” where GlassFish container is downloaded transparently using the Maven dependencies, starts the container, deploys the app, runs the test, and stops the container.

Archetype source code is at: github.com/javaee-samples/javaee7-archetypes/tree/master/javaee7-archetype and the archetype is published at search.maven.org/#search%7Cga%7C1%7Cjavaee7-arquillian-archetype.

Many thanks to @aslakknutsen for publishing this archetype!

A complete working sample can be checked out from github.com/arun-gupta/wildfly-samples/tree/master/arquillian.

Let us know if you find this useful and how would you use it.

Java EE 7 Hands-on Lab on WildFly and OpenShift (Tech Tip #33)

Thanks to @dmueller for inspiring this blog entry and @FarahJuma for keeping WildFly cartridge continuously updated!

Java EE 7 hands-on lab has been delivered at several conferences, meetups, Java User Groups, and other venues around the world. It provides instructions for a typical 3-tier application using several technologies in the Java EE 7 platform, such as WebSocket 1.0 (JSR 356), Batch Applications (JSR 352), JSON-P 1.0 (JSR 353), JAX-RS 2.0 (JSR 339), JMS 2.0 (JSR 343), CDI 1.1 (JSR 346), JPA 2.1 (JSR 338), and many more. The self-paced instructions allows the attendees to learn the design patterns in Java EE 7, and be productive right away.

This lab can be built using NetBeans, JBoss Tools/Eclipse, or IntelliJ. The deployment can be done on WildFly or GlassFish.

Do you want to get a taste of the application without trying out all the steps ? You can download the solution and deploy on application server of your choice.

Don’t have time for downloading and installing your application server ? OpenShift is your answer!

OpenShift provides an open source hybrid cloud application platform by Red Hat. It enables polyglot applications to be deployed on a public, private, and a hybrid cloud very easily. It provides an extensible cartridge-based architecture that allows a wide range of functionality such as frameworks, databases, monitoring services, or connectors to external backends to be easily added. WildFly cartridge allows you to start a WildFly instance in OpenShift Online.

This Tech Tip shows how to deploy Java EE 7 hands-on lab solution easily on WildFly cartridge on OpenShift.

  1. Register for a free OpenShift account.
  2. Login to OpenShift Console.
  3. Create a new WildFly application using the quickstart. Take the defaults, or change the name to whatever you want, and click on “Create Application”. The following page is shown:techtip33-app-created-credsThe default application page looks like:techtip33-wildfly-default-output
  4. Clone the workspace using the credentials shown for your application.
  5. Delete the generated “src” directory and copy the “src” from solution.
  6. Commit and push the changes to restart the cartridge:

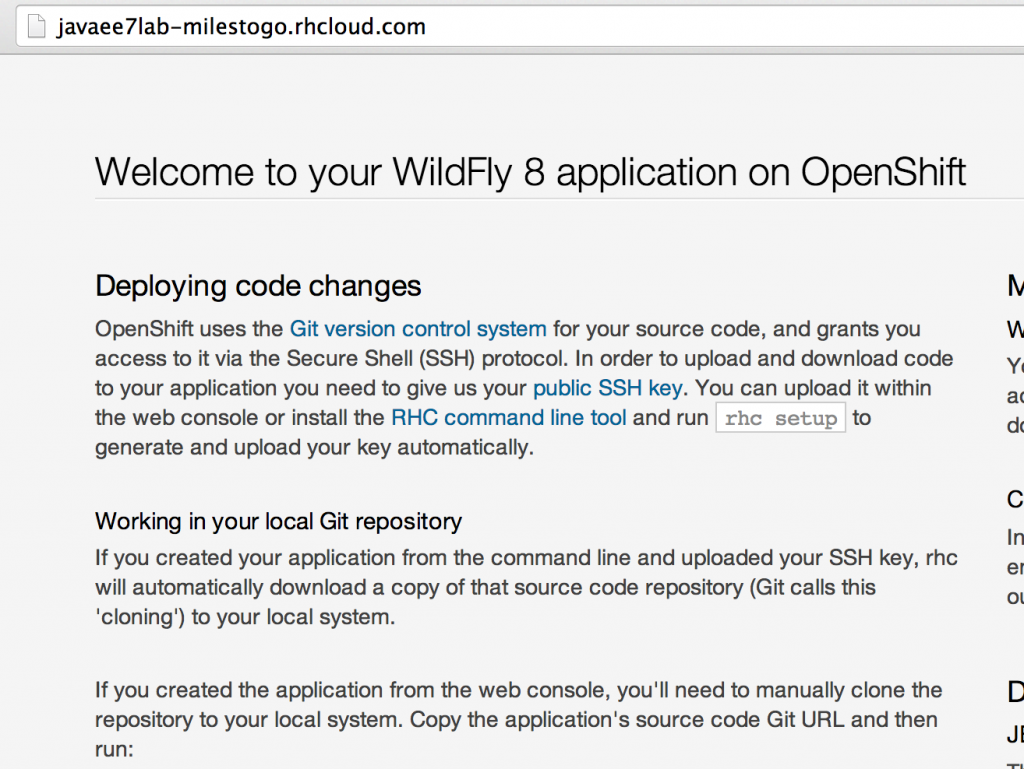
Refreshing the page at javaee7lab-milestogo.rhcloud.com now shows the application deployed successfully:

techtip33-javaee7lab-default-output

Simple, isn’t it ?

Try it and let us know your feedback!

Tech Tip #21 also talks about how to get started with WildFly in OpenShift and JBoss Developer Studio.


DeltaSpike 1.0 – Extend #JavaEE beyond #JavaEE (Tech Tip #32)

Do you want @Transactional and @TransactionScoped-like features introduced in Java EE 7 in JBoss EAP 6.x or any other Java EE 6 compliant application server ?

Need a CDI scope for window/tab for a JSF application ?

Simplified JPA Criteria API ?

How about boot and shutdown CDI container in a Java SE application ?

Simplified annotation-based security in Java EE ?

This is not a wish list for Java EE 8, but is possible today using DeltaSpike. All of this is possible by using the power of CDI portable extensions to unleash the power of a Java EE application server beyond what is defined in the existing specifications.

deltaspike-logo

DeltaSpike consist of a number of portable CDI extensions that provide useful features for Java application developers.

What are CDI portable extensions ?

CDI portable extensions extend the functionality of the container using an Service Provider Interface (SPI). A portable extension may integrate with the container by:

  • Providing its own beans, interceptors, and decorators to the container
  • Injecting dependencies into its own objects using the dependency injection service
  • Providing a contextual implementation for a custom scope
  • Augmenting or overriding the annotation-based metadata with metadata from some other source

DeltaSpike also ensure true portability! They are tested on different CDI implementations like JBoss Weld and Apache OpenWebBeans, and also on different Java EE servers like Apache Tomcat and TomEE, JBoss AS7, WildFly 8, Oracle GlassFish 3.1+ and 4.x+, IBM WebSphere 8.x, Oracle WebLogic Server 12c, Jetty, and others.

DeltaSpike has a core API and Impl module. The extensions themselves are available in different modules:

  • Security: Intercept and check security
  • Java Persistence API: @Transactional, @TransactionScoped, Extended persistence context, and more
  • Java Server Faces: Multi-window handling, New scopes, Type-safe view configs
  • Bean Validation: Add CDI support in Bean Validation
  • Servlet: Injection of common Servlet objects, propagation of Servlet events to the CDI event bus
  • Data: provides enhanced JPA experience with declarative queries, reducing boilerplate to a minimum.
  • Test Control: Allows to write CDI based tests easily
  • Scheduler: Simple integration with Quartz v2 (per default) or any other scheduler which supports cron-expressions for job-classes.
  • Container Control: Allows to boot and shutdown the CDI container in SE applications, control the life-cycle of the built-in contexts of the CDI container

You may realize that some of the functionality is already available in Java EE 7 so this would certainly be lot more relevant to Java EE 6 compliant application server. But there are still several features that can be used in Java EE 7 compliant app servers, like WildFly. And then it has the potential to be the playground for new features that are being discussed in Java EE 8!

Getting started is easy if you are using Maven. Add core and impl <dependency>s to “pom.xml”:

And then configure one of the modules as explained here.

Complete documentation for all the modules is available here.

One of the frequently needed features is accessing ServletRequest in a CDI bean. With DeltaSpike, this can be easily achieved using the following annotation:

A complete sample showcasing this functionality is available at github.com/arun-gupta/wildfly-samples/tree/master/deltaspike.

DeltaSpike 1.0 was recently announced and the complete list of JIRA tickets fixed is here.

There are usual ways to connect with the team:

Let us know what would you like to see in DeltaSpike!

Patch WildFly in Offline and Online Modes (Tech Tip #29)

wildfly-8.1-flash

WildFly 8.1 was released recently. This release includes a few minor enhancements and 247 bug fixes. Several components were updated and all the details are available in Release Notes.

This is the first time patching infrastructure introduced in WildFly 8.0.0 can be used to update WildFly. So you can either download a full install of WildFly 8.1.0, or just the update to 8.0.0. This video explains how to install the update in offline mode (server not running) and online mode (server running).

UPDATE: The patching mechanism is supposed to be used for our products (JBoss EAP etc.) to deliver a stream of bug fixes, while the community projects (WildFly) will be used to primarily deliver feature updates (and fixes of course, but the emphasis is on the updates).  So WildFly will provide “patches” and future versions of JBoss EAP will provide “patches”.

Download WildFly and let us know your feedback!

WildFly Cluster on Raspberry Pi (Tech Tip #28)

Tech Tip #25 showed how to configure WildFly on Raspberry Pi. Tech Tip #27 showed how to setup WildFly on two Raspberry Pis in managed domain mode. This tech tip will show how to setup a WildFly cluster over those two hosts.

WildFly supports mod_cluster out of the box. There are several advantages of mod_cluster:

  • Dynamic configuration of httpd workers
  • Server-side load balance factor calculation
  • Fine-grained web app lifecycle control

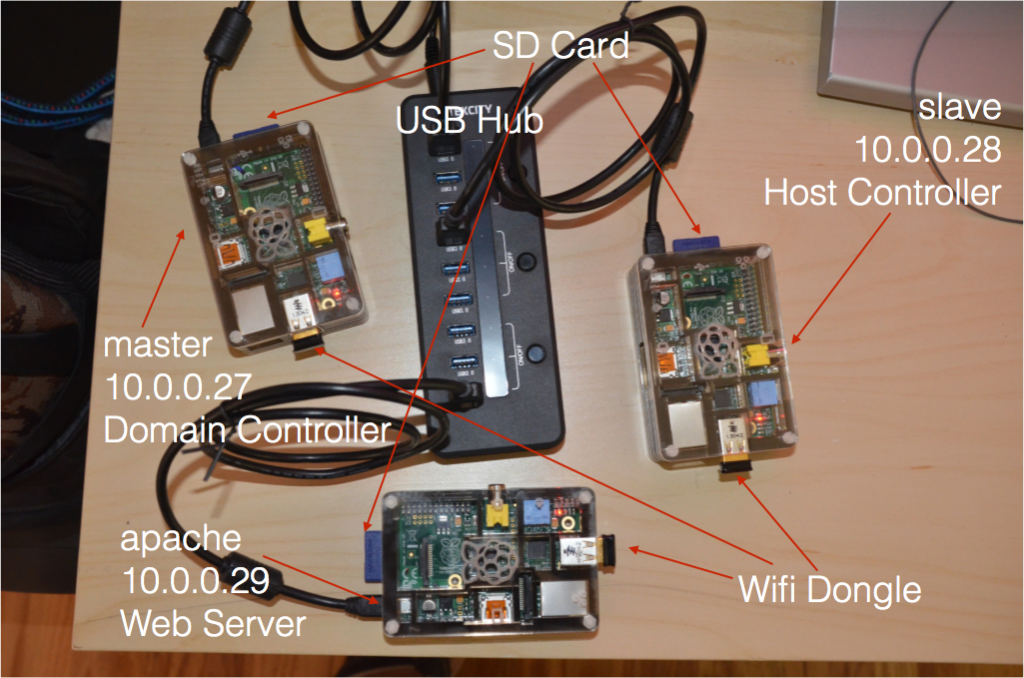
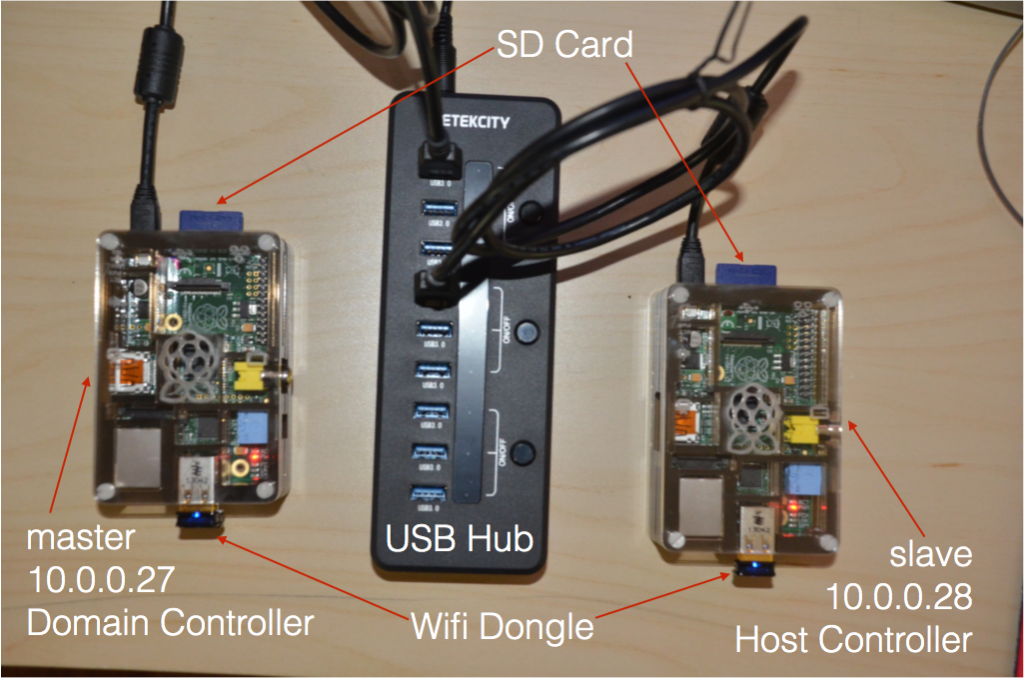
However there is no ARM build available for it, yet. So we’ll use mod_proxy instead that gets pre-installed as part of Apache2. The Domain Controller and HTTP server need not be on the same host and that’s the configuration we’ll use for our setup. So effectively, there will be three Raspberry Pis:

  • Domain Controller
  • Host Controller
  • Web Server

raspi-cluster-techtip28

Lets get started!

  1. Before installing any modules, including Apache, on Raspbian, the system needs to be fully updated:

    Trying to install Apache without updating the system will give weird errors:

    Now install Apache HTTP as:

    The log messages show that server’s name could not be determined, and 127.0.1.1 is instead used for ServerName. This can be fixed by editing “/etc/apache2/apache2.conf” and adding the following line:
  2. After Apache is installed, “mod_proxy” modules already exists in the “/usr/lib/apache2/modules” directory, and just need to enabled.Create “/etc/apache2/mods-enabled/mod_proxy.load” as:

    This file will be picked up via a direcinve in “/etc/apache2/apache2.conf”.

    Restart the server:

    If there are any errors, then you can see them in “/var/log/apache2/error.log” directory.

    The list of modules loaded can be seen using:

    The newly loaded modules are highlighted in bold.

  3. Provide convenient host names for each of the Raspberry Pis. The names chosen for each host is shown in the table below:
    IP Address Role Host Name
    10.0.0.27 Domain Controller raspi-master
    10.0.0.28 Host Controller raspi-slave
    10.0.0.29 Web Server raspi-apache

    This is enabled by editing “/etc/hostname” on each Raspberry Pi and changing “raspberrypi” to the given name.

    In addition, “/etc/hosts” on each Raspberry Pi need to make two entries of the following format:

    Here <IP Address> and <Host Name> for each host needs to be used from the table above.

    Finally, added the following entries on “/etc/hosts” on my local Mac:

    This ensures that any cookies are set from the same domain.

    Flush the DNS using:

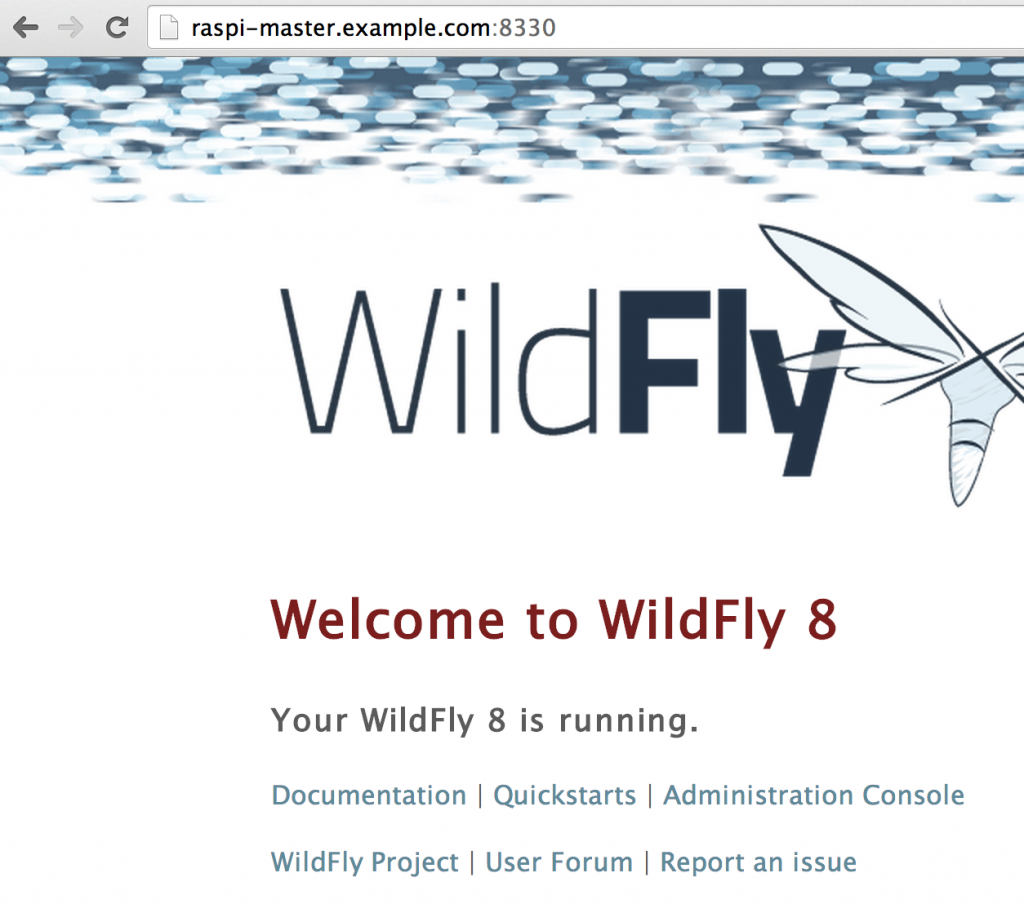
    Now raspi-master.example.com:8330 in the browser shows:

    raspi-master-defaultoutput-techtip28

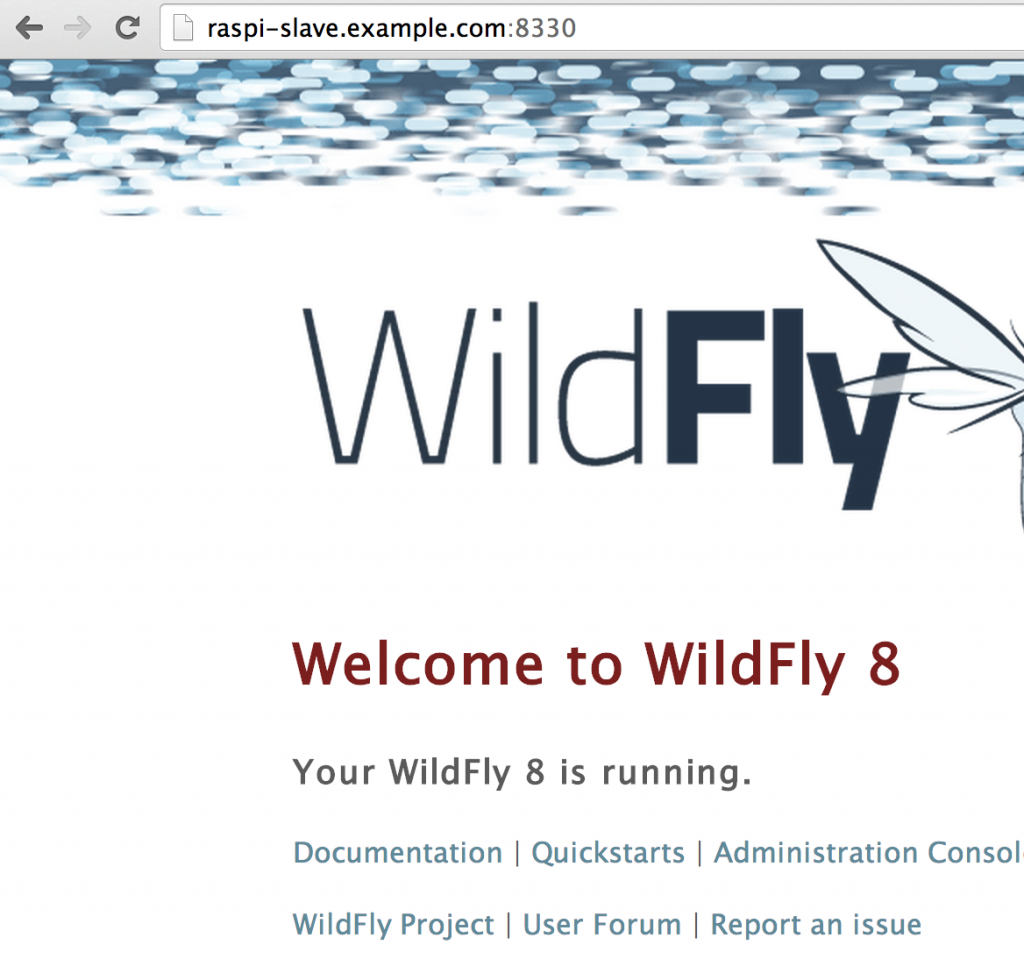
    And similarly raspi-slave.example.com:8330 shows:

    raspi-slave-default-output-techtip28

  4. Configure mod_proxy load balancer by editing “/etc/apache2/apache2.conf” and add the following lines at the end of the file:

    This directive provide load balancing between “master” and “slave”. “Header” and “ProxySet” directive provides sticky session.

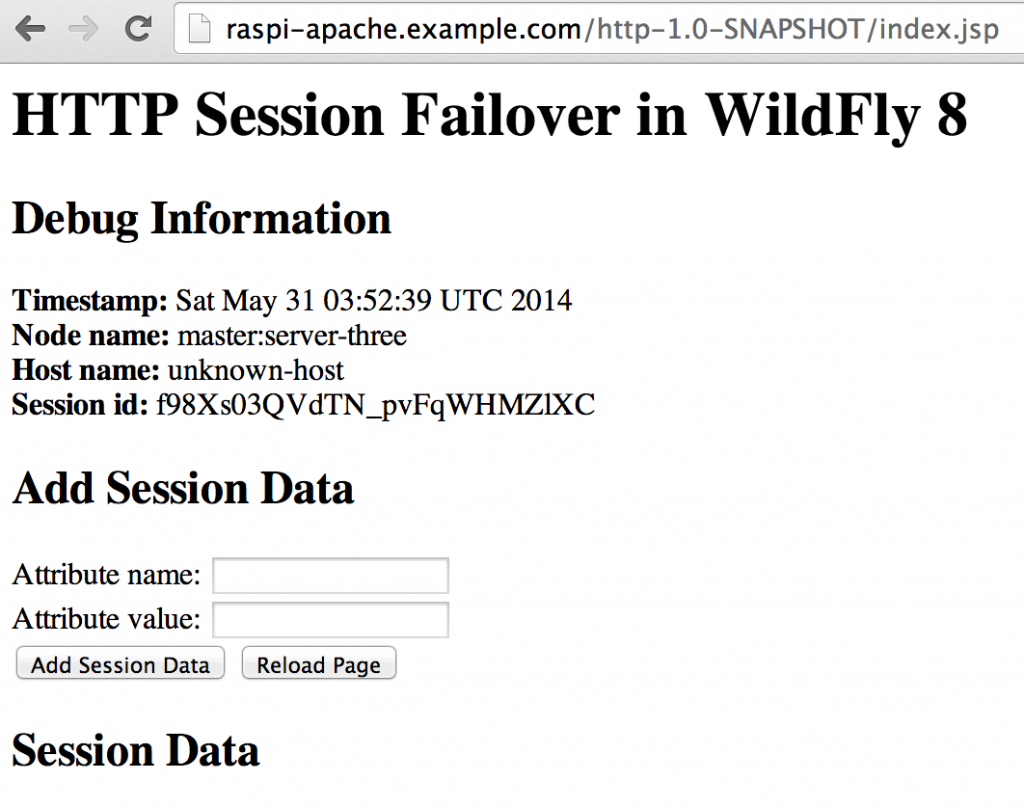
Now accessing raspi-apache.example.com/http-1.0-SNAPSHOT/index.jsp shows:

raspi-apache-default-output-techtip28

And so in three parts (part 1 and part 2), we learned how to setup a WildFly cluster on Raspberry Pi!

WildFly Managed Domain on Raspberry Pi (Tech Tip #27)

Tech Tip #25 showed how to configure WildFly on Raspberry Pi. This tech tip will show how to setup a WildFly managed domain over two hosts running on Raspberry Pi.

Lets understand some basic concepts first.

WildFly can run in two modes:

  • Managed Domain allows you to run and manage a multi-server domain topology
  • Standalone allows to run a single instance of server

Multiple standalone instances can be configured to form a highly available cluster. It is up to the user to coordinate management across multiple servers though.

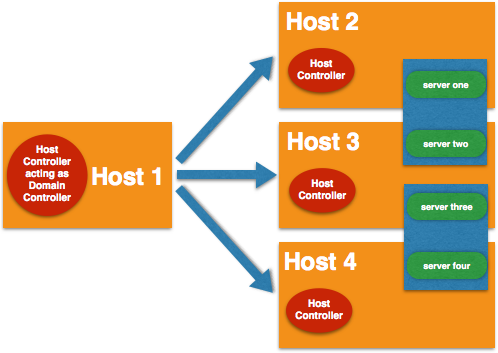
Servers running in managed domain mode are referred to as the members of a “domain”. A single Domain Controller acts as the central management control point for the domain. A domain can span multiple physical or virtual hosts, with all WildFly instances on a given host under the control of a Host Controller process. One Host Controller instance is configured to act as the Domain Controller. The Host Controller on each host interacts with the Domain Controller to control the lifecycle of the application server instances running on its host and to assist the Domain Controller in managing them.

It is important to understand that administration of servers (standalone or managed domain) is orthogonal to clustering and high availability. In the managed domain mode, a server instance always belong to a Server Group. A domain can have multiple Server Groups. Each group can be configured with different profiles and deployments.

wildfly-clustering-architecture-techtip27

For example, default WildFly installation comes with “main-server-group” and “other-server-group” as shown:

“main-server-group” has two servers: “server-one” and “server-two”. “other-server-group” has one server: “server-three”.

default-server-group-techtip27

By default, these are all configured on a single machine (localhost) with Host Controller and Domain Controller co-located. This is defined in “domain/configuration/host.xml”.

Each Server Group is configured with a profile. These profiles are defined, and associated with a Server Group, in “domain/configuration/domain.xml”. Default WildFly installation comes with two profiles: “full” and “full-ha”.

“main-server-group” is configured with “full” profile and “other-server-group” is configured with “full-ha” profile.

server-group-profiles-techtip27

Profile is a named set of subsystem configurations that adds capabilities like Servlet, EJB, JPA, JTA, etc. The “full-ha” profile also enable all subsystems needed to establish cluster (infinispan, jcluster, and mod_cluster).

OK, enough explanation, lets get into action!

Make sure to install WildFly on each of the Raspberry Pi following Tech Tip #25.

docs.jboss.org/author/display/WFLY8/WildFly+8+Cluster+Howto explain in detail on how to setup Domain Controller and Host Controller on two hosts and enable clustering. This tech tip follows these instructions and adapt them for WildFly. This tech tip will show how to configure WildFly managed domain over two Raspberry Pis.

raspi-cluster-techtip27

A subsequent blog will show how to configure cluster over this managed domain.

Here is what we’ll do:

  • Call one host as “master” and another as “slave”.
  • Both will run WildFly 8.1 CR2, master will run as Domain Controller and slave will run under the domain management of master
  • Deploy a project into domain, and verify that the application is deployed on both master and slave hosts.

Each WildFly was connected to a display to obtain the IP address and enable SSH access. It can be enabled by invoking

Scroll down to the SSH option and enable it. Then the two Raspberry Pis were configured to run in headless mode (no keyboard, mouse, or monitor).

raspi-wildfly-setup-techtip27

  1. Domain Configuration – Configure master and slave “host.xml”
    1. Master configuration
      1. Login to the master Raspberry pi:

        The default password is “raspberry”.
      2. By default, WildFly is configured to run in server VM. As mentioned in Tech Tip #25, this is not support on JDK bundled on Raspbian. This needs to be updated at two places. Edit “bin/domain.sh”:

        and remove the lines marked 80 through 110.
      3. Edit host.xml

        Remove “-server” option by removing lines 75 through 77 as shown below:

         
      4. The default setting for <interfaces> in this file looks like:

        Change this to:

        10.0.0.27 is master’s IP address.
    2. Slave configuration
      1. Login to the slave Raspberry pi:

        The default password is “raspberry”.
      2. Edit “domain.sh” and remove the lines as done for server. This will ensure that non-server, or client, JVM is used for running the domain.
      3. Edit “host.xml”
      4. Set the host name by changing

        to
      5. Remove “-server” option by removing lines 75 through 77 as explained above.
      6. Modify <domain-controller> such that slave can connect to master’s management port. Change

        to

        10.0.0.27 is master’s IP address.
      7. Change the default <interfaces> from:

        to:

        10.0.0.28 is slave’s IP address.
  2. Security Configuration
    1. Master
      1. Using “add-user.sh” script, create a user in Management Realm for master.