Category Archives: devops

NoSQL Simplifies Database DevOps

Does your organization want to simplify Database DevOps?
Is your database becoming a bottleneck to innovate rapidly?
Do you want to save millions of $$ in database licensing cost?

Read on!

State of Database DevOps

State of Database DevOps is a survey on DevOps adoption rates among SQL Server professionals. Over 1000 SQL Server professionals responded to the survey. The respondents came from across the globe and represent a wide range of job roles, company sizes and industries.

There are some good findings in the survey results. A few key findings worth highlighting here:

the greatest challenge with integrating database changes into a DevOps process would still be synchronizing application and database changes

Another one …

The greatest drawback identified with traditional siloed database development is the increased risk of failed deployments or downtime when introducing changes. This is closely followed by slow development and release cycles and the inability to respond quickly to changing business requirements

And another one …

Increasing the speed of delivery of database changes and freeing developers up to do more value added work are the key drivers for automating the delivery of database changes

The challenges highlighted here are not mentioned in the context of SQL server only, but would be applicable towards any relational database. You may be using Oracle, Postgres, MySQL, MariaDB or any other relational database for that matter and would be very much facing these issues. Why?

Why is Relational not well suited for Database DevOps?

It’s common for an application to operate on data from multiple tables in a RDBMS. For example, placing an order may use Customer, Order and Product tables. Each table has multiple columns with standard data types specific to a database. Tables may have primary, reference and foreign key constraints. Developers building applications using a relational database typically use an Object Relational Mapper (ORM), such as Hibernate or Java Persistence API for Java developers. There are similar ORM for other languages as well. ORMs captures the underlying complex database structure and allow programmers to build applications naturally using their language.

ORMs also use a persistence provider and allows your application to be independent of the underlying database. This persistence provider creates a binding between the language specific class to the database structure. For example, it maps a class to a table or multiple tables, binds the language data types to the types defined in the database and captures the relationship between tables. Theoretically, a programmer can use a different persistence provider to use a different RDBMS for the application. But this is far from a practical experience!

Any database change requires the ORM classes to be updated otherwise the application may not work. For example, adding a new table may mean a new Java class or updating an existing class. Change of a data type in a column requires the class definition to be updated otherwise the application will not even compile. Adding a new column means adding a new field in the class. Any change requires the classes to be updated and the application needs to be repackaged.

Changes in database structure are required all the time to meet the evolving needs of business. But if the DBAs make a database change and the ORM classes are not updated then there is a disconnect. Application deployment needs to be coordinated with the updating the database schema. There are tools like Flyway, Liquibase and others that integrate application and database deployment. But developers are often not allowed to make any direct changes to the production database. A disconnect would result in your application not working and the business to suffer. DevOps practices can definitely help solve these issues as it requires a close collaboration between developers that are building applications and DBAs that are updating database scripts.

But as the survey reports, more than 50% of the respondents do not have DevOps adopted today.

Database DevOps Adoption

There are challenges even if you were to integrate database changes into a DevOps process.

Database DevOps Challenges

Synchronizing application and database changes where the ORM classes need to be synchronized with the backend database structure is the biggest challenge. DBAs may want to structure the database in a certain way which may not be optimal for application development. Applying consistency across application and database development is the next major challenge for ensuring a seamless database DevOps.

A siloed development has serious issues on your ability to rapidly innovate and deliver value to your business.

Database DevOps Drawbacks

As shown in this image, failed deployments when introducing changes, slow development/release cycles and inability to respond to business needs account for over 60% of the drawbacks.

Speed of delivery of database changes is the biggest concern for database DevOps.

Database DevOps Driver

So what do you do?

How does NoSQL simplify Database DevOps?

NoSQL document database helps to simplify database DevOps!

How does NoSQL simplify database DevOps?

  • Schema flexibility – Developers need a single database that can store rapidly changing structured, semi-structured and unstructured data. NoSQL document database offers schema flexibility by allowing developers operate directly on JSON data and derive meaning out of it
  • No impedance mismatch – With no ORM for the application, there is no impedance mismatch between domain classes and database structure. Only the application code needs to be updated and no coordination is required with the schema changes
  • Scalability –  One of the drawbacks mentioned in the report is the inability to adapt to changing business requirements. This highlights scalability as a major DevOps challenge. If the volume of data, the number of queries, or the types of indexes required to support the application changes the database needs to change to accommodate those changes. Not in weeks or months, but today! No SQL databases run on commodity hardware and has a scale-out architecture as opposed to scale-up with RDBMS. Sharding can help with scalability in RDBMS but that’s an extra complexity that now need to be dealt with.

Learn more about why enterprises move to NoSQL.

Which NoSQL database is preferred by GE, Marriott, Verizon, United, LinkedIn, DIRECTV and many others?

What are some other advantages of Couchbase?

  • Homogeneous distributed architecture – no master/slave
  • SQL-like query language to query JSON documents
  • Auto-sharding using vBuckets
  • Memory-first architecture reduces the need for an additional caching layer
  • Cross-data center replication
  • Multiple SDKs
  • Database on server or mobile device, with a complete synchronization between them
  • Different container orchestration frameworks

NoSQL is not a panacea by any means. If you are building a system that needs complex transaction logic or real-time data warehousing, then RDBMS may be a better fit. However it addresses your scalability and agility concerns and simplifies database DevOps.

Here is a great video on migrating from relational database to NoSQL:

Here is another interesting video that shows why Marriott transitioned from Relational to NoSQL:

A lot more videos are available on Couchbase Connect 2016.

And some more relevant blogs:

  • Making the Shift from Relational to NoSQL: How to Get Started (whitepaper)
  • Moving from Oracle database to Couchbase
  • Moving from MySQL to Couchbase
  • Moving from SQL Server to Couchbase – Part 1 (data modeling), Part 2 (data migration), Part 3 (coming)
  • Moving from MongoDB to Couchbase
  • Migrate your MongoDB with Mongoose REST API to Couchbase with Ottoman
  • Migrating from Relational Database to Couchbase
  • Top 5 reasons companies replace Oracle with Couchbase

Talk to us:

  • Couchbase Developer Portal
  • Couchbase Forums
  • @couchhasedev and @couchbase

Source: blog.couchbase.com/nosql-simplifies-database-devops/

Getting Started with Docker for AWS and Scaling Nodes

This blog will explain how to get started with Docker for AWS and deploy a multi-host Swarm cluster on Amazon.

Docker Logo

amazon-web-services-logo

Many thanks to @friism for helping me debug through the basics!

boot2docker -> Docker Machine -> Docker for Mac

Are you packaging your applications using Docker and using boot2docker for running containers in development? Then you are really living under a rock!

It is highly recommended to upgrade to Docker Machine for dev/testing of Docker containers. It encapsulates boot2docker and allows to create one or more light-weight VMs on your machine. Each VM acts as a Docker Engine and can run multiple Docker Containers. Running multiple VMs allows you to setup multi-host Docker Swarm cluster on your local laptop easily.

Docker Machine is now old news as well. DockerCon 2016 announced public beta of Docker for Mac. This means anybody can sign up for Docker for Mac at docker.com/getdocker and use it for dev/test of Docker containers. Of course, there is Docker for Windows too!

Docker for Mac is still a single host but has a swarm mode that allows to initialize it as a single node Swarm cluster.

What is Docker for AWS?

So now that you are using Docker for Mac for development, what would be your deployment platform? DockerCon 2016 also announced Docker for AWS and Azure Beta.

Docker for AWS and Azure both start a fleet of Docker 1.12 Engines with swarm mode enabled out of the box. Swarm mode means that the individual Docker engines form into a self-organizing, self-healing swarm, distributed across availability zones for durability.

Only AWS and Azure charges apply, Docker for AWS and Docker for Azure are free at this time. Sign up for Docker for AWS and Azure at beta.docker.com. Note, that it is a restricted availability at this time.

Once your account is enabled, then you’ll get an invitation email as shown below:

docker-aws-invite

Docker for AWS CloudFormation Values

Click on Launch Stack to be redirected to the CloudFormation template page.

Take the defaults:
docker4aws-1

S3 template URL will be automatically populated, and is hidden here.

Click on Next. This page allows you to specify details for the CloudFormation template:
docker4aws-2

The following changes may be made:

  • Template name
  • Number of manager and worker nodes, 1 and 3 in this case. Note that only odd number of managers can be specified. By default, the containers are scheduled on the worker nodes only.
  • AMI size of master and worker nodes
  • A key already configured in your AWS account

Click on Next and take the defaults:
docker4aws-3

Click on Next, confirm the settings:
docker4aws-4

docker4aws-5

Select IAM resources checkbox and click on Create button to create the CloudFormation template.

It took ~10 mins to create a 4 node cluster (1 manager + 3 worker):docker4aws-6

More details about the cluster can be seen in EC2 Console:docker4aws-7

Docker for AWS Swarm Cluster Details

Output tab of EC2 Console shows more details about the cluster:docker4aws-8

More details about the cluster can be obtained in two ways:

  • Log into the cluster using SSH
  • Create a tunnel and then configure local Docker CLI

Create SSH Connection to Docker for AWS

Login using command shown in the Value column of the Output tab.

Create a SSH connection as:

Note, that we are using the same key here that was specified during CloudFormation template. The list of containers can then be seen using docker ps command:

Create SSH Tunnel to Docker for AWS

Alternatively, a SSH tunnel can be created as:

Setup DOCKER_HOST:

The list of containers can be seen as above using docker ps command. In addition, more information about the cluster can be obtained using docker info command:

Here are some key details from this output:

  • 4 nodes and 1 manager, and so that means 3 worker nodes
  • All nodes are running Docker Engine version 1.12.0-rc3
  • Each VM is created using Alpine Linux 3.4

Scaling Worker Nodes in Docker for AWS

All worker nodes are configured in an AWS AutoScaling Group. Manager node is configured in a separate AWS AutoScaling Group.

docker4aws-9

This first release allows you to scale the worker count using the the Autocaling group. Docker will automatically join or remove new instances to the Swarm. Changing manager count live is not supported in this release.

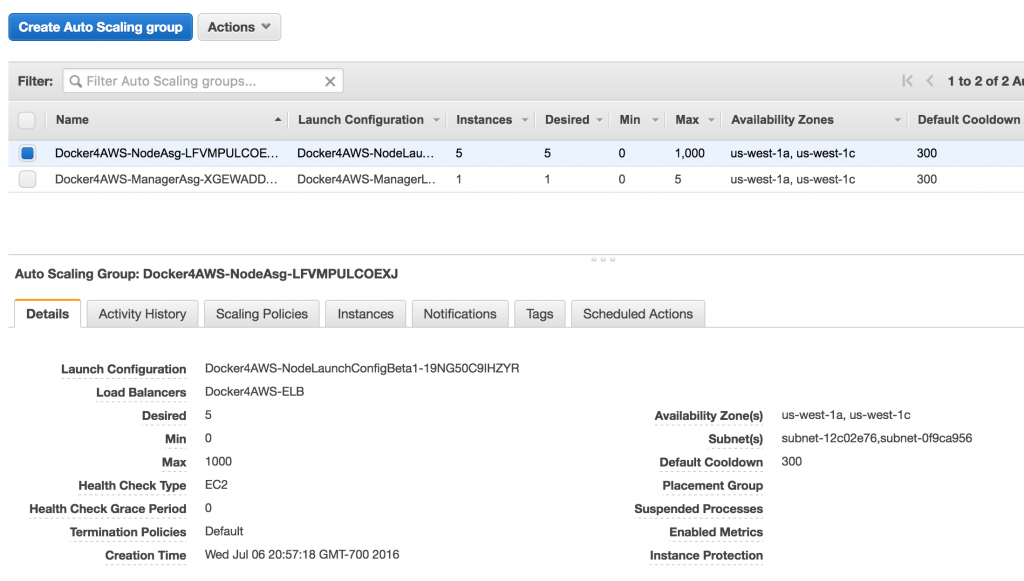
Select the AutoScaling group for worker nodes to see complete details about the group:

docker4aws-10

Click on Edit button to change the number of desired instances to 5, and save the configuration by clicking on Save button:

docker4aws-11

It takes a few seconds for the new instances to be provisioned and auto included in the Docker Swarm cluster. The refreshed Autoscaling group is shown as:

docker4aws-12

And now docker info command shows the updated output as:

This shows that there are a total of 6 nodes with 1 manager.

Docker for AWS References

  • Docker for AWS and Azure Announcement Blog
  • Docker for AWS and Azure
  • Docker for AWS Release Notes

Source: blog.couchbase.com/2016/july/docker-for-aws-getting-started-scaling-nodes

Jenkins to Nexus with Git Polling – Tech Tip #76

Build Binaries Only Once is a very important principle of Continuous Deployment (CD). However that blog guides you to build and deploy binaries to Nexus from your development machine. This is fine as a starting step where everything is locally contained on your laptop and you are just testing setup to figure out how things work. But everybody in the team having a local Nexus repository defies the purpose of a “shared repository”.  This is also against Continuous Integration (CI) where the source code committed by different team members checked out and build on a CI server. And CI is a fundamental requirement for Continuous Deployment. How do you set this up then?

You use a CI server to push binaries to Nexus.

There are a varety of CI servers in both open source and commercial range. Jenkins, Travis,  CruiseControl and Go are some of the popular ones in the open source land. They all have a commercial edition as well. Bamboo and AnthillPro are a couple of popular commercial-only offerings. This blog will use the simplest, most popular, and easiest to use Jenkins CI server.

The overall flow is shown in the diagram and explained after that.

Jenkins, GitHub, Nexus setup


The flow is:

  • Developers push code from inside firewall to GitHub
  • Jenkins is polling GitHub for code updates
  • Build the binaries and push the artifacts to Nexus (inside firewall)

This tech tip will show how to get started with Jenkins and push binaries to Nexus by polling the GitHub workspace. While polling is inefficient, it may be the only, and probably a simplified, choice.

In this setup, Jenkins and Nexus are both setup inside your firewall. This is a more common scenario as at least Nexus would be typically inside firewall. However Jenkins may be configured outside firewall in which case it will be able to archive artifacts but not directly push to Nexus. A proxy needs to be configured for Jenkins and Nexus to communicate in this case.

Lets get started!

Download and Start Jenkins Server

All information about Jenkins can be found at jenkins-ci.org.

  1. Download the latest WAR file:
    The total time to download will differ based upon your network speed.
  2. Start Jenkins as
    Starting and Accessing Jenkins provide more details about starting Jenkins and different configuration options.
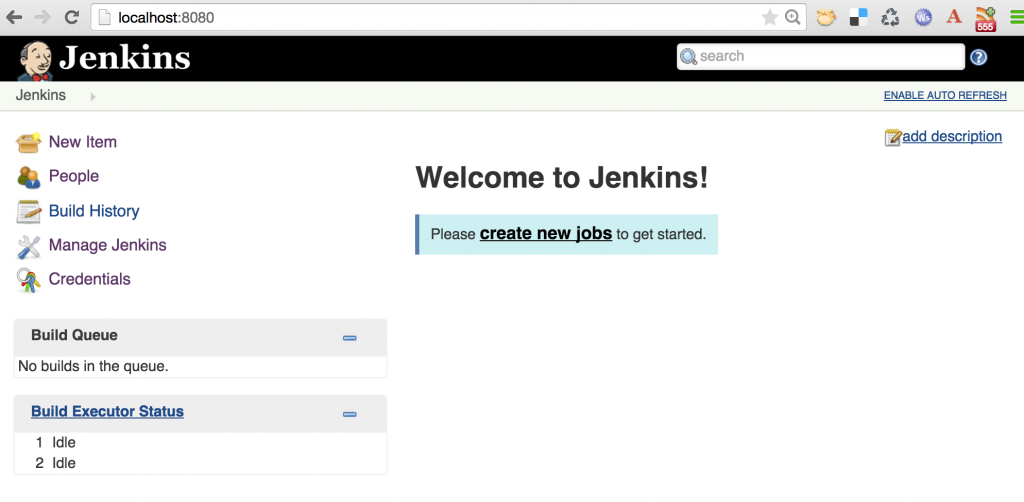
  3. Once Jenkins is started, it can be accessed at localhost:8080 and shown as:

    Default Jenkins Output

Install Git Plugin

By default, Jenkins does not have the ability to handle Git workspace. Hopefully this will be fixed in a subsequent release because of INFRA-253. In the meanwhile, lets install Git plugin.

  1. Click on “Manage Jenkins”, “Manage Plugins”
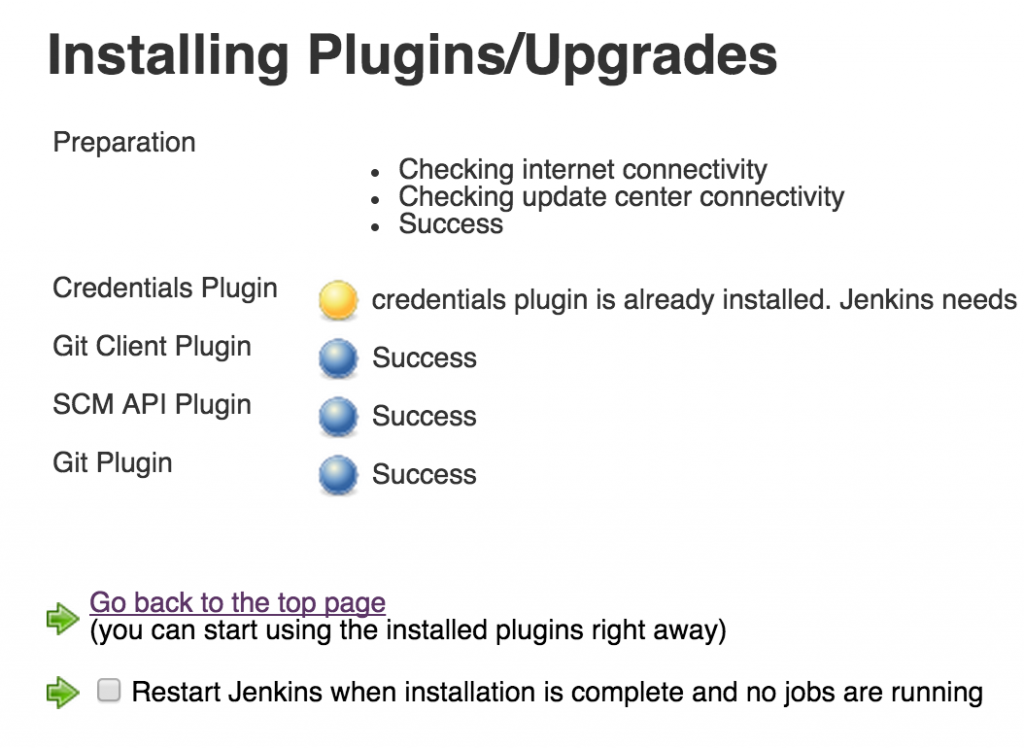
  2. Click on “Available” tab, select “GIT Plugin” and click on “Install without restart”Git plugin installation in Jenkins
  3. Click on “Restart Jenkins …” to restart Jenkins.

Create a Jenkins Job

  1. Configure Maven at Configure System as explained here
  2. Create a new Jenkins job by going to localhost:8080/newJob
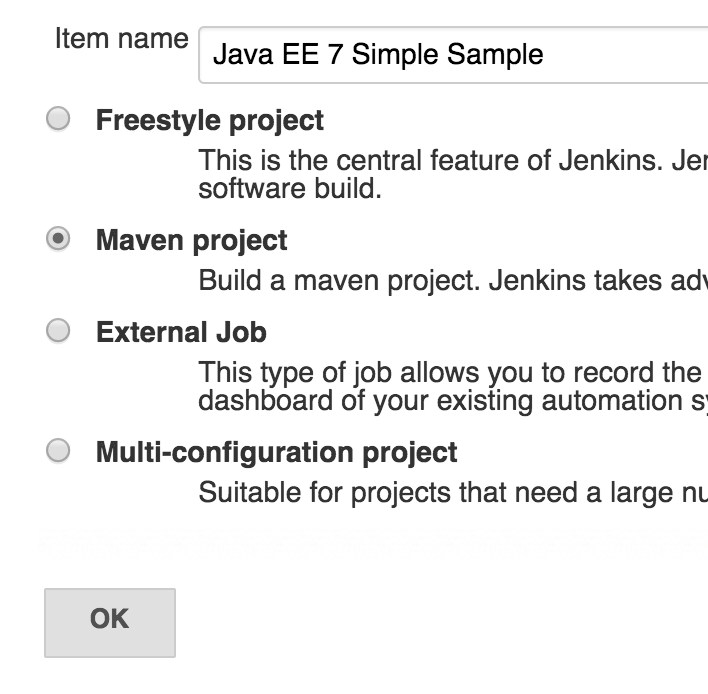
  3. Choose “Maven project” and give the name as shown:

    Jenkins New JobClick on “OK”.

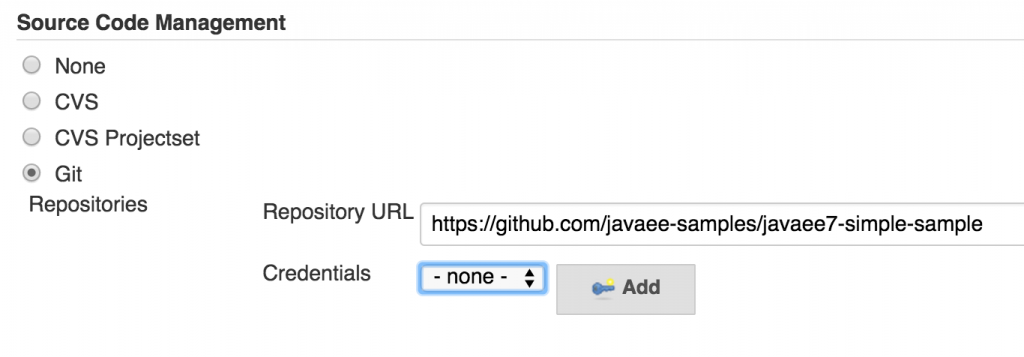
  4. In “Source Code Management”, choose “Git” and specify the repository “https://github.com/javaee-samples/javaee7-simple-sample” as shown:
    Java EE 7 Simple Sample GitHub Repo in Jenkins
  5. In “Build Triggers”, choose “Poll SCM” and specify the schedule to poll the repo every 5 minutes as “H/5 * * * *”:

    techtip75-polling-schedule

  6. In “Build”, specify “deploy” target as shown:

    Maven target in Jenkins

Deploy SNAPSHOT to Nexus

Once the setup is done, deploying to Nexus is just a click or a poll away.

  1. Click on Build Now to build the job

    Jenkins Build Job

  2. Console output for the first job will show something like:

  3. Git Polling Log will show the last poll to your workspace repo. If there are any commits to the workspace after last job then a new job will be started.

This blog showed how to push binaries from Jenkins to Nexus using Git Polling.

Enjoy!

Build Binaries Only Once for Continuous Deployment

What is Build Binaries Only Once?

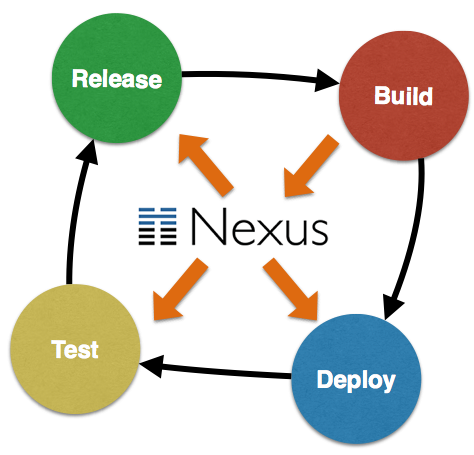
One of the fundamental principle of Continuous Delivery is Build Binaries Only Once, or in short BBOO. This means that the binary artifacts should be build once, and only once. These artifacts should then be stored in a repository manager, such as a Nexus Repository. Subsequent deploy, test, and release cycles should never attempt to build this binary again and instead reuse this binary. This ensures that the exact same binary has gone through all different test cycles and delivered to the customer.

Several times binaries are rebuilt during each testing phase using a specific tag of the workspace, and considered the same. But that is still different! This might turn out to be the same but that’s more incidental. Its more likely not same because of different environment configurations. For example, development team might be using JDK 8 on their machine and the test/staging might be using JDK 7. There are a multitude reasons because of which the binary artifacts could differ. So it’s very essential to build binaries only once, store them in a repository, and make them go through different test, staging, and production cycle. This increases the overall confidence level of delivery to the customer.

Build Binaries Only Once

This image shows how the binaries are built once during Build stage and stored on Nexus repository. There after, Deploy, Test, and Release stages are only reading the binary from Nexus.

The fact that dev, test, and staging environments differ is a different issue. And we’ll deal with that in a subsequent blog.

How do you setup Build Binaries Only Once?

For now, lets look at the setup:

  1. A Java EE 7 application WAR file is built once
  2. Store in a Nexus repository, or .m2 local repository
  3. Same binary is used for smoke testing
  4. Same binary is used for running full test suite

The smoke test in our case will be just a single test and full suite has four tests. Hopefully this is not your typical setup in terms of the number of tests, but at least you get to see how to setup everything.

Also only two stages of testing, smoke and full but the concept can be easily extended to add other stages. A subsequent blog will show a full blown deployment pipeline.

Lets get started!

  1. Check out a trivial Java EE 7 sample application from github.com/javaee-samples/javaee7-simple-sample. This is a typical Java EE application with REST endpoints, CDI beans, JPA entities.
  2. Setup a local Nexus Repository and deploy a SNAPSHOT of the application to it as:
    By default, Nexus repository is configured on localhost:8081/nexus. Note down the host/port if you are using a different combination. Also note down the exact version number that is deployed to Nexus. By default, it will be 1.0-SNAPSHOT.

    You can also deploy a RELEASE to this Nexus repository as:

    Note down whether you deployed SNAPSHOT or RELEASE.

    In either case, you can also specify -P release Maven profile and sources and javadocs will be attached with the deployment. So if RELEASE is deployed as:

    Then sources and javadocs are also attached.

  3. Check out the test workspace from github.com/javaee-samples/javaee7-simple-sample-test. Make the following changes in this project:
    1. Change nexus-repo property to match the host/port of the Nexus repository. If you used the default installation of Nexus and deployed a RELEASE, then nothing needs to be changed.By default, Nexus has one repository for SNAPSHOTs and another for RELEASEs. The workspace is configured to use RELEASE repository. If you deployed a SNAPSHOT, then “releases” in nexus-repo needs to be changed to “snapshots”to point to the appopriate repository.
    2. Change javaee7-sample-app-version property to match the version of the application deployed to Nexus.
  4. Start WildFly and run smoke tests as:

    This will run all files ending in “SmokeTest”. ShrinkWrap and Arquillian perform the heavy lifting of resolving the WAR file from Nexus and using it for running the tests:

    Running the smoke tests will show the results as:

  5. Run the full tests as:

    This will run all files included in your test suite and will show the results as:

    In both cases, smoke tests and full tests are using the binary that is deployed to Nexus.

Learn more about your toolset for creating this simple yet powerful setup:

arquillian-logo nexus-logowildfly-logo


Here are some other blogs coming in this series:

  • Use a CI server to deploy to Nexus
  • Run tests on WildFly running in a PaaS
  • Add static code coverage and code metrics in testing
  • Build a deployment pipeline

Enjoy!

Setup Local Nexus Repository and Deploying WAR File from Maven (Tech Tip #74)

Maven Central serves as the central repository manager where binary artifacts are uploaded by different teams/companies/individuals and shared with rest of the world. Much like github, and other source code repositories, which are very effective for source code control, these repository managers also act as a deployment destination for your own generated binary artifacts.

Setting up a local repository manager has several advantages. The primary ones are that they act as a highly configurable proxy between Maven central so that everybody does not have to download all the dependencies from the central repo. Another primary reason is to control your interim generated artifacts within your team. Reasons to Use a Repository Manager provide detailed explanation of a complete set of benefits.

This Tech Tip will show how to setup a local Nexus repository manager, and push artifacts to it – both snapshots and releases.

Lets get started!

Install and Configure Local Nexus Repository

  1. Download and unzip latest Nexus OSS. Default administrator’s login/password is admin/admin123. Default deployment login/password is deployment/deployment123.
  2. Start up Nexus as:
    The logs can then be seen as:
    Or you can start where the logs are displayed in the console itself:
  3. Configure Maven Settings file (~.m2/settings.xml) to include the default deployment username and password as:

Deploy Snapshot to Local Nexus Repository

  1. Check out a simple Java EE sample from github.com/javaee-samples/javaee7-simple-sample.
  2. Create and deploy the WAR file to the local Nexus repository as:
    The snapshot repository, after pushing couple of builds, can be seen at localhost:8081/nexus/#view-repositories;snapshots~browsestorage and looks like as shown:

    Nexus Snapshot Repository

    The actual repository storage is in ../sonatype-work/nexus directory. This is created in parallel to where ever Nexus OSS bundle was unzipped.

Deploy Release to Local Nexus Repository

  1. Clean any previously performed release:

  2. Prepare for the next release:

  3. Perform the release:

    Notice, how this command is ending with an error. This is similar to as reported here but the strange thing is that the files are still uploaded on Nexus. Here is the snapshot from localhost:8081/nexus/#view-repositories;releases~browsestorage while trying to test multiple releases and wondering about these “spurious” error messages:

    Nexus Release Repository

    This error will require more debugging but at least snapshot and release builds can now be stored on local Nexus repository.

    UPDATE: Manfred Moser helped debug this error by sending pull requests. This error is now gone and instead should show something like:


You learned how to setup a local Nexus Repository and push snapshot and release builds to it. Subsequent blogs will show how this repository can be used for CI/CD.

Enjoy!

Continuous Integration, Delivery, Deployment and Maturity Model

Continuous Integration, Continuous Deployment, and Continuous Delivery are all related to each other, and feed into each other. Several articles have been written on these terms. This blog will attempt to explain these terms in an easy-to-understand manner.

What is Continuous Integration?

Continuous Integration (CI) is a software practice that require developers to commit their code to the main workspace, at least once, possibly several times a day. Its expected that the developers have run unit tests in their local environment before committing the source code. All developers in the team are following this methodology. The main workspace is checked out, typically after each commit, or possibly at a regular intervals, and then verified for any thing from build issues, integration testing, functional testing, performance, longevity, or any other sort of testing.

Continuous Integration

The level of testing that is performed in CI can completely vary but the key fundamentals are that multiple integrations from different developers are done through out the day. The biggest advantage of following this approach is that if there are any errors then they are identified early in the cycle, typically soon after the commit. Finding the bugs closer to commit does make them much more easier to fix. This is explained well by Martin Fowler:

Continuous Integrations doesn’t get rid of bugs, but it does make them dramatically easier to find and remove.

There are lots of tools that provide CI capabilities. Most common ones are Jenkins from CloudBees, Travis CI, Go from ThoughtWorks, and Bamboo from Atlassian.

What is Continuous Delivery?

Continuous Delivery is the next logical step of Continuous Integration. It means that every change to the system, i.e. every commit, can be released for production at the push of a button. This means that every commit made to the workspace is a release candidate for production. This release however is still a manual process and require an explicit push of a button. This manual step may be essential because of business concerns such as slowing the rate of software deployment.

Continuous Delivery

At certain times, you may even push the software to production-like environment to obtain feedback. This allows to get a fast and automated feedback on production-readiness of your software with each commit. A very high degree of automated testing is an essential part to enable Continuous Delivery.

Continuous Delivery is achieved by building Deployment Pipelines. This is best described in Continuous Delivery book by Jez Humble (@jezhumble).

A deployment pipeline is an automated implementation of your application’s build, deploy, test, and release process.

The actual implementation of the pipeline, tools used, and processes may differ but the fundamental concept of 100% automation is the key.

What is Continuous Deployment?

Continuous Deployment is often confused with Continuous Delivery. However it is the logical conclusion of Continuous Delivery where the release to production is completely automated. This means that every commit to the workspace is automatically released to production, and thus leading to several deployments of your software during a day.

Continuous Deployment

Continuous Delivery is a basic pre-requisite for Continuous Deployment.

Continuous Delivery Maturity Model

Maturity Models allow a team or organization to assess its methods and process against a clearly defined benchmark. As defined in Capability Maturity Model – The term “maturity” relates to the degree of formality and optimization of processes, from ad hoc practices, to formally defined steps, to managed result metrics, to active optimization of the processes.

The model explains different stages and helps teams to improve by moving from a lower stage to a higher one. Several Continuous Delivery Maturity Models are available, such as InfoQ, UrbanCode, ThoughtWorks, Bekk, and others.

Capability Maturity Model Integration (CMMI) is defined by Software Engineering Institute at Carnegie Mellon University.  CMMI-Dev particularly defines model that provides guidance for applying CMMI best practices in a development organization. It defines five maturity levels:

  • Initial
  • Managed
  • Defined
  • Quantitatively Managed
  • Optimizing

Each of these Continuous Delivery maturity models mentioned define their own maturity levels. For example, Base, Beginner, Intermediate, Advanced, Expert are used by InfoQ. Expert is changed to Extreme for UrbanCode. ThoughtWorks uses CMMI-Dev maturity levels but does not segregate them into different areas.

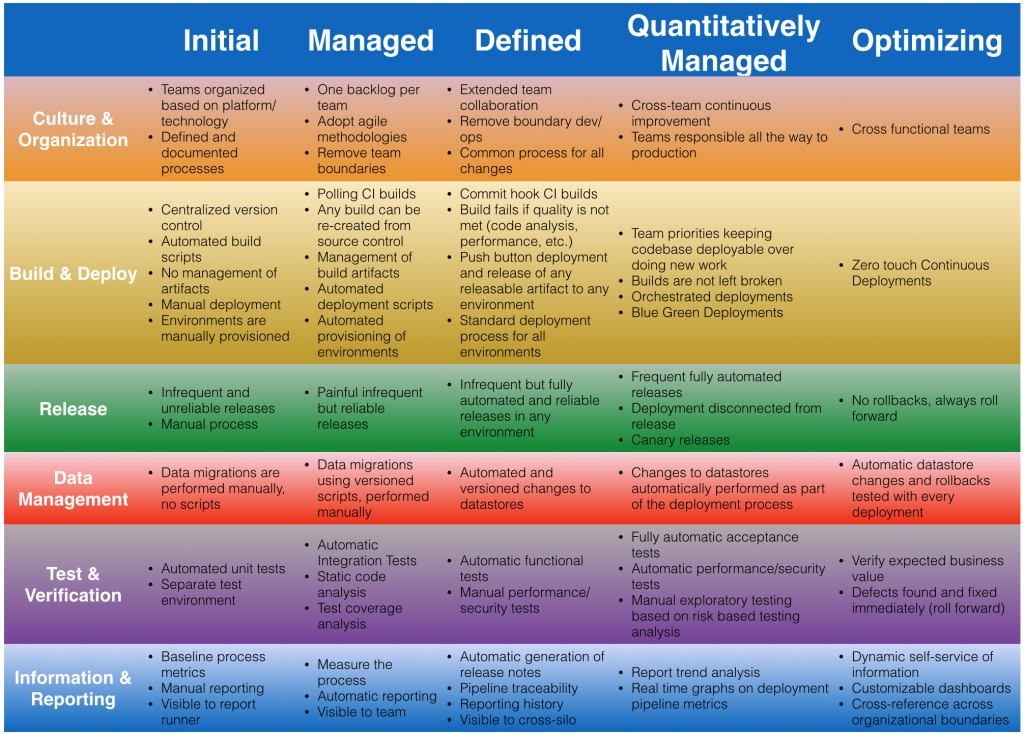
Here is another attempt to the maturity model that picks the best pieces from each of those.

Continuous Delivery Maturity Model v1.0

As a team/organization, you need to look at where do you fit in this maturity model. And once you’ve identified that, more importantly, figure how do you get to the next level. For example, if your team does not have any data management or migration strategy then you are at “Initial” level in “Data Migration”. Your goal would be to move from Initial -> Managed -> Defined -> Quantitatively Managed -> Optimizing. The progression from one level to the next is not necessarily sequential. But any changes in the organization is typically met with an inertia and so these incremental changes serve as guideline to improve.

Leave a comment on this blog to share your thoughts on the maturity model.