Monthly Archives: March 2015

Microservices, Monoliths, and NoOps

Monolithic Applications

A monolith application, in layman terms, is where entire functionality of the application is packaged together as a single unit or application. This unit could be JAR, WAR, EAR, or some other archive format, but its all integrated in a single unit. For example an online shopping website will typically consists of customer, product, catalog, checkout, and other features. Another example is of a movieplex. Such an application would typically consist of show booking, add/delete movie, ticket sales, accrue movie points, and other features. In case of a monolithic application, all these features are implemented and packaged together as one application.

Movieplex7 is one such canonical Java EE 7 sample application and the main features are shown below:

Movieplex7 Features

This application when packaged as a WAR would looks like:

Moviexplex WAR Package

The archive consists of some web pages that forms the UI. Classes implement the business logic, persistence, backing beans, etc. And finally there are some configuration files that define database connection, CDI configuration, etc.

More specifically, structure of the WAR looks like:

Movieplex7 WAR Structure

In this WAR structure, web pages are within the green box, all classes are within the orange box, and configuration files are within the blue box.

This application is somewhat modular as all the classes are neatly organized in package by different functionality. Web pages and configuration files follow a similar pattern as well.

Advantages of Monolithic Applications

There are a few advantages of this style of application:

  1. Well Known: This is how typically applications have been built so far. Its easy to conceptualize and all the code is in one place. Majority of existing tools, application servers, frameworks, scripts are able to deal with such kind of applications.
  2. IDE-friendly: Development environments, such as NetBeans, Eclipse, or IntelliJ, can be easily setup for such applications. IDEs are typically designed to develop, deploy, debug, profile a single application easily. Stepping through the code base is easy because the codebase is all together.
  3. Easy Sharing: A single archive, with all the functionality, can be shared between teams and across different stages of deployment pipeline.
  4. Simplified Testing: Once the application is deployed successfully, all the services, or features, are up and available. This simplifies testing as there are no additional dependencies to wait for in order for the testing to begin. Either the application is available, in which case all features are available, or the application is not available at all. Accessing or testing the application is simplified in either case.
  5. Easy Deployment: Easy to deploy since, typically, a single archive needs to be copied to one directory. The deployment times could vary but the process is pretty straight forward.

Disadvantages of Monolithic Applications

Monolith applications have served us well so far, and most likely will continue to work for some in the years to come. There are websites like Etsy that have 60 million monthly visitors and 1.5 billion monthly page views and are built/deployed as one large monolith. They have taken monoliths to an extreme where they are doing 50 deploys/day using a single large application. Unfortunately, most of the companies are not like that.

A monolithic application, no matter how modular, will eventually start to break down as the team grows, experienced developers leave and new ones join, application scope increases, new ways to access the applications are added, and so on. Take any monolith application that has spanned multiple years and teams and the entire code base will look like a bug ball of mud. That’s how software evolves especially when there is a pressure to deliver.

Lets look at some of the disadvantages of monolithic applications

  • Limited Agility: Every tiny change to the application means full redeployment of the archive. Consider the use case where only one piece of functionality in the application needs to be updated, such as booking or add/delete movie. This would require the entire application to be built again, and deployed again, even though other parts of the application has not changed. This means that developers will have to wait for the entire application to be deployed if they want to see the impact of quick change made in their workspace. Even if not intentional, but this may require tight coupling between different features of the application. This may not be possible all the time, especially if multiple developers are working on the application. This reduces agility of the team and the frequency by which new features can be delivered.
  • Obstacle for continuous delivery: The sample application used here is rather small so the time it takes to rebuild and deploy the archive would not be noticeable much. But a real-life application would be much bigger, and deployment times can be frustratingly long and slow. If a single change to the application would require entire application to be redeployed then this could become an obstacle to frequent deployments, and thus an impediment of continuous deployment. This could be a serious issue if you are serving a mobile application where users expect latest cool new feature all the time.
  • “Stuck” with Technology Stack: Choice of technology for such applications are evaluated and decided before the application development starts. Everybody in the team is required to use the same language, persistence stores, messaging system, and use similar tools to keep the team aligned. But this is like fitting a square peg in a round hole. Is MySQL an appropriate data store for storing graph databases? Is Java the most appropriate language for building front-end reactive applications? Its typically not possible to change technology stack mid stream without throwing away or rewriting significant part of existing application.
  • Technical Debt: “Not broken, don’t fix it” methodology is very common in software developed, more so for monolithic applications. This is convenient and enables to keep the application running.  A poor system design or badly written code is that much difficult to modify because other pieces of the application might be using it in unexpected ways. Software entropy of the system increases over a period of time unless it is refactored. Typically such an application is built over several years with the team that is maintaining the code base completely different from the one that created the application. This increases technical debt of the application and makes it that much harder to refactor the application later on.

What are Microservices?

The growing demand for agility, flexibility, and scalability to meet rapidly evolving business needs creates a strong need for a faster and more efficient delivery of software.

Meet Microservices!

Microservices is a software architectural style that require functional decomposition of an application. A monolithic application is broken down into multiple smaller services, each deployed in its own archive, and then composed as a single application using standard lightweight communication, such as REST over HTTP. The term “micro” in microservices is no indication of the LOCs in the service, it only indicates the scope is limited to a single functionality.

We’ve all been using microservices for a few years already. Think about a trivial mobile application can tell you the ratings of a hotel, find out the weather at your destination, book the hotel, locate directions to your hotel, find a nearby restaurant, and so on. This application is likely using different services such as Yelp, Google Maps, Yahoo Weather API, etc to accomplish these tasks. Each of this functionality is effectively running as an independent service and composed together in this single mobile application. Explosion of mobile apps, and their support for the growing business demand is also highlighted by Forrester’s four-tier engagement platform, and services are a key part of that.

Lets look at what are the characteristics of a microservice based application.

Characteristics of Microservices

Lets look at the characteristics of an application built using microservices.

  • Domain Driven Design: Functional decomposition of an application can be achieved using well-defined principles of Domain Driven Design by Eric Evans. This is not the only way to break down the applications but certainly a very common way. Each team is responsible for building the entire functionality around that domain or function of the business. Teams building a service include full range of developers, thus following the full-stack development methodology, and include skills for user interface, business logic, and persistence.
  • Single Responsibility Principle: Each service should have responsibility over a single part of the functionality, and it should do that well. This is one of the SOLID principles and has been very well demonstrated by Unix utilities.
  • Explicitly Published Interface: Each service publishes an explicitly defined interface and honors that all times. The consuming service only cares about that interface, and does not, rather should not, have any runtime dependency on the consumed service. The services agree upon the domain models, API, payload, or some other contract and they communicate using only that. A newer version of the interface may be introduced, but either the previous versions will continue to exist or the newer services are backwards compatible. You cannot break compatibility by changing contracts.
  • Independently Deploy, Upgrade, Scale, Replace: Each service can be independently deployed, and redeployed again, without impacting the overall system. This allows a service to be easily upgraded, for example to add more features. Each service can also scale independently on X-axis (horizontal duplication) or Z-axis (lookup oriented splits) as defined in Art of Scalability. Implementation of the service, or even the underlying technology stack, can change as long as the exact same contract is published. This is possible because other services rely only upon the published interface.
  • Potentially Heterogeneous/Polyglot: Implementation detail of the one service should not matter to another service. This enables the services to be decoupled from each other, and allows the team building the service to pick the language, persistence store, tools, methodology that is most appropriate for them. A service that requires to store data in a RDBMS can choose MySQL, and another service that needs to store documents can choose Mongo. Different teams can choose Java EE, NodeJS, Python, Vert.x, or whatever is most efficient for them.
  • Light-weight Communication: Services communicate with each other using a light-weight communication, such as REST over HTTP. This is inherently synchronous and so could have some potential bottle necks. An alternative mechanism is to use publish-subscribe mechanism that supports asynchronous messaging. Any of the messaging protocols such as AMQP, STOMP, MQTT, or WebSocket that meet the needs can be used there. Simple messaging implementations, such as ActiveMQ, that provide a reliable asynchronous fabric are quite appropriate for such usages. The choice of synchronous and asynchronous messaging is very specific to each service. They can even use a combination of the two approaches. Similarly the choice of protocol is very specific to each service but there is enough choice and independence for each team building the service.

Netflix is a poster child for microservices and several articles have been published on their adoption of microservices. A wide range of utilities that power their architecture are available at netflix.github.io.

Advantages of Microservices

  • Easier to develop, understand, and maintain: Code in a microservice is restricted to one function of the business and is thus easier to understand. IDEs can load the small code base very easily and keep the developers productive.
  • Starts faster than a monolith: Scope of each microservice is much smaller than a monolith and this leads to a smaller archive. As a result the deployment and the startup is much faster keeping developers productive.
  • Local change can be easily deployed: Each service can be deployed independent of other services. Any change local to the service can be easily made by the developer without requiring coordination with other teams. For example, performance of a service can be improved by changing the underlying implementation. As a result this keeps the agility of the microservice. This is also a great enabler of CI/CD.
  • Scale independently: Each service can scale independently using X-axis cloning and Z-axis partitioning based upon their need. This is very different from monolithic applications that may have very different requirements and yet must be deployed together.
  • Improves fault isolation: A misbehaving service, such as with a memory leak or unclosed database connections, will only affect that service as opposed to the entire monolithic application. This improves fault isolation and does not brings the entire application down, just a piece of it.
  • No long term commitment to any stack: Developers are free to pick language and stack that is best suited for their service. Even though the organizations may restrict the choice of technology but you are not penalized because of past decisions. It also enables to rewrite the service using better languages and technologies. This gives freedom of choice to pick a technology, tools, and frameworks.

Microservices may seem like a silver bullet that can solve significant amount of software problems. They serve a pretty good purpose but are certainly not easy. A significant operations overhead is required for these, and this article from Infoworld clearly points out.

with microservices, some technical debt is bound to shift from dev to ops, so you’d better have a crack devops team in place

This is very critical as now your one monolith is split across multiple microservices and they must talk to each other. Each microservice may be using a different platform, stack, persistent store and thus will have different monitoring and management requirements. Each service can then independently scale on X-axis and Z-axis. Each service can be redeployed multiple times during the day.

Microservices and NoOps

This imposes additional requirements on your infrastructure. These are commonly put together and called as NoOps. Essentially these are a set of services that provide a better process for deploying applications, and keep them running.

  • Service replication: Each service need to replicate, typically using X-axis cloning or Y-axis partitioning. Does each service need to build their logic to scale? For example, Kubernetes provide a great way to replicate services easily using Replication Controller.
  • Service discovery: Multiple services might be collaborating to provide an application’s functionality. This will require a service to discover other services. It could be tricky in a cloud environment where the services are ephemeral and possibly scale up and down. Resolving the services that are required for a service is thus a common functionality for all other services. Services need to register with a central registry and other services need to query this registry for resolving any dependencies. Netflix Eureka, Etcd, Zookeeper are some options in this space (more details).
  • Resiliency: Failure in software occurs, no matter how much and how hard you test it. The key question is not “how to avoid failure” but “how to deal with it”. This is all the more prominent in microservices where services are distributed all over the Internet. Its important for services to automatically take corrective action and ensure the user experience is not impacted. Michael Nygard’s book Release It! introducs Circuit Breaker pattern to deal with software resiliency. Netflix’s Hystrix provide an implementation of this design pattern (more details).
  • Service monitoring: One of the most important aspects of a distributed system is service monitoring and logging. This allows to take a proactive action, for example, if a service is consuming unexpected resources.

Refactoring into Microservices

Microservices also does not mean you need to throw away your existing application. Rather in majority (99.9%?) cases, you cannot throw away the application. So you’ve to build a methodology on how to refactor an existing application using microservices. However you need to bring your monolith to a stage where it is ready for refactoring. As Distributed big balls of mud highlight:

If you can’t built a monolith, what makes you think microservices are the answer?

Refactoring may not be trivial but in the long terms this has benefits which is also highlighted in the previously quoted article from Infoworld:

Refactoring a big monolithic application [using microservices] can be the equivalent of a balloon payment [for reducing technical debt] … you can pay down technical debt one service at a time

Functional decomposition of a monolith is very important otherwise it becomes a distributed monolith as opposed to a microservice based application.

Future Blogs

A subsequent blog on blog.arungupta.me will show how to refactor an existing Java EE application using microservices.

Some more questions that would be answered in subsequent blogs ….

  • How is it different from SOA?
  • Is REST the only way to exchange data? What messaging prorotocols?
  • Does microservices simplify/require CI/CD?
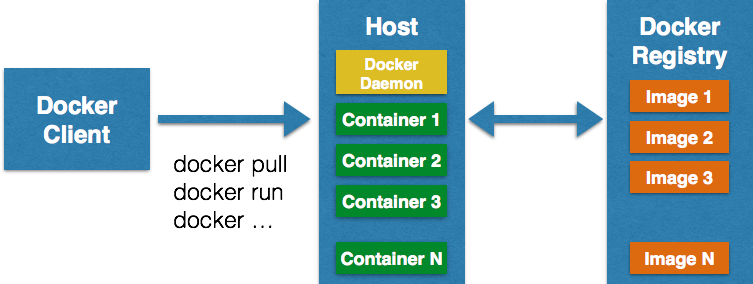
  • How is it related to Containers and DevOps? Are containers required to run microservices?
  • Are there any standards around microservices?
  • Are we pushing the problems around to orchestration?
  • What roles does PaaS play to enable microservices?
  • How can existing investment be leveraged?
  • Microservices Maturity Model
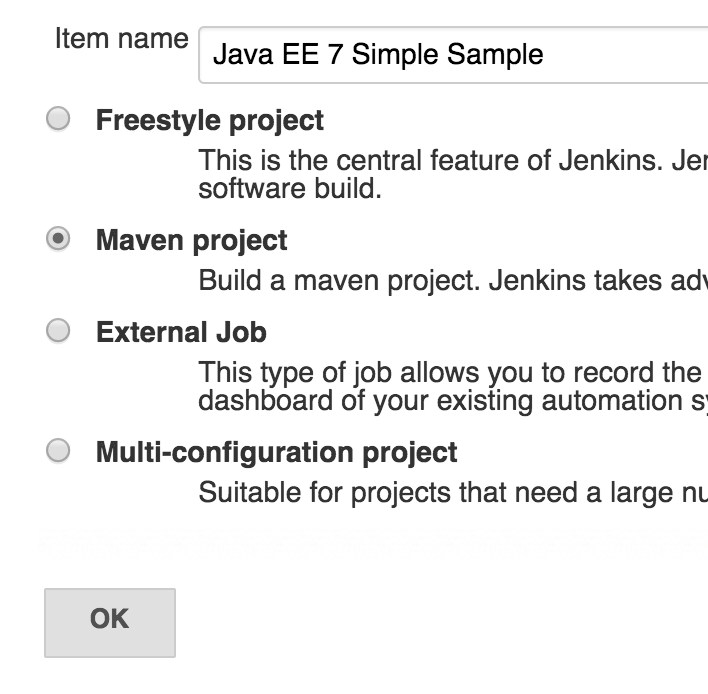
 

Minecraft Server on Google Cloud – Tech Tip #82

Minecraft Logo

Bukkit Logo

If you’ve not followed the Minecraft/Bukkit saga over the past few months, Bukkit and CraftBukkit downloads were taken down by DMCA because a developer (@wolvereness) wanted Mojang to open up. Mojang (@vubui) posted an official statement in their forums. The general feeling is that @wolvereness left the Bukkit community hanging, and Mojang is not responsible for this debacle.

One of my friends (@ryanmichela), and a contributor to Bukkit, prepared a slide deck explaining the unfortunate debacle:

Anyway, leaving all the gory details behind, this blog will show how to get started with Bukkit 1.8.3.

What?

You just said, Bukkit was shutdown by DMCA.

SpigotMC LogoHail Spigot for reviving Bukkit, and updating to 1.8.3!

Its still not clear how did Spigot get around DMCA shutdown but the binaries seem to be available again, at least for now.

As a refresher, Bukkit is the API used by developers to make plugins. CraftBukkit is the modified Minecraft server that can understand plugins made by the Bukkit API.

Minecraft Server Hosting on OpenShift already explained how to setup a Minecraft server on OpenShift. This Tech Tip will show how to get a Minecraft server running on Google Cloud.

Lets get started!

Get Started with Google Cloud

Google Cloud Platform logo

  1. Sign up for a free trial at cloud.google.com. This gives you credit of $300, which should be pretty decent to begin with.

Create and Configure Google Compute Engine

  1. Go to console.developers.google.com and create a new project by specifying the values as shown:Create Project on Google Cloud
  2. In console.developers.google.com, go to “Compute”, “Compute Engine”, “Networks”, “default”, “New firewall rule” and enter the values as shown and click on “Create”.Google Cloud Firewall Rule
  3. In the left menu bar, click on “VM Instances” under “Compute Engine”, “Create instance”. Take everything default except:
    1. Provide a name as “minecraft-instance”
    2. Change Image to Ubuntu 14.10.
    3. Change External IP to “New static IP address” and fill in the details. IP address is automatically assigned.

    Exact values are shown here:

    Google Cloud Create Instance

    And click on “Create”.

    Note down the IP address, this will be used later to connect from Minecraft launcher.

  4. Click on the newly created instance, “Add tags”, and specify “minecraft” tag. Exact same tag on the VM instance and Firewall rule ensures that the rule is applied to the appropriate instance.

Install JDK, Git, and Spigot

In console.developers.google.com, select the recently created instance, click on “SSH”, “Open in browser window”. The software is installed in the shell window.

Install JDK

Make sure to answer questions and accept license during the install. Using OpenJDK 8 to install Spigot gives the following exception:

Install Git

This is required for installing Spigot.

Install Spigot

Download and Install Spigot

A successful completion of this task shows the following message:

Start Minecraft Server on Google Cloud

Run the server as:

This will generate “eula.txt”. Accept license agreement by giving the following command:

Run server as:

This will start the CraftBukkit 1.8 server in background.

Connect to Minecraft Server from the Client

Launch Minecraft client and create a new Minecraft server as:

Google Cloud Minecraft Multiplayer

Clicking on Done shows:

Google Cloud Multiplayer Minecraft Server

Now your client can connect to the Minecraft server running on Google Cloud.
Google Cloud Minecraft Client

The server is now live. Add 104.155.38.193  to your Minecraft launcher and put some Google resources to test :)

I was hoping to provide a script that can be run using Google Cloud SDK but the bundled CLI seems to have some issues creating the project. CLI equivalent for other commands can be easily seen from the console itself.

Enjoy and happy Minecrafting!

Minecraft Modding Course at Elementary School – Teach Java to Kids

Cross posted from weblogs.java.net/blog/arungupta/archive/2015/03/22/minecraft-modding-course-elementary-school-teach-java-kids

minecraft-logo

Exactly two years ago, I wrote a blog on Introducing Kids to Java Programming using Minecraft. Since then, Devoxx4Kids has delivered numerous Minecraft Modding workshops all around the world. The workshop material is all publicly accessible at bit.ly/d4k-minecraft. In these workshops, we teach attendees, typically 8 – 16 years of age, how to create Minecraft Mods. Given the excitement around Minecraft in this age range, these workshops are typically sold out very quickly.

One of the parents from our workshops in the San Francisco Bay Area asked us to deliver a 8-week course on Minecraft modding at their local public school. As an athlete, I’m always looking for new challenges and break the rhythm. This felt like a good option, and so the game was on!

My son has been playing the game, and modding, for quite some time and helped me create the mods easily. We’ve also finished authoring our upcoming O’Reilly book on Minecraft Modding using Forge so had a decent idea on what needs to be done for these workshops.

Minecraft Modding Workshop Material

All the workshop material is available at bit.ly/d4k-minecraft.

Getting Started with Minecraft Modding using Forge shows the basic installation steps.

These classes were taught from 7:30am – 7:45am, before start of the school. Given the nature of workshop, the enthusiasm and concentration in the kids was just amazing.

Minecraft Modding Course Outline

The 8 week course was delivered using the following lessons:

Week LESSON Java concepts
1 Watch through the video and understand the software required for modding Familiarity with JDK, Forge, Eclipse
2 Work through the installation and get the bundled sample mod running. This bundled mod, without any typing, allows to explain the basic concepts of Java such as class, packages, methods, running Minecraft from Eclipse, seeing the output in Eclipse panel.
3 Chat Items mod shows how to create a stack of 64 potatoes if the word “potato” is typed in the chat window.
  • Create a new class in Eclipse
  • Annotations and event-driven programming to listen for events when a player types a message in the chat window is introduced.
  • String variable types and how they are enclosed within a quotes is introduced.
4 Continue with Chat Items mod and a couple of variations. Change the number of items to be generated. Generate different items on different words, or multiple items on same word.
  • Integer variables for changing the number of items.
  • How  use Eclipse allows code completion and scroll through the list of items that can be generated.
  • Multiple if/else blocks and scope of a block.
5 Eclipse Tutorial for Beginners Some familiarity with Eclipse
6 Ender Dragon Spawner mod spawns an Ender Dragon every time a dragon egg is placed.
  •  == to compare objects
  • Accessing properties using . notation
  • Creating a new class
  • Calling methods on a class
7 Creeper Spawn Alert mod alerts a player when creeper is spawned
  •  instanceof operator
  • for loop
  • java.util.List
  • Enums
  • && and || operators
  • Parent/child class
8 Sharp Snowballs mod turns all snowballs into arrows
  • 15-20 LOC of methods
  • ! operator
  • Basic Math in Minecraft

Most of the kids in this 8-week course had no prior programming experience. And it was amazing to see them be able to read the Java code by week 7. Some kids who had prior experience finished the workshop in first 3-4 weeks, and were helping other kids.

Check out some of pictures from the 8-week workshops:

 Minecraft Modding at Public Elementary School
 

Many thanks to attendees, parents, volunteers, Parent Teacher Association, and school authorities for giving us a chance. The real benchmark was when all the kids raised their hands to continue workshop for another 8 weeks … that was awesome!

Is Java difficult as kids first programming language?

One of the common questions asked during these workshops is “Java is too difficult a language to start with”. Most of the times these questions are not based on any personal experience but more on the lines my-friend-told-me-so or i-read-an-article-explaining-so. My typical answer consists of the following parts:

  1. Yes, Java is a bit verbose, but was designed to be readable by humans and computer. Ask somebody to read Scala or Clojure code at this age and they’ll probably never come back to programming again. These languages serve a niche purpose, and their concepts are now anyway getting integrated into the mainstream language already.
  2. Ruby, Groovy, and Python are alternative decent languages to start with. But do you really want to start teaching them fundamental programming using Hello World.
  3. Kids are already “addicted” to Minecraft. Game is written using Java and modding can be done using Java. Lets leverage that addiction and convert that into their passion for programming. Minecraft provides a perfect platform for gamification of programming experience at this early age.
  4. There are 9 million Java developers. It is a very well adopted and understood language, with lots of help in terms of books, articles, blogs, videos, tools, etc. And the language has been around for almost 20 years now. Other languages come and go, but this is the one to stay!

As Alan Kay said

The best way to predict the future is to create it

Lets create some young Java developers by teaching them Minecraft modding. This will give them bragging rights in their friends, parents a satisfaction that their kids are learning a top notch programming language, and budding Java developers to the industry.

I dare you to pick up this workshop and run in your local school :)

Minecraft Modding Course References

Sign up for an existing Devoxx4Kids chapter in your city, or open a new one.

If you are in the San Francisco Bay Area, then register for one of our upcoming workshops at meetup.com/Devoxx4Kids-BayArea/. There are several chapters in the USA (Denver, Atlanta, Seattle, Chicago, and others).

Would your school be interested in hosting a similar workshop? Devoxx4Kids can provide train-the-trainer workshop. Let us know by sending an email to info@devoxx4kids.org.

As a registered NPO and 501(c)(3) organization in the US, it allows us to deliver these workshops quite selflessly, fueled by our passion to teach kids. But donations are always welcome :)

Configure JRebel with Docker containers – Tech Tip #81

JRebel allows you to skip build and redeploy process by instantly deploying your application to the application server of your choice. It is supported in all the major IDEs such as NetBeans, Eclipse, and IntelliJ. It is also supported in a wide variety of application servers such as JBoss EAP, WildFly, WebLogic, WebsFear (err, WebSphere), Tomcat, and many others.

You can easily get started with JRebel in JBoss Developer Studio  or Integrate JRebel with JBoss on your local desktop. It can also be easily used with JBoss Developer Studio and Ticket Monster on OpenShift.

This Tech Tip will explain how do you set up JRebel with Docker containers. Specifically, we’ll use the sample application provided by Java EE 7 Hands-on Lab (jrebel branch), JBoss Tools with Eclipse Mars M5, and running the sample application in WildFly Docker container.

Many thanks to Adam Koblentz (@akoblentz) for helping me through the steps!

Lets get started!

Install JRebel in Eclipse

JRebel runs in three modes:

  • Local: App server is running from inside the IDE
  • External: App server is running from outside the IDE, such as using CLI, but on the same machine
  • Remote: App server is running on a different machine, VM, container, or cloud

Docker containers need to be configured using the “remote” mode.

  1. Install JBoss Tools  as explained at tools.jboss.org/downloads/. JRebel’s remote mode can only be enabled using the IDE. Install JRebel plugin from Eclipse Marketplace.

Package rebel.xml and rebel-remote.xml with the WAR

These files define the location of classes and resources in your archive.

  1. Clone the Java EE 7 HOL repo:
  2. Import the Maven project (from the solution directory) in the IDE, right-click on the project, select JRebel menu, and click on “Enable JRebel Nature”. This will generate rebel.xml in src/main/resources directory and would look something like:
  3. Right-click on the project again, and select “Enable Remoting”. This generates rebel-remote.xml, in src/main/resources directory again, and will look like:
    This needs to be done on the machine where JRebel will be used in the IDE. This will ensure that the public key is generated appropriately.
  4. Package your application as
    This will package rebel.xml and rebel-remote.xml in the WAR file.

Configure and Run the Application Server

Application server needs to know about JRebel agent and platform-specific library. Both of these files are available from Eclipse if JRebel was installed earlier. On Mac these files are available in eclipse/mars/m5/eclipse/plugins/org.zeroturnaround.eclipse.embedder_6.1.1.RELEASE-201503121801/jr6/jrebel/ directory. The exact name would very likely differ in your case.

  1. Build the image using the Dockerfile:
    The key parts in this image are:

    1. Using the official jboss/wildfly Docker image
    2. Copying the JRebel agent and platform-specific library to the image
    3. Configuring application server such that it knows about the “remote” mode and platform-specific library
    4. Start WildFly
    5. Downloads the pre-built WAR file from GitHub. This will not work for you, and you’ll need to replace it with something like:
      This WAR file is the same that was generated earlier.
  2. Actually build the image as:
  3. Run the container as:
    and this should show something like:
    JRebel license information is a good sign that everything is configured properly.

    If you used Docker Machine to Setup Docker Host then the application should now be accessible at 192.168.99.100:8080/movieplex7/.

Configure Eclipse

Last step is to configure Eclipse so that it knows where the application is deployed.

  1. In Eclipse, right-click on the project, select JRebel, Advanced Properties
  2. Click on “Edit” on next to “Deployment URLs”
  3. Click on Add and specify the URL of the application, 192.168.99.100:8080/movieplex7/ in our case.
  4. Click on Continue, Apply, OK.

Voila, the configuration is now complete.

Now changing any class, adding any method, updating any entity or HTML or JSF page will push the changes to the Docker container instantly. No need to redeploy the application.

Enjoy!

9 Docker recipes for Java EE Applications – Tech Tip #80

Cross-posted from www.voxxed.com/blog/2015/03/9-docker-recipes-for-java-ee-applications/

So, you’d like to start using Docker for Java EE applications?

A typical Java EE application consists of an application server, such as WildFly, and a database, such as MySQL. In addition, you might have a separate front-end tier, say Apache, for load balancing a number of application server. A caching layer, such as Infinispan, may be used to improve overall application performance. Messaging system, such as ActiveMQ, may be used for processing queues. Both the caching and messaging components could be setup as a cluster for further scalability.

This Tech Tip will show some simple Docker recipes to configure your containers that use application server and database. Subsequent blog will cover more advanced recipes that will include front-end, caching, messaging, and clustering.

Lets get started!

Docker Recipe #1: Setup Docker using Docker Machine

If Docker is not already setup on your machine, then as a first step, you need to set it up. If you are on a recent version of Linux then you already have Docker. Or optionally can be installed as:

On Mac and Windows, this means installing boot2docker which is a Tinycore Linux VM and comes with Docker host. Then you need to configure ssh keys and certificates.

Fortunately, this is extremely simplified using Docker Machine. It takes you from zero-to-Docker on a host with a single command. This host could be your laptop, in the cloud, or in your data center. It creates servers, installs Docker on them, then configures the Docker client to talk to them.

This recipe is explained in detail in Docker Machine to Setup Docker Host.

Docker Recipe #2: Application Server + In-memory Database

One of the cool features of Java EE 7 is the default database resource. This allows you to not worry about creating a JDBC resource in an application server-specific before your application is accessible. Any Java EE 7 compliant application server will map the default JDBC resource name (java:comp/DefaultDataSource) to the application server-specific resource in the bundled database server.

For example, WildFly comes bundled with H2 in-memory database. This database is ready to be used as soon as WildFly is ready to accept your requests. This simplifies your development efforts and allows you to do a rapid prototyping. The default JDBC resource is mapped to
java:jboss/datasources/ExampleDS which is then mapped to the JDBC URL of jdbc:h2:mem:test;DB_CLOSE_DELAY=-1;DB_CLOSE_ON_EXIT=FALSE.

In such a case, the Database server is another application running inside the Application server.

Docker Recipe for Java EE Application #1

Here is the command that runs Java EE 7 application in WildFly:

If you want to run a typical Java EE 7 application using WildFly and H2 in-memory database, then this Docker recipe is explained in detail in Java EE 7 Hands-on Lab on WildFly and Docker.

Docker Recipe #3: Two Containers on Same Host Using Linking

The previous recipe gets you started rather quickly but becomes a bottleneck soon as the database is only in-memory. This means that any changes made to your schema and data are lost after the application server shuts down. In this case, you need to use a database server that resides outside the application server. For example, MySQL as the database server and WildFly as the application server.

To keep things simple, both the database server and application server can run on the same host.

Docker Recipe for Java EE Application #2

Docker Container Links are used to link the two containers. Creating a link between two containers creates a conduit between a source container and a target container and securely transfer information about source container to target container. In our case, target container (WildFly) can see information about source container (MySQL). The important part to understand here is that none of this information needs to be publicly exposed by the source container, and is only made available to the target container.

Here are the commands that start the MySQL and WildFly containers and link them:

WildFly and MySQL linked on two Docker containers explains how to set up this recipe.

Docker Recipe #4: Two Containers on Same Host Using Fig

The previous recipe require you to run the containers in a specific order. Running multi-container applications can quickly become challenging if each tier of your application is sitting in a container. Fig (deprecated in favor of Docker Compose) is a Docker Orchestration Tool that:

  • Define multiple containers in a single configuration file
  • Create dependencies between two containers by creating links between them
  • Start containers in the right sequence

Docker Recipe for Java EE Application #3

The entry point for Fig is a configuration file as shown:

and all the containers can be started as:

Docker orchestration using Fig explains this recipe in detail.

Fig is only receiving updates. Its code base is used as basis for Docker Compose. This is explained in the next recipe.

Docker Recipe #5: Two Containers on Same Host Using Compose

Docker Compose is a tool for defining and running complex applications with Docker. With Compose, you define a multi-container application in a single file, then spin your application up in a single command which does everything that needs to be done to get it running.

The application configuration file is the same format as from Fig. The containers can be started as:

This recipe is explained in detail in Docker Compose to Orchestrate Containers.

Docker Recipe #6: Two Containers on Different Hosts using IP Address

In the previous recipe, the two containers are running on the same host. These two could easily communicate using Docker linking. But simple container linking does not allow cross-host communication.

Running containers on the same host means you cannot scale each tier, database or application server, independently. This is where you need to run each container on a separate host.

Docker Recipe for Java EE Application #4

MySQL container can start as:

JDBC resource can be created as:

And WildFly container can start as:

Complete details for this recipe is explained in Docker container linking across multiple hosts.

Docker Recipe #7: Two Containers on Different Hosts using Docker Swarm

Docker Machine

Docker Swarm is native clustering for Docker. It turns a pool of Docker hosts into a single, virtual host. It picks-up where Docker Machine leaves off by optimizing host resource utilization and providing failover services.  Specifically, Docker Swarm allows users to create resource pools of hosts running Docker daemons and then schedule Docker containers to run on top, automatically managing workload placement and maintaining cluster state.

More details about this recipe are coming in a subsequent blog.

Docker Recipe #8: Deploy Java EE Application from Eclipse

Last recipe will deal with how to deploy your existing applications to a Docker container.

Lets say you are using JBoss Tools as your development environment and WildFly as your application server.

eclipse-logo JBoss Tools Logo

There are a couple of ways by which these applications can be deployed:

  • Use Docker volumes + Local deployment:  Here a directory on your local machine is mounted as a Docker Volume. WildFly Docker container is started by mapping that directory to the deployment directory as:
    Configure JBoss Tools to deploy WAR files to this directory.
  • Use WildFly management API + Remote deployment: Start WildFly Docker container, and additionally expose the management port 9990 as:
    Configure JBoss Tools to use a remote WildFly server and deploy using management APIs.

This recipe is explained in detail at Deploy to WildFly and Docker from Eclipse.

Docker Recipe #9: Test Java EE Applications using Arquillian Cube

Arquillian Cube allows you to control the lifecycle of Docker images as part of the test lifecyle, either automatically or manually. Cube uses Docker REST API to talk to the container. It uses the remote adapter API, for example WildFly in this case, to talk to the application server. Docker configuration is specified as part of the maven-surefire-plugin as:

Complete details about this recipe are available on Run Java EE Tests on Docker using Arquillian Cube.

What other recipes are you using to deploy your Java EE applications using Docker?

Enjoy!

Deploy to WildFly and Docker from Eclipse – Tech Tip #79

Docker and WildFly Part 1 – Deployment via Volumes and Docker and WildFly Part 2 – Deployment over Management API shows two approaches of how JBoss Tools can be configured to run any application on WildFly server running as a Docker container.

The blogs provide detailed setup and the underlying background. This Tech Tip will provide a quick summary of how to deploy a Java EE 7 application to WildFly and Docker from Eclipse.

Lets get started!

Configure Docker

  1. Configure Docker on your machine using Docker Machine.
  2. Find the IP address as:
    and add an entry in /etc/hosts as:

Deployment to WildFly Container using Docker Volumes

  1. Create a folder that will be mounted as volume in the WildFly Docker container. In this case, the folder is /Users/arungupta/tmp/deployments.WildFly Docker container can be started as:
    rw ensures that the Docker container can write to it.
  2. Create a new server adapter:
    WildFly Docker Server Adapter
  3. Assign or create a WildFly 8.x runtime:

    Docker WildFly Server Adapter

    Changed properties are highlighted.

  4. Setup the server properties as:

    Docker WildFly Adapter Properties


    Changed properties are highlighted. The two properties on the left are automatically propagated from the previous dialog. Additional two properties on the right side are required to disable to keep deployment scanners in sync with the server.

  5. Specify a custom deployment folder on Deployment tab of Server Editor:

    Docker WildFly Server Adapter

  6. Right-click on the newly created server adapter and click “Start”.

    Docker WildFly Server Synchronized

    Status quickly changes to “Started, Synchronized” as shown.

  7. Open up any Java EE 7 project (for example javaee7-simple-sample), right-click, Run on Server, and chose this server. The project runs and displays the page:

    Docker Java EE 7 Output


Deployment to WildFly Container using Management API

  1. Run WildFly management image as:
    This is only a convenience image to reduce the number of steps required to get started. Dockerfile for this image has more details, including admin credentials.

    Volume mapping is not required in this case, instead additional management port is exposed.

  2. Configure a remote server controlled by management operations:Docker WildFly Remote Server Configuration

    Changed properties are highlighted.

  3. Take the defaults:

    Docker WildFly Remote System Integration

  4. Set up server properties by specifying the admin credentials (Admin#70365). Note, you need to delete the existing password and use this instead:

    Docker WildFly Admin Credentials

  5. Right-click on the newly created server adapter and click “Start”.Status quickly changes to “Started, Synchronized” as shown.

    Docker WildFly Server Synchronized

  6. Open up any Java EE 7 project (for example javaee7-simple-sample), right-click, Run on Server, and chose this server. The project runs and displays the page:

    Docker Java EE 7 Output

Enjoy!

This blog showed how how to deploy a Java EE 7 application to WildFly and Docker from Eclipse.

Is there any other way that you deploy to WildFly Docker container from Eclipse?

Docker Machine to Setup Docker Host – Tech Tip #78

Running Docker containers typically involve three components:

  • Docker Client is a binary that accepts commands from the user and communicates back and forth with host
  • Docker Daemon runs on a host machine and does the heavy lifting of building, running, and distributing Docker containers
  • Docker Registry is SaaS platform for sharing and managing Docker images.Docker Hub is a public hub. Private registries can be easily setup as well, such as one by Artifactory. More on this in a subsequent blog.

Docker Client communicates with Daemon, either co-located on the same host, or on a different host. It requests the Daemon to pull an image from the repository using pull command. The Daemon then downloads the image from Docker Hub, or whatever registry is configured. Multiple images can be downloaded from the registry and installed on Daemon host.

Docker Architecture


In a typical development environment setup, Docker Client and Host/Daemon will be co-located on the same host machine. Even if they are on separate machines, it still require to login to the Host and setup Docker Daemon for that OS.

docker-logoDocker Machine takes you from zero-to-Docker on a host with a single command. This host could be your laptop, in the cloud, or in your data center. It creates servers, installs Docker on them, then configures the Docker client to talk to them.

This downloads the boot2docker VM, setup ssh keys, generate certificates, start the VM. It basically takes care of all the boring work so that you can focus on all the fun things.

This Tech Tip will show you to get started with Docker Machine and use it to setup Docker Host on Mac. It does not work on Windows yet because of github.com/docker/machine/issues/742.

Lets get started!

Install Docker Machine

  1. Download the appropriate binary from docs.docker.com/machine/#installation. Binary for Mac can be downloaded as:
  2. Verify the installation as:

Setup Mac Host using Docker Machine

  1. Docker Machine can be configured to use with multiple drivers, such as Amazon Web Services, Google Compute Engine, Microsoft Azure, and Oracle VirtualBox. On a developer laptop, Virtual Box is a convenient option.Virtual Box 4.3.20 is the minimum requirement. So make sure you’ve the correct version installed.
  2. Create a Docker Host using VirtualBox provider and call the machine as “mydocker”.Make sure ssh-keygen is in the PATH before invoking this command. On Mac, this is already in /usr/bin/ssh-keygen. On Windows, this can be installed as part of Git Bash.This can be done as:
    This downloads boot2docker with the Docker daemon installed, and will create and start a VirtualBox VM with Docker running.
  3. Find IP address of the machine as:
    Note down this IP address, this will be used for accessing the application.
  4. Check the status of running machine as:
    The * in the ACTIVE column indicates this is an active host.
  5. Check the environment of newly created machine as:

Setup Docker client to Communicate

  1. Setup your client to talk to this host as:

Run Java Application on Host

  1. Run Java EE 7 Application discussed in Java EE 7 Hands-on Lab on WildFly and Docker on this host as:
  2. Access the application at 192.168.99.101:8080/movieplex7/ and looks like:Docker Machine Output

Docker Machine Commands

Complete list of Docker Machine commands can be seen as:

Learn more about Docker Machine, Swarm, and Compose in this video:

Why would you use anything else other than Docker Machine to setup Docker host? How do you setup Docker Host otherwise?

Some useful references …

  • Full documentation
  • GitHub Repo
  • Issues
  • #docker-machine on freenode

Enjoy!

Docker Compose to Orchestrate Containers – Tech Tip #77

Docker Orchestration using Fig showed how to defining and control a multi-container service using Fig. Since then, Fig has been renamed to Docker Compose, or Compose for short.

First release of Compose was announced recently

From github.com/docker/compose

Compose is a tool for defining and running complex applications with Docker. With Compose, you define a multi-container application in a single file, then spin your application up in a single command which does everything that needs to be done to get it running.

Docker Compose uses the same API used by other Docker commands and tools.

Docker Compose

This Tech Tip will rewrite Docker Orchestration using Fig blog to use Docker Compose. In other words, it will show how to run a Java EE 7 application that is deployed using MySQL and WildFly.

Lets get started!

Install Docker Compose

Install Compose as:

Docker Compose Configuration File

Entry point to Compose is docker-compose.yml. To begin with, docker-compose tool also recognizes fig.yml file name but shows the following message:

And if both fig.yml and docker-compose.yml are available in the directory then the following message is shown:

Use the same configuration file from the previous blog and rename to docker-compose.yml:

This YML-based configuration file has:

  1. Two containers defined by the name “mysqldb” and “mywildfly”
  2. Image names are defined using “image”
  3. Environment variables for the MySQL container are defined in “environment”
  4. MySQL container is linked with WildFly container using “links”
  5. Port forwarding is achieved using “ports”

Start, Verify, Stop Docker Containers

  1. All the containers can be started, in detached mode, by giving the command:
    And that shows the output as:
  2. Verify the containers as:
  3. Logs for the containers can be seen as:
    And shows the output as:
  4. Find the IP address of the host as:
    And access the application as:
    To see the output as:
    Or in the browser as:

    Docker Compose Output

  5. Stop the containers as:

    to see the output as:

Docker Compose Commands

Complete list of Docker Compose commands can be seen by typing docker-compose and shows the output as:

A subsequent blog will likely play with scale command.

Help for each command is shown by typing -h after the command name. For example, help for run command is shown as:

Enjoy!

Jenkins to Nexus with Git Polling – Tech Tip #76

Build Binaries Only Once is a very important principle of Continuous Deployment (CD). However that blog guides you to build and deploy binaries to Nexus from your development machine. This is fine as a starting step where everything is locally contained on your laptop and you are just testing setup to figure out how things work. But everybody in the team having a local Nexus repository defies the purpose of a “shared repository”.  This is also against Continuous Integration (CI) where the source code committed by different team members checked out and build on a CI server. And CI is a fundamental requirement for Continuous Deployment. How do you set this up then?

You use a CI server to push binaries to Nexus.

There are a varety of CI servers in both open source and commercial range. Jenkins, Travis,  CruiseControl and Go are some of the popular ones in the open source land. They all have a commercial edition as well. Bamboo and AnthillPro are a couple of popular commercial-only offerings. This blog will use the simplest, most popular, and easiest to use Jenkins CI server.

The overall flow is shown in the diagram and explained after that.

Jenkins, GitHub, Nexus setup


The flow is:

  • Developers push code from inside firewall to GitHub
  • Jenkins is polling GitHub for code updates
  • Build the binaries and push the artifacts to Nexus (inside firewall)

This tech tip will show how to get started with Jenkins and push binaries to Nexus by polling the GitHub workspace. While polling is inefficient, it may be the only, and probably a simplified, choice.

In this setup, Jenkins and Nexus are both setup inside your firewall. This is a more common scenario as at least Nexus would be typically inside firewall. However Jenkins may be configured outside firewall in which case it will be able to archive artifacts but not directly push to Nexus. A proxy needs to be configured for Jenkins and Nexus to communicate in this case.

Lets get started!

Download and Start Jenkins Server

All information about Jenkins can be found at jenkins-ci.org.

  1. Download the latest WAR file:
    The total time to download will differ based upon your network speed.
  2. Start Jenkins as
    Starting and Accessing Jenkins provide more details about starting Jenkins and different configuration options.
  3. Once Jenkins is started, it can be accessed at localhost:8080 and shown as:

    Default Jenkins Output

Install Git Plugin

By default, Jenkins does not have the ability to handle Git workspace. Hopefully this will be fixed in a subsequent release because of INFRA-253. In the meanwhile, lets install Git plugin.

  1. Click on “Manage Jenkins”, “Manage Plugins”
  2. Click on “Available” tab, select “GIT Plugin” and click on “Install without restart”Git plugin installation in Jenkins
  3. Click on “Restart Jenkins …” to restart Jenkins.

Create a Jenkins Job

  1. Configure Maven at Configure System as explained here
  2. Create a new Jenkins job by going to localhost:8080/newJob
  3. Choose “Maven project” and give the name as shown:

    Jenkins New JobClick on “OK”.

  4. In “Source Code Management”, choose “Git” and specify the repository “https://github.com/javaee-samples/javaee7-simple-sample” as shown:
    Java EE 7 Simple Sample GitHub Repo in Jenkins
  5. In “Build Triggers”, choose “Poll SCM” and specify the schedule to poll the repo every 5 minutes as “H/5 * * * *”:

    techtip75-polling-schedule

  6. In “Build”, specify “deploy” target as shown:

    Maven target in Jenkins

Deploy SNAPSHOT to Nexus

Once the setup is done, deploying to Nexus is just a click or a poll away.

  1. Click on Build Now to build the job

    Jenkins Build Job

  2. Console output for the first job will show something like:

  3. Git Polling Log will show the last poll to your workspace repo. If there are any commits to the workspace after last job then a new job will be started.

This blog showed how to push binaries from Jenkins to Nexus using Git Polling.

Enjoy!

Announcing JBoss Champions

JBoss Champion

JBoss Champions is a selected group of community members who are passionate advocate of JBoss technologies under a program sponsored by Red Hat. It fosters the growth of individuals that promote adoption of JBoss Projects and/or JBoss Products and actively share their deep technical expertise about it in the community, within their company and their customers or partners. This could be done in forums, blogs, screencasts, tweets, conferences, social media, whitepapers, articles, books, and other means.

Founding JBoss Champions

Proud and excited to announce the first set of JBoss Champions:

  1. Adam Bien (@AdamBien)
  2. Alexis Hassler (@alexishassler)
  3. Antonin Stefanutti (@astefanut)
  4. Antonio Goncalves (@agoncal)
  5. Bartosz Majsak (@majson)
  6. Francesco Marchioni (@mastertheboss)
  7. Geert Schuring (@geertshuring)
  8. Guillaume Scheibel (@g_scheibel)
  9. Jaikiran Pai
  10. John Ament (@JohnAment)
  11. Mariano Nicolas De Maio (@marianbuenosayr)
  12. Paris Apostolopoulos (@javapapo)

Many congratulations to the first set of JBoss Champions! Make sure to wish them using email, tweet, blog, or any other means that is available on their jboss.org profile. Give them a hug when you meet them at a conference. Ask them a tough JBoss question, challenge them! Invite them to your local Java User Group to give a talk about JBoss

Want to nominate a JBoss Champion?

Do you have it in you, and feel worthy of being a JBoss Champion?

Want to nominate yourself, or somebody else?

Send an email to champions@jboss.org.

Here are some likely candidates:

  • Senior developers, architects, consultants, academia who are using and promoting JBoss technologies using different means
    • Blogs and webinars
    • Publish articles on jboss.org, InfoQ, DZone, etc.
    • Social media
    • Talks at conferences and local JUGs/JBUGs
  • Implemented real-world projects using JBoss technologies
  • Actively answering questions in JBoss forums/StackOverflow
  • Authored a book on JBoss topic
  • Lead a JBoss User Group
  • Mentoring other community members and grooming champions

Make sure the nominee has a current jboss.org profile and has all the relevant details. Include any references that will highlight your value to the JBoss community. The complete list of criteria is clearly defined at jboss.org/champions.

Subscribe to the twitter feed of existing JBoss Champions.

Once again, many congratulations to the first set of JBoss Champions, and looking forward to many others. Submit your nomination today!

Bind WildFly to a different IP address, or all addresses on multihomed (Tech Tip #75)

Interface is a logical name, in WildFly parlance, for a network interface/IP address/host name to which sockets can be bound. There are two interfaces: “public” and “management”.

The “public” interface binding is used for all application related network communication (i.e. Web, Messaging, etc). The “management” interface is used for all components and services that are required by the management layer (i.e. the HTTP Management Endpoint).

By default, “public” interface is configured to listen on the loopback address of 127.0.0.1. So if you start WildFly as:

Then WildFly default page can be accessed as http://127.0.0.1:8080. Usually, /etc/hosts provide a mapping of 127.0.0.1 to localhost, and so the same page is accessible at http://localhost:8080. 8080 is the port where all applications are accessed.

On a multihomed machine, you may like to start WildFly and bind “public” interface to a specific IP address. This can be easily done as:

Now the applications can be accessed at http://192.168.1.1:8080.

For compatibility, -b 192.168.1.1 is also supported but -b=192.168.1.1 is recommended.

Or, if you want to bind to all available IP addresses, then you can do:

Similarly, by default, WildFly can be managed using Admin Console at http://127.0.0.1:9990. 9990 is the management port.

WildFly “management” interface can be bound to a specific IP address as:

Now Admin Console can be accessed at http://192.168.1.1:9990.

Or, bind “management” interface to all available IP addresses as:

You can also bind to two specific addresses as explained here.

Of course, you can bind WildFly “public” and “management” interface together as:

Learn more about it Interface and Port Configuration in WildFly. And more about these switches in Controlling the Bind Address with -b.