All posts by arungupta

Docker Networking with Couchbase and WildFly

Docker Multi-Host networking allows you to create virtual networks and attach containers to them so you can create the network topology that is right for your application. This blog will show how to use it with Docker Compose.

CRUD Java Application with Couchbase, Java EE, and WildFly explained how to use a Java EE application to provide a CRUD/REST interface on a data bucket in Couchbase. It required to manually download and run WildFly. The blog also used Couchbase server using Docker and required manual configuration to load travel-sample bucket.

Configure Couchbase Docker Container using REST API explained how to use Couchbase REST API to configure Couchbase Server.

Docker Multi-Host Networking

This blog will remove the explicit download of WildFly and manual configuration of Couchbase server:

  • Use Docker Compose to start WildFly and Couchbase (no download required)
  • Use a Maven profile to configure Couchbase server (no manual configuration required)
  • Uses Docker multi-host networking so that WildFly and Couchbase server can talk to each other

Lets get started!

Start Couchbase and WildFly using Docker Multi-Host Networking and Compose

  1. Start WildFly and Couchbase server using docker-compose.yml file from github.com/arun-gupta/docker-images/blob/master/wildfly-couchbase-javaee7/docker-compose.yml:
    arungupta/wildfly-admin image is used as it binds WildFly’s management to all network interfaces, and in addition also exposes port 9990. This enables WildFly Maven Plugin to be used to deploy the application.

    container_name is specified for Couchbase service and referred in WildFly service using COUCHBASE_URI. This is then used to connect to Couchbase from the Java EE application.

    The application environment is started as:

    --x-networking is an experimental switch added to Docker Compose 1.9 that allows to create a bridge or an overlay network. By default, it creates a bridge network that works on a single host. The network created can be seen as:

    Issue 2221 provide more explanation about the default networks created. wildflycouchbasejavaee7 is the new bridge network created for our application.  Issue #2345 provide some details about incorrect driver name in the output message.

Configure Couchbase Server

  1. Clone couchbase-javaee repo:

  2. Configure Couchbase server:

    exec-maven-plugin is used to invoke REST API and configure Couchbase server and is configured in a Maven profile. Make sure to setup docker.host property in pom.xml.

  3. Deploy the application to WildFly:

    Make sure to specify the correct host on CLI. In this case, this is the IP address obtained using docker-machine ip default.

Invoke the Application

  1. Invoke the REST endpoint using cURL:

    Complete set of REST endpoints are documented at CRUD Java Application with Couchbase, Java EE and WildFly. They are listed here for convenience:

    1. GET a single airline:
    2. Create a new airline using POST:

    3. Update an existing airline using PUT:
    4. Delete an existing airline using DELETE:

Enjoy!

Configure Couchbase Docker Container using REST API

Couchbase Docker image is published at hub.docker.com/_/couchbase. The easiest way to start this image is:

8091 is the network port used by Couchbase Web Console for REST traffic. Complete set of ports are documented at Couchbase Network Configuration. This image can be configured using Single Host Single Container configuration as explained at hub.docker.com/_/couchbase.

This blog will show you can create a single node Couchbase cluster using Docker, configure it with Data, Index, and Query service, load a sample bucket, and query it.

Couchbase Docker Container

Start Couchbase Docker Container

Start Couchbase Docker Container using the following docker-compose.yml:

This Docker Compose file can be downloaded from github.com/arun-gupta/docker-images/tree/master/couchbase-server.

The container can be started as:

Status of the running container can be seen as:

Logs can be seen as:

Configure Couchbase Docker Container

  1. Get IP address of the Docker Host:

    Use this IP address in all the subsequent commands.

  2. Configure memory for Data and Index services:

  3. Configure Data, Query, and Index services:

  4. Setup credentials for the cluster:

Install Couchbase Travel Sample Bucket

Query Couchbase Docker Container using CBQ

  1. List container id of Couchbase server:

    This output shows the complete information about the container. Alternatively, just the container id can be obtained as:

  2. Run Couchbase Query tool:

  3. Run a query:

    Did you realize, this was a SQL query for JSON document? How cool.  Learn more about in this interactive N1QL tutorial.

Cluster overview can be seen at 192.168.99.100:8091:

Couchbase Docker Container Cluster Overview

Data buckets can seen as:

Couchbase Docker Container Databucket

Ask your questions at forums.couchbase.com, learn more about Couchbase REST API or read more in Couchbase 4 Docs.

A subsequent blog will show how all of these steps can be fully automated.

Enjoy!

Attach Shell to Docker container

Docker Logo

Often there is a need to attach a shell to an already running Docker container. This is very useful, especially for debugging. This blog will explain how to attach a shell to an already running Docker container.

So let’s say you run a Couchbase Docker container in detached mode:

Running the container gives you the complete container id, 02061ddf0a3d1b2806a1ee6e354f4064d9d2ff4d84d8c96c0273c8883917a92f in this case.

This can be verified as:

Or complete container id can be verified as:

Attach Shell to Docker Container

Bash shell can be attached to an already running container using docker exec -it {CID} bash. The {CID} can be the complete container id, truncated container id, or even the first few digits of the container ids amongst all the currently running containers.

So the following three commands are equivalent in our case:

Attach Using Complete Container Id

Attach Using Truncated Container Id

Attach Using Unique Numbers from Container Id

In this case, just specifying 0 would work because this is the only running container. If multiple containers are running that have 0 as the starting number then the first few digits that make the container id unique are required.

Enjoy!

CRUD Java Application with Couchbase, Java EE and WildFly

Couchbase is an open-source, NoSQL, document database. It allows to access, index, and query JSON documents while taking advantage of integrated distributed caching for high performance data access.

Developers can write applications to Couchbase using different languages (Java, Go, .NET, Node, PHP, Python, C) multiple SDKs. This blog will show how you can easily create a CRUD application using Java SDK for Couchbase.

REST with Couchbase

The application will use curl to issue REST commands to a JAX-RS endpoint deployed on WildFly. These commands will then perform CRUD operations on travel-sample bucket in Couchbase. N1QL (SQL query language for JSON) will be used to communicate with Couchbase to retrieve results. Both the “builder pattern” and raw N1QL commands will be used.

Couchbase CRUD using WildFly and Curl

TL;DR

Complete source code and instructions for the sample are available at github.com/arun-gupta/couchbase-javaee.

Lets get started!

Run Couchbase Server

Couchbase server can be easily downloaded from Couchbase Server Downloads page. In a containerized world, its a lot easier to fire up a Couchbase server using Docker.

If Docker is configured on your machine then the easiest way is to use Docker Compose for Couchbase:

Starting up the application server shows:

And then the logs can be seen as:

The database needs to be configured and is explained at Configure Couchbase Server. Make sure to install travel-sample bucket.

Deploy the Java EE Application on WildFly

  • Download WildFly 9.0.2 , unzip, and start WildFly application server as ./wildfly-9.0.0.Final/bin/standalone.sh.
  • Git clone the repo: git clone https://github.com/arun-gupta/couchbase-javaee.git
  • Change directory cd couchbase-javaee
  • Deploy the application to WildFly: mvn install -Pwildfly.

The application uses Java SDK for Couchbase by importing the following Maven coordinates:

Invoke the REST Endpoints Using cURL

GET Airline resources (limit to 10)

Lets query the database to list 10 Airline resources.

Request

Response

The N1QL query for this is written as:
And can also be alternatively written as:
You may optionally update the code to include ORDER BY clause as shown in N1QL Tutorial.

GET one Airline resource

Use id attribute to query a single Airline resource

Request

Response

POST a new Airline resource

Learn how to run N1QL queries from the CLI using CBQ tool and verify the existing sample data:

This query retrieve documents where airline’s name is Airlinair. The count is shown in metrics.resultCount.

Create a new document using POST.

Request

Response

Query again using CBQ and now the results are shown as:
Note that two JSON documents are returned instead of one as before the POST command was issued.

PUT an existing Airline resource

Update an existing resource using HTTP POST.

The data model for travel-sample bucket requires to include “id” attribute in the payload and in the URI as well.

Request

Name of the airline is updated from “Airlinair” to “Airlin Air”, all other attributes stay the same.

Response

The updated record is shown in the response.

Querying for Airlinair gives:

So the previously added record is now updated and thus does not appear in query results. Querying for Airlin Airgives:

This shows the newly updated document.

DELETE an existing Airline resource

Query for a unique id:

Notice that one document is returned.

Lets delete this document.

Request

Response

The deleted document is shown in the response.

Query again for the deleted id:

And no results are returned!

As mentioned earlier, the complete code base is at github.com/arun-gupta/couchbase-javaee.

Enjoy!

Docker, Kubernetes, and Microservices Replay from Devoxx 2015

Devoxx 2015 BE Arun

Java gives us Write Once Run Anywhere (WORA) because of the common abstraction provided by Java Virtual Machine. The binary byte code produced by Java is understood by the JVM running on multiple operating systems. This allows Java code to run on any operating system. But deploying such applications typically requires to tune the JVM, setup application server, install appropriate database drivers, other similar configuration. Docker nicely complements WORA by defining a way to package Java applications, and include all the configuration in a an easy to describe format. This can be called as Package Once Deploy Anywhere, or PODA.

Docker PODA

Do you want to learn more about how Docker helps with PODA?
How do you create multi-container applications using Docker Compose?
How do you deploy this multi-container application on multiple hosts running in a Docker Swarm cluster?
What new features Docker introduced in 1.9 release – particularly multi-host networking and persistent storage?
How do you deploy Docker containers using Kubernetes?
How does Kubernetes help with scaling applications?
How does Docker Swarm compare with Kubernetes?

I had the privilege of delivering a 3-hour university on Docker and Kubernetes followed by a 3-hour hands-on lab. The replay of the university session is now available:

Slides for the university are available at: github.com/javaee-samples/docker-java/tree/master/slides

The contents from the hands-on lab are available at bit.ly/dockerlab.

In addition, I also gave a 3-hour university on Refactor your Java EE Applications using Microservices and Containers. This session explained:

  • Basic characteristics of Microservices
  • Showed a simple shopping cart monolithic application, and how it was refactored to multiple microservices (github.com/arun-gupta/microservices)
  • Talked about transactions, event sourcing and CQRS
  • How KumuluzEE was used to create standalone JARs
  • Explained how such microservices can be deployed using Docker

Slides from this session are available at: github.com/arun-gupta/microservices/tree/master/slides

Replay is available at:

The response on twitter was quite positive:

And in case you are interested, watch a quick interview with Voxxed team:

Enjoy!


Docker 1.9 – Virtual networks, persistent storage, production-ready Swarm

Docker 1.9 Logo

Docker 1.9 is released, read Announcing Docker 1.9 for complete details. This release contains:

  • Docker 1.9.0 Client Binary
  • Docker Machine 0.5.0
  • Docker Compose 0.5.0
  • Docker Toolbox 1.9.0
  • Docker Swarm 1.0.0

Some of the key features are:

  • Create virtual networks that span multiple hosts and backed by multiple plugins such as Calico, Weave, Cisco, and others (full details)
  • Persistent storage support using new volume management system and backed Flocker or Ceph (full details)
  • Docker Swarm is 1.0.0 and ready for production, tested with 1000 nodes and 30,000 containers (complete list, Announcing Swarm 1.0)
  • Docker Machine code is split into core Docker Machine client and multiple binaries, one each for the driver (complete list)
  • Docker Compose now runs on Windows, environment variables are supported in docker-compose.yml file (complete list)

Getting Started with Docker

If you’ve never installed Docker on your machine, then Docker Toolbox 1.9.0 installs everything you need to get started with Docker on Mac OS X and Windows. It even includes Virtual Box 5.0.8.

Docker 1.9 Toolbox

Download Docker Toolbox 1.9.0 for Mac or Windows.

Of course, you can apt-get install docker-engine on Ubuntu or yum install docker-engineon CentOS.

If you like to update binaries independently or learn how to use them to get started, read ahead!

Install Docker 1.9.0 CLI Binary

Download the latest Docker CLI binary:

Install Docker Machine 0.5.0

Docker Machine allows you to create Docker Engines on your laptop, on cloud, or inside your data center.

Docker Machine Logo

Download the latest Docker Machine binary:

Docker Machine has been split into multiple binaries – one for the core Docker Machine client and a binary for each driver. So the installation is different from the previous releases.

And create a new machine as:

A new machine created using this could not be queried by Docker CLI (#2147). Upgrading the machine explicitly using docker-machine upgrade lab helped resolve the issue.

Hopefully this is just a timing issue and will not occur going forward.

Docker Compose 0.5.0

Docker Compose allows to easily run multi-container applications.

A simple way to verify is to run three node Couchbase Cluster.

And the list of running containers:

A later blog will show how to use persistent storage volumes to store the data.

Currently, Docker Compose requires docker-compose.yml from the local filesystem. It would be useful for docker-compose to use these files from a URI (#2313).

Docker Swarm 1.0.0

Docker Swarm provides native clustering for Docker. It converts a pool of Docker Engines into a single virtual engine. The tools, such as Docker CLI, that work with a single engine continues to work Swarm. So your applications that would run on a single Docker Engine can now easily run on multiple Docker Engines.

Docker Swarm Logo

Read more in Clustering using Docker Swarm for more details on how to setup cluster.

Download or upgrade your binaries to Docker 1.9, and use the latest features!

Docker Hands-on Workshop and Slides

Docker hands-on workshop will be updated to use Docker 1.9 in the coming days, stay tuned!

Latest slides to introduce Docker are available at github.com/javaee-samples/docker-java/tree/master/slides.

Docker Machine “client is newer than server” error

Docker 1.9.0 is getting ready to be released. Docker Release Candidate builds can be downloaded from github.com/docker/docker/releases. Matching Docker Machine Release Candidate builds can be downloaded from github.com/docker/machine/releases.

So, you downloaded Docker Machine and Docker CLI Release Candidate build. The latest one at this time is 1.9.0 RC4 for Docker and 0.5.0 RC4 for Docker Machine.

Download is pretty straight forward:

And now Docker Machine:

A big change in Docker Machine is where implementation of drivers such as virtualbox, digitalocean, amazonec2, etc are no longer packaged in the main binary. Instead the distribution is a zip bundle with multiple drivers packaged and referenced from the main binary. These are now packaged separately and has the following benefits:

  1. Each driver can evolve rapidly without waiting for merging into upstream
  2. Additional drivers can be written and used without merging into the upstream
  3. New version of the drivers can be released more frequently. Hopefully more clarity will be available on how these drivers will be distributed.

That’s why installation is slightly different and looks like:

After installation, the Docker Machine can be created as:

And Docker CLI is configured to talk to this machine as:

But now when you try to see the list of images on this machine as docker images, it gives the following error:

This was filed as #2147.

Fortunately, the fix is rather simple even though non-intuitive. Docker Machine needs to be created as:

This is so because use a RC Docker binary require to specify to use a release candidate ISO. This can be done by using -virtualbox-boot2docker-url option as shown.

Now when the Docker Machine is created this way, the empty list of images is shown correctly:

Voila, back in business!

Couchbase Cluster using Docker Compose

Couchbase 4.0 provides lots of features that allows you to develop with agility and operate at any scale. Some of the features that allow you to operate at any scale are:

  • Elastic Scalability
  • Consistent High Performance
  • Always-On Availability
  • Multi-Data Center Deployment
  • Simple and Powerful Administration
  • Enterprise-grade Security

Learn more about these enterprise features at couchbase.com/operate-at-any-scale.

A complete overview is available in Couchbase Server 4.0 datasheet.

This blog will explain how you can easily setup a 3-node Couchbase Cluster using Docker Compose.

Docker Couchbase Cluster

The source code and latest instructions are available at github.com/arun-gupta/docker-images/tree/master/couchbase-cluster.

Create Couchbase Nodes

Couchbase cluster can be easily created using the following Docker Compose file:

This file has service definition for three Couchbase nodes. Admin ports are exposed for only one node as other nodes will talk to each other use Docker-internally assigned IP addresses.

  1. Create three directories ~couchbase/node1, ~couchbase/node2, ~couchbase/node3 – one for each node.
  2. Start three Couchbase nodes as using the docker-compose.yml shown earlier:
    This command is given on a Docker Machine.
  3. Check status of the nodes:
    Docker Compose can also show the status:
  4. Check logs of the nodes:

Configure Couchbase Cluster

Lets configure these nodes to be part of a cluster now.

  1. Find IP address of the Docker Machine:
  2. Access Couchbase Admin Console at http://<DOCKER_MACHINE_IP:8091. This is http://192.168.99.104:8091 in our case. It will show the output as:

    Docker Couchbase Cluster Setup

    Click on “Setup”.

  3. Each container is given an internal IP address by Docker, and each of these IPs is visible to all other containers running on the same host. We need to use these internal IP address when adding a new node to the cluster.Find IP address of the first container:

    Use this IP address to change the Hostname field:

    Docker Couchbase Cluster Node 1

  4. Click on “Next”. Adjust the RAM if necessary. Read more about Couchbase Cluster Settings.
  5. Pick a sample bucket that you’d like to get installed, and click on Next.
  6. Change Per Node RAM Quota from 400 to 100. This is required as we’ll add other nodes later.Docker Couchbase Cluster Per Node RAM Quota
  7. Click on Next, accept T&C, and click on Next.
  8. Enter a password that you can remember as we’ll need this later to add more nodes.

Default view of the cluster looks like as shown:

Docker Couchbase Cluster Default View

Add More Couchbase Nodes

Now, lets add the other two nodes that were created earlier by Docker Compose.

  1. Click on “Server Nodes” to see the default view as:

    Docker Couchbase Cluster Server Nodes Default View

  2. Find IP address of one of the remaining nodes:

  3. Click on “Add Server”, specify the IP address:

    Docker Couchbase Cluster Add Server Node1
    and click on “Add Server”.

  4. Repeat the previous two steps with the server name couchbasecluster_couchbase2_1.

Couchbase Cluster Rebalance

A cluster needs to be rebalanced to ensured that the data is well distributed amongst the newly added or removed nodes. Read more about Couchbase Cluster Rebalance.

Clicking on “Pending Rebalance” tab shows the nodes that have been added to the cluster but are not rebalanced yet:

Docker Couchbase Cluster Pending Rebalance

Click on “Rebalance” and this will automatically rebalance the cluster:

Docker Couchbase Cluster Rebalanced

You just deployed a Couchbase cluster using Docker Compose, enjoy!

Some more references:

  • Couchbase 4 Administration Guide
  • Couchbase 4 Server Architecture
  • Couchbase 4 Cluster Setup

Why Couchbase over MongoDB? #SayNoToMongoDB

MongoDB is one of the most popular NoSQL databases. Its easy to start, has good documentation, works well with a few nodes. But it starts to fall apart as the number of users increase or more nodes are added.

Do you keep struggling with MongoDB? Thought about Couchbase over MongoDB? But don’t know where to start.

Couchbase Logo MongoDB Logo

Why are companies switching from MongoDB to Couchbase?

  1. MongoDB is hard to scale from a single replica set to a fully sharded environment
  2. MongoDB’s performance rapidly degrades with increasing users
  3. MongoDB is significantly susceptible to data loss under failure
  4. MongoDB requires a third-party cache to help it perform
  5. When deployed in multiple geographies, MongoDB can’t perform all writes locally
  6. MongoDB lacks a mobile solution
  7. MongoDB is time-consuming to manage and maintain

Read how Couchbase avoids all of these problems in Struggling With MongoDB.

Couchbase vs MongoDB Architectural Differences and Their Impact whitepaper provide more details.

Talk to a Couchbase Solutions Engineer and learn if/how  Couchbase can yield better results for your non-performing MongoDB.

Some more useful references:

  • NoSQL Evaluation Guide
  • Getting Started with Couchbase
  • FREE Online Training for NoSQL and Couchbase
  • Couchbase Developer Portal

Viber replaced MongoDB with 50% fewer Couchbase servers. AT&T, Comcast, eBay, GE, LinkedIn, Marriott, PayPal, Tesco, Verizon, VISA, Wells Fargo and many other customers are using Couchbase.

You can too! Why wait?

#MakeTheSwitch and #SayNoToMongoDB!

Couchbase at JavaOne 2015

JavaOne Logo

JavaOne 2015 is just a couple of weeks away. Why you should attend?

  • 450+ sessions over a wide variety of topics around Java
  • 5 days of geekgasm with toys, technology, and discussions
  • Best of the best developers gather here
  • Special 20th edition of the event is going to be cherished for ever
  • Venue is the most lovely city in the world – San Francisco!

Couchbase, one of the leading open-source, NoSQL, document datastore company is going to be there with a few talks. Here is where you’ll find us:

Saturday, Oct 24

JavaOne4Kids Day – Arun Gupta (@arungupta)
5pm – 8pm: Chinascaria (invite only)
7pm – 11:30pm: NetBeans Party (invite only)

Sunday, Oct 25

8am – 9:30am: Java Champions/JUG Leaders Brunch – Arun Gupta (@arungupta)
6:30pm – 7:30pm: WildFly, Hadoop, JavaFX and HTML5 in the Enterprise (UGF10306) – Arun Gupta (@arungupta)
8pm – 10pm: NetBeans, GlassFish, and Payara Party (Thirsty Bear)

Monday, Oct 26

8:30am – 10:30am: Docker and Kubernetes Recipes for Java Developers (TUT1708) – Arun Gupta (@arungupta)
12:30pm – 1:30pm: Refactor your Java EE Applications with Microservices and Containers (CON1700) – Arun Gupta (@arungupta)

Tuesday, Oct 27

12:30pm – 1:30pm: Build Scalable And Secure Mobiles with Java That Work Offline (CON11281) – Wayne Carter (@waynecarter), Ali LeClerc (@ali_leclerc)
5:15pm – 7:15pm: JavaOne Ignite – Arun Gupta (@arungupta)

Wednesday, Oct 28

4:30pm – 5:30pm: SQL for JSON: Rich, Declarative Querying for NoSQL Databases and Applications (CON11282) – Keshav Murthy (@rkeshavmurthy), Gerald Sangudi (@sangudi)

Of course, we’ll also be running the “hallway track” and so feel free to meet us there.

8 Things About Couchbase is a good place to start learning about Couchbase!

Couchbase Logo

If you’ve any doubts about San Francisco being the most beautiful city, go visit Golden Gate, Fisherman’s Wharf, Crooked Street, Alcatraz Island, Cable cars, Chinatown, MOMA, and much more :)

Couchbase 4.0 Datasheets – Server, N1QL, Multi-dimensional Scaling

Couchbase Server 4.0 was released recently and getting good reviews so far.

Couchbase Datasheets

Are you looking for Couchbase datasheets that provide a quick overview of the key features?

Now you’ve them!

  • Couchbase Server 4.0 – Develop with Agility, Operate at Any Scale
  • What’s New – N1QL, Multi-dimensionsal Scaling, Global Secondary Indexes, Enhanced Security, ForestDB Storage Engine, Cross-Data Center Replication Filtering, Geospatial views, and much more
  • N1QL
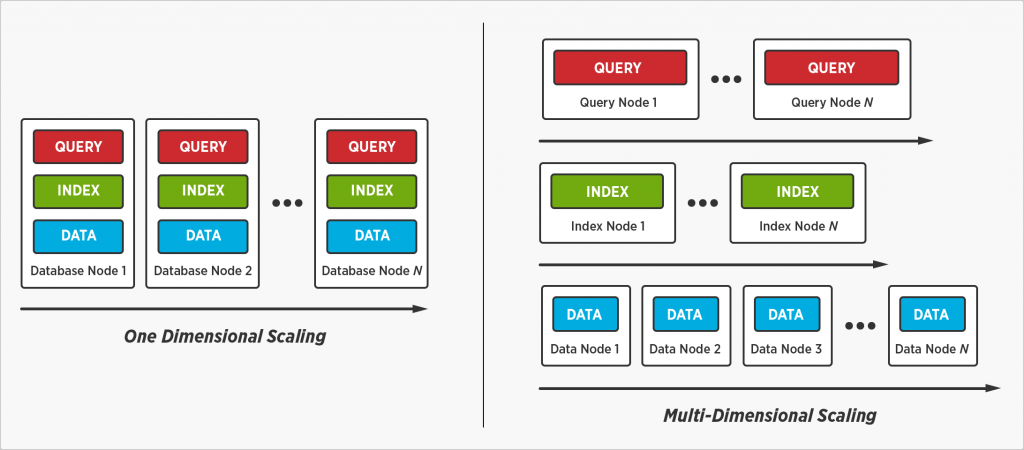
  • Multi-Dimensional Scaling

Download Couchbase Server 4.0 and start building your web, mobile, and IoT applications in a true polyglot fashion using Java, Go, Python, .NET, PHP, or Node.js SDKs.

Complete list at Couchbase Server.

Enjoy!

Getting Started with Couchbase using Docker

Couchbase Server 4.0 was recently released and can be downloaded and easily installed. Getting Started with Couchbase explains in very simple and easy steps on how to get started with Couchbase.  But when living in a container world, everything is a Docker image. And Couchbase also has a Docker image.

Couchbase Logo

docker-logo

This blog will explain how you can easily start a Couchbase Server 4.0 as a Docker image.

Install and Configure Docker

Docker is natively supported on Linux. So apt get docker-engine on Ubuntu or yum install docker-engine on CentOS will get you ready to use Docker.

On Mac or Windows, this is achieved by install Docker Machine. Docker Machine to Setup Docker Host explain in detail on how to install and configure Docker Machine.

Here is a brief summary to get you started with Docker:

  1. Download Docker client:
  2. Download Docker Machine script:
  3. Create Docker Machine host:
  4. Setup Docker client to connect to this host:

Now your current shell is configured where the Docker client can run containers on the Docker Machine.

Run Couchbase Docker Container

  1. Starting a Docker container on this machine is pretty straight forward. The CLI downloads the image from Docker Hub and then runs it on the Machine:
    In this CLI, run command runs the container using the image id specified as the last argument, -p publish port 8091 from the container to 8091 on the Docker Machine, -d runs the container in background and prints the container id.
  2. Watch the container status as: